
Owner's Manual


book.book Page 46 Thursday, July 4, 2013 10:56 AM
Removing the Heat Sink
WARNING: Before working inside your computer, read the safety information that
shipped with your computer and follow the steps in "Before Working Inside Your
Computer" on page 9. After working inside your computer, follow the instructions
in "After Working Inside Your Computer" on page 11. For additional safety best
practices information, see the Regulatory Compliance Homepage at
dell.com/regulatory_compliance.
Prerequisites
1 Remove the battery. See "Removing the Battery" on page 12.
2 Follow the instructions from step 1 to step 2 in "Removing the Optical Drive" on
page 14.
3 Follow the instructions from step 1 to step 3 in "Removing the Hard Drive" on
page 24.
4 Remove the base cover. See "Removing the Base Cover" on page 20.
5 Remove the keyboard. See "Removing the Keyboard" on page 17.
6 Remove the palm rest. See "Removing the Palm Rest" on page 29.
7 Remove the wireless mini-card. See "Removing the Wireless Mini-Card" on page 33.
8 Follow the instructions from step 1 to step 8 in "Removing the System Board" on
page 38.
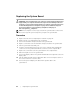
Procedure
1 In sequential order (indicated on the heat-sink), remove the screws that secure the
heat sink to the system board.
2 Lift the heat sink off the system board.
1
2
1 screws (6) 2 heat sink
46 | Removing the Heat Sink