D5169bk1.book Page 1 Thursday, October 21, 2004 4:37 PM Dell™ Inspiron™ 9200 Owner’s Manual Model PP14L w w w. d e l l . c o m | s u p p o r t . d e l l .
D5169bk1.book Page 2 Thursday, October 21, 2004 4:37 PM Notes, Notices, and Cautions NOTE: A NOTE indicates important information that helps you make better use of your computer. NOTICE: A NOTICE indicates either potential damage to hardware or loss of data and tells you how to avoid the problem. CAUTION: A CAUTION indicates a potential for property damage, personal injury, or death. Abbreviations and Acronyms For a complete list of abbreviations and acronyms, see the Dell Inspiron Help file.
D5169bk1.book Page 3 Thursday, October 21, 2004 4:37 PM Contents Finding Information 1 . . . . . . . . . . . . . . . . . . . . . . . . . . . . . . . . 11 Left Side View . . . . . . . . . . . . . . . . . . . . . . . . . . . . . . . 15 Right Side View . . . . . . . . . . . . . . . . . . . . . . . . . . . . . . 16 . . . . . . . . . . . . . . . . . . . . . . . . . . . . . . . . 17 Back View Bottom View . . . . . . . . . . . . . . . . . . . . . . . . . . . . . . . .
D5169bk1.book Page 4 Thursday, October 21, 2004 4:37 PM Charging the Battery . . . . . . . . . . . . . . . . . . . . . . . . . . . . 27 Removing a Battery . . . . . . . . . . . . . . . . . . . . . . . . . . . . 27 Installing a Battery . . . . . . . . . . . . . . . . . . . . . . . . . . . . 28 . . . . . . . . . . . . . . . . . . . . . . . . . . . . . 28 Storing a Battery . 4 Using CD, DVDs, and Other Multimedia Using CDs and DVDs . . . . . . . . . . . . . . . . . . . . . . . . . . . .
D5169bk1.book Page 5 Thursday, October 21, 2004 4:37 PM 6 Using PC Cards PC Card Types . . . . . . . . . . . . . . . . . . . . . . . . . . . . . . . PC Card Blanks . . . . . . . . . . . . . . . . . . . . . . . . . . . . . . . . . . . . . . . . . . . . . . . . . . . . . . . . . . 39 Installing a PC Card . . . . . . . . . . . . . . . . . . . . . . . . . . . . 39 . . . . . . . . . . . . . . . . . . . . . . .
D5169bk1.book Page 6 Thursday, October 21, 2004 4:37 PM A program crashes repeatedly . . . . . . . . . . . . . . . . . A program is designed for an earlier Windows operating system. A solid blue screen appears . . . . . . . . . . . . . . . . . . Other software problems . . . . . . . . . . . . . . . . . . . Memory Problems . . . . 56 57 57 57 . . . . . . . . . . . . . . . . . . . . . . . . . . . . . 58 Network Problems . . . . . 58 PC Card Problems . . . . . . . . . . . . . . . . . . . . . . . . .
D5169bk1.book Page 7 Thursday, October 21, 2004 4:37 PM Hard Drive . . . . . . . . . . . . . . . . . . . . . . . . . . . . . . . . . 75 . . . . . . . . . . . . . . . . . . . . . . . . . . . . . . . . . 75 . . . . . . . . . . . . . . . . . . . . . . . . . . . . . . . . . . 79 Memory . Modem 73 . . . . . . . . . . . . . . . . . . . . . Returning a Hard Drive to Dell Mini PCI Card . . . . . . . . . . . . . . . . . . . . . . . . . . . . . . . 81 Hinge Cover . . . . . . . . . . . . . . . . . . .
D5169bk1.
D5169bk1.book Page 9 Thursday, October 21, 2004 4:37 PM Finding Information What Are You Looking For? Find It Here • • • • • • Dell™ Product Information Guide Warranty information Terms and Conditions Safety instructions Regulatory information Ergonomics information End User License Agreement NOTE: This document is available as a PDF at support.dell.com.
www.dell.com | support.dell.com D5169bk1.book Page 10 Thursday, October 21, 2004 4:37 PM What Are You Looking For? Find It Here • Service Tag and Express Service Code • Microsoft Windows License Label Service Tag and Microsoft Windows License These labels are located on the bottom of your computer. • Use the Service Tag to identify your computer when you use support.dell.com or contact technical support. • Enter the Express Service Code to direct your call when contacting technical support.
D5169bk1.book Page 11 Thursday, October 21, 2004 4:37 PM A Tour of Your Computer Front View display latches (2) display latch release display keyboard status lights (5) power button device status lights (3) keyboard touch pad touch pad buttons (2) media control buttons (7) speakers DISPLAY LATCHES — Keeps the display closed. DISPLAY LATCH RELEASE — Slide this to release the display latches and open the display. — For more information about your display, see the Dell Inspiron Help file.
D5169bk1.book Page 12 Thursday, October 21, 2004 4:37 PM — Press the power button to turn on the computer or to enter or exit a power management mode. www.dell.com | support.dell.com POWER BUTTON NOTICE: To avoid losing data when you turn off your computer, shut down your computer through the Start menu instead of pressing the power button. DEVICE STATUS LIGHTS Turns on when you turn on the computer, and blinks when the computer is in a power management mode.
D5169bk1.book Page 13 Thursday, October 21, 2004 4:37 PM TOUCH PAD — Provides the functionality of a mouse. MEDIA CONTROL BUTTONS — Control CD, DVD, and Media Player playback. Mutes the sound. Turns the volume down. Turns the volume up. Play or pause. Plays the previous track. Plays the next track. Stop. — To adjust the volume of the integrated speakers, press the media control buttons or speakervolume keyboard shortcuts. For more information, see page 37.
D5169bk1.book Page 14 Thursday, October 21, 2004 4:37 PM www.dell.com | support.dell.com KEYBOARD STATUS LIGHTS The green lights located above the keyboard indicate the following: 9 Turns on when the numeric keypad is enabled. A Turns on when the uppercase letter function is enabled. Turns on when the scroll lock function is enabled. Turns on when wireless networking is enabled. To enable or disable wireless networking, press .
D5169bk1.book Page 15 Thursday, October 21, 2004 4:37 PM Left Side View air vent optical drive security cable slot USB connectors (2) optical drive-tray eject button — You can install devices such as a DVD drive or other optical drive in the optical drive bay. For more information, see page 88. OPTICAL DRIVE OPTICAL-DRIVE-TRAY EJECT BUTTON — Press this button to eject a CD or DVD from the optical drive. U S B C O N N E C T O R S — Connect USB devices, such as a mouse, keyboard, or printer.
D5169bk1.book Page 16 Thursday, October 21, 2004 4:37 PM — Lets you attach a commercially available antitheft device to the computer. For more information, see the instructions included with the device. www.dell.com | support.dell.com SECURITY CABLE SLOT NOTICE: Before you buy an antitheft device, ensure that it will work with the security cable slot.
D5169bk1.book Page 17 Thursday, October 21, 2004 4:37 PM — The computer uses fans to create airflow through the vents, which prevents the computer from overheating. AIR VENT CAUTION: Do not block, push objects into, or allow dust to accumulate in the air vents. Do not store your computer in a low-airflow environment, such as a closed briefcase, while it is running. Restricting the airflow can damage the computer or cause a fire.
D5169bk1.book Page 18 Thursday, October 21, 2004 4:37 PM www.dell.com | support.dell.com DIGITAL-VIDEO INTERFACE (DVI) CONNECTOR Connects an external DVI-compatible monitor. With an adapter cable, you can also connect an external VGA-compatible monitor to the DVI connector. VIDEO CONNECTOR Connects an external VGA-compatible monitor. For more information, see the Dell Inspiron Help file. To access the help file, see page 9. A C A D A P T E R C O N N E C T O R — Attaches an AC adapter to the computer.
D5169bk1.book Page 19 Thursday, October 21, 2004 4:37 PM USB CONNECTORS Connect USB devices, such as a mouse, keyboard, or printer. S - V I D E O T V- O U T C O N N E C T O R Connects your computer to a TV. Also connects digital audio capable devices using the TV/digital audio adapter cable. NETWORK CONNECTOR (RJ-45) NOTICE: The network connector is slightly larger than the modem connector. To avoid damaging the computer, do not plug a telephone line into the network connector.
D5169bk1.book Page 20 Thursday, October 21, 2004 4:37 PM www.dell.com | support.dell.com Bottom View subwoofer optical-drive locking screw battery charge gauge battery-bay latch release battery hard drive fan fan memory module cover Mini PCI card/modem cover — Provides information on the battery charge. For more information, see "Checking the Battery Charge" on page 26. BATTERY CHARGE GAUGE — Releases the battery from the battery bay. For more information, see "Removing a Battery" on page 27.
D5169bk1.book Page 21 Thursday, October 21, 2004 4:37 PM Setting Up Your Computer Connecting to the Internet NOTE: ISPs and ISP offerings vary by country. To connect to the Internet, you need a modem or network connection and an Internet service provider (ISP), such as AOL or MSN. Your ISP will offer one or more of the following Internet connection options: • Dial-up connections that provide Internet access through a telephone line.
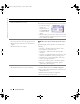
D5169bk1.book Page 22 Thursday, October 21, 2004 4:37 PM www.dell.com | support.dell.com 4 5 In the next window, click the appropriate option: • If you do not have an ISP and want to select one, click Choose from a list of Internet service providers (ISPs). • If you have already obtained setup information from your ISP but you did not receive a setup CD, click Set up my connection manually. • If you have a CD, click Use the CD I got from an ISP. Click Next.
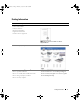
D5169bk1.book Page 23 Thursday, October 21, 2004 4:37 PM 3 Attach the USB printer cable to the USB connectors on the computer and the printer. The USB connectors fit only one way.
D5169bk1.book Page 24 Thursday, October 21, 2004 4:37 PM www.dell.com | support.dell.com Many surge protectors have a telephone jack for modem protection. See the surge protector documentation for modem connection instructions. NOTICE: Not all surge protectors offer network adapter protection. Disconnect the network cable from the network wall jack during electrical storms. Line Conditioners NOTICE: Line conditioners do not protect against power interruptions.
D5169bk1.book Page 25 Thursday, October 21, 2004 4:37 PM Using a Battery Battery Performance CAUTION: Before you begin any of the procedures in this chapter, follow the safety instructions in the Product Information Guide. NOTE: Batteries for portable computers are covered only during the initial 1-year period of the limited warranty for your computer.
D5169bk1.book Page 26 Thursday, October 21, 2004 4:37 PM www.dell.com | support.dell.com CAUTION: Misuse of the battery may increase the risk of fire or chemical burn. Do not puncture, incinerate, disassemble, or expose the battery to temperatures above 65°C (149°F). Keep the battery away from children. Handle damaged or leaking batteries with extreme care. Damaged batteries may leak and cause personal injury or equipment damage.
D5169bk1.book Page 27 Thursday, October 21, 2004 4:37 PM Low-Battery Warning NOTICE: To avoid losing or corrupting data, save your work immediately after a low-battery warning. Then connect the computer to an electrical outlet. If the battery runs completely out of power, hibernate mode begins automatically. A pop-up window warns you when the battery charge is approximately 90 percent depleted. For more information about low-battery alarms, see "Power Management" in the Dell Inspiron Help file.
www.dell.com | support.dell.com D5169bk1.book Page 28 Thursday, October 21, 2004 4:37 PM battery charge gauge battery-bay latch release battery Installing a Battery 1 Slide the battery lengthwise into the bay at a 45-degree angle. 2 Press the other side down until the latch release clicks. Storing a Battery Remove the battery when you store your computer for an extended period of time. A battery discharges during prolonged storage.
D5169bk1.book Page 29 Thursday, October 21, 2004 4:37 PM Using CD, DVDs, and Other Multimedia Using CDs and DVDs For information about using CDs and DVDs in your computer, see the Dell Inspiron Help file. To access the help file, see page 9. Copying CDs and DVDs NOTE: Ensure that you follow all copyright laws when you create CDs or DVDs. This section applies only to computers that have a CD-R, CD-RW, DVD+RW, DVD+R, or DVD/CD-RW combo drive.
D5169bk1.book Page 30 Thursday, October 21, 2004 4:37 PM www.dell.com | support.dell.com 4 To copy a CD or DVD: • If you have one CD or DVD drive, ensure that the settings are correct and click Copy. The computer reads your source CD or DVD and copies it to a temporary folder on your computer hard drive. When prompted, insert a blank CD or DVD into the CD or DVD drive and click OK. • If you have two CD or DVD drives, select the drive into which you have inserted your source CD or DVD and click Copy.
D5169bk1.book Page 31 Thursday, October 21, 2004 4:37 PM Connecting Your Computer to a TV or Audio Device NOTE: Video and audio cables for connecting your computer to a TV or other audio device are not included with your computer. Cables may be purchased at most consumer electronics stores. The composite TV-out adapter cable is available for purchase from Dell. Your TV has either an S-video input connector or a composite video-input connector.
www.dell.com | support.dell.com D5169bk1.book Page 32 Thursday, October 21, 2004 4:37 PM 3 Plug the other end of the S-video cable in to the S-video input connector on your TV. 4 Plug the single-connector end of the audio cable in to the headphone connector on your computer. 5 Plug the two RCA connectors on the other end of the audio cable in to the audio input connectors on your TV or other audio device.
D5169bk1.book Page 33 Thursday, October 21, 2004 4:37 PM composite TV-out adapter cable composite video cable audio cable 1 Turn off the computer and the TV and/or audio device that you want to connect. 2 Connect the composite TV-out adapter cable to the S-video TV-out connector on the computer.
www.dell.com | support.dell.com D5169bk1.book Page 34 Thursday, October 21, 2004 4:37 PM 5 Plug the single-connector end of the audio cable in to the headphone connector on the computer. 6 Plug the two RCA connectors on the other end of the audio cable in to the audio input connectors on your TV or other audio device. 7 Turn on the TV and any audio device that you connected (if applicable), and then turn on the computer.
D5169bk1.book Page 35 Thursday, October 21, 2004 4:37 PM Using the Keyboard and Touch Pad Numeric Keypad numeric keypad The numeric keypad functions like the numeric keypad on an external keyboard. Each key on the keypad has multiple functions. The keypad numbers and symbols are marked in blue on the right of the keypad keys. To type a number or symbol, hold down and press the desired key. • To enable the keypad, press . The • To disable the keypad, press again.
D5169bk1.book Page 36 Thursday, October 21, 2004 4:37 PM www.dell.com | support.dell.com Key Combinations System Functions Opens the Task Manager window Enables and disables the numeric keypad Enables and disables the scroll lock Battery Displays the Dell™ QuickSet Battery Meter. For more information about Dell QuickSet, see the Dell Inspiron Help file. To access the help file, see page 9.
D5169bk1.book Page 37 Thursday, October 21, 2004 4:37 PM Power Management Activates a power management mode. You can reprogram this keyboard shortcut to activate a different power management mode using the Advanced tab in the Power Options Properties window. See "Power Management" in the Dell Inspiron Help file. To access the help file, see page 9. Puts the system into Hibernate mode.
D5169bk1.book Page 38 Thursday, October 21, 2004 4:37 PM www.dell.com | support.dell.com Touch Pad The touch pad detects the pressure and movement of your finger to allow you to move the cursor on the display. Use the touch pad and touch pad buttons as you would use a mouse. • To move the cursor, lightly slide your finger over the touch pad. • To select an object, lightly tap once on the surface of the touch pad or use your thumb to press the left touch-pad button.
D5169bk1.book Page 39 Thursday, October 21, 2004 4:37 PM Using PC Cards PC Card Types See "Specifications" on page 91 for information on supported PCMCIA cards and PC card slots. NOTE: A PC Card is not a bootable device. The PC Card slot has one connector that supports a single Type I or Type II card. The PC Card slot supports CardBus technology and extended PC Cards. "Type" of card refers to its thickness, not its functionality.
D5169bk1.book Page 40 Thursday, October 21, 2004 4:37 PM www.dell.com | support.dell.com CAUTION: Before you begin any of the procedures in this section, follow the safety instructions in the Product Information Guide. To install a PC Card: 1 Hold the card with the top side of the card facing up. The latch may need to be in the "in" position before you insert the card. 2 Slide the card into the slot until the card is completely seated in its connector.
D5169bk1.book Page 41 Thursday, October 21, 2004 4:37 PM Removing a PC Card or Blank NOTICE: Use the PC Card configuration utility (click the icon in the taskbar) to select a card and stop it from functioning before you remove it from the computer. If you do not stop the card in the configuration utility, you could lose data. Do not attempt to eject a card by pulling its cable, if one is attached.
www.dell.com | support.dell.com D5169bk1.
D5169bk1.book Page 43 Thursday, October 21, 2004 4:37 PM Setting Up a Home and Office Network Connecting to a Network Adapter Before you connect your computer to a network, the computer must have a network adapter installed and a network cable connected to it. To connect a network cable: 1 Connect the network cable to the network adapter connector on the back of your computer. NOTE: Insert the cable until it clicks into place, and then gently pull it to ensure that it is secure.
D5169bk1.book Page 44 Thursday, October 21, 2004 4:37 PM www.dell.com | support.dell.com Network Setup Wizard The Microsoft® Windows® XP operating system provides a Network Setup Wizard to guide you through the process of sharing files, printers, or an Internet connection between computers in a home or small office. 1 Click the Start button, point to All Programs→ Accessories→ Communications, and then click Network Setup Wizard. 2 On the welcome screen, click Next.
D5169bk1.book Page 45 Thursday, October 21, 2004 4:37 PM Connecting to a Wireless Network in Microsoft® Windows® XP Your wireless network card requires specific software and drivers in order to connect to a network. The software is already installed. If the software is removed or corrupted, follow the instructions included in the user's guide for your wireless network card. The user’s guide is available on the Dell Support website at support.dell.com.
D5169bk1.book Page 46 Thursday, October 21, 2004 4:37 PM www.dell.com | support.dell.com 2 Click to select the network you want to configure, and then click Connect or double-click the network listing to initiate configuration. If you select a secure network (identified by a icon), you must enter a WEP or WPA key when prompted. NOTE: Network security settings are unique to your network. Dell cannot provide this information. Your network is configured automatically.
D5169bk1.book Page 47 Thursday, October 21, 2004 4:37 PM Solving Problems Dell Diagnostics CAUTION: Before you begin any of the procedures in this section, follow the safety instructions in the Product Information Guide. When to Use the Dell Diagnostics If you experience a problem with your computer, perform the checks in this chapter and run the Dell Diagnostics before you contact Dell for technical assistance. NOTICE: The Dell Diagnostics works only on Dell™ computers.
D5169bk1.book Page 48 Thursday, October 21, 2004 4:37 PM www.dell.com | support.dell.com • If failures are detected during the Pre-boot System Assessment, write down the error code(s) and contact Dell before continuing on to the Dell Diagnostics. See "Contacting Dell" on page 99. If the Pre-boot System Assessment completes successfully, you receive the message Booting Dell Diagnostic Utility Partition. Press any key to continue.
D5169bk1.book Page 49 Thursday, October 21, 2004 4:37 PM 3 If you run a test from the Custom Test or Symptom Tree option, click the applicable tab described in the following table for more information. Tab Function Results Displays the results of the test and any error conditions encountered. Errors Displays error conditions encountered, error codes, and the problem description. Help Describes the test and may indicate requirements for running the test.
www.dell.com | support.dell.com D5169bk1.book Page 50 Thursday, October 21, 2004 4:37 PM C L E A N T H E D R I V E O R D I S K — See the Dell Inspiron Help file. To access the help file, see page 9. ENSURE THAT THE CD IS SNAPPED ONTO THE SPINDLE CHECK THE CABLE CONNECTIONS C H E C K F O R H A R D W A R E I N C O M P A T I B I L I T I E S — See "Resolving Software and Hardware Incompatibilities" on page 70. R U N T H E D E L L D I A G N O S T I C S — See "When to Use the Dell Diagnostics" on page 47.
D5169bk1.book Page 51 Thursday, October 21, 2004 4:37 PM If you cannot eject the DVD or DVD+RW drive tray 1 Ensure that the computer is shut down. 2 Straighten a paper clip and insert one end into the eject hole at the front of the drive; push firmly until the tray is partially ejected. 3 Gently pull out the tray until it stops. If you hear an unfamiliar scraping or grinding sound • Ensure that the sound is not caused by the program that is running. • Ensure that the disk or disc is inserted properly.
www.dell.com | support.dell.com D5169bk1.book Page 52 Thursday, October 21, 2004 4:37 PM C H E C K T H E M I C R O S O F T O U T L O O K ® E X P R E S S S E C U R I T Y S E T T I N G S — If you cannot open your e-mail attachments: 1 In Outlook Express, click Tools, click Options, and then click Security. 2 Click Do not allow attachments to remove the checkmark.
D5169bk1.book Page 53 Thursday, October 21, 2004 4:37 PM S C A N T H E C O M P U T E R F O R S P Y W A R E — If you are experiencing slow computer performance, you frequently receive pop-up advertisements, or you are having problems connecting to the Internet, your computer might be infected with spyware. Use an anti-virus program that includes anti-spyware protection (your program may require an upgrade) to scan the computer and remove spyware. For more information, go to support.dell.
www.dell.com | support.dell.com D5169bk1.book Page 54 Thursday, October 21, 2004 4:37 PM A R E Q U I R E D . D L L F I L E W A S N O T F O U N D — The program that you are trying to open is missing an essential file. Remove and then reinstall the program. 1 Click the Start button and click Control Panel. 2 Click Add or Remove Programs. 3 Select the program you want to remove. 4 Click Remove or Change/Remove and follow the prompts on the screen.
D5169bk1.book Page 55 Thursday, October 21, 2004 4:37 PM External keyboard problems NOTE: When you attach an external keyboard, the integrated keyboard remains fully functional. C H E C K T H E K E Y B O A R D C A B L E — Shut down the computer. Disconnect the keyboard cable and check it for damage, and firmly reconnect the cable. If you are using a keyboard extension cable, disconnect it and connect the keyboard directly to the computer.
D5169bk1.book Page 56 Thursday, October 21, 2004 4:37 PM www.dell.com | support.dell.com Lockups and Software Problems CAUTION: Before you begin any of the procedures in this section, follow the safety instructions in the Product Information Guide. The computer does not start up ENSURE THAT THE AC ADAPTER IS FIRMLY CONNECTED TO THE COMPUTER AND TO THE ELECTRICAL OUTLET The computer stops responding NOTICE: You might lose data if you are unable to perform an operating system shutdown.
D5169bk1.book Page 57 Thursday, October 21, 2004 4:37 PM A program is designed for an earlier Windows operating system RUN THE PROGRAM COMPATIBILITY WIZARD — The Program Compatibility Wizard configures a program so that it runs in an environment similar to non-Windows XP operating system environments. 1 Click the Start button, point to All Programs→ Accessories, and then click Program Compatibility Wizard. 2 In the welcome screen, click Next. 3 Follow the instructions on the screen.
www.dell.com | support.dell.com D5169bk1.book Page 58 Thursday, October 21, 2004 4:37 PM S C A N T H E C O M P U T E R F O R S P Y W A R E — If you are experiencing slow computer performance, you frequently receive pop-up advertisements, or you are having problems connecting to the Internet, your computer might be infected with spyware. Use an anti-virus program that includes anti-spyware protection (your program may require an upgrade) to scan the computer and remove spyware.
D5169bk1.book Page 59 Thursday, October 21, 2004 4:37 PM C H E C K T H E N E T W O R K L I G H T S O N T H E N E T W O R K C O N N E C T O R — No light indicates that no network communication exists. Replace the network cable. RESTART THE COMPUTER AND LOG ON TO THE NETWORK AGAIN C H E C K Y O U R N E T W O R K S E T T I N G S — Contact your network administrator or the person who set up your network to verify that your network settings are correct and that the network is functioning.
www.dell.com | support.dell.com D5169bk1.book Page 60 Thursday, October 21, 2004 4:37 PM C H A R G E T H E B A T T E R Y — The battery charge may be depleted. 1 Reinstall the battery. 2 Use the AC adapter to connect the computer to an electrical outlet. 3 Turn on the computer. C H E C K T H E B A T T E R Y S T A T U S L I G H T — If the battery status light flashes orange or is a steady orange, the battery charge is low or depleted. Connect the computer to an electrical outlet.
D5169bk1.book Page 61 Thursday, October 21, 2004 4:37 PM Printer Problems CAUTION: Before you begin any of the procedures in this section, follow the safety instructions in the Product Information Guide. NOTE: If you need technical assistance for your printer, contact the printer’s manufacturer. C H E C K T H E P R I N T E R D O C U M E N T A T I O N — See the printer documentation for setup and troubleshooting information.
www.dell.com | support.dell.com D5169bk1.book Page 62 Thursday, October 21, 2004 4:37 PM RESTART THE COMPUTER AND TRY THE SCANNER AGAIN CHECK THE CABLE CONNECTIONS — • See the scanner documentation for cable connection information. • Ensure that the scanner cables are securely connected to the scanner and the computer.
D5169bk1.book Page 63 Thursday, October 21, 2004 4:37 PM A D J U S T T H E W I N D O W S V O L U M E C O N T R O L — Click or double-click the speaker icon in the lowerright corner of your screen. Ensure that the volume is turned up and that the sound is not muted. D I S C O N N E C T H E A D P H O N E S F R O M T H E H E A D P H O N E C O N N E C T O R — Sound from the speakers is automatically disabled when headphones are connected to the computer’s front-panel headphone connector.
www.dell.com | support.dell.com D5169bk1.book Page 64 Thursday, October 21, 2004 4:37 PM TO V E R I F Y T H A T T H E P R O B L E M I S W I T H T H E M O U S E , C H E C K T H E T O U C H P A D — 1 Shut down the computer. 2 Disconnect the mouse. 3 Turn on the computer. 4 At the Windows desktop, use the touch pad to move the cursor around, select an icon, and open it. If the touch pad operates correctly, the mouse may be defective.
D5169bk1.book Page 65 Thursday, October 21, 2004 4:37 PM C H E C K T H E S YS T E M F O R P O W E R — Ensure that the system has battery power or is plugged into an electrical outlet. If the display is difficult to read A D J U S T T H E B R I G H T N E S S — Press and the up- or down-arrow key.
D5169bk1.book Page 66 Thursday, October 21, 2004 4:37 PM www.dell.com | support.dell.com Drivers What Is a Driver? A driver is a program that controls a device such as a printer, mouse, or keyboard. All devices require a driver program. A driver acts like a translator between the device and any other programs that use the device. Each device has its own set of specialized commands that only its driver recognizes.
D5169bk1.book Page 67 Thursday, October 21, 2004 4:37 PM Using Windows XP Device Driver Rollback If a problem occurs on your computer after you install or update a driver, use Windows XP Device Driver Rollback to replace the driver with the previously installed version. 1 Click the Start button and click Control Panel. 2 Under Pick a Category, click Performance and Maintenance. 3 Click System. 4 In the System Properties window, click the Hardware tab. 5 Click Device Manager.
D5169bk1.book Page 68 Thursday, October 21, 2004 4:37 PM www.dell.com | support.dell.com • Dell PC Restore by Symantec restores your hard drive to the operating state it was in when you purchased the computer. Dell PC Restore permanently deletes all data on the hard drive and removes any applications installed after you received the computer.
D5169bk1.book Page 69 Thursday, October 21, 2004 4:37 PM 5 Click Next. The Restoration Complete screen appears after System Restore finishes collecting data and then the computer restarts. 6 After the computer restarts, click OK. To change the restore point, you can either repeat the steps using a different restore point, or you can undo the restoration. Undoing the Last System Restore NOTICE: Before you undo the last system restore, save and close all open files and exit any open programs.
D5169bk1.book Page 70 Thursday, October 21, 2004 4:37 PM www.dell.com | support.dell.com 2 Immediately upon seeing the blue bar, press . If you do not press in time, let the computer finish restarting, and then restart the computer again. NOTICE: If you do not want to proceed with PC Restore, click Reboot in the following step. 3 On the next screen that appears, click Restore. 4 On the next screen, click Confirm. The restore process takes approximately 6–10 minutes to complete.
D5169bk1.book Page 71 Thursday, October 21, 2004 4:37 PM Adding and Replacing Parts Before You Begin This chapter provides procedures for removing and installing the components in your computer. Unless otherwise noted, each procedure assumes that the following conditions exist: • You have performed the steps in "Turning Off Your Computer" (see this page) and "Before Working Inside Your Computer" (see page 72). • You have read the safety information in your Dell™ Product Information Guide.
D5169bk1.book Page 72 Thursday, October 21, 2004 4:37 PM www.dell.com | support.dell.com Before Working Inside Your Computer Use the following safety guidelines to help protect your computer from potential damage and to help ensure your own personal safety. CAUTION: Before you begin any of the procedures in this section, follow the safety instructions in the Product Information Guide. CAUTION: Handle components and cards with care. Do not touch the components or contacts on a card.
D5169bk1.book Page 73 Thursday, October 21, 2004 4:37 PM 5 Disconnect your computer and all attached devices from their electrical outlets, slide and hold the battery-bay latch release on the bottom of the computer, and then remove the battery from the bay. battery-bay latch release battery 6 Remove the optical drive, if installed, from the optical drive bay. See page 88. 7 Press the power button to ground the system board. 8 Remove any installed PC Cards from the PC Card slot.
D5169bk1.book Page 74 Thursday, October 21, 2004 4:37 PM www.dell.com | support.dell.com NOTE: If you are installing a hard drive from a source other than Dell, you need to install an operating system, drivers, and utilities on the new hard drive. To replace the hard drive in the hard drive bay: 1 Follow the procedures in "Before You Begin" on page 71. 2 Turn the computer over, and remove the hard drive screws.
D5169bk1.book Page 75 Thursday, October 21, 2004 4:37 PM Returning a Hard Drive to Dell Return your old hard drive to Dell in its original or comparable foam packaging. Otherwise, the hard drive may be damaged in transit. hard drive foam packaging Memory You can increase your computer memory by installing memory modules on the system board. See "Specifications" on page 91 for information on the memory supported by your computer. Install only memory modules that are intended for your computer.
D5169bk1.book Page 76 Thursday, October 21, 2004 4:37 PM www.dell.com | support.dell.com 3 Turn the computer over, loosen the captive screws on the memory module cover, and then remove the cover. NOTICE: To prevent damage to the memory module connector, do not use tools to spread the memorymodule securing clips.
D5169bk1.book Page 77 Thursday, October 21, 2004 4:37 PM memory module notch securing clips (2 per connector) NOTICE: If you need to install memory modules in two connectors, install a memory module in the connector labeled “DIMMA” before you install a module in the connector labeled “DIMMB.” Insert memory modules at a 45-degree angle to avoid damaging the connector. NOTE: If the memory module is not installed properly, the computer may not boot properly. No error message indicates this failure.
www.dell.com | support.dell.com D5169bk1.book Page 78 Thursday, October 21, 2004 4:37 PM 6 Replace the memory module cover. NOTICE: If the cover is difficult to close, remove the module and reinstall it. Forcing the cover to close may damage your computer.
D5169bk1.book Page 79 Thursday, October 21, 2004 4:37 PM 7 Insert the battery into the battery bay, or connect the AC adapter to your computer and an electrical outlet. 8 Reinstall the hard drive. See page 73. 9 Turn on the computer. As the computer boots, it detects the additional memory and automatically updates the system configuration information. If prompted, press to continue.
D5169bk1.book Page 80 Thursday, October 21, 2004 4:37 PM www.dell.com | support.dell.com 4 Remove the existing modem: a Remove the screw securing the modem to the system board, and set it aside. b Pull straight up on the attached pull-tab to lift the modem out of its connector on the system board, and disconnect the modem cable. modem cable pull-tab modem screw system board connector 5 Install the replacement modem: a Connect the modem cable to the modem.
D5169bk1.book Page 81 Thursday, October 21, 2004 4:37 PM Mini PCI Card If you ordered a Mini PCI card with your computer, the card is already installed. CAUTION: Before you begin any of the procedures in this section, follow the safety instructions in the Product Information Guide. 1 Follow the procedures in "Before You Begin" on page 71. 2 Turn the computer over and loosen the captive screws from the modem cover. 3 Place your finger under the cover at the indentation and lift the cover open.
www.dell.com | support.dell.com D5169bk1.book Page 82 Thursday, October 21, 2004 4:37 PM b Release the Mini PCI card by spreading the metal securing tabs until the card pops up slightly. c Lift the Mini PCI card out of its connector. Mini PCI card metal securing tabs (2) NOTICE: The connectors are keyed to ensure correct insertion. If you feel resistance, check the connectors and realign the card.
D5169bk1.book Page 83 Thursday, October 21, 2004 4:37 PM NOTICE: To avoid damaging the Mini PCI card, never place cables under the card. b Connect the antenna cables to the Mini PCI card if a wireless card is installed in your computer. Mini PCI card antenna cables 6 Replace the modem cover. Hinge Cover CAUTION: Before you begin any of the procedures in this section, follow the safety instructions in the Product Information Guide.
www.dell.com | support.dell.com D5169bk1.book Page 84 Thursday, October 21, 2004 4:37 PM hinge cover When replacing the hinge cover, first insert the left edge and then press from left to right until the cover snaps into place. Keyboard CAUTION: Before you begin any of the procedures in this section, follow the safety instructions in the Product Information Guide.
D5169bk1.book Page 85 Thursday, October 21, 2004 4:37 PM c Pull up on the keyboard connector pull-tab to disconnect the keyboard connector from the system board. screws (2) keyboard tabs (5) keyboard connector pull-tab system board connector NOTICE: To avoid scratching the palm rest when replacing the keyboard, hook the five tabs along the front edge of the keyboard into the palm rest, and then secure the keyboard in place.
D5169bk1.book Page 86 Thursday, October 21, 2004 4:37 PM www.dell.com | support.dell.com 4 Remove the existing battery: a Disconnect the battery cable connector from the system board. b Press the release latch on the side of the coin-cell battery compartment, and lift up the battery.
D5169bk1.book Page 87 Thursday, October 21, 2004 4:37 PM NOTICE: To avoid damaging the system board, you must remove the main battery before you begin working inside the computer. 1 Follow the procedures in "Before You Begin" on page 71. 2 Loosen the two captive screws and remove the Mini PCI card cover. 3 Disconnect the antennae cables from the Mini PCI card. antenna cables 4 Remove the hinge cover. See page 83. 5 Remove the four screws securing the display.
www.dell.com | support.dell.com D5169bk1.book Page 88 Thursday, October 21, 2004 4:37 PM display cable pull-tab screw (4) antenna cables display cable connector 7 Lift the display away from the computer at a 90-degree angle. Ensure that the antenna cables and display cable are free from the routing channels and that the cables move freely when you lift the display. When you replace the display, ensure that the ribbon tape around the display cable is securely tucked underneath the tabs.
D5169bk1.book Page 89 Thursday, October 21, 2004 4:37 PM 4 Insert a scribe into the notch and push it to the side to release the drive from the bay. optical drive notch 5 optical-drive security screw Slide the drive out of the bay. Internal Card With Bluetooth® Wireless Technology CAUTION: Before you begin any of the procedures in this section, follow the safety instructions in the Product Information Guide.
D5169bk1.book Page 90 Thursday, October 21, 2004 4:37 PM www.dell.com | support.dell.com 4 Pull the card out of the compartment so that you can disconnect the card from its cable and remove it from the computer. cover card cable 90 5 To replace the card, connect the card to the cable and then carefully insert it into the compartment. 6 Replace the card cover and tighten the screw. 7 Replace the battery.
D5169bk1.book Page 91 Thursday, October 21, 2004 4:37 PM Appendix Specifications Processor Processor type Intel® Pentium® M L1 cache 32 KB L2 cache 2 MB External bus frequency 400 MHz System Information System chip set Intel 855PM Data bus width 64 bits DRAM bus width single channel bus Processor address bus width 36 bits Flash EPROM 1 MB PCI bus 32 bits PC Card CardBus controller Ricoh R5C841 PC Card connector one (supports one Type I or Type II card) Cards supported 3.
www.dell.com | support.dell.com D5169bk1.book Page 92 Thursday, October 21, 2004 4:37 PM Memory (continued) Minimum memory 256 MB Maximum memory 2 GB Ports and Connectors Audio microphone-in connector, stereo headphones/speakers connector IEEE 1394a 4-pin mini, nonpowered connector Mini PCI Type IIIA Mini PCI card slot Modem RJ-11 port Network adapter RJ-45 port S-video TV-out 7-pin mini-DIN connector (optional S-video to composite video adapter cable) USB four 4-pin USB 2.
D5169bk1.
www.dell.com | support.dell.com D5169bk1.book Page 94 Thursday, October 21, 2004 4:37 PM Display (continued) Power consumption (panel with backlight) (typical): Controls 6.81 W brightness can be controlled through keyboard shortcuts Keyboard Number of keys 87 (U.S. and Canada); 88 (Europe); 91 (Japan) Layout QWERTY/AZERTY/Kanji Touch Pad X/Y position resolution (graphics table mode) 240 cpi Size: Width 73.0-mm (2.88-inch) sensor-active area Height 42.9-mm (1.
D5169bk1.book Page 95 Thursday, October 21, 2004 4:37 PM Battery (continued) Life span (approximate) 500 discharge/charge cycles Temperature range: Operating 0° to 35°C (32° to 95°F) Storage –40° to 65°C (–40° to 149°F) AC Adapter Input voltage 90–264 VAC Input current (maximum) 1.7 A Input frequency 47–63 Hz Output current 4.5 A (maximum at 4-second pulse); 3.5 A (continuous) Output power 90 W Rated output voltage 19.5 VDC Dimensions: Height 27.94 mm (1.1 inches) Width 58.42 mm (2.
www.dell.com | support.dell.com D5169bk1.book Page 96 Thursday, October 21, 2004 4:37 PM Environmental Temperature range: Operating 0° to 35°C (32° to 95°F) Storage –40° to 65°C (–40° to 149°F) Relative humidity: Operating 10% to 90% (noncondensing) Storage 5% to 95% (noncondensing) Maximum vibration (using a random-vibration spectrum that simulates user environment): Operating 0.66 GRMS Storage 1.
D5169bk1.book Page 97 Thursday, October 21, 2004 4:37 PM NOTICE: Unless you are an expert computer user or are directed to do so by Dell technical support, do not change the system setup settings. Certain changes might make your computer work incorrectly. Viewing the System Setup Screens 1 Turn on (or restart) your computer. 2 When the DELL™ logo appears, press immediately. If you wait too long and the Windows logo appears, continue to wait until you see the Windows desktop.
D5169bk1.book Page 98 Thursday, October 21, 2004 4:37 PM www.dell.com | support.dell.com To control the boot devices, select (highlight) a device by pressing the down-arrow or up-arrow key, and then enable or disable the device or change its order in the list. • To enable or disable a device, highlight the item and press the space bar. Enabled items appear as white and display a small triangle to the left; disabled items appear blue or dimmed without a triangle.
D5169bk1.book Page 99 Thursday, October 21, 2004 4:37 PM Dell provides limited technical support for the computer and any "Dell-installed" software and peripherals1. Support for third-party software and peripherals is provided by the original manufacturer, including those purchased and/or installed through Dell Software and Peripherals, Readyware, and Custom Factory Integration2.
www.dell.com | support.dell.com D5169bk1.book Page 100 Thursday, October 21, 2004 4:37 PM Country (City) International Access Code Country Code City Code Department Name or Service Area, Website and E-Mail Address Area Codes, Local Numbers, and Toll-Free Numbers Anguilla General Support toll-free: 800-335-0031 Antigua and Barbuda General Support 1-800-805-5924 Argentina (Buenos Aires) Website: www.dell.com.ar International Access Code: 00 E-mail: us_latin_services@dell.
D5169bk1.book Page 101 Thursday, October 21, 2004 4:37 PM Country (City) International Access Code Country Code City Code Department Name or Service Area, Website and E-Mail Address Area Codes, Local Numbers, and Toll-Free Numbers Austria (Vienna) Website: support.euro.dell.com International Access Code: 900 E-mail: tech_support_central_europe@dell.
www.dell.com | support.dell.com D5169bk1.book Page 102 Thursday, October 21, 2004 4:37 PM Country (City) International Access Code Country Code City Code Department Name or Service Area, Website and E-Mail Address Area Codes, Local Numbers, and Toll-Free Numbers Canada (North York, Ontario) Online Order Status: www.dell.
D5169bk1.book Page 103 Thursday, October 21, 2004 4:37 PM Country (City) International Access Code Country Code City Code Department Name or Service Area, Website and E-Mail Address China (Xiamen) Technical Support website: support.dell.com.cn Country Code: 86 Technical Support E-mail: cn_support@dell.com City Code: 592 Customer Care E-mail: customer_cn@dell.
www.dell.com | support.dell.com D5169bk1.book Page 104 Thursday, October 21, 2004 4:37 PM Country (City) International Access Code Country Code City Code Department Name or Service Area, Website and E-Mail Address Area Codes, Local Numbers, and Toll-Free Numbers Czech Republic (Prague) Website: support.euro.dell.com International Access Code: 00 E-mail: czech_dell@dell.
D5169bk1.book Page 105 Thursday, October 21, 2004 4:37 PM Country (City) International Access Code Country Code City Code Department Name or Service Area, Website and E-Mail Address Area Codes, Local Numbers, and Toll-Free Numbers France (Paris) (Montpellier) Website: support.euro.dell.com International Access Code: 00 E-mail: support.euro.dell.
www.dell.com | support.dell.com D5169bk1.book Page 106 Thursday, October 21, 2004 4:37 PM Country (City) International Access Code Country Code City Code Department Name or Service Area, Website and E-Mail Address Area Codes, Local Numbers, and Toll-Free Numbers Greece Website: support.euro.dell.com International Access Code: 00 E-mail: support.euro.dell.
D5169bk1.book Page 107 Thursday, October 21, 2004 4:37 PM Country (City) International Access Code Country Code City Code Department Name or Service Area, Website and E-Mail Address Ireland (Cherrywood) Website: support.euro.dell.com International Access Code: 16 E-mail: dell_direct_support@dell.com Country Code: 353 Technical Support City Code: 1 U.K. Technical Support (dial within U.K.
www.dell.com | support.dell.com D5169bk1.book Page 108 Thursday, October 21, 2004 4:37 PM Country (City) International Access Code Country Code City Code Department Name or Service Area, Website and E-Mail Address Japan (Kawasaki) Website: support.jp.dell.
D5169bk1.book Page 109 Thursday, October 21, 2004 4:37 PM Country (City) International Access Code Country Code City Code Latin America Department Name or Service Area, Website and E-Mail Address Area Codes, Local Numbers, and Toll-Free Numbers Customer Technical Support (Austin, Texas, U.S.A.) 512 728-4093 Customer Service (Austin, Texas, U.S.A.) 512 728-3619 Fax (Technical Support and Customer Service) (Austin, Texas, U.S.A.) 512 728-3883 Sales (Austin, Texas, U.S.A.
www.dell.com | support.dell.com D5169bk1.
D5169bk1.book Page 111 Thursday, October 21, 2004 4:37 PM Country (City) International Access Code Country Code City Code Department Name or Service Area, Website and E-Mail Address Norway (Lysaker) Website: support.euro.dell.com International Access Code: 00 E-mail: http://support.euro.dell.
www.dell.com | support.dell.com D5169bk1.book Page 112 Thursday, October 21, 2004 4:37 PM Country (City) International Access Code Country Code City Code Department Name or Service Area, Website and E-Mail Address Area Codes, Local Numbers, and Toll-Free Numbers Singapore (Singapore) Website: support.ap.dell.
D5169bk1.book Page 113 Thursday, October 21, 2004 4:37 PM Country (City) International Access Code Country Code City Code Department Name or Service Area, Website and E-Mail Address Area Codes, Local Numbers, and Toll-Free Numbers Spain (Madrid) Website: support.euro.dell.com International Access Code: 00 E-mail: support.euro.dell.
www.dell.com | support.dell.com D5169bk1.book Page 114 Thursday, October 21, 2004 4:37 PM Country (City) International Access Code Country Code City Code Department Name or Service Area, Website and E-Mail Address Area Codes, Local Numbers, and Toll-Free Numbers Taiwan Website: support.ap.dell.com International Access Code: 002 E-mail: ap_support@dell.
D5169bk1.book Page 115 Thursday, October 21, 2004 4:37 PM Country (City) International Access Code Country Code City Code Department Name or Service Area, Website and E-Mail Address Area Codes, Local Numbers, and Toll-Free Numbers U.K. (Bracknell) Website: support.euro.dell.com International Access Code: 00 Customer Care website: support.euro.dell.com/uk/en/ECare/Form/Home.asp Country Code: 44 City Code: 1344 Uruguay E-mail: dell_direct_support@dell.
www.dell.com | support.dell.com D5169bk1.book Page 116 Thursday, October 21, 2004 4:37 PM Country (City) International Access Code Country Code City Code Department Name or Service Area, Website and E-Mail Address Area Codes, Local Numbers, and Toll-Free Numbers U.S.A.
D5169bk1.book Page 117 Thursday, October 21, 2004 4:37 PM FCC Notices (U.S. Only) Most Dell computers are classified by the Federal Communications Commission (FCC) as Class B digital devices. To determine which classification applies to your computer, examine all FCC registration labels located on the bottom, side, or back panel of your computer, on card-mounting brackets, and on the cards themselves.
www.dell.com | support.dell.com D5169bk1.book Page 118 Thursday, October 21, 2004 4:37 PM • Connect the equipment into an outlet on a circuit different from that to which the receiver is connected. • Consult the dealer or an experienced radio/television technician for help. FCC Identification Information The following information is provided on the device or devices covered in this document in compliance with FCC regulations: • Model number: PP14L • Company name: Dell Inc.
D5169bk1.book Page 119 Thursday, October 21, 2004 4:37 PM Index A C D audio connectors description, 17 CardBus technology PC Cards, 39 audio device connecting, 31 CD drive problems, 50 Dell contacting, 99, 117 support policy, 98 support site, 10 audio.
D5169bk1.
D5169bk1.
D5169bk1.book Page 122 Thursday, October 21, 2004 4:37 PM Index System Restore, 67-68 U system setup program, 97 uninterruptible power supply.