Dell™ Inspiron™ 1210 Service Manual Before You Begin Replacing the Hinge Cover Replacing the Keyboard Replacing the Palm Rest Replacing the Display Replacing the Internal Card With Bluetooth® Wireless Technology Replacing the Hard Drive Replacing the Power Button Board Replacing the Speaker Communication Cards Replacing the Power Cable Replacing the 2-in-1 Processor and Memory Board Replacing the Coin-Cell Battery Replacing the CRT Board Replacing the Camera Replacing the Inverter Board Replacing the USB B
Back to Contents Page Before You Begin Dell™ Inspiron™ 1210 Service Manual Recommended Tools Turning Off Your Computer Before Working Inside Your Computer This section provides procedures for removing and installing the components in your computer. Unless otherwise noted, each procedure assumes that the following conditions exist: l You have performed the steps in Turning Off Your Computer and Before Working Inside Your Computer. l You have read the safety information shipped with your computer.
1. Ensure that the work surface is flat and clean to prevent the computer cover from being scratched. 2. Turn off your computer. See Turning Off Your Computer. NOTICE: To disconnect a network cable, first unplug the cable from your computer and then unplug the cable from the network device. 3. Disconnect all telephone or network cables from the computer. 4. Press and eject any installed cards from the 3-in-1 memory card reader. 5.
Back to Contents Page Flashing the BIOS Dell™ Inspiron™ 1210 Service Manual Flashing the BIOS From a CD Flashing the BIOS From the Hard Drive Flashing the BIOS in Ubuntu If a BIOS-update program CD is provided with the new system board, flash the BIOS from the CD. If you do not have a BIOS-update program CD, flash the BIOS from the hard drive. NOTE: Your computer does not ship with an external optical drive. Use an external optical drive or any external storage device for the procedures that involve discs.
1. Ensure that the AC adapter is plugged in, the main battery is properly installed, and a network cable is attached. 2. Turn on the computer. 3. Select 4. Create a new folder and name it BIOS. 5. Locate the latest BIOS update file for your computer at support.dell.com. 6. Click Download Now to download the file. 7. If the Export Compliance Disclaimer window appears, click Yes, I Accept this Agreement. ®Places®Documents. The File Download window appears. 8.
Back to Contents Page Replacing the Internal Card With Bluetooth® Wireless Technology Dell™ Inspiron™ 1210 Service Manual CAUTION: Before working inside your computer, read the safety information that shipped with your computer. For additional safety best practices information, see the Regulatory Compliance Homepage at www.dell.com/regulatory_compliance.
Back to Contents Page Replacing the Camera Dell™ Inspiron™ 1210 Service Manual CAUTION: Before working inside your computer, read the safety information that shipped with your computer. For additional safety best practices information, see the Regulatory Compliance Homepage at www.dell.com/regulatory_compliance. NOTICE: To avoid electrostatic discharge, ground yourself by using a wrist grounding strap or by periodically touching an unpainted metal surface (such as a connector on the back of the computer).
Back to Contents Page Replacing the Power Cable Dell™ Inspiron™ 1210 Service Manual CAUTION: Before working inside your computer, read the safety information that shipped with your computer. For additional safety best practices information, see the Regulatory Compliance Homepage at www.dell.com/regulatory_compliance. NOTICE: To avoid electrostatic discharge, ground yourself by using a wrist grounding strap or by periodically touching a connector on the back panel of the computer. 1.
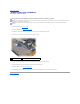
Back to Contents Page Replacing the Coin-Cell Battery Dell™ Inspiron™ 1210 Service Manual CAUTION: Before working inside your computer, read the safety information that shipped with your computer. For additional safety best practices information, see the Regulatory Compliance Homepage at www.dell.com/regulatory_compliance.
Back to Contents Page Replacing the 2-in-1 Processor and Memory Board Dell™ Inspiron™ 1210 Service Manual CAUTION: Before working inside your computer, read the safety information that shipped with your computer. For additional safety best practices information, see the Regulatory Compliance Homepage at www.dell.com/regulatory_compliance.
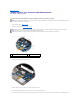
7. Lift the 2-in-1 memory and processor board out of its system board connector. 8. To replace the 2-in-1 memory and processor board, align the notch in the 2-in-1 memory and processor edge connector with the tab in the connector slot. 9. Slide the 2-in-1 memory and processor board firmly into the slot at a 45- degree angle, and gently press the 2-in-1 memory and processor board down until it clicks into place. If you do not hear the click, remove the module and reinstall it. 10.
Back to Contents Page Processor Heat Sink Dell™ Inspiron™ 1210 Service Manual Removing the Processor Heat Sink Replacing the Processor Heat Sink CAUTION: Before working inside your computer, follow the safety instructions shipped with your computer. NOTICE: To avoid electrostatic discharge, ground yourself by using a wrist grounding strap or by periodically touching an unpainted metal surface (such as a connector on the back of the computer). Removing the Processor Heat Sink 1.
Back to Contents Page
Back to Contents Page Replacing the Display Dell™ Inspiron™ 1210 Service Manual Replacing the Display Assembly Replacing the Display Bezel Replacing the Display Panel CAUTION: Before working inside your computer, read the safety information that shipped with your computer. For additional safety best practices information, see the Regulatory Compliance Homepage at www.dell.com/regulatory_compliance.
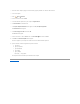
7. To replace the display assembly, route and connect the display cable to the connector on the system board. 8. Route and connect the 2-in-1 camera and LVDS cable to the connector on the system board. 9. Replace the four M2.5 x 3-mm screws on each side of the display assembly. 10. Replace the palm rest. See Replacing the Palm Rest. 11. Slide the battery into the battery bay, until it clicks in place and slide the battery-lock latch towards the lock position.
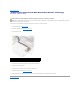
8. Replace the two rubber bumpers at the bottom of the display bezel on either side. 9. Replace the display assembly (see Follow the instructions in "Before You Begin" on page 9.). Replacing the Display Panel 1. Remove the display assembly (see Follow the instructions in "Before You Begin" on page 9.). 2. Remove the display bezel (see Replacing the Display Bezel). 1 M2.5 x 3-mm screws (6) 3 connector on the camera board 3. 2 inverter board connectors (2) Remove the six M2.
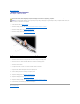
6. 1 Remove the 2-in-1 camera and LVDS cable. display panel bracket 2 M2 x 2.5-mm screws (4) 7. Remove the four M2 x 2.5-mm screws (two on each side) that secure the display panel bracket to the display panel. 8. To replace the display panel, align the display panel bracket with the display panel. 9. Replace the four M2 x 2.5-mm screws that secure the display panel brackets to each side of the display panel. 10. Replace the 2-in-1 camera and LVDS cable. 11.
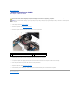
Back to Contents Page Replacing the Hard Drive Dell™ Inspiron™ 1210 Service Manual CAUTION: Before working inside your computer, read the safety information that shipped with your computer. For additional safety best practices information, see the Regulatory Compliance Homepage at www.dell.com/regulatory_compliance. CAUTION: If you remove the hard drive from the computer when the drive is hot, do not touch the metal housing of the hard drive.
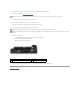
6. Remove the hard drive from the rubber case. 7. To replace the hard drive, replace the rubber case onto the hard drive. 8. Attach the hard drive cable to the hard drive cable connector. 9. Place the hard drive in the hard drive compartment. 10. Attach the hard drive cable to the hard-drive system board connector. 11. Replace the palm rest. See Replacing the Palm Rest. 12.
Back to Contents Page Replacing the Hinge Cover Dell™ Inspiron™ 1210 Service Manual CAUTION: Before working inside your computer, read the safety information that shipped with your computer. For additional safety best practices information, see the Regulatory Compliance Homepage at www.dell.com/regulatory_compliance.
Back to Contents Page Replacing the Inverter Board Dell™ Inspiron™ 1210 Service Manual CAUTION: Before working inside your computer, read the safety information that shipped with your computer. For additional safety best practices information, see the Regulatory Compliance Homepage at www.dell.com/regulatory_compliance.
Back to Contents Page Replacing the Keyboard Dell™ Inspiron™ 1210 Service Manual CAUTION: Before working inside your computer, read the safety information that shipped with your computer. For additional safety best practices information, see the Regulatory Compliance Homepage at www.dell.com/regulatory_compliance.
Back to Contents Page
Back to Contents Page Memory Module Dell™ Inspiron™ 1210 Service Manual Removing the Memory Module(s) Replacing the Memory Module(s) CAUTION: Before you begin any of the procedures in this section, follow the safety instructions shipped with your computer. NOTICE: To avoid electrostatic discharge, ground yourself by using a wrist grounding strap or by periodically touching an unpainted metal surface (such as a connector on the back of the computer).
1 tab 2 notch 3. Replace the module cover (see Base Cover). 4. Slide the battery into the battery bay, until it clicks into place. 5. Turn on the computer. As the computer boots, it detects the additional memory and automatically updates the system configuration information. To confirm the amount of memory installed in the computer, click Start Back to Contents Page ® Help and Support® Dell System Information.
Back to Contents Page Communication Cards Dell™ Inspiron™ 1210 Service Manual Subscriber Identity Module Wireless Mini-Cards Subscriber Identity Module Subscriber Identity Modules (SIM) identify users uniquely through an International Mobile Subscriber Identity. CAUTION: Before working inside your computer, read the safety information that shipped with your computer. For additional safety best practices information, see the Regulatory Compliance Homepage at www.dell.com/regulatory_compliance.
2. Remove the palm rest. See Replacing the Palm Rest. 1 Mini-Card 3 antenna cable connector (2) 2 securing screw (2) 3. Disconnect the antenna cables from the Mini-Card. 4. Release the Mini-Card by removing the securing screws. 5. Lift the Mini-Card out of its system board connector. NOTICE: When the Mini-Card is not in the computer, store it in protective antistatic packaging.
WWAN (2 antenna cables) Main WWAN (white triangle) white with gray stripe Auxiliary WWAN (black triangle) black with gray stripe WLAN (2 or 3 antenna cables) Main WLAN (white triangle) white Auxiliary WLAN (black triangle) black 10. Secure unused antenna cables in the protective mylar sleeve. 11. Replace the palm rest. See Replacing the Palm Rest. 12. Slide the battery into the battery bay, until it clicks in place and slide the battery-lock latch to the lock position. 13.
Back to Contents Page Optical Drive Dell™ Inspiron™ 1210 Service Manual Removing the Optical Drive Replacing the Optical Drive CAUTION: Before performing the following procedures, follow the safety instructions shipped with your computer. NOTICE: To avoid electrostatic discharge, ground yourself by using a wrist grounding strap or by periodically touching an unpainted metal surface (such as the back panel) on the computer. Removing the Optical Drive 1. Follow the procedures in Before You Begin. 2.
Back to Contents Page
Back to Contents Page Replacing the Palm Rest Dell™ Inspiron™ 1210 Service Manual CAUTION: Before working inside your computer, read the safety information that shipped with your computer. For additional safety best practices information, see the Regulatory Compliance Homepage at www.dell.com/regulatory_compliance. NOTICE: To avoid electrostatic discharge, ground yourself by using a wrist grounding strap or by periodically touching an unpainted metal surface (such as the back panel) on the computer.
1 speaker cable 2 power button board cable 3 antenna cables (2) 4 palm rest 5 touch pad cable 6 bluetooth card cable 7. Disconnect the Bluetooth card cable, touch pad cable, the power button board cable, and speaker cable from the respective system board connectors. NOTICE: Carefully separate the palm rest from the computer base to avoid damage to the palm rest. 8.
Back to Contents Page Replacing the Power Button Board Dell™ Inspiron™ 1210 Service Manual CAUTION: Before working inside your computer, read the safety information that shipped with your computer. For additional safety best practices information, see the Regulatory Compliance Homepage at www.dell.com/regulatory_compliance.
Back to Contents Page Replacing the Speaker Dell™ Inspiron™ 1210 Service Manual CAUTION: Before working inside your computer, read the safety information that shipped with your computer. For additional safety best practices information, see the Regulatory Compliance Homepage at www.dell.com/regulatory_compliance. NOTICE: To avoid electrostatic discharge, ground yourself by using a wrist grounding strap or by periodically touching an unpainted metal surface (such as the back panel) on the computer. 1.
Back to Contents Page Replacing the System Board Dell™ Inspiron™ 1210 Service Manual Entering the Service Tag in the BIOS Setting the Keyboard Matrix CAUTION: Before working inside your computer, read the safety information that shipped with your computer. For additional safety best practices information, see the Regulatory Compliance Homepage at www.dell.com/regulatory_compliance.
13. Enter the service tag. See Entering the Service Tag in the BIOS. 14. The keyboard matrix may change after you replace the system board. To set the keyboard matrix according to your country, see Setting the Keyboard Matrix. Entering the Service Tag in the BIOS 1. Ensure that the AC adapter is plugged in and that the main battery is installed properly. 2. Press during POST to enter the system setup program. 3.
Back to Contents Page Replacing the USB Board Dell™ Inspiron™ 1210 Service Manual CAUTION: Before working inside your computer, read the safety information that shipped with your computer. For additional safety best practices information, see the Regulatory Compliance Homepage at www.dell.com/regulatory_compliance.
Back to Contents Page Replacing the CRT Board Dell™ Inspiron™ 1210 Service Manual CAUTION: Before working inside your computer, read the safety information that shipped with your computer. For additional safety best practices information, see the Regulatory Compliance Homepage at www.dell.com/regulatory_compliance.