Dell™ XPS™ M1710 Owner's Manual Finding Information A Tour of Your Computer Setting Up Your Computer Using the Display Using the Keyboard and Touch Pad Using a Battery Dell™ QuickSet Features Using CDs, DVDs, and Other Multimedia Using Cards Setting Up a Home and Office Network Securing Your Computer Troubleshooting Adding and Replacing Parts Traveling With Your Computer Specifications Getting Help Appendix Contacting Dell Glossary Model PP05XB Notes, Notices, and Cautions NOTE: A NOTE indicates important
Back to Contents Page A Tour of Your Computer Dell™ XPS™ M1710 Owner's Manual Determining Your Computer's Configuration Front View Left Side View Right Side View Back View Bottom View Determining Your Computer's Configuration Based on selections that you made when purchasing your computer, your computer has one of several different video controller configurations. To determine your computer's video controller configuration: 1. Access the Windows Help and Support Center.
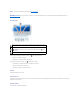
display — For more information about your display, see Using the Display. power button — Press to turn on the computer or to enter or exit a power management mode. For more information on power management modes, see Power Management Modes. device status lights Turns on when you turn on the computer, and blinks when the computer is in a power management mode. Turns on when the computer reads or writes data. NOTICE: To avoid loss of data, never turn off the computer while the flashing.
1 touch pad scroll zone Mute the sound. Turn the volume down. Turn the volume up. Play or pause. Play the previous track. Play the next track. Stop. speakers — To adjust the volume of the integrated speakers, press the media control buttons or speaker-volume keyboard shortcuts. For more information, see Speaker Functions. touch pad buttons — Touch pad buttons provide the same functionality as mouse buttons. keyboard — The keyboard includes a numeric keypad as well as the Microsoft Windows logo key.
Turns on when the numeric keypad is enabled. Turns on when the uppercase letter function is enabled. Turns on when the scroll lock function is enabled. Turns on when wireless networking is enabled. To quickly enable or disable wireless networking, press . Turns on when a card with Bluetooth® wireless technology is enabled. NOTE: The card with Bluetooth wireless technology is an optional feature, so the For more information, see the documentation that came with your card.
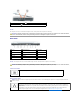
Right Side View 1 smart card slot 4 IEEE 1394 connector 2 hard drive 5 5-in-1 media memory card reader 3 ExpressCard slot 6 audio connectors (2) 7 air vent smart card slot — Supports one smart card. See Smart Cards. NOTE: The smart card slot is optional and may not ship with your computer. hard drive — Stores software and data. ExpressCard slot — Supports one ExpressCard, such as a modem or network adapter. The computer ships with a plastic blank installed in the slot.
Attach headphones or speakers to the Attach a microphone to the connector. connector. air vent — The computer uses fan(s) to create airflow through the vent(s), which prevents the computer from overheating. CAUTION: Do not block, push objects into, or allow dust to accumulate in the air vents. Do not store your computer in a low-airflow environment, such as a closed briefcase, while it is running. Restricting the airflow can damage the computer or cause a fire.
modem connector (RJ-11) To use the internal modem, connect the telephone line to the modem connector. For additional information on using the modem, see the modem documentation supplied with your computer under the Windows Help and Support Center. To access the Help and Support Center, see Windows Help and Support Center. USB connectors Connect USB devices, such as a mouse, keyboard, or printer.
1 subwoofer 5 cover for optional internal card with Bluetooth® wireless technology 9 docking connector 2 battery charge gauge 6 hard drive 10 memory module cover 3 battery-bay latch release 7 air vent 11 air vent 4 battery 8 Mini-Card/modem cover 12 optical-drive locking screw subwoofer — Produces a broader bass output than is provided by the speakers. battery charge gauge — Provides information on the battery charge status. For more information, see Checking the Battery Charge.
docking-device connector — Lets you attach your computer to a docking device. See the documentation that came with your docking device for more information.
Back to Contents Page Appendix Dell™ XPS™ M1710 Owner's Manual Using the System Setup Program Cleaning Your Computer FCC Notices (U.S. Only) Macrovision Product Notice Dell Technical Support Policy (U.S. Only) Using the System Setup Program NOTE: Your operating system may automatically configure most of the options available in the system setup program, thus overriding options that you set through the system setup.
l CD/DVD/CD-RW drive l Modular bay HDD NOTE: Only devices that are preceded by a number are bootable. During the boot routine, the computer starts at the top of the list and scans each enabled device for the operating system start-up files. When the computer finds the files, it stops searching and starts the operating system. To control the boot devices, select (highlight) a device by pressing the down-arrow or up-arrow key, and then enable or disable the device or change its order in the list.
CDs and DVDs NOTICE: Always use compressed air to clean the lens in the CD/DVD drive, and follow the instructions that come with the compressed-air product. Never touch the lens in the drive. If you notice problems, such as skipping, with the playback quality of your CDs or DVDs, try cleaning the discs. 1. Hold the disc by its outer edge. You can also touch the inside edge of the center hole. NOTICE: To avoid damaging the surface, do not wipe in a circular motion around the disc. 2.
appropriate functionality of the computer and all Dell-installed hardware. In addition to this technician-assisted technical support, online technical support is available at support.dell.com. Additional technical support options may be available for purchase. Dell provides limited technical support for the computer and any "Dell-installed" software and peripherals1.
Back to Contents Page Using a Battery Dell™ XPS™ M1710 Owner's Manual Battery Performance Checking the Battery Charge Conserving Battery Power Power Management Modes Configuring Power Management Settings Charging the Battery Replacing the Battery Storing a Battery Battery Performance NOTE: For information about the Dell warranty for your computer, see the Product Information Guide or separate paper warranty document that shipped with your computer.
The Windows Power Meter indicates the remaining battery charge. To check the Power Meter, double-click the If the computer is connected to an electrical outlet, a icon on the taskbar. icon appears.
l Click the Start button, click Turn off computer, and then click Stand by. or l Depending on how you set the power management options in the Power Options Properties window or the QuickSet Power Management Wizard, use one of the following methods: ¡ Press the power button. ¡ Close the display. ¡ Press . To exit standby mode, press the power button or open the display depending on how you set the power management options.
CAUTION: Before performing these procedures, turn off the computer, disconnect the AC adapter from the electrical outlet and the computer, disconnect the modem from the wall connector and computer, and remove any other external cables from the computer. NOTICE: You must remove all external cables from the computer to avoid possible connector damage. CAUTION: Using an incompatible battery may increase the risk of fire or explosion. Replace the battery only with a compatible battery purchased from Dell.
Back to Contents Page Using Cards Dell™ XPS™ M1710 Owner's Manual ExpressCards Media Memory Cards Smart Cards ExpressCards ExpressCards leverage PC Card technology to provide a fast and convenient way to add memory, wired and wireless network communications (including wireless wide area network [WWAN] communications), multimedia, and security features to your computer. See Specifications for information on supported ExpressCards. NOTE: An ExpressCard is not a bootable device.
1 ExpressCard The computer recognizes the ExpressCard and automatically loads the appropriate device driver. If the configuration program tells you to load the manufacturer's drivers, use the CD that came with the ExpressCard. Removing an ExpressCard or Blank NOTICE: Use the ExpressCard configuration utility (click the icon in the taskbar) to select a card and stop it from functioning before you remove it from the computer. If you do not stop the card in the configuration utility, you could lose data.
Installing a Media Memory Card You can install a media memory card in the computer while the computer is running. The computer automatically detects the card. Media memory cards are generally marked with a symbol (such as a triangle or an arrow) or a label to indicate which end to insert into the slot. The cards are keyed to prevent incorrect insertion. If card orientation is not clear, see the documentation that came with the card.
1 gold contact pad 2. 2 smart card (top) Slide the smart card into the smart card slot until the card is completely seated in its connector. The smart card will protrude approximately 1/2 inch from the slot. If you encounter too much resistance, do not force the card. Check the card orientation and try again.
Back to Contents Page Contacting Dell Dell™ XPS™ M1710 Owner's Manual To contact Dell electronically, you can access the following websites: l www.dell.com l support.dell.com (support) For specific web addresses for your country, find the appropriate country section in the table below. NOTE: Toll-free numbers are for use within the country for which they are listed.
Bermuda General Support 1-800-342-0671 Bolivia General Support toll-free: 800-10-0238 Website: www.dell.
International Access Code: 00 Country Code: 420 Customer Care 22537 2707 Fax 22537 2714 Technical Fax 22537 2728 Switchboard 22537 2711 Website: support.euro.dell.
Website: support.ap.dell.com Technical Support E-mail: HK_support@Dell.
Korea (Seoul) International Access Code: 001 Public Sales (government agencies, educational institutions, and medical institutions) 044-556-1469 Global Segment Japan 044-556-3469 Individual User 044-556-1760 Switchboard 044-556-4300 E-mail: krsupport@dell.
Country Code: 64 General Support 0800 441 567 Nicaragua General Support 001-800-220-1006 Website: support.euro.dell.
International Access Code: 00 Switchboard 902 118 541 Country Code: 34 Fax 902 118 539 Corporate City Code: 91 Technical Support Customer Care 902 100 130 902 115 236 Switchboard 91 722 92 00 Fax 91 722 95 83 Website: support.euro.dell.
AutoTech (portable and desktop computers) toll-free: 1-800-247-9362 Hardware and Warranty Support (Dell TV, Printers, and Projectors) for Relationship customers toll-free 1-877-459-7298 Consumer (Home and Home Office) Support for all other Dell products toll-free: 1-800-624-9896 Customer Service toll-free: 1-800-624-9897 Employee Purchase Program (EPP) Customers toll-free: 1-800-695-8133 Financial Services website: www.dellfinancialservices.
Back to Contents Page Using the Display Dell™ XPS™ M1710 Owner's Manual Adjusting Brightness Switching the Video Image Setting Display Resolution Adjusting Brightness When a Dell™ computer is running on battery power, you can conserve power by setting the brightness to the lowest comfortable setting by pressing and the up- or down-arrow key on the keyboard.The Dell QuickSet Brightness Meter shows the current brightness setting for the display.
Back to Contents Page Finding Information Dell™ XPS™ M1710 Owner's Manual Finding Information Finding Information NOTE: Some features or media may be optional and may not ship with your computer. Some features or media may not be available in certain countries. NOTE: Additional information may ship with your computer.
l l l l l l l l l l Solutions — Troubleshooting hints and tips, articles from technicians, and online courses, frequently asked questions Community Forum — Online discussion with other Dell customers Upgrades — Upgrade information for components, such as memory, the hard drive, and the operating system Customer Care — Contact information, service call and order status, warranty, and repair information Service and support — Service call status and support history, service contract, online discussions with
Back to Contents Page
Back to Contents Page Glossary Dell™ XPS™ M1710 Owner's Manual Terms in this Glossary are provided for informational purposes only and may or may not describe features included with your particular computer. A AC — alternating current — The form of electricity that powers your computer when you plug the AC adapter power cable in to an electrical outlet.
CD — compact disc — An optical form of storage media, typically used for audio and software programs. CD drive — A drive that uses optical technology to read data from CDs. CD player — The software used to play music CDs. The CD player displays a window with buttons that you use to play a CD. CD-R — CD recordable — A recordable version of a CD. Data can be recorded only once onto a CD-R. Once recorded, the data cannot be erased or written over. CD-RW — CD rewritable — A rewritable version of a CD.
E ECC — error checking and correction — A type of memory that includes special circuitry for testing the accuracy of data as it passes in and out of memory. ECP — extended capabilities port — A parallel connector design that provides improved bidirectional data transmission. Similar to EPP, ECP uses direct memory access to transfer data and often improves performance. EIDE — enhanced integrated device electronics — An improved version of the IDE interface for hard drives and CD drives.
Microsoft Word. Other help files function as stand-alone reference sources. Help files typically have a filename extension of .hlp or .chm. hibernate mode — A power management mode that saves everything in memory to a reserved space on the hard drive and then turns off the computer. When you restart the computer, the memory information that was saved to the hard drive is automatically restored.
your files while you are working on them, and always save your files before you shut down the computer. Your computer can contain several different forms of memory, such as RAM, ROM, and video memory. Frequently, the word memory is used as a synonym for RAM. memory address — A specific location where data is temporarily stored in RAM. memory mapping — The process by which the computer assigns memory addresses to physical locations at start-up.
program — Any software that processes data for you, including spreadsheet, word processor, database, and game packages. Programs require an operating system to run. PS/2 — personal system/2 — A type of connector for attaching a PS/2-compatible keyboard, mouse, or keypad. PXE — pre-boot execution environment — A WfM (Wired for Management) standard that allows networked computers that do not have an operating system to be configured and started remotely.
SIM — Subscriber Identity Module. A SIM card contains a microchip that encrypts voice and data transmissions. SIM cards can be used in phones or portable computers. SVGA — super-video graphics array — A video standard for video cards and controllers. Typical SVGA resolutions are 800 x 600 and 1024 x 768. The number of colors and resolution that a program displays depends on the capabilities of the monitor, the video controller and its drivers, and the amount of video memory installed in the computer.
W — watt — The measurement of electrical power. One W is 1 ampere of current flowing at 1 volt. WHr — watt-hour — A unit of measure commonly used to indicate the approximate capacity of a battery. For example, a 66-WHr battery can supply 66 W of power for 1 hour or 33 W for 2 hours. wallpaper — The background pattern or picture on the Windows desktop. Change your wallpaper through the Windows Control Panel. You can also scan in your favorite picture and make it wallpaper. WLAN — wireless local area network.
Back to Contents Page Getting Help Dell™ XPS™ M1710 Owner's Manual Obtaining Assistance Problems With Your Order Product Information Returning Items for Warranty Repair or Credit Before You Call Obtaining Assistance CAUTION: If you need to remove the computer covers, first disconnect the computer power and modem cables from all electrical outlets. 1. Complete the procedures in Troubleshooting 2. Run the Dell Diagnostics (see Dell Diagnostics). 3.
support.euro.dell.com (Europe only) l Electronic Quote Service apmarketing@dell.com (Asian/Pacific countries only) sales_canada@dell.com (Canada only) AutoTech Service Dell's automated support service—AutoTech—provides recorded answers to the questions most frequently asked by Dell customers about their portable and desktop computers. When you call AutoTech, use your touch-tone telephone to select the subjects that correspond to your questions.
Before You Call NOTE: Have your Express Service Code ready when you call. The code helps Dell's automated-support telephone system direct your call more efficiently. Remember to fill out the Diagnostics Checklist. If possible, turn on your computer before you call Dell for technical assistance and call from a telephone at or near the computer.
Back to Contents Page Using the Keyboard and Touch Pad Dell™ XPS™ M1710 Owner's Manual Numeric Keypad Key Combinations Touch Pad Numeric Keypad The numeric keypad functions like the numeric keypad on an external keyboard. Each key on the keypad has multiple functions. The keypad numbers and symbols are marked in blue on the right of the keypad keys. To type a number or symbol, press and the desired key after enabling the keypad. l To enable the keypad, press .
arrow key Wireless Networking and Bluetooth® Wireless Technology Function Enables and disables wireless networking and Bluetooth wireless technology. Power Management Activates a power management mode. You can reprogram this keyboard shortcut to activate a different power management mode using the Advanced tab in the Power Options Properties window. See Power Management Modes. Puts the system into hibernate mode (if Dell QuickSet is installed).
The touch pad has silk screening on the right side and the bottom to indicate scrolling abilities. Scrolling is enabled by default. To disable this feature, modify the mouse properties within the Control Panel. NOTE: The scroll zones may not work with all applications. For the scroll zones to function properly, the application being used must take advantage of the touch pad scroll feature. Customizing the Touch Pad 1.
Back to Contents Page Using CDs, DVDs, and Other Multimedia Dell™ XPS™ M1710 Owner's Manual Playing CDs or DVDs Adjusting the Volume Adjusting the Picture Copying CDs and DVDs Using Dell Media Experience and Dell MediaDirect™ Connecting Your Computer to a TV or Audio Device Playing CDs or DVDs NOTICE: Do not press down on the CD or DVD tray when you open or close it. Keep the tray closed when you are not using the drive. NOTICE: Do not move the computer when you are playing CDs or DVDs. 1.
Mute the sound. Turn the volume down. Turn the volume up. Play or pause. Play the previous track. Play the next track. Stop. You can also adjust the volume with the Volume Control option through the Start menu. 1. Click the Start button, point to All Programs (or Programs)® Accessories® Entertainment (or Multimedia), and then click Volume Control. 2. In the Volume Control window, click and drag the bar in the Volume Control column and slide it up or down to increase or decrease the volume.
4. In the Display Properties window, click and drag the bar in Screen resolution to reduce the screen resolution setting. 5. Click the drop-down menu under Color quality, and then click Medium (16 bit). 6. Click OK to save the settings and close the window. Copying CDs and DVDs NOTE: Ensure that you observe all copyright laws when creating CDs or DVDs. This section applies only to computers that have a CD-RW, DVD+/-RW, or CD-RW/DVD (combo) drive.
CD-R Yes Yes No CD-RW Yes Yes Yes DVD+R Yes Yes No DVD-R Yes Yes No DVD+RW Yes Yes Yes DVD-RW Yes Yes Yes DVD+R DL Yes Yes No DVD-R DL Maybe No No DVD-RAM Maybe No No Helpful Tips l Use Microsoft® Windows® Explorer to drag and drop files to a CD-R or CD-RW only after you start Sonic DigitalMedia and open a DigitalMedia project. l Use CD-Rs to burn music CDs that you want to play in regular stereos. CD-RWs do not play in most home or car stereos.
1 Dell MediaDirect button Dell MediaDirect and Dell Media Experience Help The Dell media application on your computer provides help information. When you launch the media application, click on the desktop icon for additional help. Connecting Your Computer to a TV or Audio Device NOTE: Video and audio cables for connecting your computer to a TV or other audio device may not be included with your computer. Cables and TV/digital audio adapter cables are available for purchase from Dell.
l Component-out video and standard audio When you finish connecting the video and audio cables between your computer and your TV, you must enable your computer to work with the TV. See Enabling the Display Settings for a TV in Microsoft® Windows® XP to ensure that the computer recognizes and works properly with the TV. Additionally, if you are using S/PDIF digital audio, see Enabling S/PDIF Digital Audio. S-Video and Standard Audio 1 audio connector 1 standard S-video cable 1.
1 S-video TV-out connector 1 composite video adapter 2 2 composite video adapter S-video cable 3 S/PDIF digital audio cable 1. Turn off the computer and the TV and/or the audio device that you want to connect. 2. Connect the composite video adapter to the S-video TV-out connector on your computer. 3. Plug one end of the S-video cable into the S-video output connector on the composite video adapter. 1 composite video adapter 2 S-video cable 4.
1 audio input connector 1 composite video adapter 2 S-video TV-out connector 2 composite video cable 3 composite video adapter 3 standard audio cable 1. Turn off the computer and the TV and/or audio device that you want to connect. 2. Connect the composite video adapter to the S-video TV-out connector on your computer. 3. Plug one end of the composite video cable into the composite video-output connector on the composite video adapter.
1 1 S-video TV-out connector composite video adapter 2 2 composite video adapter composite video cable 3 SPDIF digital audio cable 1. Turn off the computer and the TV and/or audio device that you want to connect. 2. Connect the composite video adapter to the S-video TV-out connector on the computer. 3. Plug one end of the composite video cable into the composite video-input connector on the composite video adapter. 1 composite video adapter 2 composite video cable 4.
1 S-video TV-out connector 1 component video adapter 2 2 component video adapter component video cable 3 standard audio cable 1. Turn off the computer and the TV and/or audio device that you want to connect. 2. Connect the component video adapter to the S-video TV-out connector on your computer. 3. Plug all three ends of the component video cable into the component video-output connectors on the component video adapter.
1 S-video TV-out connector 1 component video adapter 2 component video adapter 2 component video cable 3 SPDIF digital audio cable 1. Turn off the computer and the TV and/or audio device that you want to connect. 2. Connect the component video adapter to the S-video TV-out connector on the computer. 3. Plug all three ends of the component video cable into the component video-output connectors on the component video adapter.
8. See Enabling the Display Settings for a TV in Microsoft® Windows® XP to ensure that the computer recognizes and works properly with the TV. Enabling S/PDIF Digital Audio If your computer has a DVD drive, you can enable digital audio for DVD playback. 1. Click Start, and point to All Programs, and click PowerDVD to launch the Cyberlink PowerDVD application. 2. Insert a DVD into the DVD drive. If the DVD begins playing, click the stop button. 3. Click the Settings option. 4. Click the DVD option.
Enabling the Display Settings for a TV in Microsoft® Windows® XP Video Controller NOTE: To ensure that the display options appear correctly, connect the TV to the computer before you enable the display settings. 1. Click the Start button, point to Settings, and then click Control Panel. 2. Double-click Display and click the Settings tab. 3. Click Advanced. 4. Click the tab for your video card.
Back to Contents Page Adding and Replacing Parts Dell™ XPS™ M1710 Owner's Manual Before You Begin Hard Drive Memory Modem Mini-Card Hinge Cover Keyboard Coin-Cell Battery Optical Drive Internal Card With Bluetooth® Wireless Technology Before You Begin This chapter provides procedures for removing and installing the components in your computer.
NOTICE: To avoid electrostatic discharge, ground yourself by using a wrist grounding strap or by periodically touching an unpainted metal surface (such as a connector on the back of the computer). NOTICE: To avoid damaging the computer, perform the following steps before you begin working inside the computer. 1. Ensure that the work surface is flat and clean to prevent the computer cover from being scratched. 2. Turn off your computer. See Turning Off Your Computer.
1 hard drive screws (2) 2 hard drive NOTICE: When the hard drive is not in the computer, store it in protective antistatic packaging. See "Protecting Against Electrostatic Discharge" in the Product Information Guide. 3. Slide the hard drive out of the computer. 4. Remove the new drive from its packaging. Save the original packaging for storing or shipping the hard drive. NOTICE: Use firm and even pressure to slide the drive into place. If you use excessive force, you may damage the connector. 5.
CAUTION: Before you begin any of the procedures in this section, follow the safety instructions in the Product Information Guide. NOTICE: To avoid electrostatic discharge, ground yourself by using a wrist grounding strap or by periodically touching an unpainted metal surface (such as a connector on the back of the computer). NOTICE: To avoid damaging the system board, you must remove the battery before you begin working inside the computer. 1. Follow the procedures in Before You Begin. 2.
6. Replace the memory module cover. NOTICE: If the cover is difficult to close, remove the module and reinstall it. Forcing the cover to close may damage your computer. 7. Insert the battery into the battery bay, or connect the AC adapter to your computer and an electrical outlet. 8. Turn on the computer. As the computer boots, it detects the additional memory and automatically updates the system configuration information. If prompted, press to continue.
1 modem 2 modem pull-tab 4 modem screw 5 modem connector on system board 5. 3 modem cable Install the replacement modem: a. Connect the modem cable to the modem. NOTICE: The connectors are keyed to ensure correct insertion. If you feel resistance, check the connectors and realign the card. 6. b. Align the modem with the screw holes and press the modem into the connector on the system board. c. Replace the screw that secures the modem to the system board. Replace the Mini-Card/modem cover.
4. If a Mini-Card is not already installed, go to step 5. If you are replacing a Mini-Card, remove the existing card: a. 1 Disconnect the antenna cables from the Mini-Card. antenna cables (2) 1 2 Mini-Card 3 Mini-Card connector b. Release the Mini-Card by pushing the metal securing clips toward the back of the computer until the card pops up slightly. c. Lift the Mini-Card out of its connector. securing clips 2 Mini-Card NOTICE: The connectors are keyed to ensure correct insertion.
b. Connect the antenna cables to the antenna connectors on the Mini-Card by matching the color of the cable to the color of the triangle above the connector. Connect the main antenna cable (white) to the antenna connector with the white triangle. Connect the auxiliary antenna cable (black) to the antenna connector with the black triangle. NOTE: If your computer has a gray cable, connect it to the connector with the gray triangle, if one is available on your card. 6. Replace the Mini-Card/modem cover.
NOTICE: To avoid damaging the system board, you must remove the battery before you begin working inside the computer. 1. Follow the procedures in Before You Begin. 2. Open the display and remove the hinge cover. See Hinge Cover. 3. Remove the keyboard: a. Remove the two screws at the top of the keyboard. NOTICE: The key caps on the keyboard are fragile, easily dislodged, and time-consuming to replace. Be careful when removing and handling the keyboard. b. c. d.
1 coin-cell battery 5. 2 release latch 3 battery cable connector Install the replacement battery: a. Insert the battery at a 30-degree angle under the release latch with the positive side up, and then push the battery into place. b. Connect the battery cable to the connector on the system board. 6. Replace the keyboard. 7. Replace the hinge cover. Optical Drive CAUTION: Before you begin any of the procedures in this section, follow the safety instructions in the Product Information Guide. 1.
NOTICE: To avoid electrostatic discharge, ground yourself by using a wrist grounding strap or by periodically touching an unpainted metal surface (such as a connector on the back of the computer). NOTICE: To avoid damaging the system board, you must remove the battery before you begin working inside the computer. If you ordered a card with Bluetooth wireless technology with your computer, it is already installed. 1. Follow the procedures in Before You Begin. 2. Remove the battery.
Back to Contents Page Dell™ QuickSet Features Dell™ XPS™ M1710 Owner's Manual NOTE: This feature may not be available on your computer. Dell™ QuickSet provides you with easy access to configure or view the following types of settings: l Network connectivity l Power management l Display l System information Depending on what you want to do in Dell™ QuickSet, you can start it by either clicking, double-clicking, or right-clicking the QuickSet icon, Microsoft® Windows® taskbar.
Back to Contents Page Securing Your Computer Dell™ XPS™ M1710 Owner's Manual Security Cable Lock Passwords Computer Tracking Software If Your Computer Is Lost or Stolen Security Cable Lock NOTE: Your computer does not ship with a security cable lock. A security cable lock is a commercially available antitheft device. To use the lock, attach it to the security cable slot on your Dell™ computer. For more information, see the instructions included with the device.
If Your Computer Is Lost or Stolen l Call a law enforcement agency to report the lost or stolen computer. Include the Service Tag in your description of the computer. Ask that a case number be assigned and write down the number, along with the name, address, and phone number of the law enforcement agency. If possible, obtain the name of the investigating officer. NOTE: If you know where the computer was lost or stolen, call a law enforcement agency in that area.
Back to Contents Page Setting Up Your Computer Dell™ XPS™ M1710 Owner's Manual Connecting to the Internet Transferring Information to a New Computer Setting Up a Printer Power Protection Devices Connecting to the Internet NOTE: ISPs and ISP offerings vary by country. To connect to the Internet, you need a modem or network connection and an Internet service provider (ISP).
Transferring Information to a New Computer The Microsoft® Windows® XP operating system provides a Files and Settings Transfer Wizard to move data from a source computer to a new computer. You can transfer data, such as: l E-mail messages l Toolbar settings l Internet bookmarks You can transfer the data to the new computer over a network connection, or you can store it on removable media, such as a writable CD, for transfer to the new computer.
3. Click Finished and restart the new computer. Running the Files and Settings Transfer Wizard Without the Operating System CD To run the Files and Settings Transfer Wizard without the optional Operating System CD, you must create a wizard disk that lets you create a backup of your data files. Create the wizard disk on removable media so that you can move it from your new computer to your old computer.
Setting Up a Printer NOTICE: Complete the operating system setup before you connect a printer to the computer. See the documentation that came with the printer for setup information, including how to: l Obtain and install updated drivers. l Connect the printer to the computer. l Load paper and install the toner or ink cartridge. For technical assistance, refer to the printer owner's manual or contact the printer manufacturer.
effectiveness of different devices. NOTICE: Most surge protectors do not protect against power fluctuations or power interruptions caused by nearby lightning strikes. When lightning occurs in your area, disconnect the telephone line from the telephone wall jack and disconnect your computer from the electrical outlet. Many surge protectors have a telephone jack for modem protection. See the surge protector documentation for modem connection instructions.
Back to Contents Page Specifications Dell™ XPS™ M1710 Owner's Manual NOTE: Your computer comes in different configurations. To determine the configuration of your computer, see Determining Your Computer's Configuration.
Ports and Connectors Audio microphone-in connector, stereo headphones/speakers connector IEEE 1394a 4-pin mini, nonpowered connector Modem RJ-11 port Network adapter RJ-45 port S-video TV-out 7-pin mini-DIN connector (optional S-video to composite video adapter cable; optional S-video to component video adapter cable) USB six 4-pin USB 2.0-compliant connectors Video 15-pin connector DVI-D (Digital Video Interface) 24-pin connector Communications Modem: Type V.
Display Type (active-matrix TFT) WUXGA Dimensions: Height 245.0 mm (9.64 inches) Width 383.0 mm (15 inches) Diagonal 431.8 mm (17 inches) Maximum resolution 1920 x 1200 at 16.7 million colors Refresh rate 60 Hz Operating angle 0º (closed) to 180° Viewing angle (typical): Horizontal ±60° Vertical ±45° Pixel pitch 0.191 mm (17-inch display) Power consumption (panel with backlight) (typical): 7.
Input voltage 90–264 VAC Input current (maximum) 2.5 A Input frequency 47–63 Hz Output current 7.7 A (maximum at 4-second pulse); 6.7 A (continuous) Output power 130 W Rated output voltage 19.5 VDC Dimensions: Height 36 mm (1.35 inches) Width 65 mm (2.39 inches) Depth 169.5 mm (6.04 inches) Weight (with cables) 0.76 kg (1.68 lb) Temperature range: Operating 0° to 35°C (32° to 95°F) Storage –40° to 65°C (–40° to 149°F) Physical Height 42.4 mm (1.7 inches) Width 394 mm (15.
Back to Contents Page Dell™ XPS™ M1710 Owner's Manual Notes, Notices, and Cautions NOTE: A NOTE indicates important information that helps you make better use of your computer. NOTICE: A NOTICE indicates either potential damage to hardware or loss of data and tells you how to avoid the problem. CAUTION: A CAUTION indicates a potential for property damage, personal injury, or death. Abbreviations and Acronyms For a complete list of abbreviations and acronyms, see Glossary.
Back to Contents Page Traveling With Your Computer Dell™ XPS™ M1710 Owner's Manual Identifying Your Computer Packing the Computer Travel Tips Identifying Your Computer l Attach a name tag or business card to the computer. l Write down your Service Tag and store it in a safe place away from the computer or carrying case l Use the Service Tag if you need to report a loss or theft to law enforcement officials and to Dell. l Create a file on the Microsoft® Windows® desktop called if_found.
l Prior to entering the airplane, verify that using a computer is permitted. Some airlines forbid the use of electronic devices during flight. All airlines forbid the use of electronic devices during takeoff and landing.
Back to Contents Page Troubleshooting Dell™ XPS™ M1710 Owner's Manual Dell Technical Update Service Dell Diagnostics Dell Support Utility Drive Problems E-Mail, Modem, and Internet Problems Error Messages IEEE 1394 Device Problems Keyboard Problems Lockups and Software Problems Memory Problems Network Problems ExpressCard Problems Power Problems Printer Problems Scanner Problems Sound and Speaker Problems Touch Pad or Mouse Problems Video and Display Problems Drivers Resolving Software and Hardware Incompa
a. Turn on the computer. When the DELL™ logo appears, press immediately. Select Diagnostics from the boot menu and press . NOTE: If you wait too long and the operating system logo appears, continue to wait until you see the Microsoft® Windows® desktop. Then shut down your computer and try again. b. Press and hold the key while powering the computer on.
3. If you run a test from the Custom Test or Symptom Tree option, click the applicable tab described in the following table for more information. Tab Function Results Displays the results of the test and any error conditions encountered. Errors Displays error conditions encountered, error codes, and the problem description. Help Describes the test and may indicate requirements for running the test. Configuration Displays your hardware configuration for the selected device.
Drive Problems CAUTION: Before you begin any of the procedures in this section, follow the safety instructions in the Product Information Guide. Ensure that Microsoft® Windows® recognizes the drive — Click the Start button and click My Computer. If the floppy, CD, or DVD drive, is not listed, perform a full scan with your antivirus software to check for and remove viruses. Viruses can sometimes prevent Windows from recognizing the drive.
l Ensure that the sound is not caused by the program that is running. l Ensure that the disk or disc is inserted properly. Hard Drive Problems Allow the computer to cool before turning it on — A hot hard drive may prevent the operating system from starting. Try allowing the computer to return to room temperature before turning it on. Run Check Disk — 1. Click the Start button and click My Computer. 2. Right-click Local Disk C:. 3. Click Properties. 4. Click the Tools tab. 5.
1. Click the Start button and click Control Panel. 2. Click Printers and Other Hardware. 3. Click Phone and Modem Options. 4. Click the Modems tab. 5. Click the COM port for your modem. 6. Click Properties, click the Diagnostics tab, and then click Query Modem to verify that the modem is communicating with Windows. If all commands receive responses, the modem is operating properly. Ensure that you are connected to the Internet — Ensure that you have subscribed to an Internet provider.
Drive not ready — The operation requires a hard drive in the bay before it can continue. Install a hard drive in the hard drive bay. See Hard Drive. Error reading ExpressCard — The computer cannot identify the ExpressCard. Reinsert the card or try another ExpressCard. See Using Cards. Extended memory size has changed — The amount of memory recorded in NVRAM does not match the memory installed in the computer. Restart the computer. If the error appears again, contact Dell. See Contacting Dell.
Keyboard clock line failure — For external keyboards, check the cable connection. Run the Keyboard Controller test in the Dell Diagnostics. See Dell Diagnostics. Keyboard controller failure — For external keyboards, check the cable connection. Restart the computer, and avoid touching the keyboard or the mouse during the boot routine. Run the Keyboard Controller test in the Dell Diagnostics. See Dell Diagnostics. Keyboard data line failure — For external keyboards, check the cable connection.
Not enough memory or resources. Exit some programs and try again — You have too many programs open. Close all windows and open the program that you want to use. Operating system not found — Reinstall the hard drive (see Hard Drive). If the problem persists, contact Dell. See Contacting Dell. Optional ROM bad checksum — The optional ROM apparently failed. Contact Dell. See Contacting Dell. A required .DLL file was not found — The program that you are trying to open is missing an essential file.
Unexpected interrupt in protected mode — The keyboard controller may be malfunctioning, or a memory module may be loose. Run the System Memory tests and the Keyboard Controller test in the Dell Diagnostics. See Dell Diagnostics. x:\ is not accessible. The device is not ready — Insert a disk into the drive and try again. Warning: Battery is critically low — The battery is running out of charge. Replace the battery, or connect the computer to an electrical outlet.
4. Type some characters on the external keyboard and verify that they appear on the display. If you cannot verify these steps, you may have a defective external keyboard. To verify that the problem is with the external keyboard, check the integrated keyboard — 1. Shut down the computer. 2. Disconnect the external keyboard. 3. Turn on the computer. 4. From the Windows desktop, click the Start button, point to Programs, point to Accessories, and click Notepad. 5.
4. Click End Task. Check the software documentation — If necessary, uninstall and then reinstall the program. A Program Is Designed for an Earlier Microsoft® Windows® Operating System Run the Program Compatibility Wizard — The Program Compatibility Wizard configures a program so it runs in an environment similar to non-Windows XP operating system environments. 1. Click the Start button, point to All Programs® Accessories, and then click Program Compatibility Wizard. 2.
Check the software documentation or contact the software manufacturer for troubleshooting information — l Ensure that the program is compatible with the operating system installed on your computer. l Ensure that your computer meets the minimum hardware requirements needed to run the software. See the software documentation for information. l Ensure that the program is installed and configured properly. l Verify that the device drivers do not conflict with the program.
Check your network settings — Contact your network administrator or the person who set up your network to verify that your network settings are correct and that the network is functioning. Mobile Broadband Network NOTE: The Dell Mobile Broadband Card Utility user's guide is located under Help and Support. You can also download the user's guide from support.dell.com. NOTE: The icon appears on the Windows desktop if the computer has a Dell Mobile Broadband card installed.
Contact the ExpressCard manufacturer. Power Problems CAUTION: Before you begin any of the procedures in this section, follow the safety instructions in the Product Information Guide. Check the power light — When the power light is lit or blinking, the computer has power. If the power light is blinking, the computer is in standby mode—press the power button to exit standby mode. If the light is off, press the power button to turn on the computer. Charge the battery — The battery charge may be depleted.
Ensuring Sufficient Power for Your Computer For optimum system performance, always use a 130-W AC adapter. Using less-powerful AC adapters may cause you to receive a WARNING message. The use of a less-powerful AC adapter may also cause your computer to experience a degradation in performance. Docking Power Considerations Due to the extra power consumption when a computer is docked to a docking device, normal computer operation is not possible on battery power alone.
Check the scanner documentation — See the scanner documentation for setup and troubleshooting information. Unlock the scanner — Ensure that your scanner is unlocked if it has a locking tab or button. Restart the computer and try the scanner again Check the cable connections — l See the scanner documentation for cable connection information. l Ensure that the scanner cables are securely connected to the scanner and the computer. Verify that the scanner is recognized by Microsoft Windows — 1. 2.
Disconnect headphones from the headphone connector — Sound from the speakers is automatically disabled when headphones are connected to the computer's front-panel headphone connector. Test the electrical outlet — Ensure that the electrical outlet is working by testing it with another device, such as a lamp. Eliminate possible interference — Turn off nearby fans, fluorescent lights, or halogen lamps to check for interference. Reinstall the audio driver — See Reinstalling Drivers and Utilities.
If the touch pad operates correctly, the mouse may be defective. Reinstall the touch pad driver — See Reinstalling Drivers and Utilities. Video and Display Problems CAUTION: Before you begin any of the procedures in this section, follow the safety instructions in the Product Information Guide. If the Display Is Blank NOTE: If you are using a program that requires a higher resolution than your computer supports, it is recommended that you attach an external monitor to your computer.
Eliminate sunlight glare, which can cause poor picture quality. Adjust the Windows display settings — 1. Click the Start button and then click Control Panel. 2. Click Appearance and Themes. 3. Click the area you want to change or click the Display icon. 4. Try different settings for Color quality and Screen resolution. See "Error Messages" — If an error message appears, see Error Messages If Only Part of the Display is Readable Connect an external monitor — 1.
6. Scroll down the list to see if any device has an exclamation point (a yellow circle with a [!]) on the device icon. If an exclamation point is next to the device name, you may need to reinstall the driver or install a new driver. See Reinstalling Drivers and Utilities. Reinstalling Drivers and Utilities NOTICE: The Dell Support website at support.dell.com and your Drivers and Utilities CD provide approved drivers for Dell™ computers.
Manually Reinstalling Drivers 1. After extracting the driver files to your hard drive as described in the previous section, click the Start button and right-click My Computer. 2. Click Properties. 3. Click the Hardware tab and click Device Manager. 4. Double-click the type of device for which you are installing the driver (for example, Modems or Infrared devices). 5. Double-click the name of the device for which you are installing the driver. 6. Click the Driver tab and click Update Driver. 7.
3. Follow the instructions on the screen. Restoring the Computer to an Earlier Operating State If problems occur after you install a device driver, use Device Driver Rollback (see Using Windows XP Device Driver Rollback) to resolve the problem. If that is unsuccessful, then use System Restore. NOTICE: Before you restore the computer to an earlier operating state, save and close any open files and exit any open programs.
To reinstall Windows XP, you need the following items: l Dell™ Operating System CD l Dell Drivers and Utilities CD NOTE: The Drivers and Utilities CD contains drivers that were installed during assembly of the computer. Use the Drivers and Utilities CD to load any required drivers. Depending on the region from where you ordered your computer, or whether you requested the CDs, the Drivers and Utilities CD and Operating System CD may not ship with your computer.
Back to Contents Page Setting Up a Home and Office Network Dell™ XPS™ M1710 Owner's Manual Physically Connecting to a Network or Broadband Modem Network Setup Wizard Wireless Local Area Network (WLAN) Connecting to a Wireless Local Area Network Mobile Broadband or Wireless Wide Area Network Internet Connection Firewall Physically Connecting to a Network or Broadband Modem Before you connect your computer to a network, the computer must have a network adapter installed and a network cable connected to it.
Wireless Local Area Network (WLAN) A WLAN is a series of interconnected computers that communicate with each other over the air waves rather than through a network cable connected to each computer. In a WLAN, a radio communications device called an access point or wireless router connects network computers and provides Internet, or network, access. The access point or wireless router and the wireless network card in the computer communicate by broadcasting data from their antennas over the air waves.
6. Disconnect the network cable from the computer and the modem. NOTE: Wait for a minimum of 5 minutes after disconnecting your broadband modem before you continue with the network setup. 7. Disconnect the AC adapter cable from your wireless router to ensure that there is no power connected to the router. 8. Insert a network cable into the network (RJ-45) connector on the unpowered broadband modem. 9.
To access the Help and Support Center: 1. Click the Start button and click Help and Support. 2. Under Pick a Help topic, click Dell User and System Guides.s 3. Under Device Guides, select the documentation for your wireless network card. Completing the Connection to the WLAN When you turn on your computer and a network (for which your computer is not configured) is detected in the area, a pop-up appears near the network icon in the notification area (in the lower-right corner of the Windows desktop).
Checking Your Dell Mobile Broadband Card Depending on what you selected when you purchased your computer, the computer has a variety of configurations. To determine your computer configuration, see one of the following: l l Your order confirmation Microsoft® Windows® Help and Support Center To check your Mobile Broadband card in the Help and Support Center: 1. Click the Start button and click Help and Support. 2.