
Owners Manual


Dell Integrated Systems for Oracle Database - Oracle Enterprise Manager Integration Guide v1.0
10
Database nodes prerequisites:
a. Create bonding (bond0) by using the public network ports on each of the
database nodes and configure public IP address to ensure that the database
nodes can be reached from the customer’s public network.
NOTE: In the R730-based database nodes, eth4 and eth6 are the public network ports,
and in the R930-based database nodes, eth2 and eth4 are the public network ports.
b. Assign hostnames to each of the database nodes.
c. In the DNS server, add the DNS (A) records for the hostnames of all the
database servers and map it to their respective public IP addresses that was
assigned in step a. This will establish the FQDN for each of the database
servers. For example, database.domain.local, which in turn, will map to
their respective IP addresses.
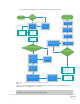
DAAD nodes prerequisites:
All the DAAD nodes are configured with a temporary domain name, public cluster
IP address, and public management IP address. Therefore, ensure to reconfigure
them according to customer’s public network standards and policies. To
reconfigure DAAD nodes:
1. Ensure all DAAD nodes are turned on.
2. From the management server, by using a browser, log in to iDRAC of the first
DAAD node.
NOTE: Refer to DISOD 2.0 Owner’s Guide to determine the pre-configured IP address of
each DAAD node’s iDRAC.
3. After logging in to the iDRAC GUI, click the Launch button to start the Virtual
Console of the DAAD server.
4. From the Virtual Console of the DAAD server, perform the following steps to
reconfigure the DAAD node’s management IP address, domain name, and
cluster IP address:
a. Log in as admin/oracle to the DAAD node.
b. At the CLI, enter maintenance on.
c. Enter setup lan to view the Setup dialog box for LAN configuration.
d. Press the Tab key to highlight Ethernet Network Adapter (the
management IP adapter), and then press ALT + i to edit its IP address.
e. Enter the appropriate customer’s public IP address and Subnet Mask, and
then press ALT + n.
f. Press ALT + s to switch to the Hostname/DNS tab.
g. Press ALT + D to edit the Domain Name and add the appropriate domain
name.
NOTE: Customers need not change the hostname of DAAD, unless it is necessary to
conform to their DNS standards and policies.