
Owner's manual


Table Of Contents
- Product Overview
- Installation
- Basic Software Operation
- Viewing Your System in the Explorer
- Customizing the Window Display
- Adding a Remote Console Switch (Dell or Avocent)
- Accessing Your Remote Console Switch
- Launching the VNC or RDP Viewer
- Changing Server and Switch Properties
- Changing Server and Switch Options
- Organizing Your System
- Customizing the Explorer Window
- Managing Your Local Databases
- Using the Viewer
- Accessing Servers from the RCS Software
- Interacting With the Server Being Viewed
- Viewer Window Features
- Adjusting the Viewer
- Adjusting the Viewer Resolution
- Adjusting the Video Quality
- Minimizing Remote Video Session Discoloration
- Improving Screen Background Color Display
- Setting Mouse Scaling
- Minimizing Mouse Trailing
- Improving Mouse Performance
- Reducing Mouse Cursor Flickering
- Viewing Multiple Servers Using the Scan Mode
- Scanning Your Servers
- Thumbnail View Status Indicators
- Navigating the Thumbnail Viewer
- Using Macros to Send Keystrokes to the Server
- Session Options - General Tab
- Screen Capturing
- Session Sharing Options
- Virtual Media
- Appendix A: Updating RCS Software
- Appendix B: Keyboard and Mouse
- Appendix C: TCP Ports
- Appendix D: Technical Support
- Bookmarks
40xxx | Basic Software Operationxxx
-or-
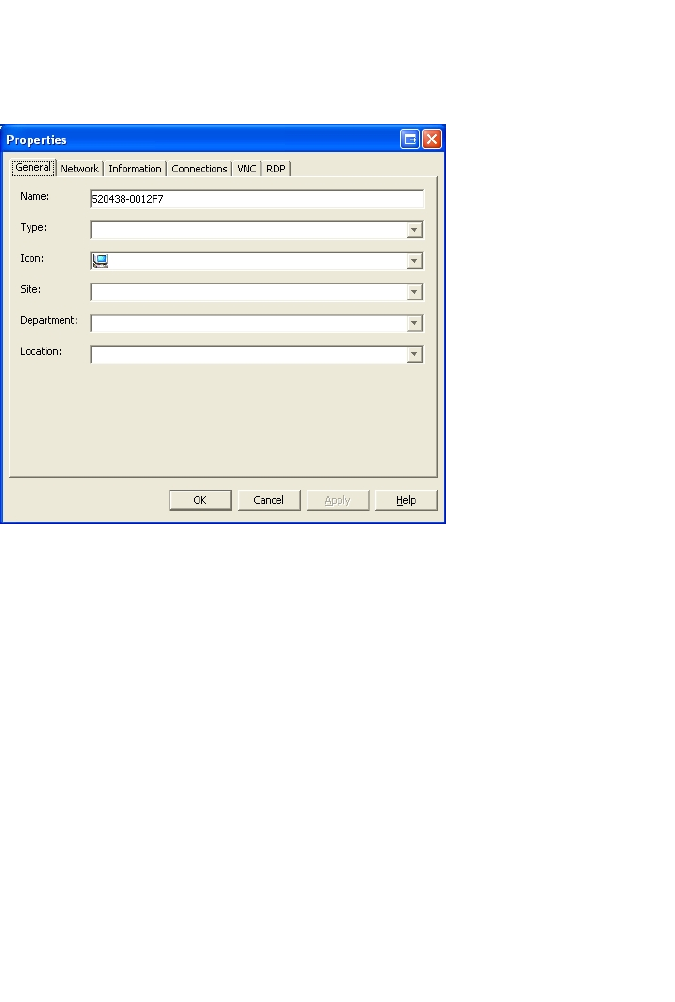
Right-click the unit and select Properties. The Properties dialog box
appears.
Figure 3.8: General Properties Tab for a Server
3 Type the name of the unit. Duplicate names are not allowed.
4 (Servers Only - Optional) Select the server type. If the selection is not in the
drop-down list, type the name of the new server type in the text field. Once
entered, the option becomes available in the drop-down list for future
assignment.
5 Select the icon to display for the unit.
6 (Optional) Assign a unit to a site, department, or location. If an option is
not in the drop-down list, type the name of the new assignment in the text
field. Once entered, the option becomes available in the drop-down list for a
future assignment.
7 Click Apply to save the new settings.
-or-