Dell Latitude 12 Rugged Tablet – 7202 Getting Started Guide Guide de mise en route دﻟﻴﻞ ﺑﺪء اﻟﺘﺸﻐﻴﻞ Regulatory Model: T03H Regulatory Type: T03H001
Notes, cautions, and warnings NOTE: A NOTE indicates important information that helps you make better use of your computer. CAUTION: A CAUTION indicates either potential damage to hardware or loss of data and tells you how to avoid the problem. WARNING: A WARNING indicates a potential for property damage, personal injury, or death. Copyright © 2015 Dell Inc. All rights reserved. This product is protected by U.S. and international copyright and intellectual property laws.
Contents 1 Finding Information and Resources.................................................................. 4 2 Front and Back View.............................................................................................5 3 Quick Setup............................................................................................................7 4 Removing and Installing Components............................................................. 9 Removing the Battery........................................
Finding Information and Resources See the safety and regulatory documents that shipped with your computer and the regulatory compliance website at www.dell.com/regulatory_compliance for more information on: • Safety best practices • Regulatory certification • Ergonomics See www.dell.com for additional information on: • Warranty • Terms and Conditions (U.S. only) • End User License Agreement Additional information on your product is available at www.dell.
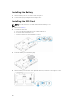
Front and Back View 1. 2. 3. 4. 5. 6. 7. 8. 9. 10. 11. 12. 2 Microphone Camera status light Camera Camera shutter switch Ambient light sensor Stylus Power button Micro serial port USB 3.
13. 14. 15. 16. 17. 18. 19. 20. 21. 22. 23. 24. 25. 26. 27. 28. 29. 30. 31. 32. 33. 34. 35. 36. 37. 38.
Quick Setup 3 WARNING: Before you begin any of the procedures in this section, read the safety information that shipped with your computer. For additional best practices information, see www.dell.com/ regulatory_compliance WARNING: The AC adapter works with electrical outlets worldwide. However, power connectors and power strips vary among countries. Using an incompatible cable or improperly connecting the cable to the power strip or electrical outlet may cause fire or equipment damage.
Removing and Installing Components 4 This section provides detailed information on how to remove or install the components from your computer. Removing the Battery WARNING: Using an incompatible battery may increase the risk of fire or explosion. Replace the battery only with a compatible battery purchased from Dell. The battery is designed to work with your Dell tablet. Do not use a battery from any other tablet with your tablet.
Installing the Battery 1. Slide the battery into its slot until it clicks into place. 2. Lock the battery by sliding the latch away from it. Installing the SIM Card NOTE: The SIM card slot is located underneath the battery 2 slot. 1. Remove the battery. 2. To install the SIM card: a. Press the SIM latch and pull it in an outward direction. b. Insert the SIM card into the slot. c. Push the SIM release latch inwards to lock it. 3. Install the battery into the battery bay. 4.
Dell Rugged Control Center Application 5 The Dell Rugged Control Center (RCC) is an application designed for your Dell Latitude 12 Rugged Tablet, which enables you to perform several important tasks on the tablet. After you install the Dell Rugged Control Center application on your tablet, you can view all the basic features, such as Wi-Fi, Bluetooth, camera, volume, brightness, and so on. In addition, this application also enables you to add a shortcut of any feature onto it.
Feature Description Allows you to enable or disable the WWAN / Mobile broadband service (if configured). Allows you to enable or disable Bluetooth. Allows you to turn on or off the built-in flashlight. Allows you to enable or disable the Automatic Light Sensor. Launches the camera application. Launches the GPS control panel, which allows you to enable or disable the GPS. If you enable the GPS, the control panel will also show your current location, along with the time, date, latitude, and longitude.
Using the Settings Option in Rugged Control Center You can also touch the options. option from the top-right corner of the RCC application to explore more The following table shows the feature description available in the Settings option of the RCC Application: Feature Description Launches the Windows control panel for pen and touch settings. NOTE: This option is compatible only if you have the optional keyboard accessory for your tablet.
Feature Description Launches a control panel to assign actions to the 3 programmable buttons on the front of the tablet. Launches the Windows control panel for battery settings. Launches the Windows control panel. Launches the control panel to adjust settings of the RCC application. Installing the Dell Rugged Control Center NOTE: 1. • Dell Rugged Control Center is compatible only with Windows 8 or higher versions of operating systems.
Enabling or Disabling the Keyboard Backlight NOTE: This feature can be used only if the tablet is connected to an external keyboard accessory (sold separately). 1. Launch the Rugged Control Center application. 2. Press the Settings 3. Press the Backlit Keyboard button 4. Adjust the required parameters for Backlight settings and Backlight colors. button on the top-right corner. to access the Backlit Keyboard control panel. Changing the Keyboard Backlight Colors 1.
6 Stealth Mode Latitude fully rugged products come equipped with a Stealth mode. Stealth mode allows you to turn off the Display, all the LED lights, internal speakers, the fan and all wireless radios with a single key combination. NOTE: This mode is aimed at using the tablet in covert operations. When the stealth mode is activated, the tablet remains functional but will not emit any light or sound.
3. Set any 3 programmable buttons to enable or disable the Stealth Mode. 4. Use the selected programmable buttons to enable or disable the Stealth Mode. Modifying the Stealth Mode Settings You can also modify your desired features to disable in the stealth mode settings. To modify the stealth mode settings: 1. Launch the Rugged Control Center application on your tablet. 2. From the main screen, press the Settings button 3. Select the features that you want to disable in the stealth mode.
Enabling and Disabling Wireless (WiFi) Feature 7 You can enable or disable the wireless (Wi-Fi) feature, using the optional keyboard accessory and using the programmable buttons in RCC application. NOTE: WiFi can also be enabled/disabled by using the user defined programmable buttons on the tablet. Enabling or Disabling Wireless (WI-Fi) Feature Using Optional Keyboard Accessory 1. Press the + keys to enable wireless feature. 2.
5. Use the programmed button to Enable/Disable Wireless networks on the tablet.
Smart Cards 8 There are two main types of Smart or Common Access Cards (CAC): 1. Enclosed Smart Cards — These cards have a contact area with many gold plated connection pads. When inserted into a card reader, the information from the chip can be read and written Insert the card into the smart card slot with the gold contact pad facing upward and pointing toward the smart card slot. Slide the card into the slot until it is fully seated in its connector. 2.
9 Specifications NOTE: Offerings may vary by region. The following specifications are only those required by law to ship with your computer. For more information about the configuration of your computer, go to Help and Support in your Windows operating system and select the option to view information about your computer.
Communications Network adapter WLAN, LTE, HSPA+ Wireless BT, NFC • Bluetooth 4.0 LE NOTE: The optional I/O expansion module, if purchased with the tablet, comes equipped with an additional Network port (Ethernet). Ports and Connectors Audio one 3.5 mm jack Video one mini HDMI connector USB one USB 3.
Display Feature Specification Minimum viewing angles: Horizontal • • +/- 40° for HD +/- 60° for FHD Vertical • • +10°/-30° for HD +/-50° for FHD Pixel pitch 0.2265 mm Front camera Type OV 2724 (2 MP) Resolution 1366 x 768 pixels Rear camera Type IMX 134 (8 MP) Resolution 3264 pixels x 2448 pixels Storage Storage M.2 SSD 128 GB / 256 GB / 512 GB Battery Type 2-cell lithium ion (26 WHr) Dimensions Length 103.60 mm (4.08 inches) Height 15.00 mm (0.59 inch) Width 62.70 mm (2.
AC Adapter Input current (maximum) 0.60 A Input frequency 50 Hz to 60 Hz Output power 45 W Output current (45 W) 2.31 A Rated output voltage 19.5 VDC Temperature range: Operating 0 °C to 40 °C (32 °F to 104 °F) Non-operating –40 °C to 70 °C (–40 °F to 158 °F) Physical Typical Width 312.20 mm (12.29 inches) Height 203.00 mm (7.99 inches) Thickness 24.40 mm (0.96 inch) Maximum Width 318.20 mm (12.53 inches) Height 209.00 mm (8.23 inches) Thickness 28.90 mm (1.
Contacting Dell 10 NOTE: If you do not have an active Internet connection, you can find the contact information on your purchase invoice, packing slip, bill, or Dell product catalog. Dell provides several online and telephone-based support and service options. Availability varies by country and product, and some services may not be available in your area. To contact Dell for sales, technical support, or customer service issues: Go to dell.com/contactdell.
Dell Latitude 12 Rugged – 7202الكمبيوتر اللوحي دليب لدء التﺷﻎي النموذج الرقابيT03H : النوع الرقابيT03H001 :
الملاحظات والتنبيهات والتحذيرات ملاحظة :تشير كلمة "ملاحظة" الى المعلومات المهمة التي تساعدك على تحقيق أقصى استفادة من الكمبيوتر. تنبيه :تشير كلمة "تنبيه" اما الى احتمال حدوث تلف بالأجهزة أو فقدان للبيانات ،كما تعلمك بكيفية تجنب المشكلة. تحذير :تشير كلمة "تحذير" الى احتمال حدوث ضرر بالممتلكات أو التعرض لإصابة جسدية أو الوفاة. حقوق الطبع والنشر © لعام 2015لشركة .Dell Incجميع الحقوق محفوظة .
جدول المحتويات 1البحث عن المزيد من المعلومات والموارد4 ................................................................................................. 2منظر أمامي وخلفي5 .................................................................................................................. 3الإعداد السريع7 ...................................................................................................................... 4ازالة المكونات وتركيبها8 ...................................
1 البحث عن المزيد من المعلومات والموارد انظر مستندات الأمان والوثائق التنظيمية الواردة مع جهاز الكمبيوتر وموقع الويب للتوافق التنظيمي على العنوان www.dell.com/regulatory_complianceللحصول على مزيد من المعلومات حول: • • أفضل ممارسات الأمان الشهادة التنظيمية • الهندسة البشرية انظر www.dell.
2 منظر أمامي وخلفي .1الميكروفون .2مصباح حالة الكاميرا .3الكاميرا .4مفتاح مصراع الكاميرا .5مستشعر الإضاءة المحيطة .6قلم التأشير .7زر التشغيل .8المنفذ التسلسلي Micro .9موصل USB 3.0باستخدام PowerShare .
.11 .12 .13 .14 .15 .16 .17 .18 .19 .20 .21 .22 .23 .24 .25 .26 .27 .28 .29 .30 .31 .32 .33 .34 .35 .36 .37 .
3 الإعداد السريع تحذير :قبل الشروع في أي اجراء من الإجراءات الموضحة في هذا القسم ،يرجى قراءة معلومات الأمان الواردة مع جهاز الكمبيوتر .للحصول على معلومات اضافية حول أفضل الممارسات ،انظر www.dell.com/regulatory_compliance تحذير :يعمل مهايئ التيار المتردد مع منافذ التيار الكهربي في جميع أنحاء العالم .ومع ذلك ،تختلف موصلات التيار وشرائح التيار بين البلدان .
4 ازالة المكونات وتركيبها يوفر هذا القسم معلومات تفصيلية حول كيفية ازالة أو تركيب مكونات من الكمبيوتر. اخراج البطارية تخدما بطارية متوافقة يتم شراؤها من شركة .Dellتم تصميم البطارية للعمل مع أجهزة تحذير :يمكن أن يزيد استخدام بطارية غير متوافقة من خطر التعرض للحريق أو الانفجار .استبدل البطارية فقط مس ً كمبيوتر Dellاللوحية الخاصة بك .لإ تستخدم البطاريات الخاصة بأجهزة الكمبيوتر اللوحية الأخرى مع جهاز الكمبيوتر اللوحي الخاص بك.
تركيب البطارية .1 أدخل البطارية في الفتحة الخاصة بها حتى تصدر تكه دليل على استقرارها في مكانها. .2 قفل البطارية من خلال تحريك السقاطة بعًيدا عنها. SIMتركيب بطاقة ملاحظة :توجد فتحة بطاقة SIMأسفل فتحة البطارية .2 .1 .2 قم بازالة البطارية. لتثبيت بطاقة :SIM .aاضغط على سقاطة بطاقة SIMواسحبها في اتجاه الى الخارج. .bأدخل بطاقة SIMفي الفتحة. .cاضغط على سقاطة تحرير SIMللداخل لقفله. .3 قم بازاحة البطارية داخل علبة البطارية.
5 Dell Rugged Control Centerتطبيق Dell Rugged Control Centerهو عبارة عن تطبيق مصمم خصًيصا من أجل الكمبيوتر اللوحي ، Dell Latitude 12 Ruggedوهو يمكنك من اجراء عدة مهام هامة على الكمبيوتر اللوحي .وبعد تثبيت تطبيق Dell Rugged Control Centerعلى الكمبيوتر اللوحي الخاصة بك ،يمكنك عرض كافة الميزات الأساسية ،مثل أجهزة ،Wi-Fi ، Bluetooth الكاميرا ،مستوى الصوت ،السطوع ،وهكذا. بالإضافة الى ذلك ،هذا التطبيق يمكّنك من اضافة اختصار لأي ميزة عليه .
الوصف الميزة يتيح لك تمكين Bluetoothأو تعطيله. تتيح لك تشغيل أو ايقاف تشغيل ضوء الوميض المضمن. يتيح لك تمكين أو تعطيل مستشعر الإضاءة الأوتوماتيكي. يبدأ تشغيل تطبيق الكاميرا. يبدأ تشغيل لوحة تحكم ،GPSالتي تسمح لك بتمكين أو تعطيل نظام تحديد الموقع العالمي (). GPSفي حالة قيامك بتمكين ،GPSستعرض لوحة التحكم أًيضا موقعك الحالي ،بالإضافة الى الوقت والتاريخ ،وخط العرض وخط الطول.
يوضح الجدول التالي وصف الميزة المتوفر في خيار الإعدادات لتطبيق :RCC الميزة الوصف يبدأ تشغيل لوحة تحكم Windowsلإعدادات القلم واللمس. ملاحظة :يتوافق هذا الخيار فقط اذا كان لديك ملحق لوحة المفاتيح الاختيارية للكمبيوتر اللوحي لديك. يفتح لوحة التحكم لضبط اعدادات ملحق لوحة المفاتيح ذات الإضاءة الخلفية الاختيارية( اذا تم تكوينه مع ملحق لوحة المفاتيح الاختيارية ).لوحة التحكم تتيح أًيضا امكانية تعيين ألوان الإضاءة الخلفية وضبط اعدادات السطوع والمهلة.
الوصف الميزة يبدأ تشغيل لوحة التحكم في .Windows يبدأ تشغيل لوحة التحكم لضبط اعدادات تطبيق .RCC Dell Rugged Control Centerتثبيت ملاحظة: .1 • يتوافق فقط Dell Rugged Control Centerمع Windows 8أو اصدارات أعلى من أنظمة التشغيل. • قبل تثبيت هذا التطبيق ،تأكد من وجود الإصدار الأحدث من ملف الإعداد من صفحة Dell.com/supportالخاصة بالكمبيوتر اللوحي Dell Latitude 12 .
.4 قم بضبط المعلمات المطلوبة لإعدادات الإضاءة الخلفية وألوان الإضاءة الخلفية. تغيير ألوان الإضاءة الخلفية للوحة المفاتيح .1 اضغط على المفتاحين <> FN> + < Cللتنقل بين ألوان الإضاءة الخلفية المتاحة. ملاحظة :اضغط على المفتاحين <> FN> + < Cللتنقل بين ألوان الإضاءة الخلفية المتاحة. .2 14 اضغط على المفتاحين < >Fn> +
6 Stealthوضع تأتي منتجات Latitude fully ruggedمزودة بالوضع .Stealthيسمح لك وضع Stealthبايقاف تشغيل الشاشة وجميع مصابيح LEDومكبرات الصوت الداخلية والمروحة وكل أجهزة الراديو اللاسلكية بمزيج مفتاح فردي. ملاحظة :يهدف هذا الوضع الى استخدام الكمبيوتر اللوحي في عمليات خفية .عندما يتم تنشيط وضع ،Stealthيظل الكمبيوتر اللوحي قيد التشغيل ،ولكنه لن يصدر أي اضاءة أو صوت. يمكن تنشيط وضع ،Stealthباستخدام تطبيق Rugged Control Centerوباستخدام ملحق لوحة المفاتيح الاختيارية.
تعديل اعدادات وضع التسلل يمكنك أًيضا تعديل الخصائص المرغوبة لتعطيلها في اعدادات وضع التسلل .لتعديل اعدادات وضع التسلل: .1 لبدء تشغيل تطبيق Rugged Control Centerعلى الكمبيوتر اللوحي. .2 من الشاشة الرئيسية ،اضغط على زر الإعدادات .3 حدد الميزات التي تريد تعطيلها في وضع التسلل .على سبيل المثال :مستوى الصوت ،الإتصال اللاسلكي ،الشاشة ،وهكذا. 16 >وضع التسلل.
7 ) (WiFiتمكين وتعطيل ميزة الشبكة اللاسلكية يمكنك تمكين أو تعطيل ميزة شبكة ( ) Wi-Fiاللاسلكية ،باستخدام ملحق لوحة المفاتيح الاختيارية وباستخدام الأزرار المبرمجة في تطبيق .RCC ملاحظة :يمكن أ ً يضا تمكين/تعطيل شبكة WiFiاللاسلكية باستخدام الأزرار المبرمجة المحدة من قبل المستخدم على الكمبيوتر اللوحي. باستخدام ملحق لوحة المفاتيح الاختيارية ) (Wi-Fiتمكين أو تعطيل الإتصال اللاسلكي .1 اضغط على المفتاحين < >Fn> +
.5 18 استخدم الزر المبرمج لتمكين/تعطيل الشبكات اللاسلكية في الكمبيوتر اللوحي.
8 البطاقات الذكية يوجد نوعان أساسيان للبطقات الذكية أو بطاقات الوصول العامة( ):CAC .1 البطاقات الذكية المرفقة -تتضمن هذه البطاقات مساحة تلامس مع بطانات اتصال ذهبية اللون .عند ادخالها في قارئ بطاقة ،يمكن قراءة المعلومات من الرقاقة وكتابتها. تماما. أدخل البطاقة في فتحة البطاقة الذكية بحيث تكون بطانة التلامس الذهبية متجهة لأعلى وتشير باتجاه فتحة البطاقة الذكية .قم بازاحة البطاقة الى الفتحة حتى تستقر في الموصل الخاص بها ً .
9 المواصفات ملاحظة :قد تختلف العروض حسب المنطقة .المواصفات التالية هي فقط المطلوبة بمقتضى القانون لنقلها مع الكمبيوتر .لمزيد من المعلومات المتعلقة بتهيئة الكمبيوتر ،اذهب الى Help and ( Supportالتعليمات والدعم) في نظام تشغيل Windowsلديك ،ثم حدد الخيار لعرض المعلومات المتعلقة بالكمبيوتر.
الإتصالإت مهايئ الشبكة +WLAN, LTE, HSPA الإتصال اللاسلكي BT, NFC • Bluetooth 4.0 LE ملاحظة :وحدة توسيع الإدخال/الإخراج الاختيارية اذا تم شراؤها مع الكمبيوتر اللوحي ،تأتي مزودة بمنفذ شبكة اضافية( ).Ethernet المنافذ والموصلات Audio مقبس واحد 3.5ملم الفيديو موصل HDMIمصغر واحد USB موصل واحد USB 3.
الشاشة المواصفات الميزة رأسية المسافة بين وحدات البكسل • 60 -/+درجة للدقة الفائقة الكاملة • • 10+درجات 30-/درجة للدقة الفائقة 50 -/+درجة للدقة الفائقة الكاملة 0.2265مم الكاميرا الأمامية النوع ov 2724 (2ميجا بكسل) الدقة 768 × 1366بكسل الكاميرا الخلفية النوع imx 134 (8ميجابكسل) الدقة 2448 × 3264بكسل التخزين التخزين M.
مهايئ التيار المتردد تردد الإدخال من 50هرتز الى 60هرتز طاقة الإخراج 45وات تيار الإخراج( 45وات) 2.31أمبير جهد الإخراج المقدر 19.5فولت تيار مستمر نطاق درجة الحرارة: عند التشغيل من 0الى 40مئوية( من 32الى 104فهرنهايت) في حالة عدم التشغيل من – 40الى 70مئوية( من – 40الى 158فهرنهايت) الجوانب المادية النموذجي العرض 312.20مم( 12.29بوصة) الارتفاع 203.00مم( 7.99بوصة) السمك 24.40مم( 0.
10 Dellالإتصال بشركة ملاحظة :اذا لم يكن لديك اتصال نشط بالإنترنت ،فيمكنك العثور على معلومات الإتصال على فاتورة الشراء الخاصة بك أو ايصال الشحن أو الفاتورة أو كتيب منتج .Dell توفر Dellالعديد من خيارات الدعم والخدمة القائمة على الهاتف والإنترنت .يختلف التوفر حسب البلد والمنتج ،وقد لإ تتوفر بعض الخدمات في منطقتك .للاتصال بشركة Dellللاستفسار عن مسائل تتعلق بالمبيعات أو الدعم الفني أو خدمة العملاء: اذهب الى .dell.
Tablette durcie Dell Latitude 12 – 7202 Guide de mise en route Modèle réglementaire: T03H Type réglementaire: T03H001
Remarques, précautions et avertissements REMARQUE : Une REMARQUE indique des informations importantes qui peuvent vous aider à mieux utiliser votre ordinateur. PRÉCAUTION : Une PRÉCAUTION indique un risque d'endommagement du matériel ou de perte de données et vous indique comment éviter le problème. AVERTISSEMENT : Un AVERTISSEMENT indique un risque d'endommagement du matériel, de blessures corporelles ou même de mort. Copyright © 2015 Dell Inc. Tous droits réservés.
Table des matières 1 Où trouver des informations et des ressources supplémentaires............... 4 2 Vues avant et arrière.............................................................................................5 3 Installation et configuration rapides................................................................. 7 4 Retrait et installation des composants............................................................. 9 Retrait de la batterie.............................................................
Où trouver des informations et des ressources supplémentaires 1 Consultez les documents réglementaires et de sécurité livrés avec votre ordinateur et la page Regulatory Compliance (Conformité à la réglementation) à l'adresse www.dell.com/regulatory_compliance pour plus d'informations sur : • Les meilleures pratiques en matière de sécurité • La certification réglementaire • L'ergonomie Consultez le site www.dell.
Vues avant et arrière 1. 2. 3. 4. 5. 6. 7. 8. 9. 10. 11. 12. 2 Microphone Voyant d'état de la caméra Caméra Obturateur de l'appareil photo Capteur de lumière ambiante Stylet Bouton d'alimentation Port série micro Connecteur USB 3.
13. 14. 15. 16. 17. 18. 19. 20. 21. 22. 23. 24. 25. 26. 27. 28. 29. 30. 31. 32. 33. 34. 35. 36. 37. 38.
Installation et configuration rapides 3 AVERTISSEMENT : vant de commencer à appliquer toute procédure expliquée dans cette section, prenez connaissance des consignes de sécurité fournies avec votre ordinateur. Pour plus d’informations sur les meilleures pratiques, consultez le site www.dell.com/ regulatory_compliance AVERTISSEMENT : L’adaptateur secteur fonctionne avec les prises électriques du monde entier. Mais les connecteurs et les barrettes d’alimentation varient d’un pays à l’autre.
REMARQUE : Il est recommandé d’allumer et d’éteindre l’ordinateur au moins une fois avant d’installer des cartes ou de connecter l’ordinateur à une station d’accueil ou un autre périphérique externe tel qu’une imprimante.
Retrait et installation des composants 4 Cette section fournit des informations détaillées sur le retrait ou l'installation des composants de l'ordinateur. Retrait de la batterie AVERTISSEMENT : L’utilisation d’une batterie non compatible peut accroître le risque d’incendie ou d’explosion. Remplacez la batterie uniquement par une batterie compatible achetée auprès de Dell. La batterie est conçue pour fonctionner avec votre tablette Dell.
Installation de la batterie 1. Faites glisser la batterie dans son emplacement jusqu’à ce que vous l’entendiez s’enclencher. 2. Verrouillez la batterie en faisant glisser le loquet tout en l'éloignant de celle-ci. Installation de la carte SIM REMARQUE : Le logement de la carte SIM est situé en-dessous du compartiment de la batterie 2. 1. Retirez la batterie. 2. Pour installer la carte SIM : a. Appuyez sur le loquet de la carte SIM puis tirez-le en exerçant un mouvement vers l'extérieur. b.
Application Rugged Control Center de Dell. 5 Le Rugged Control Center (RCC) de Dell est une application conçue pour votre tablette durcie Latitude 12 de Dell, qui vous permet d'effectuer plusieurs tâches importantes sur la tablette. Après avoir installé l'application Rugged Control Center de Dell sur votre tablette, vous pouvez visualiser toutes les fonctionnalités de base, telles que le Wi-Fi, le Bluetooth, l’appareil photo, le volume, la luminosité et ainsi de suite.
Fonction Description REMARQUE : Pour vous connecter au WLAN, assurez-vous que votre réseau soit configuré. Vous permet d’activer ou de désactiver le mode WWAN / service mobile à large bande (si configuré). Vous permet d'activer ou de désactiver le Bluetooth. Vous permet d'allumer ou d'éteindre la lampe de poche intégrée. Vous permet d'activer ou de désactiver l'émulation WWAN. Lance l'application de l’appareil photo. Lance le panneau de commande GPS, qui vous permet d'activer ou de désactiver le GPS.
Utiliser l'option Paramètres dans l'application Rugged Control Center Vous pouvez également toucher d’explorer davantage d'options. option depuis le coin supérieur droit de l'application RCC afin Le tableau suivant montre la description de la fonctionnalité disponible dans l'option Paramètres de l'application RCC : Fonction Description Lance le panneau de configuration Windows pour les paramètres d’utilisation avec stylet et tactile.
Fonction Description Lance un panneau de configuration afin d’attribuer des actions aux 3 touches programmables situées sur le devant de la tablette. Lance le panneau de configuration Windows pour les paramètres de la batterie. Lance le panneau de configuration de Windows. Lance le panneau de configuration afin d'ajuster les paramètres de l'application RCC. Installation du Rugged Control Center de Dell REMARQUE : 1.
Activation ou désactivation du rétroéclairage clavier REMARQUE : Cette fonctionnalité peut être utilisée uniquement si la tablette est connectée à un accessoire clavier externe (vendu séparément). 1. Lancez l'application Rugged Control Center. 2. Appuyez sur Réglages 3. Appuyez sur le bouton Clavier rétroéclairé rétroéclairé. 4. Ajustez les paramètres requis pour les réglages et les couleurs du rétroéclairage. bouton dans le coin supérieur droit.
2.
Mode Stealth 6 Les produits tout terrain Latitude sont équipés d’un mode Stealth. Le mode Stealth vous permet d’éteindre l’écran, tous les voyants LED, les haut-parleurs internes, le ventilateur et les communications sans fil avec une seule combinaison de touches. REMARQUE : Ce mode est destiné à utiliser la tablette dans des opérations de couverture. Lorsque le mode furtif est activé, l’ordinateur continue de fonctionner, mais n’émet pas de lumière ou d'audio.
Mettre en marche et arrêter le mode furtif en utilisant le RCC 1. Lancez l'application Rugged Control Center sur votre tablette. 2. À partir de l'écran principal, appuyez sur le bouton Réglages 3. Définissez 3 touches programmables afin d'activer ou de désactiver le mode furtif. 4. Utilisez les touches programmables sélectionnées afin d’activer ou de désactiver le mode furtif. > Touches programmables.
7 Activation et désactivation de la fonction sans fil (WiFi) Vous pouvez activer ou désactiver la fonction de sans fil (Wi-Fi) en utilisant l'accessoire clavier en option et les touches programmables dans l'application RCC. REMARQUE : La WiFi peut également être activée/désactivée en utilisant les touches programmables définies par l'utilisateur sur la tablette. Activer ou désactiver la fonctionnalité sans fil (WI-Fi) avec l'accessoire clavier en option 1.
5. 20 Utilisez la touche programmée pour activer/désactiver les réseaux sans fil sur la tablette.
Cartes à puce 8 Il existe deux types principaux de cartes à puce ou de cartes d'accès commune (CAC) : 1. Cartes à puce jointes : ces cartes ont une zone de contact avec de nombreux points de connexion en or plaqué. Lorsqu’elles sont insérées dans un lecteur de carte, les informations peuvent aisément être lues et écrites Insérez la carte dans le logement de carte à puce avec le point de contact métallique face vers le haut pointant vers le logement de carte à puce.
Caractéristiques 9 REMARQUE : Les offres proposées peuvent varier selon les pays. Les caractéristiques qui suivent se limitent à celles que la législation impose de fournir avec l'ordinateur. Pour plus d'informations concernant la configuration de votre ordinateur, cliquez sur Aide et support dans votre système d'exploitation Windows, puis sélectionnez l'option qui permet d'afficher les informations relatives à votre ordinateur.
Communications Carte réseau WLAN, LTE, HSPA+ Sans fil Bluetooth, NFC • Bluetooth 4.0 LE REMARQUE : Le module d'extension I/O en option, si acheté avec la tablette, est livré avec un port réseau supplémentaire (Ethernet). Ports et connecteurs Audio Une prise jack de 3,5 mm Vidéo un connecteur mini HDMI USB Un connecteur USB 3.
Écran Fonction Spécification Fréquence de rafraîchissement 60 Hz Angles minimums de visualisation : Horizontal • • +/- 40° pour la HD +/- 60° pour la FHD Vertical • • +10°/-30° pour la HD +/- 50° pour la FHD Pas de pixel 0,2265 mm Caméra avant Type OV 2724 (2 MP) Résolution 1366 x 768 pixels Caméra arrière Type IMX 134 (8 MP) Résolution 3264 × 2448 pixels Stockage Stockage M.
Adaptateur secteur Type Tension d’entrée de 100 VCA à 240 VCA Courant d’entrée (maximal) 0,60 A Fréquence en entrée 50 Hz à 60 Hz Puissance de sortie 45 W Courant de sortie (45 W) 2,31 A Tension de sortie nominale 19,5 VCC Plage de températures : En fonctionnement de 0 °C à 40 °C (de 32 °F à 104 °F) Hors fonctionnement de –40° C à 70° C (de –40° F à 158° F) Caractéristiques physiques Par défaut Largeur 312,20 mm (12,29 pouces) Hauteur 203,00 mm (7,99 pouces) Profondeur 24,40 mm (0,96 po
26
Contacter Dell 10 REMARQUE : Si vous ne disposez pas d'une connexion Internet, les informations de contact figurent sur la facture d'achat, le borderau de colisage, la facture le catalogue des produits Dell. Dell propose diverses options d'assistance et de maintenance en ligne et téléphonique. Ces options varient en fonction du pays et du produit et certains services peuvent ne pas être disponibles dans votre région Pour contacter le service commercial, technique ou client de Dell : Rendez-vous sur dell.