Dell™ Latitude™ D520 User's Guide About Your Computer Finding Information Using a Battery Using the Display Using the Keyboard and Touch Pad Using Multimedia Using Cards Setting Up a Network Securing Your Computer Troubleshooting System Setup Program Reinstalling Software Adding and Replacing Parts Dell™ QuickSet Traveling With Your Computer Getting Help Specifications Appendix Glossary Click the links to the left for information on the features and operation of your computer.
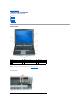
Back to Contents Page About Your Computer Dell™ Latitude™ D520 User's Guide Front View Left View Right View Back View Bottom View Front View 1 display 2 device status lights 3 keyboard 4 touch pad 5 display latch 6 speakers 7 touch pad buttons 8 keyboard status lights 9 power button display — For more information about your display, see Using the Display.
Turns on when you turn on the computer and blinks when the computer is in Standby mode. Turns on when the computer reads or writes data. NOTICE: To avoid loss of data, never turn off the computer while the flashing. light is Turns on steadily or blinks to indicate battery charge status. If the computer is connected to an electrical outlet, the ¡ ¡ If the computer is running on a battery, the ¡ ¡ ¡ light operates as follows: Solid green: The battery is charging.
icon turns on only if Bluetooth wireless technology is installed on your computer. For more information, see the documentation that came with your Bluetooth wireless technology. Turns on when the scroll lock function is enabled. power button — Press the power button to turn on the computer or exit a power management mode (see Power Management Modes). NOTICE: To avoid losing data, turn off your computer by performing a Microsoft® Windows® operating system shutdown rather than by pressing the power button.
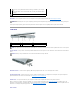
Attach headphones or speakers to the Attach a microphone to the connector. connector. hard drive — Stores software and data. Right View 1 media bay 2 device latch release 3 USB connectors (2) media bay — You can install devices such as an optical drive, second battery, or a Dell TravelLite™ module in the media bay. For more information, see Media Bay. device latch release — Releases the media bay device. See Media Bay for instructions.
USB connectors Connect USB devices, such as a mouse, keyboard, or printer. You can also connect the optional floppy drive directly to a USB connector using the optional floppy drive cable. modem connector (RJ-11) If you ordered the optional internal modem, connect the telephone line to the modem connector. For information on using the modem, see the online modem documentation supplied with your computer. See Finding Information for information about accessing online user's guides.
CAUTION: The AC adapter works with electrical outlets worldwide. However, power connectors and power strips vary among countries. Using an incompatible cable or improperly connecting the cable to the power strip or electrical outlet may cause fire or equipment damage. NOTICE: When you disconnect the AC adapter cable from the computer, grasp the connector, not the cable itself, and pull firmly but gently to avoid damaging the cable.
CAUTION: Do not block, push objects into, or allow dust to accumulate in the air vents. Do not store your computer in a low-airflow environment, such as a closed briefcase, while it is running. Restricting the airflow can damage the computer or cause a fire. hard drive — Stores software and data.
Back to Contents Page Appendix Dell™ Latitude™ D520 User's Guide Cleaning Your Computer Macrovision Product Notice FCC Notice (U.S. Only) Cleaning Your Computer CAUTION: Before you begin any of the procedures in this section, follow the safety instructions in the Product Information Guide. Computer, Keyboard, and Display CAUTION: Before you clean your computer, disconnect the computer from the electrical outlet and remove any installed batteries. Clean your computer with a soft cloth dampened with water.
Macrovision Product Notice This product incorporates copyright protection technology that is protected by U.S. patents and other intellectual property rights. Use of this copyright protection technology must be authorized by Macrovision, and is intended for home and other limited viewing uses only unless otherwise authorized by Macrovision. Reverse engineering or disassembly is prohibited. FCC Notice (U.S.
Back to Contents Page Using a Battery Dell™ Latitude™ D520 User's Guide Battery Performance Checking the Battery Charge Conserving Battery Power Power Management Modes Configuring Power Management Settings Charging the Battery Replacing the Battery Storing a Battery Battery Performance NOTE: For information about the Dell warranty for your computer, see the Product Information Guide or separate paper warranty document that shipped with your computer.
Microsoft® Windows® Power Meter The Windows Power Meter indicates the remaining battery charge. To check the Power Meter, double-click the If the computer is connected to an electrical outlet, a icon on the taskbar. icon appears.
NOTICE: If your computer loses AC and battery power while in standby mode, it may lose data. To enter standby mode: l Click Start® Shut Down® Stand by. or l Depending on how you set the power management options in the Power Options Properties window or the QuickSet Power Management Wizard, use one of the following methods: ¡ Press the power button. ¡ Close the display. ¡ Press .
For more information about resolving problems with a battery, see Power Problems. Replacing the Battery CAUTION: Before performing these procedures, turn off the computer, disconnect the AC adapter from the electrical outlet and the computer, disconnect the modem from the wall connector and computer, and remove any other external cables from the computer. CAUTION: Using an incompatible battery may increase the risk of fire or explosion.
Back to Contents Page Using Cards Dell™ Latitude™ D520 User's Guide Card Types Card Blanks Extended Cards Installing a PC Card or ExpressCard Removing a Card or Blank Card Types See Specifications for information on supported card types. NOTE: A PC Card is not a bootable device. The PC Card/ExpressCard slot has one connector that supports a single Type I or Type II card, as well as an adapter for a 34-mm ExpressCard. The PC Card/ExpressCard slot supports CardBus technology and extended PC Cards.
1. Hold the card with its orientation symbol pointing into the slot and the top side of the card facing up. The latch may need to be in the "in" position before you insert the card. 2. Slide the card into the slot until the card is completely seated in its connector. If you encounter too much resistance, do not force the card. Check the card orientation and try again. The computer recognizes most cards and automatically loads the appropriate device driver.
Back to Contents Page Using the Display Dell™ Latitude™ D520 User's Guide Adjusting Brightness Switching the Video Image Setting Display Resolution and Refresh Rate Dual Independent Display Mode Swapping Primary and Secondary Displays Adjusting Brightness When a Dell™ computer is running on battery power, you can conserve power by setting the brightness to the lowest comfortable setting by pressing and the up- or down-arrow key on the keyboard.
1. Connect the external monitor, TV, or projector to the computer. 2. Click Start® Control Panel® Display® Settings. NOTE: If you choose a resolution or color palette that is higher than the display supports, the settings adjust automatically to the closest supported values. For more information, see your operating system documentation. 3. Click the monitor 2 icon® Extend my Windows desktop onto this monitor® Apply. 4.
Back to Contents Page Finding Information Dell™ Latitude™ D520 User's Guide NOTE: Some features or media may be optional and may not ship with your computer. Some features or media may not be available in certain countries. NOTE: Additional information may ship with your computer.
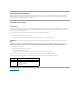
l l l l How to remove and replace parts Specifications How to configure system settings How to troubleshoot and solve problems User's Guide Microsoft Windows XP Help and Support Center 1. 2. l l Service Tag and Express Service Code Microsoft Windows License Label Click Start® Help and Support® Dell User and System Guides® System Guides. Click the User's Guide for your computer in the list of online documentation. Service Tag and Microsoft® Windows® License These labels are located on your computer.
l l l How to use Windows XP How to work with programs and files How to personalize my desktop Windows Help and Support Center 1. 2. 3. 4. Click the Start button and click Help and Support. Type a word or phrase that describes your problem and click the arrow icon. Click the topic that describes your problem. Follow the instructions on the screen. Dell QuickSet Help To view Dell QuickSet Help, right-click the taskbar.
Back to Contents Page Glossary Dell™ Latitude™ D520 User's Guide Terms in this Glossary are provided for informational purposes only and may or may not describe features included with your particular computer. A AC — alternating current — The form of electricity that powers your computer when you plug the AC adapter power cable in to an electrical outlet.
carnet — An international customs document that facilitates temporary imports into foreign countries. Also known as a merchandise passport. CD — compact disc — An optical form of storage media, typically used for audio and software programs. CD drive — A drive that uses optical technology to read data from CDs. CD player — The software used to play music CDs. The CD player displays a window with buttons that you use to play a CD. CD-R — CD recordable — A recordable version of a CD.
E ECC — error checking and correction — A type of memory that includes special circuitry for testing the accuracy of data as it passes in and out of memory. ECP — extended capabilities port — A parallel connector design that provides improved bidirectional data transmission. Similar to EPP, ECP uses direct memory access to transfer data and often improves performance. EIDE — enhanced integrated device electronics — An improved version of the IDE interface for hard drives and CD drives.
help file — A file that contains descriptive or instructional information about a product. Some help files are associated with a particular program, such as Help in Microsoft Word. Other help files function as stand-alone reference sources. Help files typically have a filename extension of .hlp or .chm. hibernate mode — A power management mode that saves everything in memory to a reserved space on the hard drive and then turns off the computer.
memory — A temporary data storage area inside your computer. Because the data in memory is not permanent, it is recommended that you frequently save your files while you are working on them, and always save your files before you shut down the computer. Your computer can contain several different forms of memory, such as RAM, ROM, and video memory. Frequently, the word memory is used as a synonym for RAM. memory address — A specific location where data is temporarily stored in RAM.
memory, hard drives, and video. If no problems are detected during POST, the computer continues the start-up. processor — A computer chip that interprets and executes program instructions. Sometimes the processor is referred to as the CPU (central processing unit). program — Any software that processes data for you, including spreadsheet, word processor, database, and game packages. Programs require an operating system to run.
Surge protectors do not protect against lightning strikes or against brownouts, which occur when the voltage drops more than 20 percent below the normal AC-line voltage level. Network connections cannot be protected by surge protectors. Always disconnect the network cable from the network connector during electrical storms. SIM — Subscriber Identity Module. A SIM card contains a microchip that encrypts voice and data transmissions. SIM cards can be used in phones or portable computers.
W W — watt — The measurement of electrical power. One W is 1 ampere of current flowing at 1 volt. WHr — watt-hour — A unit of measure commonly used to indicate the approximate capacity of a battery. For example, a 66-WHr battery can supply 66 W of power for 1 hour or 33 W for 2 hours. wallpaper — The background pattern or picture on the Windows desktop. Change your wallpaper through the Windows Control Panel. You can also scan in your favorite picture and make it wallpaper.
Back to Contents Page Getting Help Dell™ Latitude™ D520 User's Guide Obtaining Assistance Problems With Your Order Product Information Returning Items for Warranty Repair or Credit Before You Call Contacting Dell Obtaining Assistance CAUTION: If you need to remove the computer covers, first disconnect the computer power and modem cables from all electrical outlets. 1. Complete the procedures in Troubleshooting. 2. Run the Dell Diagnostics (see Dell Diagnostics). 3.
support.jp.dell.com (Japan only) support.euro.dell.com (Europe only) l Electronic Quote Service apmarketing@dell.com (Asian/Pacific countries only) sales_canada@dell.com (Canada only) AutoTech Service Dell's automated support service—AutoTech—provides recorded answers to the questions most frequently asked by Dell customers about their portable and desktop computers. When you call AutoTech, use your touch-tone telephone to select the subjects that correspond to your questions.
Before You Call NOTE: Have your Express Service Code ready when you call. The code helps Dell's automated-support telephone system direct your call more efficiently. Remember to fill out the Diagnostics Checklist. If possible, turn on your computer before you call Dell for assistance and call from a telephone at or near the computer. You may be asked to type some commands at the keyboard, relay detailed information during operations, or try other troubleshooting steps possible only at the computer itself.
Website: www.dell.com.ar E-mail: la-techsupport@dell.com Argentina (Buenos Aires) International Access Code: 00 Country Code: 54 City Code: 11 E-mail for desktop and portable computers: la-techsupport@dell.com E-mail for servers and EMC® storage products: la_enterprise@dell.com Customer Care toll-free: 0-800-444-0730 Technical Support toll-free: 0-800-444-0733 Technical Support Services toll-free: 0-800-444-0724 Sales 0-810-444-3355 Website: www.dell.com.aw Aruba E-mail: la-techsupport@dell.
Website: support.ca.dell.com Canada (North York, Ontario) International Access Code: 011 AutoTech (automated Hardware and Warranty Support) toll-free: 1-800-247-9362 Customer Service (Home/Home Office) toll-free: 1-800-847-4096 Customer Service (small/med.
Denmark (Copenhagen) International Access Code: 00 Country Code: 45 Technical Support for all other Dell computers 7023 0182 Customer Care (Relational) 7023 0184 Home/Small Business Customer Care 3287 5505 Switchboard (Relational) 3287 1200 Switchboard Fax (Relational) 3287 1201 Switchboard (Home/Small Business) 3287 5000 Switchboard Fax (Home/Small Business) 3287 5001 Website: www.dell.com/dm Dominica E-mail: la-techsupport@dell.com General Support toll-free: 1-866-278-6821 Website: www.
Country Code: 30 Gold Service Switchboard 2108129811 Sales 2108129800 Fax 2108129812 E-mail: la-techsupport@dell.com Grenada General Support toll-free: 1-866-540-3355 E-mail: la-techsupport@dell.com Guatemala General Support 1-800-999-0136 E-mail: la-techsupport@dell.com Guyana General Support toll-free: 1-877-270-4609 Website: support.ap.dell.com Technical Support E-mail: support.dell.com.
Fax Switchboard 02 575 035 30 02 577 821 E-mail: la-techsupport@dell.com Jamaica General Support (dial from within Jamaica only) 1-800-440-9205 Website: support.jp.dell.
001-877-384-8979 Customer Technical Support or 001-877-269-3383 Mexico International Access Code: 00 50-81-8800 Sales or 01-800-888-3355 001-877-384-8979 Country Code: 52 Customer Service or 001-877-269-3383 50-81-8800 Main or 01-800-888-3355 E-mail: la-techsupport@dell.com Montserrat General Support toll-free: 1-866-278-6822 E-mail: la-techsupport@dell.com Netherlands Antilles General Support 001-800-882-1519 Website: support.euro.dell.
Website: www.dell.com/kn St. Kitts and Nevis E-mail: la-techsupport@dell.com General Support toll-free: 1-866-540-3355 Website: www.dell.com/lc St. Lucia E-mail: la-techsupport@dell.com General Support toll-free: 1-866-464-4352 Website: www.dell.com/vc St. Vincent and the Grenadines E-mail: la-techsupport@dell.com General Support toll-free: 1-866-464-4353 NOTE: The phone numbers in this section should be called from within Singapore or Malaysia only. Singapore (Singapore) Website: support.ap.dell.
Switzerland (Geneva) Technical Support for XPS 0848 33 88 57 International Access Code: 00 Technical Support (Home and Small Business) for all other Dell products 0844 811 411 Technical Support (Corporate) 0844 822 844 Country Code: 41 Customer Care (Home and Small Business) 0848 802 202 City Code: 22 Customer Care (Corporate) 0848 821 721 Fax 022 799 01 90 Switchboard 022 799 01 01 Website: support.ap.dell.com E-mail: support.dell.com.
Employee Purchase Program (EPP) Customers toll-free: 1-800-695-8133 Financial Services website: www.dellfinancialservices.com U.S.A.
Back to Contents Page Using the Keyboard and Touch Pad Dell™ Latitude™ D520 User's Guide Numeric Keypad Key Combinations Touch Pad Numeric Keypad The numeric keypad functions like the numeric keypad on an external keyboard. Each key on the keypad has multiple functions. The keypad numbers and symbols are marked in blue on the right of the keypad keys. To type a number or symbol, hold down and press the desired key. l To enable the keypad, press .
Speaker Functions Increases speaker volume. Decreases speaker volume. Mutes speaker volume. Radios (Including Wireless Networking and Bluetooth® Wireless Technology) Enables and disables radios, including wireless networking and Bluetooth wireless technology. Power Management Activates a power management mode.
l l To select and move (or drag) an object, position the cursor on the object and tap twice on the touch pad. On the second tap, leave your finger on the touch pad and move the selected object by sliding your finger over the surface. To double-click an object, position the cursor on the object and tap twice on the touch pad or use your thumb to press the left touch-pad button twice. Customizing the Touch Pad You can use the Mouse Properties window to disable the touch pad or adjust its settings. 1.
Back to Contents Page Using Multimedia Dell™ Latitude™ D520 User's Guide Playing a CD or DVD Adjusting the Volume Adjusting the Picture Copying CDs and DVDs Connecting Your Computer to a TV or Audio Device Playing a CD or DVD NOTICE: Do not press down on the CD or DVD tray when you open or close it. Keep the tray closed when you are not using the drive. NOTICE: Do not move the computer when you are playing CDs or DVDs. 1. Press the eject button on the front of the drive. 2. Pull out the tray. 1 3.
When the Volume Meter is enabled, adjust the volume with the volume control buttons or by pressing the following key combinations: l Press to increase the volume. l Press to decrease the volume. l Press to mute the volume. For more information about QuickSet, right-click the icon in the taskbar and click Help.
CD-RW drives can write to CD recording media only (including high-speed CD-RW) while DVD-writable drives can write to both CD and DVD recording media. Use blank CD-Rs to record music or permanently store data files. After creating a CD-R, you cannot write to that CD-R again (see the Sonic documentation for more information). Use blank CD-RWs to write to CDs or to erase, rewrite, or update data on CDs. Blank DVD+/-Rs can be used to permanently store large amounts of information.
It is recommended that you connect video and audio cables to your computer in one of the following combinations. NOTE: See the diagrams at the beginning of each subsection to help you determine which method of connection you should use. l S-video and standard audio l Composite video and standard audio When you finish connecting the video and audio cables between your computer and your TV, you must enable your computer to work with the TV.
1 standard S-video to composite video adapter 2 composite video cable 3 standard audio cable 1. Turn off the computer and the TV and/or audio device that you want to connect. 2. Connect the standard video to composite video adapter cable to the S-video TV-out connector on the computer. 3. Plug one end of the composite video cable in to the composite video-input connector on the standard video to composite video cable. 4.
4. Click the DVD option. 5. Click the DVD Audio Setting icon. 6. Click the arrows beside the Speaker Configuration setting to scroll through the options, and select the Headphones option. 7. Click the arrows beside the Audio listening mode setting to scroll through the options, and select the CL Headphone option. 8. Click the arrows beside the Dynamic range compression option to select the most suitable option. 9.
Back to Contents Page Setting Up a Network Dell™ Latitude™ D520 User's Guide Physically Connecting to a Network or Broadband Modem Network Setup Wizard Wireless Local Area Network (WLAN) Mobile Broadband or Wireless Wide Area Network (WWAN) Internet Connection Firewall Physically Connecting to a Network or Broadband Modem Before you connect your computer to a network that is not wireless, the computer must have a network adapter installed and a network cable connected to it.
l A wireless router or access point l A wireless network card for each computer that you want to connect to your WLAN l A network cable with the network (RJ-45) connector Checking Your Wireless Network Card Depending on what you selected when you purchased your computer, the computer has a variety of configurations.
NOTE: Restart your wireless equipment in the order described below to prevent a potential connection failure. 11. Turn on only your broadband modem and wait for at least 2 minutes for the broadband modem to stabilize. After 2 minutes, proceed to step 12. 12. Turn on your wireless router and wait for at least 2 minutes for the wireless router to stabilize. After 2 minutes, proceed to the step 13. 13. Start your computer and wait until the boot process completes. 14.
Once you have configured your computer for the wireless network that you selected, another pop-up notifies you that your computer is connected to that network. Thereafter, whenever you log on to your computer within the range of the wireless network that you selected, the same pop-up notifies you of the wireless network connection. NOTE: If you select a secure network, you must enter a WEP or WPA key when prompted. Network security settings are unique to your network. Dell cannot provide this information.
NOTE: The Connect button changes to the Disconnect button. 3. Follow the instructions on the screen to manage the network connection with the utility. Internet Connection Firewall The Internet Connection Firewall provides basic protection from unauthorized access to the computer while the computer is connected to the Internet. The firewall is automatically enabled when you run the Network Setup Wizard.
Back to Contents Page Adding and Replacing Parts Dell™ Latitude™ D520 User's Guide Before You Begin Hard Drive Media Bay Hinge Cover Keyboard Memory Wireless Cards Internal Card With Bluetooth® Wireless Technology Coin-Cell Battery Before You Begin This chapter provides procedures for removing and installing the components in your computer.
NOTICE: To prevent damage to the computer, perform the following steps before you begin working inside the computer. 1. Ensure that the work surface is flat and clean to prevent the computer cover from being scratched. 2. Turn off your computer (see Turning Off Your Computer). NOTICE: To disconnect a network cable, first unplug the cable from your computer and then unplug it from the network wall connector. 3. Disconnect any telephone or network cables from the computer. 4.
4. Remove the new drive from its packaging. Save the original packaging for storing or shipping the hard drive. NOTICE: Use firm and even pressure to slide the drive into place. If you use excessive force, you may damage the connector. 5. Slide the new hard drive into the bay and into the connector until it is fully seated. 6. Replace the screws. 7. Install the operating system for your computer (see Restoring Your Operating System). 8.
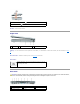
1 device security screw 2 device latch release Removing and Installing Media Bay Devices NOTE: If the device security screw is not installed, you can remove and install devices while the computer is running and connected to a docking device (docked). NOTICE: To prevent damage to devices, store them in a safe, dry place when they are not installed in the computer. Avoid pressing down on them or placing heavy objects on top of them. 1.
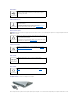
1 hinge cover 2 indent 4. Ease the hinge cover up, moving from right to left, and remove it. 5. To replace the hinge cover, insert the left edge of the cover into the hinge cover slot, and press from left to right until the cover snaps into place. Keyboard CAUTION: Before you begin any of the procedures in this section, follow the safety instructions in the Product Information Guide.
4 keyboard cable 5 plastic bar on keyboard connector NOTICE: To avoid scratching the palm rest when replacing the keyboard, hook the tabs along the front edge of the keyboard into the palm rest, and then secure the keyboard in place. 6. To replace the keyboard, connect the keyboard cable to the connector on the system board. 7. Place the tabs along the front edge of the keyboard into the palm rest, and lay the keyboard down on the palm rest. 8. Replace the two screws at the top of the keyboard.
NOTE: If the memory module is not installed properly, the computer may not boot properly. No error message indicates this failure. 6. Ground yourself and install the new memory module: a. b. Align the notch in the module edge connector with the tab in the connector slot. Slide the module firmly into the slot at a 45-degree angle, and rotate the module down until it clicks into place. If you do not feel the click, remove the module and reinstall it. 7. Replace the keyboard (see Keyboard). 8.
6. Insert the battery into the battery bay, or connect the AC adapter to your computer and an electrical outlet. 7. Turn on the computer. As the computer boots, it detects the additional memory and automatically updates the system configuration information. To confirm the amount of memory installed in the computer, click the Start button, click Help and Support, and then click Computer Information. Wireless Cards If you ordered a WLAN card with your computer, the card is already installed.
1 WLAN card c. 2 metal securing tab Slide the card at a 45-degree angle out of its connector. NOTICE: The connectors are keyed to ensure correct insertion. If you feel resistance, check the connectors and realign the card. NOTE: Do not insert a Mobile Broadband (WWAN) network card into the WLAN card connector. NOTE: The WLAN card may have two or three antenna connectors, depending on the type of card you ordered. 4.
NOTICE: To avoid electrostatic discharge, ground yourself by using a wrist grounding strap or by periodically touching a connector on the back panel of the computer. NOTICE: To prevent damage to the system board, remove the main battery before you service the computer. 1. Follow the procedures in Before You Begin. 1 2. coin-cell battery Insert a plastic scribe into the guide on the side of the coin-cell battery compartment, and pop the battery out.
Back to Contents Page Dell™ QuickSet Dell™ Latitude™ D520 User's Guide NOTE: This feature may not be available on your computer. Dell™ QuickSet provides you with easy access to configure or view the following types of settings: l Network connectivity l Power management l Display l System information Depending on what you want to do in Dell™ QuickSet, you can start it by either clicking, double-clicking, or right-clicking the QuickSet icon, Microsoft® Windows® taskbar.
Back to Contents Page Securing Your Computer Dell™ Latitude™ D520 User's Guide Security Cable Lock Passwords Computer Tracking Software If Your Computer Is Lost or Stolen NOTE: For information on how to secure your computer while traveling, see Traveling With Your Computer. Security Cable Lock NOTE: Your computer does not ship with a security cable lock. A security cable lock is a commercially available antitheft device. To use the lock, attach it to the security cable slot on your Dell™ computer.
NOTICE: If you disable the administrator password, the primary password is also disabled. If you have assigned an administrator password, you can use it instead of the primary password. The computer does not specifically prompt you for the administrator password. Using an Administrator Password The administrator password is designed to give system administrators or service technicians access to computers for repair or reconfiguration.
The Dell customer service representative will log your report under the computer Service Tag and record the computer as missing or stolen. If someone calls Dell for technical assistance and gives your Service Tag, the computer is identified automatically as missing or stolen. The representative will attempt to get the phone number and address of the caller. Dell will then contact the law enforcement agency to which you reported of the missing computer.
Back to Contents Page System Setup Program Dell™ Latitude™ D520 User's Guide Overview Viewing the System Setup Screens System Setup Screens Commonly Used Settings Overview NOTE: Your operating system may automatically configure most of the options available in the system setup program, thus overriding options that you set through the system setup program. (An exception is the External Hot Key option, which you can disable or enable only through the system setup program.
NOTE: To change the boot sequence on a one-time-only basis, see Performing a One-Time Boot. The Boot Sequence page displays a general list of the bootable devices that may be installed in your computer, including but not limited to the following: l Diskette Drive l Modular bay HDD l Internal HDD l CD/DVD/CD-RW drive During the boot routine, the computer starts at the top of the list and scans each enabled device for the operating system start-up files.
Back to Contents Page Reinstalling Software Dell™ Latitude™ D520 User's Guide Drivers Software and Hardware Incompatibilities Restoring Your Operating System Drivers What Is a Driver? A driver is a program that controls a device such as a printer, mouse, or keyboard. All devices require a driver program. A driver acts like a translator between the device and any other programs that use the device. Each device has its own set of specialized commands that only its driver recognizes.
Using the Drivers and Utilities CD NOTE: The Drivers and Utilities CD may be optional and may not ship with your computer. If using Device Driver Rollback or System Restore does not resolve the problem, then reinstall the driver from the Drivers and Utilities CD (also known as the ResourceCD). 1. 2. Save and close any open files, and exit any open programs. Insert the Drivers and Utilities CD. In most cases, the CD starts running automatically.
Restoring Your Operating System You can restore your operating system in the following ways: l l Microsoft® Windows® XP System Restore returns your computer to an earlier operating state without affecting data files. Use System Restore as the first solution for restoring your operating system and preserving data files. If you received an Operating System CD with your computer, you can use it to restore your operating system. However, using the Operating System CD also deletes all data on the hard drive.
Enabling System Restore If you reinstall Windows XP with less than 200 MB of free hard-disk space available, System Restore is automatically disabled. To see if System Restore is enabled: 1. Click Start® Control Panel® Performance and Maintenance® System® System Restore. 2. Ensure that Turn off System Restore is unchecked.
Back to Contents Page Specifications Dell™ Latitude™ D520 User's Guide Processor Processor type Intel® Core™ 2 Duo processor, Intel Core Duo processor, Intel Core Solo processor, or Intel Celeron® M processor L1 cache 32 KB (internal) L2 cache up to 4 MB (on die), depending on your Intel Core processor, and 1 MB for Celeron M processor External bus frequency 533 or 667 MHz System Information System chipset Intel 945GM or Intel 940GML Data bus width 64 bits DRAM bus width 64 bits Processor ad
IEEE 1394a 4-pin serial connector Mini-Card one Type IIIA Mini-Card slot Network adapter RJ-45 port D-Port standard docking connector for D/Port advanced port replicator Communications Modem: Type v.
XGA 0.297 mm (0.012 inch) SXGA+ 0.217 mm (0.008 inch) Power consumption (panel with backlight) (typical): XGA 5.0 W (max.) SXGA+ 4.8 W (max.) Controls brightness can be controlled through keyboard shortcuts Keyboard Number of keys 87 (U.S. and Canada); 87 (China); 89 (Brazil); 88 (Europe); 91 (Japan) Key travel 2.5 mm ± 0.3 mm (0.11 inch ± 0.016 inch) Key spacing 19.05 mm ± 0.3 mm (0.75 inch ± 0.
Height 28.3 mm (1.11 inches) Width 57.8 mm (2.28 inches) Depth 137.2 mm (5.40 inches) Weight (with cables) 0.36 kg (0.79 lb) Dimensions and weight (90-W AC adapter): Height 34.2 mm (1.35 inches) Width 60.9 mm (2.39 inches) Depth 153.42 mm (6.04 inches) Weight (with cables) 0.46 kg (1.01 lb) Temperature range: Operating 0° to 40°C (32° to 104°F) Storage –40° to 60°C (–40° to 140°F) Physical Height 35.8 mm (1.4 inches) Width 338.3 mm (13.3 inches) Depth 273.0 mm (10.
Back to Contents Page Dell™ Latitude™ D520 User's Guide Click the links to the left for information on the features and operation of your computer. For information on other documentation included with your computer, see Finding Information. NOTE: A NOTE indicates important information that helps you make better use of your computer. NOTICE: A NOTICE indicates either potential damage to hardware or loss of data and tells you how to avoid the problem.
Back to Contents Page Traveling With Your Computer Dell™ Latitude™ D520 User's Guide Identifying Your Computer Packing the Computer Travel Tips Identifying Your Computer l l Attach a name tag or business card to the computer. Write down your Service Tag and store it in a safe place away from the computer or carrying case. Use the Service Tag if you need to report a loss or theft to law enforcement officials and to Dell. l Create a file on the Microsoft® Windows® desktop called if_found.
Back to Contents Page
Back to Contents Page Troubleshooting Dell™ Latitude™ D520 User's Guide Dell Technical Update Service Memory Problems Dell Diagnostics Network Problems Dell Support Utility PC Card or ExpressCard Problems Drive Problems Power Problems E-Mail, Modem, and Internet Problems Printer Problems Error Messages Scanner Problems IEEE 1394 Device Problems Sound and Speaker Problems Keyboard Problems Touch Pad or Mouse Problems Lockups and Software Problems Video and Display Problems Dell Technical U
l l l During the assessment, answer any questions that appear. If a failure is detected, the computer stops and beeps. To stop the assessment and restart the computer, press ; to continue to the next test, press ; to retest the component that failed, press . If failures are detected during the Pre-boot System Assessment, write down the error code(s) and contact Dell (see Contacting Dell).
The Dell Diagnostics obtains configuration information for all devices from system setup, memory, and various internal tests, and it displays the information in the device list in the left pane of the screen. The device list may not display the names of all the components installed on your computer or all devices attached to your computer. Parameters Allows you to customize the test by changing the test settings. 4.
perform a full scan with your antivirus software to check for and remove viruses. Viruses can sometimes prevent Windows from recognizing the drive. Test the drive — l l Insert another floppy disk, CD, or DVD to eliminate the possibility that the original one is defective. Insert a bootable floppy disk and restart the computer. Clean the drive or disk — See Cleaning Your Computer.
E-Mail, Modem, and Internet Problems CAUTION: Before you begin any of the procedures in this section, follow the safety instructions in the Product Information Guide. NOTE: Connect the modem to an analog telephone connector only. The modem does not operate while it is connected to a digital telephone network. Check the Microsoft Outlook® Express Security Settings — If you cannot open your e-mail attachments: 1. 2. In Outlook Express, click Tools® Options® Security.
CD drive controller failure — The CD drive does not respond to commands from the computer (see Dell Support Utility). Data error — The hard drive cannot read the data (see Dell Support Utility). Decreasing available memory — One or more memory modules may be faulty or improperly seated. Reinstall the memory modules and, if necessary, replace them (see Memory). Disk C: failed initialization — The hard drive failed initialization. Run the hard drive tests in the Dell Diagnostics (see Dell Diagnostics).
Keyboard controller failure — For external keyboards, check the cable connection. Restart the computer, and avoid touching the keyboard or the mouse during the boot routine. Run the Keyboard Controller test in the Dell Diagnostics (see Dell Diagnostics). Keyboard data line failure — For external keyboards, check the cable connection. Run the Keyboard Controller test in the Dell Diagnostics (see Dell Diagnostics). Keyboard stuck key failure — For external keyboards or keypads, check the cable connection.
Seek error — The operating system cannot find a specific track on the hard drive. Shutdown failure — A chip on the system board may be malfunctioning. Run the System Set tests in the Dell Diagnostics (see Dell Diagnostics). Time-of-day clock lost power — System configuration settings are corrupted. Connect your computer to an electrical outlet to charge the battery. If the problem persists, try to restore the data by entering the system setup program. Then immediately exit the program.
Check the keyboard cable — Shut down the computer. Disconnect the keyboard cable and check it for damage, and firmly reconnect the cable. If you are using a keyboard extension cable, disconnect it and connect the keyboard directly to the computer. Check the external keyboard — 1. 2. 3. 4. Shut down the computer, wait 1 minute, and turn it on again. Verify that the numbers, capitals, and scroll lock lights on the keyboard blink during the boot routine.
A program is designed for an earlier Microsoft® Windows® operating system Run the Program Compatibility Wizard — The Program Compatibility Wizard configures a program so it runs in an environment similar to non-Windows XP operating system environments. 1. 2. Click Start® All Programs® Accessories® Program Compatibility Wizard® Next. Follow the instructions on the screen.
CAUTION: Before you begin any of the procedures in this section, follow the safety instructions in the Product Information Guide. General Check the network cable connector — Ensure that the network cable is firmly inserted into both the network connector on the back of the computer and the network connector. Check the network lights on the network connector — No light indicates that no network communication exists. Replace the network cable.
If you have problems with a Dell-provided Card — Contact Dell (see Contacting Dell). If you have problems with a Card not provided by Dell — Contact the card manufacturer. Power Problems Fill out the Diagnostics Checklist (see Diagnostics Checklist) as you complete these checks. CAUTION: Before you begin any of the procedures in this section, follow the safety instructions in the Product Information Guide. Check the power light — When the power light is lit or blinking, the computer has power.
normal computer operation is not possible on battery power alone. Ensure that the AC adapter is connected to your computer when the computer is docked to a docking device. Docking While the Computer Is Running If your computer is connected to the Dell D/Port while the computer is running, presence of the docking device is ignored until the AC adapter is connected to the computer.
Reinstall the scanner driver — See the scanner documentation for instructions. Sound and Speaker Problems Fill out the Diagnostics Checklist (see Diagnostics Checklist) as you complete these checks. CAUTION: Before you begin any of the procedures in this section, follow the safety instructions in the Product Information Guide. No sound from integrated speakers Adjust the Windows volume control — Double-click the speaker icon in the lower-right corner of your screen.
Check the touch pad settings — 1. 2. Click Start® Control Panel® Printers and Other Hardware® Mouse. Try adjusting the settings. Check the mouse cable — Shut down the computer. Disconnect the mouse cable, check it for damage, and firmly reconnect the cable. If you are using a mouse extension cable, disconnect it and connect the mouse directly to the computer. To verify that the problem is with the mouse, check the touch pad — 1. 2. 3. 4. Shut down the computer. Disconnect the mouse.
Adjust the brightness — Press and the up- or down-arrow key. Move the external subwoofer away from the computer or monitor — If your external speaker system includes a subwoofer, ensure that the subwoofer is at least 60 cm (2 ft) away from the computer or external monitor. Eliminate possible interference — Turn off nearby fans, fluorescent lights, halogen lamps, or other appliances. Rotate the computer to face a different direction — Eliminate sunlight glare, which can cause poor picture quality.