Dell Latitude E6420 XFR Setup and Features Information WARNING: A WARNING indicates a potential for property damage, personal injury, or death. CAUTION: A CAUTION indicates either potential damage to hardware or loss of data and tells you how to avoid the problem. NOTE: A NOTE indicates important information that helps you make better use of your computer.
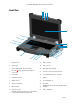
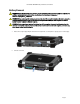
Dell Latitude E6420 XFR Setup and Features Information Front View 1 2 3 1 4 21 20 19 18 5 6 7 17 16 15 13 12 11 10 9 8 14 1 Microphones (2) 12 Express card slot 2 Display latch 13 Audio connector 3 Camera (optional) and camera status light 14 Fingerprint reader (optional) 4 Direct Vue™ outdoor-readable display (optional touchscreen) 15 Contactless smart-card reader (optional) 5 Power button 16 Secure Digital (SD) memory-card reader 6 eSata/USB connector 17 Handle 7 H
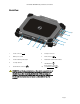
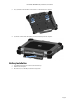
Dell Latitude E6420 XFR Setup and Features Information Back View 10 9 8 1 7 6 2 3 1 Power connector ( 2 5 6 Serial port connector Battery access panel 7 VGA connector ( 3 Power and battery status lights 8 QuadCool™ sealed thermal chamber 4 Security cable slot 9 Hard Disk Drive ( 10 Enclosed Smart-card reader ) (see Smart Cards) ( 5 ) 4 RJ-45 network connector ( ) ) ) WARNING: Do not block, push objects into, or allow dust to accumulate in the air vents.
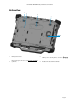
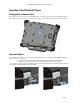
Dell Latitude E6420 XFR Setup and Features Information Bottom View 1 2 3 1 4 1 Battery latch release 3 Sliding cover to docking device connector ( 2 RF pass-through connectors (see RF Pass-through) (optional) 4 QuadCool™ sealed thermal chamber Page 4 )
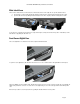
Dell Latitude E6420 XFR Setup and Features Information Battery Removal WARNING: Before working inside your computer, read the safety information that shipped with your computer. For additional safety best practices information, see the Regulatory Compliance Homepage at www.dell.com/regulatory_compliance. WARNING: Using an incompatible battery may increase the risk of fire or explosion. Replace the battery only with a compatible battery purchased from Dell.
Dell Latitude E6420 XFR Setup and Features Information 3. Press outward on the two battery release latches on the bottom of the computer. 4. Use the tab on the bottom of the battery to remove the battery from the computer. Battery Installation 1. 2. 3. Insert battery until you hear a click and a mechanical stop. Rotate the door into place. Ensure the door is in the fully closed and locked position.
Dell Latitude E6420 XFR Setup and Features Information Hard Drive Removal WARNING: Before working inside your computer, read the safety information that shipped with your computer. For additional safety best practices information, see the Regulatory Compliance Homepage at www.dell.com/regulatory_compliance.
Dell Latitude E6420 XFR Setup and Features Information Operation of the PrimoSeal™ Doors Docking Device Connector Door The docking device connector door is opened by sliding the door towards the front of the computer to its fully open position. Reverse this procedure to close the door. Be sure the door is fully closed by sliding door until it reaches a mechanical stop. Press-Latch Doors There are three press-latch doors. Two on the back (power and RJ45) and one on the right side panel (HDMI and eSATA).
Dell Latitude E6420 XFR Setup and Features Information Slide Latch Doors There are three slide-latch doors on the unit, two on the left side and one on the right side. To open the slide-latch doors: a. Ensure the door is unlocked by pushing the slide-latch in (the latch is locked when slid outward from the system) b. Open the slide-latch door by sliding the latch towards the rear of the computer, and then rotating the door down.
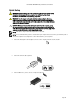
Dell Latitude E6420 XFR Setup and Features Information Quick Setup WARNING: Before you begin any of the procedures in this section, read the safety information that shipped with your computer. For additional best practices information, see www.dell.com/regulatory_compliance. WARNING: The AC adapter works with electrical outlets worldwide. However, power connectors and power strips vary among countries.
Dell Latitude E6420 XFR Setup and Features Information 4. Open the computer display and press the power button to turn on the computer. NOTE: It is recommended that you turn on and shut down your computer at least once before you install any cards or connect the computer to a docking device or other external device, such as a printer. Smart Cards There are two main types of Smart or Common Access Cards (CAC): 1.
Dell Latitude E6420 XFR Setup and Features Information Direct Vue™ Touch Display Information The computer provides an optional touch screen display for entering and selecting data using an approved pointing device such as your finger, a passive stylus or any non-abrasive smooth blunt object that will not damage the touch display. NOTE: To ensure you properly care for and maintain your touch display, adhere to the care instructions regarding the display.
Dell Latitude E6420 XFR Setup and Features Information General The general property page shows all the eGalaxTouch touch screen controllers installed including RS232, USB and PS2 interfaces. The touch screen controller is a USB device. Tools The Tools property page provides the following information and functions. NOTE: Your touch screen is configured and calibrated at the factory.
Dell Latitude E6420 XFR Setup and Features Information 2. Linearization Style The eGalaxTouch utility provides you with both 9 points and 25 points calibration for linearization. You can select the suitable kind of linearization type with this setting. The Linearization function is accessed under the Tools tab. 3. Double Click Time The double Click Time group is used to set system double click time. Changing this value will affect the double click behavior for all of the mice devices in the system.
Dell Latitude E6420 XFR Setup and Features Information Specifications NOTE: Offerings may vary by region. The following specifications are only those required by law to ship with your computer. For more information regarding the configuration of your computer, click Start → Help and Support and select the option to view information about your computer.
Dell Latitude E6420 XFR Setup and Features Information Audio Internal speaker amplifier 0.
Dell Latitude E6420 XFR Setup and Features Information Display Dimensions: Height 192.50 mm (7.58 inches) Width 324.00 mm (12.76 inches) Diagonal 355.60 mm (14.00 inches) Maximum resolution 1366 x 768 Maximum Brightness 730 nits Operating angle 0° (closed) to 135° Refresh rate Minimum Viewing angles: 60 Hz Horizontal +/- 50° Vertical +/- 40° Pixel pitch 0.
Dell Latitude E6420 XFR Setup and Features Information Battery Charge time with computer off (with 90 W adapter) approximately 1 hour to 80% capacity and 2 hours to 100% capacity. Voltage 11.10 VDC Temperature range: Operating 0 °C to 60 °C (32 °F to 140 °F) Non-Operating –51 °C to 71 °C (–59 °F to 159 °F) Coin-cell battery 3 V CR2032 lithium coin cell AC Adapter Type 90 W Input voltage 100 VAC to 240 VAC Input current (maximum) 1.50 A, 1.60 A, and 1.
Dell Latitude E6420 XFR Setup and Features Information Environmental Temperature: Operating 0 °C to 35 °C (32 °F to 95 °F) Storage -51 °C to 71 °C (-59 °F to 159 °F) Relative humidity (maximum): Operating 10 % to 90 % (noncondensing) Storage 5 % to 95 % (noncondensing) Altitude (maximum): Operating -15.2 m to 3048 m (-50 ft to 10,000 ft) Operating with SSD -15.2 m to 4572m (-50ft to 15,000 ft) Non-Operating -15.
Dell Latitude E6420 XFR Setup and Features Information Finding More Information and Resources This section is the last part of the SFITS See the safety and regulatory documents that shipped with your computer and the regulatory compliance website at www.dell.com/regulatory_compliance for more information on: • Safety best practices for your computer • Warranty • Terms and Conditions • Regulatory • Ergonomics • End User License Agreement Information in this publication is subject to change without notice.