
User guide


3. Replace the display bezel .
Removing the Display Panel Brackets
1. Follow the procedures in Before You Begin.
2. Remove the display assembly (see Removing the Display Assembly).
3. Remove the display bezel (see Removing the Display Bezel).
4. Remove the display panel (see Removing the Display Panel).
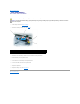
5. Remove the four M2 x 3-mm screws from the right display panel side bracket and lift away the bracket.
6. Remove the four M2 x 3-mm screws from the left display-panel side bracket and lift away the bracket.
Removing the Display Latch
1. Follow the procedures in Before You Begin.
2. Remove the display assembly (see Removing the Display Assembly).
3. Remove the display bezel (see Removing the Display Bezel).
4. Remove the display panel (see Removing the Display Panel).
5. Remove the four M2 x 3-mm screws from the top display panel bracket and lift away the bracket.
CAUTION: Before performing the following procedures, follow the safety instructions in the Product Information Guide.
NOTICE: To avoid electrostatic discharge, ground yourself by using a wrist grounding strap or by periodically touching a connector on the back
panel of the computer.
1
display panel
2
display panel side bracket
3
screws (4)
CAUTION: Before performing the following procedures, follow the safety instructions in the Product Information Guide.
NOTICE: To avoid electrostatic discharge, ground yourself by using a wrist grounding strap or by periodically touching a connector on the back
panel of the computer.
1
screws (4)
2
top display panel bracket
3
top cover