
White Papers

Reinitiate Auto-discovery
8
.
.
DfcwL1vaburBpaOmj5HIBvGLzcWEz5iTuzc1AiU09dacT8/UyrO8KAVp5zu0b8bP
BGUQbNBUqKsCPTKnNSNaDb+j0sQYB66B+9yZtaLPfdWkvob93oUUwj+CxTlxLGqe
-----END RSA PRIVATE KEY-----
</p:KeyContent>
<p:Password>[PASSWORD HERE]</p:Password>
<p:CAContent>-----BEGIN CERTIFICATE-----
MIIE2zCCA8OgAwIBAgIBADANBgkqhkiG9w0BAQQFADCBqTELMAkGA1UEBhMCVVMx
CzAJBgNVBAgTAlRYMRQwEgYDVQQHEwtNYWluIFN0cmVldDEVMBMGA1UEChMMSm9l
.
.
.
8o5kZK8xCaSQ9UQKdH5z6sUasj8DYk6pXndgWIV5Wc9JfsN3+dratX3lrpoPJPhk
N1hTdXHYiDjLwSg79yIkIJP1qZ5gdaeJ1jUYJBehRDQ+X7HxWN2VNk+ZlNvYyZc=
-----END CERTIFICATE-----
</p:CAContent>
</p:DownloadClientCerts_INPUT>
Use default certificate
Deleting custom auto-discovery keys
The following WSMAN methods will delete any custom auto-discovery keys that may exist on the iDRAC.
Once the custom keys are deleted, the iDRAC will return to using factory signed keys.
EXAMPLES:
winrm i DeleteAutoDiscoveryServerPublicKey
http://schemas.dmtf.org/wbem/wscim/1/cim-
schema/2/root/dcim/DCIM_LCService
?SystemCreationClassName=DCIM_ComputerSystem
+CreationClassName=DCIM_LCService
+SystemName=DCIM:ComputerSystem
+Name=DCIM:LCService
-u:%USERNAME% -p:%PASSWORD%
-r:https://%IPADDRESS%/wsman
-encoding:utf-8 -a:basic -SkipCACheck -SkipCNCheck –skiprevocationcheck
winrm i DeleteAutoDiscoveryClientCerts
http://schemas.dmtf.org/wbem/wscim/1/cim-
schema/2/root/dcim/DCIM_LCService
?SystemCreationClassName=DCIM_ComputerSystem
+CreationClassName=DCIM_LCService
+SystemName=DCIM:ComputerSystem
+Name=DCIM:LCService
-u:%USERNAME% -p:%PASSWORD%
-r:https://%IPADDRESS%/wsman
-encoding:utf-8 -a:basic -SkipCACheck -SkipCNCheck -skiprevocationcheck
Specifying the provisioning server
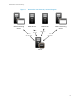
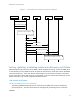
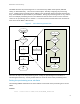
There are two steps in auto-discovery (see Figure 2). In the first step the iDRAC discovers the
provisioning server. In the second step the provisioning server learns there is a new server that needs
to be configured, the iDRAC receives its initial credentials, and the secure SSL handshake takes place.