Creating RAID Using Lifecycle Controller This Dell Technical White Paper provides the procedure to create RAID using Lifecycle Controller on the 12th generation servers and later of Dell. Dell Engineering December 2013 Balaji K Bala Gupta Vinod P S Shravya Hebbar Sheshadri P.R.
Revisions Date Description August 2013 Initial release PURPOSES ONLY, AND MAY CONTAIN TYPOGRAPHICAL ERRORS AND TECHNICAL INACCURACIES. THE CONTENT IS PROVIDED AS IS, WITHOUT EXPRESS OR IMPLIED WARRANTIES OF ANY KIND. © 2013 Dell Inc. All rights reserved. Reproduction of this material in any manner whatsoever without the express written permission of Dell Inc. is strictly forbidden. For more information, contact Dell. Dell, the DELL logo, and the DELL badge are trademarks of Dell Inc.
countries. IBM® is a registered trademark of International Business Machines Corporation. Broadcom® and NetXtreme® are registered trademarks of Broadcom Corporation. Qlogic is a registered trademark of QLogic Corporation. Other trademarks and trade names may be used in this document to refer to either the entities claiming the marks and/or names or their products and are the property of their respective owners. Dell disclaims proprietary interest in the marks and names of others.
Contents Revisions ..................................................................................................................................................................................................2 Executive Summary ...............................................................................................................................................................................5 1 2 What is RAID? ..................................................................................
Executive Summary This whitepaper provides information about the procedure to create RAID using Lifecycle Controller on the 12th generation of servers or later of Dell.
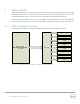
1 What is RAID? RAID―Redundant Array of Inexpensive/Independent Disks is a storage technology that combines multiple hard disk drives (HDDs) into a logical unit. Data is distributed across the storage disk drives in one of the methods called "RAID levels", on the basis of level of redundancy and performance required. There are multiple methods in which you can create RAID on PowerEdge servers of Dell.
H D D H D D H D D H D D H D D H D D H D D H D D H D D H D D H D D H D D H D D H D D H D D H D D H D D H D D H D D H D D H D D H D D H D D H D D H D D H D D H D D ENCLOSURE 1 RAID CONTROLLER (PCIe slot, Dedicated slot for RAID controller) H D D H D D H D D H D D H D D H D D H D D H D D H D D ENCLOSURE 2 H D D H D D H D D H D D H D D H D D H D D H D D H D D ENCLOSURE 3 Figure 2 1.
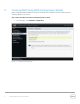
2 Creating RAID Using RAID Configuration Wizard RAID configuration Wizard feature in Lifecycle Controller GUI provides an easy five-step solution for creating a RAID of your choice. Step 1: Select the RAID controller on which RAID to be created. a. In the left pane, click Hardware configuration.
Click Configuration wizards, and then select RAID Configuration Wizards. Figure 4 Configuration Wizards The Step 1 page of RAID configuration lists all the supported RAID controllers available on the server.
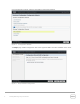
b. Select the RAID controller on which you want to have the RAID created. Details of any virtual disk(s) available on the selected controller will be shown in the table displayed on the page below the controller list. Click Next, Step 1A page will be displayed if there are any foreign or uninitialized HDD(s) available on the server.
Figure 7 Step 1a of RAID Configuration displaying unintialized HDDs Step 2: Select RAID Level The RAID levels are a basic set of RAID configurations that employs the techniques of stripping, mirroring, or parity to create large reliable data stores from general-purpose computer HDDs. For more information about RAID levels, see the section “RAID Levels” in this document. Lifecycle Controller supports 7 RAID levels―RAID 0, RAID 1, RAID10, RAID 5, RAID 6, RAID 50 and RAID 60.
Figure 8 Step 2 of RAID Configuration displaying various RAID levels Step 3: Select the HDDs to create RAID. This page lists all the available HDDs connected to the RAID controller you have selected to create a RAID. The page shows the minimum and maximum number of HDDs required for the RAID level that you have selected to create RAID. Select the appropriate options for Protocol, Media Type, Encryption Capability, Span length to list the exact HDDs you want to be part of the RAID.
Figure 9 Step 3 of RAID Configuration – HDD Selection Step 4: Select Virtual Disk name and attributes This page gives options to select the name and size of a virtual disk. 1. 2. 3. 4. In the Virtual Disk Name box, type the name of the virtual disk. In the Size box, type the size of the virtual disk. Select the relevant option from the Read policy and Write policy drop-down menu. To assign a hot-spare disk, select the Assign a Hot Spare Disk if available option.
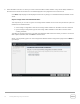
Figure 10 Step 4 of RAID Configuration displaying virtual disk attributes Step 5: RAID configuration summary This page displays the summary of all the settings you have made to create the RAID. Click Back to go back to the earlier pages to make any corrections in the settings. If the settings are correct then click Finish to create a RAID.
Figure 11 Summary of virtual disk settings Lifecycle Controller displays a message to indicate that all the current data about the virtual disks available on the controller will be lost. Click OK to continue.
Figure 13 RAID Creation in progress After the creation of RAID, Lifecycle Controller UI displays a message indicating that the RAID creation is successful.
2.1 Important Information Lifecycle Controller GUI allows you to create only one virtual disk on a controller at anytime. When a new virtual disk is created from Lifecycle Controller, all the existing virtual disk configurations are lost. 2.2 Best Practices • Make sure RAID controller is connected to the server and is detected in the POST operation. • Make sure the HDDs are connected to the RAID controller correctly and RAID controller is able to detect them.
configurations using which you can clear the foreign configurations or retain them as it is while creating a virtual disk. 2.5 Protocol Protocol is a technology used for communication between HDDs and RAID controller. You can select any one of the following options from the Protocol drop-down menu: Serial Attached SCSI (SAS) – Used for high performance Serial ATA (SATA) – Used for cost-effective solutions 2.6 Media Type The media type is the type of HDDs available in the server.
2.11 Size Type the size of a virtual disk. Minimum value must be 0.1GB and maximum value depends on the total number of HDDs selected, HDDs’ sizes, and the RAID level. 2.12 Stripe Element Size The stripe element size is the disk space a stripe uses on each HDD. Select the required stripe element size from the drop-down menu. Use the up- and down arrow keys to display all options. 2.
block of data when you write to the HDD. It returns these values on a read request. When you read or write data to an HDD, the data is checked for errors. Select this option to enable T10 Protection Information Capability on a virtual disk and select one of the following types of T10 protection information capabilities: All — Indicates both T10 Protection Information capable and non-T10 protection informationcapable HDDs are selected.