
Quick Installation Guide


A lazy-zeroed thick disk has all the disk space allocated at the time of creation, but each block is zeroed only
on first write. This results in a shorter creation time, but reduced performance the first time a block is written
to. Subsequent writes have the same performance as eager-zeroed thick disks.
b. Thick Provision Eager Zeroed [Recommended]
An eager-zeroed thick disk has all the space allocated and zeroed out at the time of creation. This increases
the time it takes to create the disk, but results in the best performance, even on the first write to each block.
c. Thin Provision [Not Recommended]
Space required for a thin-provisioned virtual disk is allocated and zeroed upon first write, as opposed to upon
creation. There is a higher I/O cost (similar to that of lazy-zeroed thick disks) during the first write to an
unwritten file block, but on subsequent writes thin-provisioned disks have the same performance as eager-
zeroed thick disks.
15. Click Next.
16. In the Ready to Complete window, review the selected options for the OVF deployment task and click Finish. The
deployment job runs and provides a completion status window where you can track job progress.
Registering Dell Management Plug-in within vCenter And Importing The License File
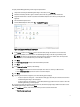
1. From vSphere Client, select Home → Hosts and Clusters, then in the left panel, locate the Dell Management Plug-in
just deployed, and then click Power on the virtual machine.
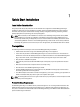
2. Click on the Console tab in the main VMware vCenter window to initiate the console Administration Console.
3. Allow the Dell Management Plug-in to finish booting up and then enter the user name for the administrator (the
default is Admin), and set a password.
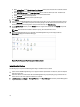
4. Configure the Dell Management Plug-in network and time zone information.
Figure 2. Console tab
5. Open a Web browser and type the appliance's IP address or hostname.
For example: https://10.210.126.120 or https://myesxihost. The URL is not case sensitive.
8