Dell™ Dell Management Plug-in for VMware vCenter Version 1.0.
Notes and Cautions NOTE: A NOTE indicates important information that helps you make better use of your computer. CAUTION: A CAUTION indicates potential damage to hardware or loss of data if instructions are not followed. ____________________ Information in this document is subject to change without notice. © 2011 Dell Inc. All rights reserved. Reproduction of these materials in any manner whatsoever without the written permission of Dell Inc. is strictly forbidden.
Contents 1 Overview . . . . . . . . . . . . . . . . . . . . . . . . . . 5 . . . . . 5 . . . . . . . . . . . . . . . . . . . . . . . 5 Dell Management Plug-in for VMware vCenter Key Features . How Does the Plug-in Help With vCenter Administration? 6 Plug-In Features 2 . . . . . . . . . . . . . . . . . . . . . . Installation and Quick Start Information Prerequisites 6 . . . . . . . . . . . 9 . . . . . . . . . . . . . . . . . 9 . . . . . . . . . . . . 10 . . . . . . . . . . . . . . . . .
Deploy Plug-In OVF Using the vSphere Client . . . Upload License File and Register Plug-In Within vCenter . . . . . . . . . . . . . . . . . . . . . . . 18 . . . . . . . . . . . . . . 23 . . . . . . . . . . 23 . . . . . . . . . . . . . . . . . . . . . . . . . . . . . . . 25 Installation Verification .
Overview Dell Management Plug-in for VMware vCenter VMware vCenter is the primary console used by IT administrators to manage and monitor VMware vSphere ESX/ESXi hosts. In a standard virtualized environment, VMware alerts and monitoring are used to prompt an administrator to launch a separate console to resolve hardware issues.
• Deployment and Provisioning—Create hardware profiles, hypervisor profiles, and deploy any combination of the two on bare-metal Dell PowerEdge 11th generation servers, remotely and without PXE—using vCenter. • Service Information—Retrieve warranty information from Dell online.
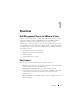
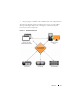
• Integrate plug-in capabilities with standard vCenter roles and permissions The following diagram provide an architectural overview of a typical Dell Management Plug-In deployment, including the communication paths between the various components. Figure 1-1.
12 Overview
Installation and Quick Start The following sections provide installation and quick start information, including step-by-step instructions for plug-in installation and initial configuration. Once these steps are complete, the Dell Plug-In for VMware vCenter is ready for use. NOTE: Dell OpenManage agents are required on Dell hosts, and must be deployed on existing hosts prior to installing the Dell Management Plug-in. You can find details on installing the agents at http://support.dell.
NOTE: The virtual appliance functions as a regular virtual machine; any interruptions or shut downs will impact overall functionality. Product Hardware Requirements The Dell Management Plug-in for VMware vCenter provides full support for 11th generation Dell servers with iDRAC and limited support for ninth and tenth generation Dell servers. Servers must also officially support the ESX and ESXi version listed below. See the Dell Management Plug-In for VMWare vCenter Version 1.0.
iDRAC firmware versions supported • iDRAC for Blade 3.0 • iDRAC for Tower/Rack 1.5 Management Plug-in Port Requirements • 443 & 80 (https) - Administration portal • 4433 (https) - For auto discovery and handshake • 162 & 11620 - For SNMP trap listener • 2049, 4001, 4002, 4003, 4004 - NFS share Administration Portal Supported Browsers The administration portal can be accessed using the following browsers: • Internet Explorer 7.0.x and 8.0.
b Deploy a Open Virtualization Format (OVF) file that contains the plug-in using the vSphere client c Upload license file d Register plug-in with vCenter using the Administrator Portal 3 Complete Configuration Wizard 4 Enable OMSA functionality a Enter the OMSA URL on the plug-in Setting page 5 Enable Dell Events a Set up event filter options on the Setting page b Navigate to the OMSA user interface on selected hosts, and configure appliance IP as trap destination if not already configured 6 Ena
1 Install the vSphere command line tool (vSphere CLI) from VMWare.com, if not already installed. 2 Enter the following command: Vihostupdate.pl -server -i -b OM-SrvAdmin-Dell-Web-6.3.0-2075.VIBESX41i_A00.8.zip NOTE: It can take a few minutes for OMSA to install. This command will require a reboot of the host after it completes. To install OMSA agent tar.gz on ESX system with the required remote enablement setting (-c): 1 Run the OMSA agent installation script: srvadmin-install.
3 From the vSphere client, select File −> Deploy OVF Template. Figure 2-1. Deploy OVF template from vSphere 4 The Source window displays. Use the Browse button to locate the OVF package; the location can be a local drive, network drive, CD/DVD, or from the Internet. The plug-in file size is approximately 720 MB. CAUTION: It is not recommended to use shared/remote network drives to install the plug-in, as the install can take 10-30 minutes. Click Next.
Figure 2-2. Select the source location 5 The OVF Template Details window displays. Review the information presented and click Next. Figure 2-3. OVF Template Details 6 The Name and Location window displays. Name the template; the name can contain up to 80 characters. Select a location to store it in an inventory folder and click Next.
Figure 2-4. Name the OVF template 7 The Resource Pool window displays. Select the resource pool of virtual servers to deploy the template to and click Next. Figure 2-5. Choose a resource pool 8 The Datastore window displays. Select where to store the virtual machine (VM) files from the data stores displayed, and click Next.
9 The Disk Format window displays. The data formats available to store the virtual machines on the selected data store are displayed. Select thin provisioned format to allocate storage space as needed to the virtual machines, and select thick provisioned format to allocate all needed storage space up front to the virtual machines. NOTE: It is recommended that the thick provisioned format is used for better performance. 10 Click Next. Figure 2-6.
Figure 2-7. Ready to complete Upload License File and Register Plug-In Within vCenter 1 Locate the plug-in VM just deployed, and click Power on the virtual machine. 2 Click on the Console tab in the main VM window to initiate the console administration portal. 3 Wait for the appliance to finish booting up. 4 Enter the default user name of "admin," and set a password of your choice. 5 Configure appliance network and time zone information using applicable wizards if needed; see Figure 2-8.
Figure 2-8. Admin portal URL 6 Launch another browser window, and enter the Admin Portal URL displayed in the Console tab. The URL uses the following format and is case sensitive: https:///DellAdminPortal/index.html 7 The Administration Console login window displays. Enter the password created in Step 4 and click Login.
Figure 2-9. Administration Console 8 The vCenter Registration window displays. Any vCenter servers that are registered are displayed. To register a new vCenter server, click Register a new vCenter Server.
Figure 2-10. vCenter Registration Window. 9 On the Register a New vCenter window, enter the vCenter server IP address or hostname and an administrator user name and password, and click Apply.
Figure 2-11. Register a New vCenter 10 If you are using the Plug-In trial version, skip to step 12. If you are using the full product version, there is a Dell_Management_Center_license.bin file included in the product download package. This file contains your product license, and must be uploaded to your appliance. To upload the license file, click Upload License. 11 On the Upload License window, click the Browse button to navigate to the license file. Click Upload to upload the license file.
Figure 2-12. Plug-in successfully added to vCenter Installation Verification The following steps verify that the Plug-In installation was successful. 1 If the icon doesn’t appear inside of vSphere, restart the vSphere client and check again. 2 Check that vCenter can communicate with the Plug-In by attempting a ping command from the vCenter server to the virtual appliance IP address or hostname.
Installation and Quick Start
Index D R Dell plug-in register with vCenter, 18 upload license, 18 What is it?, 5 registering Dell plug-in, 18 F S features high-level functionality, 5 server deployment using profiles, 6 firmware updates for Dell hardware, 5 software requirements ESX/ESXi, OMSA, and LCC, 10 H W hardware faults alerting, 5 warranty information Dell online, 6 remote operations deployment and provisioning, 6 I inventory displays in vCenter, 5 L license upload, 18 Index 25
Index