Dell Management-Plugin für VMware vCenter Version 1.5.
Anmerkungen, Vorsichtshinweise und Warnungen ANMERKUNG: Eine ANMERKUNG liefert wichtige Informationen, mit denen Sie den Computer besser einsetzen können. VORSICHT: Ein VORSICHTSHINWEIS macht darauf aufmerksam, dass bei Nichtbefolgung von Anweisungen eine Beschädigung der Hardware oder ein Verlust von Daten droht, und zeigt auf, wie derartige Probleme vermieden werden können.
Inhaltsverzeichnis Anmerkungen, Vorsichtshinweise und Warnungen................................................................2 Kapitel 1: Schnellstart-Installation..............................................................................................5 Einführung in die Installation....................................................................................................................................5 Voraussetzungen........................................................................
Schnellstart-Installation 1 Einführung in die Installation Dieses Handbuch enthält Schritt-für-Schritt-Anleitungen zur Installation und Konfiguration der Dell Management-PluginInstallation auf Dell Servern. Nach Abschluss der Installation finden Sie im Dell Management Plug-in User's Guide (Benutzerhandbuch des Dell Management Plugin) Information zu allen Aspekten der Verwaltung wie: Verwaltung von Bestandsaufnahmen, Überwachung und Warnungen, Bereitstellung und Provisionierung sowie Garantieverwaltung.
welcher Generation von Dell-Server Sie arbeiten, sehen Sie in den Tabellen in den Versionshinweisen nach. Spezifische Informationen für den Hardware-Support entnehmen Sie den Dell Management Plug-in for VMware vCenter Release Notes (Versionshinweisen zum Dell Management-Plugin für VMware vCenter). Software-Anforderungen Die vSphere-Umgebung muss die Anforderungen des virtuellen Geräts, des Portzugriffs und des Überwachungsports erfüllen.
5. Konfigurieren Sie den Dell iDRAC-Benutzername und das Kennwort. Bereitstellen der OVF-Datei mit dem Dell Management-Plugin unter Verwendung des vSphere-Clients Bei diesem Verfahren wird davon ausgegangen, dass Sie die Zip-Datei bereits von der Dell-Website heruntergeladen haben. ANMERKUNG: Das bei dieser Installation empfohlene Festplattenformat lautet „Thick Provision Eager Zeroed“.
7. Klicken Sie auf Weiter. 8. Prüfen Sie im Fenster OVF-Vorlagedetails die angezeigten Informationen. 9. Klicken Sie auf Weiter. 10. Führen Sie im Fenster Name und Speicherort folgende Schritte aus: a. Geben Sie im Textfeld Name den Namen der Vorlage ein. Diese Name darf bis zu 80 Zeichen lang sein. b. Wählen Sie in der Liste Speicherort der Bestandsaufnahme einen Speicherort für die Vorlage aus. 11. Klicken Sie auf Weiter. 12.
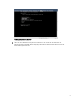
Abbildung 2. Registerkarte „Konsole“ 5. Öffnen Sie einen Webbrowser und geben Sie die IP-Adresse des Geräts oder den Hostnamen ein. Zum Beispiel: https://10.210.126.120 oder https://myesxihost. Bei der URL wird nicht zwischen Groß- und Kleinschreibung unterschieden.
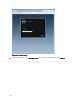
Abbildung 3. Verwaltungskonsole 6. 10 Geben Sie im Anmeldefenster der Verwaltungskonsole das Kennwort ein, und klicken Sie dann auf Anmelden.
Abbildung 4. vCenter-Registrierungsfenster innerhalb der Verwaltungskonsole 7. Klicken Sie im Fenster vCenter-Registrierung auf Neuen vCenter-Server registrieren. 8. Führen Sie im Fenster Neues vCenter registrieren einen der folgenden Vorgänge aus: a) Geben Sie unter vCenter-Name im Textfeld IP oder Hostname des vCenter-Servers die IP oder den Hostnamen des Servers und anschließend in das Textfeld Beschreibung eine optionale Beschreibung ein.
Abbildung 5. Das Dell Management-Plugin wurde erfolgreich zum vCenter hinzugefügt. Überprüfen der Installation Mit den folgenden Schritten wird überprüft, ob die Installation des Dell Management-Plugins erfolgreich war: 1. Überprüfen Sie, ob das Symbol des Dell Management-Plugins im vSphere-Client angezeigt wird. Starten Sie andernfalls den vSphere-Client neu, und prüfen Sie die Anzeige erneut. 2.
Grundlegende Informationen zum Konfigurieren des Dell Management-Plugins mithilfe des Assistenten 2 Nachdem Sie die grundlegende Installation des Dell Management-Plugins abgeschlossen haben, muss es konfiguriert werden. Dies erfolgt in der Regel mit dem Konfigurationsassistenten, Sie können aber auch die Optionen auf der Seite „Einstellungen“ in den Optionen der Dell Management Center-Einstellungen verwenden. Die Benutzeroberfläche ist in beiden Bereichen ähnlich.
Erstellen des Verbindungsprofils ist im Konfigurationsassistenten und im Dell Management Center, Option „Einstellungen“ nahezu identisch. ANMERKUNG: In dieser Version und bei Installationen auf Hosts mit der Version 12G und höher ist die Installation des OMSA-Agenten nicht erforderlich. Bei Installationen auf 11G-Hosts wird der OMSA-Agent jetzt automatisch vor dem Bereitstellungsprozess installiert. So erstellen Sie ein neues Verbindungsprofil mithilfe des Assistenten: 1.
Konfigurieren von Ereignissen und Alarmen [Assistent] Sie können Ereignisse und Alarme entweder mit dem Konfigurationsassistenten oder im Dell Management Center, Option „Einstellungen“ für Ereignisse und Alarme konfigurieren. ANMERKUNG: Auf Hosts vor 12G erfordert diese Funktion, dass das virtuelle Gerät als Trap-Ziel in OMSA konfiguriert wurde, um die Hostereignisse in vCenter anzuzeigen. So konfigurieren Sie Ereignisse und Alarme: 1. 2.
Planen von Jobs zum Erstellen von Bestandsaufnahmen [Assistent] Die Vorgehensweise bei der Konfiguration eines Zeitplans zum Erstellen einer Bestandsaufnahme ähnelt der im Konfigurationsassistenten und der Option „Einstellungen“ im Dell Management Center. Der wesentliche Unterschied besteht darin, dass der Assistent eine Option bietet, über die Sie die Bestandsaufnahme sofort erstellen können.
Konfigurieren des Anmeldeinformationen für die Bereitstellung [Assistent] Die Anmeldeinformationen für die Bereitstellung werden für die sichere Kommunikation mit einem Bare-Metal-System verwendet; dabei wird iDRAC von der ersten Erfassung bis zum Ende des Bereitstellungsprozesses verwendet. Nach Abschluss der Bereitstellung werden die Anmeldeinformationen auf die Informationen im Verbindungsprofil geändert, das dem Bare-Metal-System vom Bereitstellungsassistenten zugewiesen wurde.
* CIFS-Freigabe für gz-Datei: \\host\freigabe\dateiname.gz b) Wenn Sie eine CIFS-Freigabe verwenden, geben Sie Werte in die Felder Benutzername, Kennwort und Kennwort bestätigen ein, die Kennwörter müssen gleich sein. Diese Felder sind nur dann aktiv, wenn Sie eine CIFS-Freigabe verwenden. ANMERKUNG: Das Zeichen „@“ wird für die Verwendung in Benutzernamen/Kennwörtern für freigegebene Netzwerkordner nicht unterstützt, c) Klicken Sie zum Überprüfen Ihrer Einträge auf Test starten. 3.
7. Schließen Sie die iDRAC-Benutzeroberfläche, dann booten Sie das System neu und melden sich erneut an. 8. Drücken Sie nach dem Neustart , wenn die iDRAC-IP-Adresse angezeigt wird. 9. Gehen Sie zu LAN-BENUTZERKONFIGURATION und setzen Sie das „Autom. Ermittlung“ auf „Aktivieren“. Stellen Sie sicher, dass die iDRAC-Administratorkonten deaktiviert sind. Alternativ richten Sie das Netzwerk für die automatische Ermittlung und das Handshaking ein.