VMware vCenter 向け Dell Management Plug-In バージョン 1.5.
メモ、注意、警告 メモ: コンピュータを使いやすくするための重要な情報を説明しています。 注意: ハードウェアの損傷やデータの損失の可能性を示し、その問題を回避するための方法を説明してい ます。 警告: 物的損害、けが、または死亡の原因となる可能性があることを示しています。 © 2012 Dell Inc. 本書に使用されている商標:Dell™、Dell のロゴ、Dell Precision™、OptiPlex™、Latitude™、PowerEdge™、PowerVault™、PowerConnect™、 OpenManage™、EqualLogic™、Compellent™、KACE™、FlexAddress™、Force10™ および Vostro™ は Dell Inc. の商標です。Intel®、 Pentium®、Xeon®、Core® および Celeron® は米国およびその他の国における Intel Corporation の登録商標です。AMD® は Advanced Micro Devices, Inc.
目次 メモ、注意、警告.......................................................................................................................2 章 1: インストールのクイックスタート..............................................................................5 インストールのイントロダクション.................................................................................................................5 作業を開始する前に............................................................................................................................................
インストールのクイックスタート 1 インストールのイントロダクション このガイドは、Dell サーバーへの Dell Management Plug-in のインストールおよび設定方法を手順を追って説明 します。 インストールが完了したら、インベントリ管理、監視とアラート、ファームウェアのアップデー ト、展開とプロビジョン、および保証管理に関するすべての側面について、『Dell Management Plug-in User's Guide』(Dell Management Plug-in ユーザーズガイド)を参照してください。 メモ: 本リリースおよび PowerEdge 第 12 世代サーバー上のホストへのインストールでは、OMSA エージ ェントのインストールは必要ありません。PowerEdge 第 11 世代サーバーへのインストールでは、展開プ ロセス中に OMSA エージェントが自動的にインストールされます。OMSA について詳細は、『Dell Management Plug-in User's Guide』(Dell Management Plug-in ユーザーズガイド)の「Understa
代であるかを確認するには、リリースノートの表を参照してください。特定のハードウェアサポート情報に ついては、『Dell Management Plug-in for VMware vCenter Release Notes』(VMware vCenter 向け Dell Management Plug-in リリースノート)を参照してください。 ソフトウェア要件 vSphere 環境は仮想アプライアンス、ポートアクセス、およびリスニングポートの各要件に合致する必要があ ります。さらに、vSphere Client システムに Adobe Flash player 10.
a. ファームウェアアップデートをダウンロードし、適用されるシステムで使用可能となるようにしま す。 5. Dell iDRAC のユーザー名およびパスワードを設定します。 vSphere クライアントを使用した Dell Management Plug-in OVF の展開 この手順は、デルのウェブサイトからジップファイルをダウンロードしていることを前提としています。 メモ: シックプロビジョン Eager Zeroed はこのインストールに推奨されるディスクの形式です。 vSphere クライアントを使用して Dell Management Plug-in OVF を展開するには次の手順を実行します。 1. Dell Management Plug-in 仮想ディスクを含むファイルを解凍して、setup.exe を実行します。 2. Setup.exe ファイルをダブルクリックして EULA に同意し、ユーザーガイドを抽出して OVF を入手します。 3.
10. 名前と場所ウィンドウで次の手順を実行します。 a. 名前 テキストボックスで、テンプレートの名前を入力します。この名前は半角文字で 80 文字以下 となるようにします。 b. インベントリの場所リストで、テンプレートを保存する場所を選択します。 11. 次へ をクリックします。 12. vCenter の設定に応じて、次のオプションの 1 つが表示されます。 – – リソースプールが設定されている場合 — リソースプールのページで、Dell Management Plug-in の 展開先となる仮想サーバーのプールを選択してください。 リソースプールが設定されていない場合 — ホスト / クラスタのページで、Dell Management Plrugin の展開先となるホストまたはクラスタを選択してください。 13. ホストで 1 つ以上のデータストアが使用可能な場合、データストアのページが表示されます。Dell Management Pluig-in ファイルの保存先の場所を選択し、次へ をクリックします。 14. ディスクの形式 ウィンドウで、仮想ディスクを保存する形式を選択します。 a.
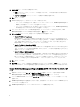
図 2. コンソールタブ 5. ウェブブラウザを開き、アプライアンスの IP アドレスまたはホスト名をタイプします。 例えば:https://10.210.126.120 or https://myesxihost となります。URL は大文字と小文字を区別しません。 図 3.
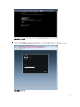
6. 管理コンソール のログインウィンドウでパスワードを入力し、ログイン をクリックします。 図 4. 管理コンソール内での vCenter 登録ウィンドウ 7. vCenter 登録 ウィンドウで、新規 vCenter サーバーの登録をクリックします。 8. 新規 vCenter の登録ウィンドウで、次の手順を実行します。 a) vCenter の名前で、vCenter サーバー IP またはホスト名テキストボックスにサーバー IP またはホスト 名を入力した後で、説明 テキストボックスにオプションの詳細説明を入力します。 b) 管理ユーザーアカウント で、管理ユーザー名 テキストボックスに管理ユーザー名を入力します。管 理ユーザーアカウントは vCenter 向け Dell Management Plug-in の管理のために使用されます。 c) パスワードテキストボックスにパスワードを入力します。 d) パスワードの確認テキストボックスにパスワードを再度入力します。 9. 登録をクリックします。 10.
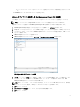
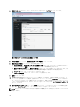
12. Dell Management Plug-in が登録されると、Dell Management Plug-in アイコンが vCenter のホームページにあ る 管理 カテゴリの下に表示されます。 図 5. Dell Managment Plug-in が vCenter に正常に追加されました インストールの検証 Dell Management Plug-in のインストールが正常に行われたかを検証するには、次の手順を行います。 1. Dell Management Plug-in アイコンが vSphere クライアント内部に表示されていることを確認します。表 示されない場合、vSphere クライアントを再起動して再度確認します。 2. vCenter サーバーから仮想アプライアンス IP アドレスまたはホスト名宛てに ping コマンドを実行するこ とで、vCenter が Dell Management Plug-in と通信可能であることを確認します。 3.
2 ウィザードを使用した Dell Management Plugin の設定方法について Dell Management Plug-in の基本的なインストール後、設定する必要があります。これは通常 設定ウィザード を使用して行いますが、Dell Management Center 設定オプションの設定 ページを使用して行うこともできま す。 両方共、ユーザーインタフェースは似通っていますが、ウィザードでは 保存して続行をクリックするのに対 し、設定オプションでは適用 をクリックします。 本項ではウィザードを使用した設定方法について説明します。Dell Management Plug-in を設定する Dell Management Center の設定オプションの使用についての詳細は、Dell Management Plug-in ユーザーズガイド を 参照してください。 設定ウィザード使用の設定タスク 設定ウィザードを使用して Dell Management Plug-in を設定するには、このタスクを使用します。 1. 設定ウィザードようこそページ 2. 新しい接続プロファイルの作成 3.
メモ: このリリースは、バージョン 12G 以上のホストでのインストールでは、OMSA エージェントのイン ストールは必要ありません。11G ホストへのインストールでは、現在、OMSA エージェントは展開プロ セス中に自動的にインストールされます。 ウィザードを使用する新規接続プロファイルの作成には、以下を行います。 1. 接続プロファイルタブで、新規作成をクリックします。 2. プロファイル名と説明パネルでカスタム接続プロファイルを管理しやすくするために使われる プロフ ァイル名とオプションの 説明を入力し、次へをクリックします。 3. 関連ホストパネルで、当該接続プロファイル用のホストを選択し、次へをクリックします。 4. 資格情報と接続プロトコルの情報を表示し、次へをクリックします。 5. iDRAC パネルで、iDRAC 資格情報を入力します。 a) ユーザー名、パスワード、およびパスワードの確認を入力します。 ユーザー名にはスペースを含め て 16 文字を使用できます。次の文字は使用できません:/(スラッシュ)、\\(バックスラッシュ)、. (ピリオド)、@(アットマーク)、\"(
イベントおよびアラームを設定するには、以下を行います。 1. 設定ウィザードの イベント掲載レベルで、 以下のいずれかを選択します。 – すべてのイベントを掲載をしない - ハードウェアイベントはブロックされます。 – すべてのイベントを掲載する - すべてのハードウェアイベントが掲載されます。 – 2. 重要および警告イベントのみを掲載する - 重要または警告レベルのハードウェアイベントのみが 掲載されます。 – 仮想化関連の重要および警告イベントのみを掲載する - 仮想化関連の重要および警告イベントの みが掲載されます。これはデフォルトのイベント掲載レベルです。 すべてのハードウェアアラームとイベントを有効化するには、Dell ホストのアラームを有効にするチェ ックボックスを選択します。 メモ: アラームが有効化されている Dell ホストは、重要イベントに対応して保守モードに入ります。 3.
1. 2. 設定ウィザードの インベントリのスケジュールウィンドウで、以下の中から 1 つを行います。 – インベントリスケジュールを実行するには、選択した曜日をクリックします。 – インベントリスケジュールを実行しない場合は、Dell ホストではインベントリを実行しないを選 択します。 選択した曜日を選択した場合は、以下を行います。 a) インベントリを実行したい各曜日の横にあるチェックボックスを選択します。 b) テキストボックスに、時刻を HH:MM フォーマットで入力します。 入力時刻は現地時刻です。インベントリの収集を適切な時刻に実行するよう、時間差を計算します。 c) ウィザードの完了後、インベントリタスクを自動的に実行するには、ウィザードの最後にインベント リを実行します(推奨)チェックボックスを選択します。 このチェックボックスは、選択した曜日が選択されている場合にのみ表示されます。 3.
デフォルトのファームウェアアップデートリポジトリの設定 ウィザード ファームウェアリポジトリ設定には、展開サーバーのアップデートに使用されるファームウェアカタログロ ケーションが含まれます。ファームウェアの設定には最初にウィザードで設定し、後に Dell Management Center 設定オプションで設定できます。アップデートは後で Dell Server Management タブで実行できます。 デフォルトのファームウェアアップデートリポジトリを設定するには、以下を行います。 1. 設定ウィザードの ファームウェアリポジトリで、ファームウェアアップデートのためにデフォルトリポ ジトリを選択するには、以下のいずれか 1 つを選択します。 – Dell Online これは、Dell Online(ftp.dell.
Dell iDRAC 自動検出および初期始動の設定 メモ: 自動検出とハンドシェークを実行するには、管理者レベルのすべてのユーザーのアクセスを無効化 する必要があります。また、アプライアンスの展開資格情報が既存ユーザーの資格情報と一致する場 合、既存ユーザーのパスワードはアプライアンスの資格情報と一致させるために変更されます。 Dell iDRAC 自動検出および初期始動を設定するには、以下を行います。 1. iDRAC ユーザーインタフェースにログインします。 2. 左側のツリーメニューで、リモートアクセスをクリックします。 3. メインペインの上部タブで ネットワーク / セキュリティをクリックします。 4. 5. ユーザーサブタブをクリックして、ユーザー ID リンクを選択することにより、編集するユーザーを選択 します。 ユーザーの設定オプションボタンが選択されていることを確認し、次のページに進みます。 6. ユーザーを設定するには、次のいずれかを行います。 – ユーザーを無効化するには ユーザーの有効化チェックボックスを外し、適用をクリックします。 – 7.
メモ: 上記の手順は、使用している Linux ディストリビューションによって異なる場合があります。 3.