Dell Management Plug-In for VMware vCenter Version 1.
Notes, Cautions, and Warnings NOTE: A NOTE indicates important information that helps you make better use of your computer. CAUTION: A CAUTION indicates potential damage to hardware or loss of data if instructions are not followed. WARNING: A WARNING indicates a potential for property damage, personal injury, or death. Information in this publication is subject to change without notice. © 2012 Dell Inc. All rights reserved.
Contents Notes, Cautions, and Warnings...................................................................................................2 1 Overview.......................................................................................................................................9 Dell Management Plug-in For VMware vCenter.......................................................................................................9 Key Features...................................................................
Setting Up The Firmware Repository ...............................................................................................................29 Server Security Settings For Deployment........................................................................................................29 About Host, Bare Metal, and iDRAC Compliance Issues........................................................................................31 Running The Fix Non-Compliant vSphere Hosts Wizard.........................
Zero-Touch Hardware Provisioning And Deployment........................................................57 Hardware Prerequisites..........................................................................................................................................57 Provisioning Overview............................................................................................................................................58 Understanding Deployment Job Times...........................................
Virtual Appliance Management..............................................................................................................................75 Restarting The Virtual Appliance.....................................................................................................................75 Updating A Repository Location And Virtual Appliance..................................................................................75 Updating The Virtual Appliance Software Version...................
My vCenter Update Failed. What Can I Do?.....................................................................................................86 Performance during Connection Profile Test Credentials is extremely slow or unresponsive.......................86 Bare Metal Deployment Issues..............................................................................................................................87 Enabling Auto-Discovery On A Newly Purchased System..............................................
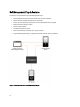
1 Overview Dell Management Plug-in For VMware vCenter VMware vCenter is the primary console used by IT administrators to manage and monitor VMware vSphere ESX/ESXi hosts. In a standard virtualized environment, VMware alerts and monitoring are used to prompt an administrator to launch a separate console to resolve hardware issues.
Dell Management Plug-in Features The following are high-level features of the Dell Management Plug-in: • Monitor Dell platforms using the standard vCenter event and alarm subsystem • Perform advanced hardware management and configuration • Perform zero touch deployment of hypervisors on bare-metal systems without using PXE • Build hardware and hypervisor profiles • Perform firmware updates • Troubleshoot infrastructure issues • Report at the Datacenter and Cluster view—export to CSV file • In
Dell Management Plug-in Configuration 2 The following sections provide step-by-step instructions for the Dell Management Plug-in initial configuration and compliance. Upgrade, uninstallation, and security role information are also covered in the following sections. Security Roles And Permissions The Dell Management Plug-in encrypts and stores sensitive user credential information. It does not provide any passwords to client applications to avoid any improper requests that could lead to issues.
Figure 3. vCenter vSphere Client Roles and Privileges Dell Operation Role Contains the privileges/groups required to do general appliance and vCenter operations including firmware update, hardware inventory, restart host, put host to maintenance mode, create vCenter task. This role contains the following privilege groups. Privilege Group - Dell.
Figure 4. Dell Infrastructure Deployment Role The privileges this role provides are Create Template, Configure HW Configuration Profile, Configure Hypervisor Deployment Profile, Configure Connection Profile, Assign Identity, and Deploy. Privilege Group — Dell.
Understanding Privileges Every action performed by the Dell Management Plug-in is associated to a privilege. The following sections list the available actions and the associated privileges: • • • • 14 Dell.Configuration.
– • Dell.Deploy-Provisioning.Create Template – • Create, display, delete, and edit deployment templates Dell.Configuration.Perform Host-Related Tasks – • Test the network and repository connections Blink LED, Clear LED, Configure OMSA URL from the Dell Server Management tab – Launch OMSA Console – Launch iDRAC Console – Display and clear SEL log Dell.Inventory.
3 Understanding How To Configure or Edit the Dell Management Plug-in After you do the basic installation of the Dell Management Plug-in, it needs to be configured. This is typically done using the Configuration Wizard, but you can also do it using the Settings page options in the Dell Management Center. The user interface in both areas is similar except in the wizard you click Save and Continue, whereas in the Settings options you click Apply.
This section provides more information and lets you view details about non-compliant host or bare metal servers or run the wizards to fix them. • Inventory Schedule In this section, you can learn more about inventory scheduling. • Warranty Data Retrieval Schedule This section lets you learn more or view/change warranty schedules. • Licensing This section lets you learn more about licensing. From there are links to the licensing tasks.
6. Click Next. 7. In the Host Root Credentials panel, do the following: a) Enter the User Name, Password, and Verify Password. The passwords must match. NOTE: Passwords cannot exceed 31 characters and cannot contain any special characters. NOTE: For servers that do not have either an iDRAC Express or Enterprise card, the iDRAC test connection result states Not Applicable for this system. NOTE: The OMSA credentials are the same credentials used for ESX and ESXi hosts.
To set up a proxy server: 1. In the Configure HTTP Proxy window, do one of the following: – To not use a proxy server, click Save and Continue. – To use a proxy server, under Settings enter a Proxy Server Address. 2. Enter the Proxy Port number. 3. Select the Credentials Required check box, if needed. 4. If you selected Credentials Required, do the following: a) In the Proxy User Name text box, type the proxy user name. b) In the Proxy Password text box, type the proxy password.
– 2. To not run warranty schedules, select Do not run inventory on Dell hosts. If you selected On Selected Days, then do the following: a) Select the text box next to each day of the week that you want to run the warranty jobs. b) In the text box, enter the time in HH:MM format. The time you enter is your local time. Calculate the time difference you need to run the warranty jobs at the proper time. 3.
* CIFS share for xml file: \\host\share\filename.xml * CIFS share for gz file: \\host\share\filename.gz b) If using a CIFS share, enter the User Name, Password, and Verify Password; the passwords must match. These fields are only active when entering a CIFS share. NOTE: The @ character is not supported for use in shared network folder user names/passwords. c) To validate your entries click Begin Test. 3. To save this selection and continue the Configuration Wizard, click Save and Continue.
10. In the Provisioning server field, enter the virtual appliance IP address, and then press Enter. 11. To initiate discovery and initial start up, click Save. Configuring NFS Shares To use NFS shares with the Dell Management Plug-in for backup and restore operations, firmware updates, and as a staging folder, there are certain configuration items that you must complete. CIFS shares do not require additional configuration. To configure NFS shares: 1.
• Enable or Disable Warranty Expiration Notification. The OMSA software can be used to: NOTE: OMSA software is only required on Dell servers prior to version 12G. • Manage vCenter elements (detailed sensor, component-level health information). • Clear command logs and system event logs (SELs). • Obtain NIC statistics. • Make sure that the Dell Management Plug-in captures events from a selected host.
warranty expiration notifications for hosts and clusters. Set or edit this feature in the Dell Management Center on the Settings, General Page. To enable or disable server warranty expiration notification: 1. In the Dell Management Center, click Settings → General. 2. In the General page, to enable notifications, select the Enable Warranty Status Notifications check box. 3.
b) For Certificate Check, to download and store the OMSA certificate and validate it during all future connections, select Enable , or select Disable to perform no check and not store the certificate. Select Enable if you use Active Directory. 9. Click Next. 10. The Test Connection window tests the entered iDRAC and Host Root Credentials on the selected servers. Do one of the following: – To begin the test, click Test Selected. The other options are inactive. – To stop the tests click Abort Tests. 11.
• Define any required credentials - user name and password NOTE: Proxy passwords cannot exceed 31 characters. Related Tasks: • Setting Up A Proxy Server • Using The HTTP Proxy For Retrieving Web Based Data • Setting Up The HTTP Proxy Using The Administration Console Setting Up A Proxy Server Set up the proxy server in the Configuration Wizard or later using the Settings option, Proxy. NOTE: Proxy passwords cannot exceed 31 characters. To set up a proxy server: 1.
– Hardware Inventory – Storage – Firmware – Power Monitoring – Warranty Status The following host commands work within the Dell Server Management tab or by right clicking on a host: – Blink Indicator Light – Run Firmware Update Wizard – Launch Remote Access – Launch OMSA Plug-In Configuration – Launch CMC – Renew Warranty – Proactive Systems Management Running A Warranty Retrieval Job The warranty retrieval job configuration is similar between the wizard and from the Dell Management
1. In Dell Management Center → Settings → Deployment Credentials , click Edit. 2. In the Credentials for Bare Metal Server Deployment, under Credentials, do the following: – In the User Name text box, enter the user name. The user name should be 16 characters or less (only ASCII printable characters). – In the Password text box, enter the password. The password should be 20 characters or less (only ASCII printable characters). – In the Verify Password text box, enter the password again.
• Enabling A Server White List • Adding Servers To A White List • Deleting Servers From A WhiteList Enabling A Deployable Server White List For information about security settings for deployable servers, see Server Security Settings For Deployment. To enable a server white list: 1. In the Dell Management Center, in the left pane, select Settings. 2. In the right-pane, select Security. 3. In the Security window, click Edit. 4.
About Host, Bare Metal, and iDRAC Compliance Issues To manage hosts, bare metal servers, and iDRAC with the Dell Management Plug-in each must meet certain minimum criteria. If not compliant, then they are not managed properly by the Dell Management Plug-in. Use the Fix NonCompliant Hosts, Bare Metal Server, and iDRAC compliance links to see which host/bare metal servers/iDRACs in your configuration are not compliant and fix them.
1. In the Dell Management Center, in the left pane, click Compliance → vSphere Hosts. 2. In the vSphere Host Compliance window, view the noncompliant hosts, then click Fix Non-Compliant vSphere Hosts. 3. In the Fix Non-Compliant vSphere Hosts wizard, select the check boxes for the hosts you want to fix. 4. Click Next. 5. If there is a server without a connection profile, you are given the option to exit the wizard and fix these systems from the Connection Profile page, or continue with this wizard.
3. To run the re-check, click Check Compliance. 4. To abort the re-check, click Abort All Tests. 5. If you successfully fixed your system, the list refreshes and your system is removed from the list. If not, the noncompliant system remains on the list. 6. When finished, click Done. Downloading An ISO For Manual Firmware Updates The Dell Management Plug-in automatically fixes most compliance issues. Sometimes, a manual ISO installation is required.
1. Launch a browser window and enter the Administration Portal URL displayed in the vSphere vCenter Console tab for the virtual machine you want to configure or use the link from the Dell Management Console → Settings page. The URL uses the following format and is case sensitive: https:// 2. In the Administration Portal, to unregister the 1.0 appliance from any vCenter instances to which it is registered, select VCENTER REGISTRATION → UNREGISTER . 3.
1. Launch a browser window and enter the Administration Portal URL displayed in the vSphere vCenter Console tab for the virtual machine you want to configure or use the link from the Dell Management Console → Settings page. The URL uses the following format and is case sensitive: https:// 2. In the left pane of the Administration Portal, click APPLIANCE MANAGEMENT. 3.
• In Use - the number of vCenter Connection or Host Connection licenses in use. For Host Connection, this number represents the number of hosts (or servers) that have been discovered and inventoried. • Available - the number of vCenter Connection or Host Connection licenses available for future use. • Unlicensed Hosts - the number of Host Connections that exceeded the licensed amount.
End-To-End Hardware Management 4 The goal of end-to-end hardware management is to provide the system health status and up-to-date infrastructure information that an administrator needs to respond to critical hardware events without leaving the Dell Management Center or vCenter.
Post only Critical and Warning Events Posts only events with either Critical or Warning criticality into related vCenters. Post only Virtualization-Related Critical and Warning Events Post Virtualization related events received from hosts into related vCenters. Virtualization related events are those that Dell has selected to be most critical to hosts running virtual machines. When you configure your Events and Alarms, you can enable them.
1. In the Dell Management Center, under Settings → Events and Alarms , click Edit. 2. Under Event Posting Levels, select one of the following: 3. – Do not post any events - Block hardware events. – Post All Events - Post all hardware events. – Post only Critical and Warning Events - Post only critical or warning level hardware events.
3. If the OMSA agent is already installed, make sure that it has remote enablement configuration (-c) or the Dell Management Plug-in installation will not complete successfully. Reinstall it with the -c option and restart the service: srvadmin-install.sh -c srvadmin-services.sh restart Deploying The OMSA Agent Onto An ESXi System Install the OMSA VIB on an ESXi system to gather inventory and alert information from the systems.
Events appear only on those nodes in the vSphere tree. vSphere Client Host Overview The Overview provides information on key host server attributes, including individual component health, identification, hypervisor, and firmware information. HARDWARE COMPONENT HEALTH Component health is a graphical representation of the status of all major host server components: system chassis, power supply, temperature, fans, voltage, processors, batteries, intrusion, hardware log, power management, and memory.
– • List of how many of each storage component is present in the system component data table that contains detailed information on that component Firmware Run the Firmware Update Wizard or view your firmware status. See, Firmware Updates.
About Inventory Schedule The inventory schedule sets the time/day for running inventory jobs, such as: • Weekly at a specific time and on selected days • At a set time interval A completed inventory is required to gather the data needed by the majority of the Dell Management Plug-In features. An inventory of all host systems must be collected to display this information.
The overview provides information on key host server attributes, including individual component health, identification, hypervisor, and firmware information. – Hardware Component Health is a graphical representation of the status of all major host server components: system chassis, power supply, temperature, fans, voltage, processors, batteries, intrusion, hardware log, power management, and memory.
8. Under Host Information, click Warranty to display system warranty information including: – Warranty provider name and description of the warranty. – Start and end dates and how many days are left on the warranty. – Status of the warranty (active, inactive) and when the warranty information was last updated.
Viewing Host Power Monitoring The host system power monitoring provides general power information, energy statistics, and reserve power information, including: • Current power budget, profile, warning and failure thresholds • Energy consumption, system peak power, and amperage statistics • Reserve power and peak reserve capacity To view host power monitoring: 1. In vSphere Client, select your host, then select the Dell Server Management tab. 2.
• A list of hosts associated with the connection profile • iDRAC credentials • Host root credentials After you have run the Configuration Wizard, you can manage connection profiles from the Dell Management Center, which include: • Creating A New Connection Profile • Viewing And Editing An Existing Connection Profile • Deleting A Connection Profile • Testing A Connection Profile • Refreshing A Connection Profile Creating A New Connection Profile A connection profile stores the credentials tha
b) For Certificate Check, to download and store the OMSA certificate and validate it during all future connections, select Enable , or select Disable to perform no check and not store the certificate. Select Enable if you use Active Directory. 9. Click Next. 10. The Test Connection window tests the entered iDRAC and Host Root Credentials on the selected servers. Do one of the following: – To begin the test, click Test Selected. The other options are inactive. – To stop the tests click Abort Tests. 11.
1. From the Dell Management Center, click Connection Profiles. 2. Under Available Profiles, select the profile to delete and then click Delete. 3. On the message that displays, to remove the profile, click Delete, or click Cancel to cancel the delete action. Testing A Connection Profile To test a connection profile: 1. In the Dell Management Center, select Connection Profiles. 2.
1. From the Dell Management Center, in the left pane, select Log. 2. To update the log with the most recent data, click Refresh. 3. To select a severity category to filter the log data, in the All Categories drop-down list select one of the following: All Categories, Info, Warning, Error, or Security. 4. To select a date range for filtering log data, click the Last Week drop-down list and select one of the following: Last week, Last Month, Last Year, or Custom Range.
About Firmware Updates The location where servers receive firmware updates is a global setting that is available in the Dell Management Center. The firmware repository is set up in the Dell Management Center, but updates are run on the specific Dell Host tab in vSphere Client. Firmware repository settings contain the firmware catalog location used to update deployed servers. There are two location types: Dell (ftp.dell.com) Uses the firmware update repository of Dell (ftp.dell.com).
1. In vSphere Client → Dell Server Management tab → Host Information, click Firmware → Run Firmware Update Wizard. 2. To use the Load a single firmware update from a file option: a) Enter the file path in the following format: CIFS: \\\.exe or NFS: host:/share/filename.exe b) If you have NFS, skip to step 7. Otherwise enter the User Name and Password in a domain format that has access to the share drive. c) Continue to step 7.
– To automatically exit maintenance mode after the firmware update, select the Exit maintenance mode after firmware update completes check box. – To enter maintenance mode to examine and/or test the machine before adding it back to the cluster, do not check the check box. 3. Click Update. 4. The Success dialog box tells you that an update is now in progress.
Proactive Systems Management The Dell Management Plug-in lets you install and use Proactive Systems Management software, which is a free remotesupport software. You can enable it from the Dell Management Center Settings → General page. Once enabled, the link to it is found on the Dell Server Management tab in vSphere Client, Host's view page.
NOTE: Dell does not store transmitted service tag information. Related Tasks: • Renewing Host Warranty • Running A Warranty Retrieval Job • Viewing Server Warranty Information For A Single Host • Viewing Warranty Information For An Entire Data Center Renewing Host Warranty You can view the warranty status for your servers, or renew the warranty on the Warranty page. 1. In vSphere Client → Dell Server Management tab → Host Information, click Warranty. 2.
Zero-Touch Hardware Provisioning And Deployment 5 Hardware Prerequisites To successfully perform hardware provisioning and deployment, the physical servers must appear in the Deployment Wizard. All physical servers must meet the following prerequisites: • See the Dell Management Plug-In for VMWare vCenter Version 1.5 Release Notes for specific hardware support information. • The server must have the minimum supported versions of iDRAC firmware, Lifecycle controller and BIOS.
Provisioning Overview Once a physical inventory of the datacenter is complete, all auto-discovered bare-metal systems are available to the Dell Management Plug-in for zero touch hardware provisioning and hypervisor deployment. To prepare for provisioning and deployment, you must: Create a Hardware Profile Contains the hardware settings gathered from a reference server that is used to deploy new servers. See Creating A New Hardware Profile.
Configured The server is configured with all hardware information required for a successful hypervisor deployment. Downloading Custom Dell ISO Images Custom ESXi 4.1 and ESXi 5.0 images that contain all Dell drivers are required for deployment. Dell cannot produce custom ESX 4.1 images. For deployments to work all drivers must be present natively in the ISO VMware produces. NOTE: The Dell Management Plug-in ISO does not contain the required ESXi 4.1 and ESXi 5.0 custom ISO images for deployment.
RAID Configuration The RAID configuration displays the current RAID topology on the reference server at the time the hardware profile was extracted. NOTE: If using the customized settings from the reference server option in the hardware profile, the RAID configuration task defaults to RAID1 on the first two drives of the integrated controller that are RAID1 capable. Additionally, a dedicated hot-spare for the RAID1 array is created if a candidate drive meeting the criteria exists.
7. To find a reference server that is compliant, managed by vCenter, and successfully inventoried by the Dell Management Plug-in, click Browse. 8. In the Servers dialog box, scroll down the list to find the right reference server, and click Select. 9. To customize the reference server settings as defaults, click Customize Settings from Reference Server , and then click Save. 10. A dialog box that states extracting the settings takes several minutes is displayed. To populate settings, click Continue.
NOTE: For detailed iDRAC information, including setting options and explanations, refer to the iDRAC User’s Guide for the selected server. 17. In the left pane, select iDRAC Settings → User List. To include user list information in the profile, select the Include User List in this Hardware Profile check box. Under iDRAC Local User List, do one of the following: a) Add User: Manually enter an iDRAC user and the required information. When finished, click Save to save your changes or Cancel to cancel.
Viewing Or Editing A Hardware Profile To view or edit a hardware profile: 1. In the Dell Management Center, select Deployment → Deployment Templates → Hardware Profile. 2. Select a profile and click View/Edit. 3. In the Hardware Profile window, to make any changes, click Edit. 4. Click Save to apply changes, or click Cancel to cancel changes. Duplicating A Hardware Profile To duplicate a hardware profile: 1. In the Dell Management Center, select Deployment → Deployment Templates → Hardware Profile.
Creating A New Hypervisor Profile To deploy and configure ESX/ESXi to a server, a hypervisor profile must be created.
Managing Hypervisor Profiles There are several management actions you can perform on existing hypervisor profiles, including: • Viewing Or Editing Hypervisor Profiles • Duplicating Hypervisor Profiles • Renaming Hypervisor Profiles • Deleting A Hypervisor Profile • Refreshing Hypervisor Profiles Viewing Or Editing Hypervisor Profiles To view or edit hypervisor profiles: 1. In the Dell Management Center, select Deployment → Deployment Template → Hypervisor Profile window. 2.
Refreshing Hypervisor Profiles To refresh an updated hypervisor profile: 1. In the Dell Management Center, select Deployment → Deployment Templates → Hypervisor Profile. 2. Click Refresh. The updated hypervisor profile information displays. Building A New Deployment Template A deployment template contains either a hardware profile, a hypervisor profile, or both. The Deployment Wizard uses this template to provision server hardware and deploy hosts within vCenter. To build a new deployment template: 1.
3. Click Delete on the message box to delete the template, or click Cancel to cancel. Renaming a Deployment Template To rename deployment template: 1. In the Dell Management Center, select Deployment → Deployment Templates . 2. On the Deployment Templates page, select a template, click Rename. 3. Enter the template's new name and click Apply. The template must have a unique name. 4.
3. Click Next. To continue with the task to step two, click Deployment Wizard Step 2. Deployment Wizard Step 2: Deployment Templates Deployments to a hardware profile differ from hypervisor deployments. If you are deploying to a hardware profile, click Deployment Wizard Step 6. NOTE: A successful deployment requires an ESX ISO that has the correct drivers. Deployment on newer Dell systems may require using Dell custom ISO images that contain all the required Dell drivers. ESX 4.
• Enter networking information (IP address, subnet mask and gateway); a fully-qualified domain name for the hostname is mandatory. • Use the Dynamic Host Configuration Protocol (DHCP) to configure IP addresses, subnet mask, gateway IP, hostname and preferred/alternate DNS servers. To identify your server: 1. Server Identification assigns deployed servers new names and network identification.
a) Click Schedule server(s) for deployment. b) Use the calendar control to select the date. c) Enter the time of day: * Immediately: Click Deploy server(s) now. * Postpone job: Click Create deployment job. * Put on hold: With this option, only the schedule can be modified and all other deployment job options cannot be changed. 2. Enter a Job Name and Job Description. 3. Click Finish. 4. Now that the deployment wizard is complete, you can manage deployment jobs using the Job Queue. 5.
To display full information for each item in the dialog’s table, hover over the item and an additional text pop-up is displayed. 4. To either put a selected job on hold or to enter an updated schedule, click Modify. 5. Click Abort to abort the deployment job. 6. When the message displays, click Abort Job to abort, or click Do Not Abort Job to cancel. NOTE: Any deployment jobs that are in progress cannot be aborted. 7. To display the Purge Deployment Job Queue window, click Purge Job Queue.
Dell Management Plug-In Administration 6 Administration of the Dell Management Plug-in and its virtual environment is achieved by using two additional administration portals: • Web-based administration portal • Console view for an individual server (the appliance virtual machine console). Through the use of these two portals, global settings for vCenter management, plug-in database backup and restore, and reset/restart actions can be entered and used across all vCenter instances.
4. Under Admin User Account, do the following: a) In the Admin User Name text box, enter the administrator's user name. b) In the Password text box, enter the password. c) In the Verify Password text box, enter the password again. 5. Click Register. Modifying The vCenter Administrator Login To modify the vCenter administrator login: 1.
1. Launch a browser window and enter the Administration Portal URL displayed in the vSphere vCenter Console tab for the virtual machine you want to configure or use the link from the Dell Management Console → Settings page. The URL uses the following format and is case sensitive: https:// 2. In the left pane, click VCENTER REGISTRATION. The registered vCenters are displayed in a table. To display the upload license dialog box, click Upload License. 3.
1. Launch a browser window and enter the Administration Portal URL displayed in the vSphere vCenter Console tab for the virtual machine you want to configure or use the link from the Dell Management Console → Settings page. The URL uses the following format and is case sensitive: https:// 2. In the left pane, click APPLIANCE MANAGEMENT. 3. Next to Appliance Update, click Edit. 4.
1. Launch a browser window, and enter the Administration Portal URL displayed in the vSphere vCenter Console tab for the virtual machine you want to configure or use the link from Dell Management Console → Settings page. The URL uses the following format and is case sensitive: https:// 2. In the left pane, click Appliance Management. 3. In the Appliance Management page, scroll down to the HTTP Proxy Settings, and then click Edit. 4.
Uploading An HTTPS Certificate You can use HTTPS Certificates for secure communication between the virtual appliance and host systems. To set up this type of secure communication, a certificate signing request must be sent to a certificate authority and then the resulting certificate is uploaded using the Administration Portal. There is also a default certificate that is self-signed and can be used for secure communication; this certificate is unique to every installation. To upload a certificate: 1.
Managing Backup And Restore Managing backup and restore is accomplished from the Administrative Portal. Tasks on this page include: • Configuring Backup And Restore • Scheduling Atomatic Backups • Performing An Immediate Backup • Restoring The Database From Backup Configuring Backup And Restore The backup and restore function backs up the Dell Management Plug-in database to a remote location from which it can be restored at a later date.
The Next Backup populates with the date and time of the next scheduled backup. 7. Click Apply. Performing An Immediate Backup To perform an immediate backup: 1. Launch a browser window, and enter the Administration Portal URL displayed in the vSphere vCenter Console tab for the virtual machine you want to configure or use the link from Dell Management Console → Settings page. The URL uses the following format and is case sensitive: https:// 2.
1. In the vSphere Client, select the Dell Management Plug-in, and then click the Console tab. 2. In the Console window, select Configure Network, then press . 3. Enter the desired network settings under Edit Devices or under Edit DNS configuration, then click Save & Quit. To abort any changes, click Quit. Changing The Virtual Appliance Password The virtual appliance password is changed in the vSphere Client using the Console tab. To change the virtual appliance password: 1.
have made to this appliance will be Lost. Are you sure you wish to Reset this Appliance to Factory Settings? 4. Enter y to reset or n to cancel. The appliance is reset to the original factory settings. NOTE: When the virtual appliance is reset to factory settings, any updates made to the Network Configuration are preserved; these settings are not reset. Refresh Console Tab View To refresh the Console view, select Refresh and press .
Troubleshooting 7 Use this section to find answers to troubleshooting questions. Upgrading Issues I backed up my 1.0 appliance, powered it off, deployed 1.5 and tried to restore my database. The Dell Management Plugin is disabled. What do I do? The 1.0 appliance must be unregistered before it is powered off. Follow the supported upgrade procedure in this book for more details. I backed up my 1.0 virtual appliance, unregistered it, deployed 1.5 and registered it, and then restored the database.
10. Select the System Board Ambient Temp link, and select the Set to Values option button. 11. Set the Maximum Warning Threshold to below the current listed reading; for example if the current reading is 27, set the threshold to 25. 12. Select Apply Changes, and the temperature warning event is generated. To cause another event, restore the original settings using the same Set to Values option. Events are generated as warnings, and then to a normal state.
If you puts the host in lockdown mode or removes a host from lockdown mode, a 30 minute wait is necessary before performing the next operation on the Dell Management Plug-in. What Setting Should I Use For UserVars.CIMoeMProviderEnable With ESXi 4.1 U1? Set UserVars.CIMoemProviderEnabled to 1. I Am Using A Reference Server To Create A Hardware Profile But It Failed.
4. Click UnregisterExtension. 5. Enter the extension key to unregister com.dell.plugin.Dell Management Plug-in, then click Invoke method. 6. In the vSphere client, power off the Dell Management Plug-in and delete it. Entering A Password In The Backup Now Screen Receives An Error Message If you are using the low resolution monitor, the Encryption Password field will not be visible from the BACKUP NOW window. You must scroll down the page to enter the encryption password.
6. In the User Configuration page for the selected user, select the check box next to Enable user, and then and click Apply. Bare Metal Deployment Issues This section deals with issues found during the deployment process. Auto-Discovery and Handshake Prerequisites • Prior to running auto-discovery and handshake, make sure that iDRAC and Lifecycle Controller firmware and BIOS versions meet the minimum recommendations. • CSIOR must have run at least once on the system or iDRAC.
1. Visit support.dell.com. 2. Select your support category. 3. If you are not a U.S. customer, select your country code at the bottom of the support.dell.com page, or select All to see more choices. 4. Select the appropriate service or support link based on your need. Where To Get Additional Help For This Software View or download Dell virtualization documentation: http://support.dell.com/support/edocs/software/eslvmwre/. Dell vCenter Plug-In Frequently Asked Questions http://i.dell.
8 Virtualization—Related Events The following table contains the virtualization-related critical and warning events, including event name, description and severity level. Event Name Description Severity Recommended Action Dell-Current sensor detected a warning value A current sensor in the specified system exceeded its warning threshold. Warning No action Dell-Current sensor detected a failure value A current sensor in the specified system exceeded its failure threshold.
Dell - Power supply sensor A power supply sensor in detected a non-recoverable the specified system value detected an error from which it cannot recover. Error No action Dell - Memory Device Status warning A memory device correction Warning rate exceeded an acceptable value. No action Dell - Memory Device error A memory device correction Error rate exceeded an acceptable value, a memory spare bank was activated, or a multibit ECC error occurred.
configuration error, or experienced a thermal trip. Dell - Processor sensor A processor sensor in the Error detected a non-recoverable specified system has failed. value No action Dell - Device configuration error A configuration error was detected for a pluggable device in the specified system.
Dell - Temperature sensor detected a failure value Error Put the system into maintenance mode Dell - Temperature sensor A temperature sensor on detected a non-recoverable the backplane board, value system board, or drive carrier in the specified system detected an error from which it cannot recover. Error No action Dell - Fan sensor returned to a normal value Info No action Dell - Fan sensor detected a Fan Sensor reading in the warning value host exceeded a warning threshold value.
Dell - Storage: Controller warning A portion of the physical disk is damaged. Warning No action Dell - Storage: Controller failure A portion of the physical disk is damaged Error Put the system into maintenance mode Dell - Storage: Channel Failure Channel failure. Error Put the system into maintenance mode Dell - Storage: Enclosure hardware information Enclosure hardware information. Info No action Dell - Storage: Enclosure hardware warning Enclosure hardware warning.