
User's Manual
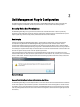

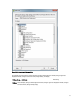

Table Of Contents
- Contents
- Notes, Cautions, and Warnings
- Overview
- Dell Management Plug-in Configuration
- Understanding How To Configure or Edit the Dell Management Plug-in
- Dell Management Plug-In Home Page
- Configuration Wizard Welcome Page
- Creating A New Connection Profile [Wizard]
- Configuring Events And Alarms [Wizard]
- Setting Up A Proxy Server [Wizard]
- Scheduling Inventory Jobs [Wizard]
- Running A Warranty Retrieval Job [Wizard]
- Configuring the Deployment Credentials [Wizard]
- Setting The Default Firmware Update Repository [Wizard]
- Enabling The OMSA Link [Wizard]
- Configuring Dell iDRAC Auto-Discovery And Initial Start-up
- Configuring NFS Shares
- Settings Overview
- About Host, Bare Metal, and iDRAC Compliance Issues
- Upgrading Dell Management Plug-In For VMware VCenter
- About Dell Management Plug-in Licensing
- End-To-End Hardware Management
- Monitoring the Datacenter And Host System
- vSphere Client Host Overview
- About Inventory Schedule
- Viewing Storage Inventory
- Viewing Host Power Monitoring
- Displaying The Entire Datacenter Hardware Configuration And Status
- Managing Connection Profiles
- Understanding System Event Logs In vSphere Client Host View
- About Firmware Updates
- Advanced Host Management Using vCenter
- Zero-Touch Hardware Provisioning And Deployment
- Hardware Prerequisites
- Provisioning Overview
- Understanding Deployment Job Times
- Server States Within The Deployment Sequence
- Downloading Custom Dell ISO Images
- Understanding How To Configure A Hardware Profile
- About Managing Hardware Profiles
- Creating A New Hypervisor Profile
- Managing Hypervisor Profiles
- Building A New Deployment Template
- Running The Deployment Wizard
- Deployment Wizard - Step 1: Select Servers
- Deployment Wizard Step 2: Deployment Templates
- Deployment Wizard Step 3: Global Settings
- Deployment Wizard Step 4: Server Identification
- Deployment Wizard Step 5: Connection Profile
- Deployment Wizard Step 6: Scheduling Jobs
- Understanding Job Queue
- Adding A Server Manually
- Removing A Bare Metal Server
- Dell Management Plug-In Administration
- Web-based Administration Portal
- Managing vCenter Server Connections
- Virtual Appliance Management
- Setting Up Global Alerts
- Managing Backup And Restore
- Understanding vSphere Client Console Tab
- Troubleshooting
- Upgrading Issues
- Common Questions
- How Do I Test Event Settings By Using OMSA To Simulate A Temperature Hardware Fault?
- I Have The OMSA Agent Installed On A Dell Host System, But I Still Get An Error Message That OMSA Is Not Installed.What Should I Do?
- Can The Dell Management Plug-in Support ESX/ESXI with Lockdown Mode Enabled?
- Inventory is Failing on Hosts ESXi 4.0 Update2 and ESXi Update 3 in Lockdown Mode After a Reboot.
- When I tried to use lockdown mode, it failed.
- What Setting Should I Use For UserVars.CIMoeMProviderEnable With ESXi 4.1 U1?
- I Am Using A Reference Server To Create A Hardware Profile But It Failed. What Should I Do?
- I Am Attempting To Deploy ESX/ESXi On A Blade Server And It Failed. What Should I Do?
- Why Do I See Auto-discovered Systems Without Model Information In The Deployment Wizard
- The NFS Share Is Set Up With The ESX/ESXI ISO, But Deployment Fails With Errors Mounting The Share Location.
- How Do I Force Removal Of The Virtual Appliance?
- Entering A Password In The Backup Now Screen Receives An Error Message
- In vSphere, Clicking The Dell Server Management Tab Or Dell Management Icon Returns A 404 Error
- My Firmware Update Failed. What Do I Do?
- My vCenter Update Failed. What Can I Do?
- Performance during Connection Profile Test Credentials is extremely slow or unresponsive
- Bare Metal Deployment Issues
- Contacting Dell
- Where To Get Additional Help For This Software
- Dell Management Plug-in For VMware vCenter Related Information
- Virtualization—Related Events

This section provides more information and lets you view details about non-compliant host or bare metal servers
or run the wizards to fix them.
• Inventory Schedule
In this section, you can learn more about inventory scheduling.
• Warranty Data Retrieval Schedule
This section lets you learn more or view/change warranty schedules.
• Licensing
This section lets you learn more about licensing. From there are links to the licensing tasks.
• Events and Alarms Settings
Learn more about event and alarm settings or take the link that lets you configure them.
• Host Connection Licenses
Here you can view the host connection licenses in real time. In addition, you can use the Buy Now link to
purchase a full version license to manage more than one host. The Buy Now link only appears if you are using a
demo license.
Configuration Wizard Welcome Page
After you install the Dell Management Plug-in, it must be configured.
1. In the vSphere Client, under Management, click the Dell Management icon.
2. The first time you run the Dell Management Icon, it opens the Configuration Wizard. You can also access this
wizard on the Dell Management Center → Settings page.
3. In the Welcome tab, review the steps you will step through, and then click Next.
Creating A New Connection Profile [Wizard]
A connection profile stores the credentials that the virtual appliance uses to communicate with Dell servers. Each Dell
server must be associated with a connection profile to be managed by the Dell Management Plug-in. You may assign
multiple servers to a single connection profile. Creating the Connection Profile is similar between the Configuration
Wizard and from the Dell Management Center, Settings option.
NOTE: With this release, and with installations on hosts that are version 12G and above, OMSA agent installation is
not required. For installations on 11G hosts, OMSA agent is now automatically installed during the deployment
process.
To create a new connection profile using the wizard:
1. From the Connection Profiles tab, click Create New.
2. In the Profile Name and Description panel, enter the Profile Name and an optional Description that are used to help
manage custom connection profiles, and then click
Next.
3. In the Associated Hosts panel, select the hosts for the connection profile and click Next.
4. View the information about credentials and connection protocols and click Next.
5. In the iDRAC panel, enter the iDRAC credential information.
a) Enter the User Name, Password, and Verify Password. The passwords must match and use ASCII-printable
characters only.
NOTE: Passwords cannot exceed 20 characters and cannot contain any special characters.
b) For Certificate Check, select Enable to download and store the iDRAC certificate and validate it during all future
connections, or select Disable to perform no check and not store the certificate.
You need to select Enable if you are using Active Directory.
18