Metered Rack-Stromverteilungseinheit (rPDU) Dellt Benutzerhandbuch zur Firmware-Aktualisierung www.dell.com | support.dell.
Hinweise und Warnungen HINWEIS: Ein HINWEIS macht auf eine wichtige Information aufmerksam, mit deren Hilfe Sie Ihr Produkt besser nutzen können. Die Angaben in diesem Dokument unterliegen unangekündigten Änderungen. E 2010 Dell Inc. Alle Rechte vorbehalten. Eine Vervielfältigung gleich welcher Art ist ohne schriftliche Genehmigung von Dell Inc. strengstens untersagt. In diesem Text verwendete Marken: Bei Dell und dem DELL Logo handelt es sich um Marken von Dell Inc.
Inhaltsverzeichnis 1 Einleitung Unterstützte Gerätetypen . . . . . . . . . . . . . . . . . . . . . . . . . . . . . . . . . . . . . . . . . . 2 6 Netzwerkaktualisierungen für NMC- und MCU-Firmware Bevor Sie beginnen . . . . . . . . . . . . . . . . . . . . . . . . . . . . . . . . . . . . . . . . . . . . . . Beschreibung der Registerkarte „Network Upgrade“ (Netzwerkaktualisierung) . . . . . . . . . . . . . . . . . . . . . . . . . . . . . . . . . . . . . . . 7 8 Herstellen der Netzwerkverbindung . . . . .
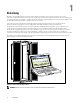
Einleitung 1 Die Dellt Metered Rack-Stromverteilungseinheit (rPDU) verfügt über einen seriellen Anschluss sowie einen 10/100 Base-T Ethernet-Anschluss für externe Steuerung. Diese Anschlüsse werden nicht nur für die Überwachung und Verwaltung der gemessenen rPDUs, sondern auch für die Aktualisierung der Mikroprozessor-Steuereinheit (MCU)- und der Dell Netzwerkmanagementkarte (NMC)-Firmware verwendet.
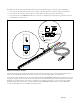
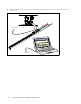
Die rPDU-Frontblende wird folgendermaßen für Firmware-Flash-Aktualisierungen verwendet (siehe Abbildung 2): S Verwenden Sie den Ethernet-Anschluss für eine NMC- oder MCU-Firmware-Aktualisierung über das Netzwerk. S Verwenden Sie den seriellen Anschluss für eine serielle NMC- oder MCU-Firmware-Aktualisierung. S Verwenden Sie die Taste RESET (Zurücksetzen), um bei einer NMC-Firmware-Aktualisierung über das Netzwerk die NMC-Karte zurückzusetzen.
Unterstützte Gerätetypen Die rPDU NMC- und die MCU-Firmware-Aktualisierungen werden für die folgenden Modelle unterstützt: S DELLM0001 S DELLM001A S DELLM0002 S DELLM0003 S DELLM0004 S DELLM004A S DELLM0005 S DELLM0006 S DELLM0007 6 | Einleitung
2 Netzwerkaktualisierungen für NMC- und MCU-Firmware In diesem Kapitel wird die Verwendung des Hilfsprogramms für die Netzwerkaktualisierung der Dell Metered Rack-Stromverteilungseinheit (rPDU) zur Aktualisierung der Dell Netzwerkmanagementkarte (NMC)- oder Mikroprozessor-Steuereinheit (MCU)-Firmware beschrieben. Hier finden Sie außerdem eine Beschreibung des Aktualisierungshilfsprogrammfensters und Informationen zu den Voraussetzungen der rPDU-Aktualisierung.
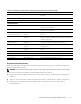
Beschreibung der Registerkarte „Network Upgrade“ (Netzwerkaktualisierung) Auf der Registerkarte „Network Upgrade“ (Netzwerkaktualisierung) der PDU Upgrade Utility (siehe Abbildung 3) können Sie Folgendes: S Auswählen der Firmware-Datei für diese Aktualisierung S Überprüfen der eindeutigen rPDU- und Firmware-Identifizierungsdaten vor Beginn der rPDU-Aktualisierung S Starten der rPDU-Firmware-Aktualisierung Beschreibungen zu den Feldern und Schaltflächen auf der Registerkarte „Network Upgrade“ (Netzwerkaktua
Tabelle 1. Beschreibungen zur Registerkarte „Network Upgrade“ (Netzwerkaktualisierung) (Fortsetzung) Feld Zweck Beschreibung Modify (Ändern) Aktionsschaltfläche Ermöglicht die Eingabe des Kennworts, das Sie zum Fortfahren benötigen. Remove (Entfernen) Aktionsschaltfläche Entfernt ein rPDU-Aktualisierungsziel aus der Liste. Discover (Abrufen) Aktionsschaltfläche Ruft eine Liste der rPDUs in Ihrem Netzwerk ab.
4 Stellen Sie sicher, dass der PC, den Sie für die Firmware-Aktualisierung verwenden, mit demselben Netzwerk verbunden ist. Zum Netzwerk Zum Netzwerk Abbildung 4.
Aktualisieren der Firmware Die Vorgehensweise für die Flash-Aktualisierung über das Netzwerk wird in der folgenden Reihenfolge beschrieben: S Vorbereiten der rPDU für die Aktualisierung S Zugreifen auf die Benutzeroberfläche für die Netzwerkaktualisierung S Auswählen der Aktualisierungseinstellungen S Identifizieren der zu aktualisierenden rPDU S Auswählen, ob die NMC- oder die MCU-Firmware aktualisiert werden soll S Abschließen des Aktualisierungsvorgangs HINWEIS: Wenn die Stromversorgung zur rPDU während
So wählen Sie die zu aktualisierende rPDU aus: 4 5 Klicken Sie auf Discover (Abrufen), um eine Liste der rPDUs in Ihrem Netzwerk einschließlich IPv4- bzw. IPv6-Adressen abzurufen. Vergewissern Sie sich, dass die zu aktualisierende rPDU im Bereich PDU List (PDU-Liste) angezeigt wird (siehe Abbildung 6). Abbildung 6. Überprüfen der zu aktualisierenden rPDU 6 Wählen Sie die Zeile der rPDU aus, die aktualisiert werden soll (siehe Abbildung 7). Abbildung 7.
7 Klicken Sie auf Modify (Ändern). Das Popup-Fenster Modify (Ändern) wird angezeigt. Geben Sie im Feld „Password“ das Kennwort admin ein und klicken Sie auf OK (siehe Abbildung 8). Abbildung 8. Angeben des Benutzerkennworts HINWEIS: Das Kennwort wird mithilfe von Sternchen angezeigt. So wählen Sie aus, ob die rPDU NMC- oder die MCU-Firmware aktualisiert werden soll: 8 Aktualisieren Sie die NMC- oder die MCU-Firmware? Wenn Sie die NMC-Firmware aktualisieren möchten, fahren Sie mit Schritt 9 fort.
9 Vergewissern Sie sich unter Image Information (Abbildinformationen), dass die Option „NMC“ ausgewählt ist (siehe Abbildung 9). Abbildung 9.
10 Klicken Sie auf Open (Öffnen), um eine Liste der gültigen NMC-Firmware-Aktualisierungsdateien anzuzeigen. Wählen Sie aus, welche Aktualisierungsdatei für die Flash-Aktualisierung verwendet werden soll (siehe Abbildung 10). Abbildung 10. Auswählen der Firmware-Aktualisierungsdatei 11 Fahren Sie zum Starten der Aktualisierung mit Schritt 14 fort.
12 Vergewissern Sie sich unter Image Information (Abbildinformationen), dass die Option „MCU“ ausgewählt ist (siehe Abbildung 11). Abbildung 11.
13 Klicken Sie auf Open (Öffnen), um eine Liste der gültigen MCU-Firmware-Aktualisierungsdateien anzuzeigen. Wählen Sie die Aktualisierungsdatei aus (siehe Abbildung 12). Abbildung 12. Auswählen der Firmware-Aktualisierungsdatei So starten Sie die Firmware-Flash-Aktualisierung: 14 Klicken Sie im Fenster PDU Upgrade Utility auf Upgrade (Aktualisieren).
15 Eine Bestätigungsmeldung wird angezeigt. Wenn die ausgewählte Firmware-Version älter als die vorhandene Firmware ist, werden Sie aufgefordert, die Auswahl der Version für die Aktualisierung zu bestätigen (siehe Abbildung 13 und Abbildung 14). Klicken Sie auf OK, um die Version zu bestätigen, oder auf Cancel (Abbrechen), um zu Schritt 8 zurückzukehren und eine andere Firmware-Aktualisierungsdatei für die NMC oder MCU auszuwählen. Abbildung 13. Bestätigen der NMC-Aktualisierungsversion Abbildung 14.
17 Stellen Sie fest, ob die Aktualisierung erfolgreich abgeschlossen wurde (siehe Tabelle 2). Tabelle 2. Status der Aktualisierung Angezeigte Meldung Beschreibung Erfolgreich Bei erfolgreicher Firmware-Aktualisierung wird eine entsprechende Meldung an gezeigt. Dieser Vorgang ist damit abgeschlossen. Nicht erfolgreich Treten im Verlauf der Aktualisierung Fehler auf, wird eine Fehlermeldung angezeigt. Gehen Sie zum Wiederholen der Aktualisierung folgendermaßen vor: 1.
Abbildung 16. Deaktivierte Einstellung „Network Upgrade“ (Netzwerkaktualisierung) Abbildung 17.
3 Serielle Aktualisierungen für NMC-Firmware In diesem Kapitel wird die Verwendung des Hilfsprogramms für die serielle Aktualisierung der Dell Metered Rack-Stromverteilungseinheit (rPDU) zur Aktualisierung der Dell Netzwerkmanagementkarte (NMC)-Firmware beschrieben. Hier finden Sie außerdem eine Beschreibung des Aktualisierungshilfsprogrammfensters und Informationen zu den Voraussetzungen der rPDU-Aktualisierung.
Beschreibung der Registerkarte „Serial Upgrade“ (Serielle Aktualisierung) Auf der Registerkarte „Serial Upgrade“ (Serielle Aktualisierung) der PDU Upgrade Utility (siehe Abbildung 18) können Sie Folgendes: S Auswählen der NMC-Firmware-Datei für diese Aktualisierung S Überprüfen der eindeutigen rPDU- und Firmware-Identifizierungsdaten vor Beginn der rPDU-Aktualisierung S Starten der rPDU-Firmware-Aktualisierung Beschreibungen zu den Feldern und Schaltflächen auf der Registerkarte „Serial Upgrade“ (Serielle
3 Schließen Sie das serielle Kabel über den RJ-45-Stecker am seriellen Anschlussport der rPDU an (siehe Abbildung 19). Abbildung 19.
So bereiten Sie die rPDU für die serielle Flash-Aktualisierung der NMC-Firmware vor: 1 Vergewissern Sie sich, dass die zu aktualisierende rPDU ordnungsgemäß per RJ-45/DB-9 (RS-232)-Kabel am PC-COM-Anschluss angeschlossen ist (siehe Abbildung 19). 2 Starten Sie die rPDU folgendermaßen: S Stecken Sie den Netzstecker der rPDU in die Steckdose. S Schalten Sie alle Trennschalter in ON-Stellung (EIN).
7 Klicken Sie auf die Schaltfläche Open (Öffnen) und wählen Sie die NMC-Flash-Aktualisierungsdatei aus (siehe Abbildung 21). HINWEIS: Die NMC-Flash-Aktualisierungsdatei liegt als Binärdatei (*.bin) vor. Abbildung 21.
So starten Sie die Firmware-Flash-Aktualisierung: 8 Wählen Sie die Zeile der NMC aus, die aktualisiert werden soll, und klicken Sie auf Upgrade (Aktualisieren) (siehe Abbildung 22). Abbildung 22. Identifizieren der zu aktualisierenden NMC 9 Eine Bestätigungsmeldung wird angezeigt. Wenn die ausgewählte Firmware-Version älter als die vorhandene NMC-Firmware ist, werden Sie aufgefordert, die Auswahl der Version für die Aktualisierung zu bestätigen (siehe Abbildung 23).
Tabelle 4. Status der Aktualisierung Angezeigte Meldung Beschreibung Erfolgreich Bei erfolgreicher NMC-Firmware-Aktualisierung wird eine entsprechende Meldung angezeigt. Dieser Vorgang ist damit abgeschlossen. Nicht erfolgreich Treten im Verlauf der Aktualisierung Fehler auf, wird eine Fehlermeldung angezeigt. Gehen Sie zum Wiederholen der Aktualisierung folgendermaßen vor: 1. Beginnen Sie erneut mit Schritt 4, klicken Sie erneut auf Discover (Abrufen) und starten Sie die Aktualisierung erneut. 2.
Serielle Aktualisierungen für MCU-Firmware 4 In diesem Kapitel wird die Verwendung des Hilfsprogramms für die serielle Aktualisierung der Dell Metered Rack-Stromverteilungseinheit (rPDU) zur Aktualisierung der Mikroprozessor-Steuereinheit (MCU)-Firmware beschrieben. Hier finden Sie außerdem eine Beschreibung des Aktualisierungshilfsprogrammfensters und Informationen zu den Voraussetzungen der rPDU-Aktualisierung.
Beschreibungen zu den Feldern und Schaltflächen im Fenster des UPS/PDU Upgrade Software-Hilfsprogramms finden Sie in Tabelle 5. Tabelle 5. Beschreibungen zu UPS/PDU Upgrade Software Feld Zweck Beschreibung UPS/PDU Firmware File (USV/ PDU-Firmware-Datei) Aktualisierungseinstellung Gibt eine Liste der rPDU-Firmware-Versionen aus. Die Pro grammreferenznummer und die Firmware-Version werden in der Spalte UPS/PDU Information (USV/PDU-Informationen) für die ausgewählte Datei angezeigt.
Herstellen der seriellen Verbindung Überprüfen Sie vor der seriellen MCU-Aktualisierung, ob Sie eine geeignete Verbindung zur rPDU herstellen können. So stellen Sie eine serielle Verbindung zwischen der rPDU und einem PC her: 1 Nehmen Sie das RJ-45/DB-9 (RS-232)-Kabel zur Nutzung dieser Verbindung zur Hand (im Lieferumfang enthalten). 2 Vergewissern Sie sich, dass das serielle RS-232-Kabel am COM-Anschluss des PC angeschlossen ist.
So bereiten Sie die rPDU für die serielle Flash-Aktualisierung der MCU-Firmware vor: 1 Vergewissern Sie sich, dass die zu aktualisierende rPDU ordnungsgemäß per RJ-45/DB-9 (RS-232)-Kabel am PC-COM-Anschluss angeschlossen ist (siehe Abbildung 26). 2 Starten Sie die rPDU folgendermaßen: S Stecken Sie den Netzstecker der rPDU in die Steckdose. S Schalten Sie alle Trennschalter in ON-Stellung (EIN).
7 Wählen Sie RS232 or USB (RS232 oder USB) aus, um für die Aktualisierung den PC-COM-Anschluss zu verwenden (siehe Abbildung 28). Abbildung 28. Auswählen der RS-232-Einstellung 8 Klicken Sie auf Connect (Verbinden), um die Verbindung mit der rPDU MCU herzustellen. Die rPDU-Geräteinformationen werden im Feld UPS/PDU Information (USV/PDU-Informationen) angezeigt (siehe Abbildung 29). Abbildung 29.
10 Klicken Sie im UPS/PDU Upgrade Software-Fenster auf Upgrade (Aktualisieren) (siehe Abbildung 30). Überwachen Sie den Fortschritt der Aktualisierung anhand der Statusleiste in der Mitte des Fensters. Abbildung 30. Überwachen des MCU-Aktualisierungsfortschritts HINWEIS: Im Verlauf der Aktualisierung wird auf dem rPDU-LCD die Meldung Flash Update in Process (Flash-Aktualisierung wird ausgeführt) angezeigt. Auf dem LCD wird außerdem eine Statusleiste mit Angabe des prozentualen Fortschritts angezeigt.