Microsoft® Windows® Compute Cluster Server 2003 SP1 Installation Guide w w w. d e l l . c o m | s u p p o r t . d e l l .
Notes and Notices NOTE: A NOTE indicates important information that helps you make better use of your computer. NOTICE: A NOTICE indicates either potential damage to hardware or loss of data and tells you how to avoid the problem. ____________________ Information in this document is subject to change without notice. © 2007 Dell Inc. All rights reserved. Reproduction in any manner whatsoever without the written permission of Dell Inc. is strictly forbidden.
Contents Setting Up Your Hardware . . . . . . . . . . . . . . . . Installing the Windows Server 2003 Compute Cluster Edition With Service Pack 2 Operating System Using Dell OpenManage Server Assistant . . . . . . Configuring Your Cluster After Installing the Operating System . . . . . . . . . . . . . . . . 7 . . . . . . . 8 Windows Server 2003 Compute Cluster Edition With SP2 Post-Setup Security Updates . . . . Promote System to Domain Controller and Install DNS . . . . . . . . . . . . . . . . .
Contents
This document provides information about installing Microsoft® Windows® Compute Cluster Server 2003 Service Pack 1 (SP1) on your Dell™ PowerEdge™ cluster. It is intended for experienced IT professionals who need to configure the cluster solution, and for trained service technicians who perform upgrade and maintenance procedures.
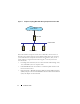
Figure 1-1.
Microsoft Windows Compute Cluster Server 2003 SP1 is supported on the following AMD™-based systems and network devices: • PowerEdge 2970 systems as the head node and PowerEdge SC1435 and M605 systems as compute nodes. • Embedded Broadcom network devices as both the public interface and the cluster interconnect. • Dell PowerVault MD1000 attached to PowerEdge RAID Controller (PERC) Adapter or Dell PowerVault MD3000 attached to SAS 5/E Adapter on the head node.
d Configure the file system type and hard drive partition size. NOTE: If you plan to use Windows Deployment Services (WDS) (earlier named Remote Installation Services (RIS) in Windows Server 2003 versions prior to SP2), you require a second hard drive or partition to install the compute nodes (recommended). The second hard drive or partition must have at least 10 GB. The recommended partition type is NTFS. 6 Configure your network.
Windows Server 2003 Compute Cluster Edition With SP2 Post-Setup Security Updates 1 After the installation of Windows Server 2003 Compute Cluster Edition With SP2, a window appears prompting you to apply existing security updates. If the system is connected to the Internet, download and apply the latest updates at this time. 2 If you plan to have the system connected to the Internet at all times, configure the automatic updates at this time as well.
c In the Install or Configure DNS screen, select No, just install and configure DNS on this computer and click Next. d In the New Domain Name screen, enter a DNS name for the new domain (for example, cluster.com) and click Next. e In the NetBIOS Domain Name screen, enter a NetBIOS domain name and click Next. f In the Database and Log Folders screen, select folders for the database and logs, and click Next.
4 In the Summary of Selections window, click Next. The installer runs and you may be prompted to insert the operating system media. 5 In the New Scope wizard, click Next. Complete the following steps to set the scope parameters and to activate the scope: a In the Scope Name screen, select a name and enter description for the scope, and click Next.
3 In the DHCP Control window, right-click the server name and select Authorize. 4 Close the DHCP Server window. Before You Install Microsoft Compute Cluster Pack (CCP) Service Pack 1 (SP1) A separate partition is required for the WDS server images which is used for the compute node installation. If an external storage is used for keeping the compute node images, install and configure any unconfigured external storage devices at this time.
Installing CCP SP1 To install CCP: 1 Insert the CCP CD, run setup.exe, and click Next. 2 The End User License Agreement window appears. Read the agreement, choose I Accept, and click Next if you agree to the terms and conditions. 3 In the Select Installation Type screen, determine if the head node must also function as a compute node and select the Create a new compute cluster with this server as the head node option.
6 Select Disable Internet Connection Sharing and click Next. NOTE: This option disables the cluster compute node Internet connectivity. 7 In the Summary window, verify the contents and click Finish. 8 In the Configuration Succeeded window, click Close. 9 Click Manage Windows Firewall Settings and click Next. 10 In the Configure Firewall window, select Enable Windows Firewall and click Next. The firewall is enabled on the public network interface but is disabled on the private network interface.
4 To add a new image, click Manage Images (wizard) and click Next. a Select Add new image and click Finish. b When the wizard starts, click Next. c Select a destination for the remote installation folder and click Next. This destination must be on the partition that was previously prepared for WDS/RIS. d Select the drive or path that contains the Microsoft Windows Compute Cluster Server 2003 SP2 media or image and click Next. e Select a folder name for the image and click Next.
Adding PowerEdge-Specific Drivers to the RIS Image To complete the configuration of Compute Cluster Server 2003 on PowerEdge systems, you must install additional drivers. Download the drivers applicable to your cluster from the Dell Support website at support.dell.com depending on the compute node hardware configuration. The drivers that must be downloaded are listed below (select Windows Server 2003 x64 as the operating system). • Network Driver for Broadcom NetXtreme II Family of Adapters, required.
4 Run the Broadcom driver package that you downloaded (Bcom_LAN_105_35_W2K364_AXX.exe) and extract its contents to C:\Broadcom\W2K364, where C:\ is the system boot directory. 5 Copy the files in the NX2_RIS_Drivers directory (C:\Broadcom\W2K364\NX2_RIS_Drivers) to D:\RemoteInstall\Setup\English\Images\WINDOWS\$OEM$\$1\drivers \nic. 6 Run the setup.exe program with a command line option of -a. Click Start→ Run, and type C:\Broadcom\W2K364\Driver_Management_Apps_Install er\setup.exe -a.
10 Edit the ristndrd.sif file at D:\RemoteInstall\Setup\English\Images\WINDOWS\amd64\templates a Add the following line to the Unattended section OemPnpDriversPath="\Drivers\Nic" b Save and close the file. If the compute nodes have a PERC or SAS Adapter, perform the following steps. Otherwise no additional storage drivers are required (for example, if compute nodes have non-RAID SATA disks), go to step 13.
b Add another section labeled OEMBootFiles to the ristndrd.sif and list the names of all the files from the text mode directory excluding .txt files. For PERC drivers: [OEMBootFiles] nodev.inf oemsetup.inf percsas.cat percsas.sys txtsetup.oem For SAS drivers: [OEMBootFiles] lsi_sas.inf lsi_sas.sys lsi_sas.tag s2k3amd64.cat txtsetup.oem 13 Restart the RIS by opening a command prompt and typing net stop wdsserver and net start wdsserver.
4 The End User License Agreement screen appears. Read the agreement, choose Accept, and click Next if you agree to the terms and conditions. 5 In the Start RIS screen, click Next. 6 In the Image Nodes screen, click Start RIS. 7 When RIS starts, the compute nodes can be booted through PXE. After booting over PXE, the Windows Compute Cluster Edition is installed and configured on the compute node. Following this, CCP is installed and configured.