Microsoft® Windows® Compute Cluster Server 2003 Installation Guide w w w. d e l l . c o m | s u p p o r t . d e l l .
Notes, Notices, and Cautions NOTE: A NOTE indicates important information that helps you make better use of your computer. NOTICE: A NOTICE indicates either potential damage to hardware or loss of data and tells you how to avoid the problem. CAUTION: A CAUTION indicates a potential for property damage, personal injury, or death. ____________________ Information in this document is subject to change without notice. © 2006 Dell Inc. All rights reserved.
Contents Setting Up Your Hardware . . . . . . . . . . . . . . . . . . . . . . . . . . . . . Installing the Operating System With Dell OpenManage Server Assistant . . . . . . . . . . . . . . . . . . . . . . . . . . . . . . . . . . Before You Install CCP . . . . . . . . . . 7 7 8 9 9 . . . . . . . . . . . . . . . . . . . . . . . . . . . . . . . . . . . . . . . . . . . . . . . . . . . . . . . . . . . . . . 10 . . . . . . . . . . . . . 10 . . . . . . . . . . . . . . . . . . . . . . . . . . . . . . .
Contents
This document provides information about installing Microsoft® Windows® Compute Cluster Server 2003 on your Dell™ PowerEdge™ Cluster. It is intended for experienced IT professionals who need to configure the cluster solution, and for trained service technicians who perform upgrade and maintenance procedures.
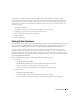
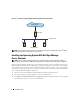
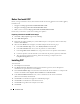
Figure 1-1. Example of a Topology With Nodes Running Compute Cluster Server 2003 public network head node private network compute nodes NOTE: If you purchased the head node with preinstalled operating system from Dell, Windows Server® 2003 R2 Enterprise 64-bit Edition is preinstalled on your head node.
4 In the Home window, select Click here for server setup. a Set the date, time, and time zone for the server. b Configure the RAID controller. For internal drives, RAID 1 configuration is recommended. c Select the operating system, in this case, Microsoft Windows Server 2003 x64 Edition. d Configure the hard drive. If you plan to use the Remote Install Server (RIS) to install the compute nodes (recommended), then a second hard drive or partition is required.
Promote System to Domain Controller and Install DNS NOTE: If you are using your system running Compute Cluster Server 2003 as a stand-alone device, or if a domain network is already installed, see "Install DHCP Server" for more information. 1 Click Start→ Programs→ Administrative Tools→ Manage Your Server. 2 In the Manage Your Server Roles window, click Add or remove a role and click Next. The system detects your network settings and connections, and displays the Configuration Options window.
Install DHCP Server If you are using RIS, you must install and configure a DHCP server. The DHCP server is required for network installation of compute nodes. To install and configure the DHCP server: 1 Click Start→ Programs→ Administrative Tools→ Manage Your Server. 2 In the Manage Your Server Roles window, click Add or remove a role and click Next. 3 Select DHCP server and click Next. 4 In the Summary window, click Next. The installer runs and you may be prompted to insert the operating system CD.
Before You Install CCP Before you begin installation of CCP, download and install the following Quick Fix Executables (QFEs) from Microsoft: • ICS QFE from http://go.microsoft.com/fwlink/?linkid=55166 • RIS QFE from http://go.microsoft.com/fwlink/?linkid=55167 • MMC 3.0 x64 version from http://go.microsoft.com/fwlink/?linkid=62400 Ensure that you reboot the system after installing these updates. Preparing a Partition for the RIS Server Images 1 Click Start→ My Computer (right-click)→ Manage.
Configuring CCP After installing CCP on your cluster, a To Do list appears. This section describes the steps to follow for completing the CCP configuration through the To Do list. Networking To complete the tasks in the Networking section: 1 Click Configure Cluster Network Topology and click Next. 2 From the drop down menu, select the Network Topology and click Next. 3 Select Compute Nodes Isolated on a Private Network for this installation.
4 Click Manage Images (wizard) and click Next. Perform the following steps to add a new image. a Select Add New Image and click Finish. b When the wizard starts, click Next. c Select a destination for the remote installation folder and click Next. This destination should be on the partition that was previously prepared for RIS. d Select the drive or path that contains the Compute Cluster Server 2003 operating system CD or image and click Next. e Select a folder name for the image and click Next.
To integrate these drivers into the RIS image, follow the instructions in this section. NOTE: Throughout this section, D:\ refers to the RIS image partition and C:\ refers to the system boot directory. 1 Open an explorer window. 2 Navigate to the image directory on the RIS image partition. If the defaults were picked during the RIS image creation, the RIS image directory will be D:\RemoteInstall\Setup\English\Images\WINDOWS, where D:\ is the RIS image partition.
9 Copy the .inf and .sys files from the NIC driver directory, D:\RemoteInstall\Setup\English\Images\WINDOWS\$OEM$\$1\drivers\nic to D:\RemoteInstall\Setup\English\Images\WINDOWS\amd64. 10 Extract the PERC 5/i drivers into the textmode directory. This may require running an executable installer and then accessing the location at which the files are installed (for example, C:\Dell\PERC5). NOTE: Copy the text in the SCSI section from the file txtsetup.
13 In the Node Management section, click Add Nodes (wizard) and then click Next. In the wizard, perform the following procedure: a Select Automated Deployment and click Next. b In the Select Image screen, enter the administrator (or a user with permission to add nodes to a domain) user name and password, and click Next. c Enter a node series name and click Next. This name will be used to name the compute nodes when they are installed.
Installation Guide