book.
book.book Page 2 Monday, September 20, 2010 1:36 PM Notes and Cautions NOTE: A NOTE indicates important information that helps you make better use of your computer. CAUTION: A CAUTION indicates potential damage to hardware or loss of data if instructions are not followed. ____________________ Information in this publication is subject to change without notice. © 2010 Dell Inc. All rights reserved. Reproduction of these materials in any manner whatsoever without the written permission of Dell Inc.
book.book Page 3 Monday, September 20, 2010 1:36 PM Contents Overview . . . . . . . . . . . . . . . . . . . . . . . . . . . . . . . . . . . . . . . . . . 5 . . . . . . . . . . . . . . . . . . 7 Setting Up Your Hardware . Setting Up Your Cluster 5 Configuring Your Head Node . . . . . . . . . . . . . 8 Promoting System to Domain Controller and Installing DNS . . . . . . . . . . . . . . . . . 10 Installing Microsoft HPC Pack 2008 R2 . . . . . . . 12 . . . . . . . . . . .
book.
book.book Page 5 Monday, September 20, 2010 1:36 PM Overview This publication is intended for experienced IT professionals who need to configure the Dell PowerEdge cluster solution, and for trained service technicians who perform upgrade and maintenance procedures.
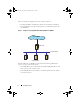
book.book Page 6 Monday, September 20, 2010 1:36 PM The recommended configurations for the compute nodes are: • Ensuring that PXE is enabled on the primary network interface card (NIC 1). • Ensuring that the boot order has the primary network interface before the local hard drive. Figure 1.
book.book Page 7 Monday, September 20, 2010 1:36 PM • Mellanox ConnectX and ConnectX-2 DDR and QDR Infiniband network devices as the cluster interconnect. • Dell PowerVault MD1200, MD1220, MD3200, MD3220, MD 3200i, and MD3220i storage arrays attached to the head node or Dell EqualLogic PS5000 and PS6000 series SAN arrays connected using iSCSI on the head node.
book.book Page 8 Monday, September 20, 2010 1:36 PM 3 Install the Microsoft HPC pack 2008 R2 Express or Enterprise. For more information, see "Installing Microsoft HPC Pack 2008 R2" on page 12. 4 Install the compute nodes. For more information, see "Installing the Compute Nodes" on page 18. 5 If the cluster is equipped with an Infiniband network, you must set up the Infiniband network. For more information, see "Additional Information" on page 22.
book.book Page 9 Monday, September 20, 2010 1:36 PM Installing Windows Server 2008 R2 HPC Edition on a Non-Factory Installed Head Node CAUTION: The following installation procedure erases all data on your hard drive. It is recommended that you backup all your data before you begin installation. NOTE: This section also describes the steps required to re-install Windows Server 2008 R2 HPC Edition operating system on the head node.
book.book Page 10 Monday, September 20, 2010 1:36 PM 8 After reboot, the installer prompts for the Windows Server 2008 R2 media. Insert the Windows Server 2008 R2 HPC Edition media into the optical drive and click OK. After the installer verifies the operating system media, it prompts for the additional information that is required for the installation. 9 Provide the required information and click Install now to start the installation. The License terms window is displayed.
book.book Page 11 Monday, September 20, 2010 1:36 PM 3 Click Add roles in the Initial Configuration Tasks window. The Add Roles Wizard is activated. 4 In the Add Roles Wizard, click Next and follow the steps below: a Select Active Directory Domain Services and click Next. b In the Active Directory Domain Services window, click Next. c In the Confirm Installation Selections window, click Install. d Click Close when the installation completes.
book.book Page 12 Monday, September 20, 2010 1:36 PM i In the Directory Services Restore Mode Administrator Password window, set the password for the Directory Services Restore Mode (DSRM) administrator account and click Next. j In the Summary window, review the settings and click Next to start installation. k After the installation finishes, click Finish and Restart Now. For information on installing the HPC pack, see "Installing Microsoft HPC Pack 2008 R2" on page 12.
book.book Page 13 Monday, September 20, 2010 1:36 PM • Select Install all databases in the same folders if you want to use the same folder for all the HPC databases, specify the location (default recommended) and then click Next. • Select Install each database in separate folders if you want each HPC database in a different folder, and click Next. Specify the location for each database in the next windows.
book.book Page 14 Monday, September 20, 2010 1:36 PM e In the Private Network Configuration window, the default IP address, and the DHCP scope is displayed. Make any modifications if necessary and click Next. f In the Firewall Setup window, configure the firewall settings (Default is recommended) and click Next. g In the Review window, verify the contents and click Configure. h In the Configuration Summary window, click Finish.
book.book Page 15 Monday, September 20, 2010 1:36 PM On a non-factory installed head node perform the following steps in the HPC Cluster Manager: 1 Configure Network task in the To-do list: a Click Configure your network. b In the Network Topology Selection window, select the Network Topology of the cluster, for example: Compute nodes isolated on a private network, and click Next.
book.book Page 16 Monday, September 20, 2010 1:36 PM c In the Specify Template Name window, enter the name of the template, for example Dell SLP ComputeNode Template and click Next. d In the Select Deployment Type window, select With operating system and click Next. e In the Select OS Image window, click Add Image. The Add Operating System Image window is displayed. f Insert the Windows Server 2008 R2 HPC Edition Operating System media into the optical drive and click Browse.
book.book Page 17 Monday, September 20, 2010 1:36 PM a Download the latest network drivers from the Drivers and Downloads section at support.dell.com. b Browse for the relevant model of the compute nodes and select Windows Server 2008 R2 as the operating system. c Download the relevant Broadcom driver and the corresponding Dell driver if the compute nodes have PowerEdge Expandable RAID Controller (PERC) S100 or PERC S300 adapters to the head node.
book.book Page 18 Monday, September 20, 2010 1:36 PM • Bxvbd.inf under the location C:\Broadcom\Program Files 64\ Broadcom\BDrv5706\VBD • Bxnd.inf under the location C:\Broadcom\Program Files 64\ Broadcom\BDrv5706\Win2k8 • B57amd64.inf under the location C:\Broadcom\Program Files 64\ Broadcom\BDRVINST • B57nd60a.inf and b57ports.
book.book Page 19 Monday, September 20, 2010 1:36 PM 5 In the Node management pane, after the status of the compute nodes changes from Provisioning to Offline, right-click the node name and select Bring Online. Reinstalling Compute Node Network Drivers If you use the Dell provided compute node template, the node reboots a few minutes after the compute node installation is complete.
book.book Page 20 Monday, September 20, 2010 1:36 PM DRM downloads Dell Update Packages (DUP) into a repository which is then used on a system to automatically detect and upgrade the components that are outdated. If the nodes in the cluster do not have an internet connection, install DRM on a machine that is connected to the Internet to create the update repository. Installing Dell Repository Manager 1 Double-click on the Dell Repository Manager msi package. Click Next on the Welcome screen.
book.book Page 21 Monday, September 20, 2010 1:36 PM 7 In the Select System Model(s) window, choose the Select Model(s) option, select the system models for which the update packages are required, and click Next. 8 In the Select Bundle(s) screen, select ONLY include most recent and custom bundle(s) and click Next. 9 The Additional Component(s) window is displayed with a message asking if you want your repository to include additional components that are not included in the selected bundles.
book.book Page 22 Monday, September 20, 2010 1:36 PM Additional Information InfiniBand Configuration InfiniBand is supported as the cluster application network. This section describes the process of setting up an InfiniBand Interconnect on a Windows HPC Cluster. Installing InfiniBand Drivers 1 Ensure that the InfiniBand adapters have the latest firmware. NOTE: The minimum recommended version is 2.7 or later.
book.book Page 23 Monday, September 20, 2010 1:36 PM Configuring IPoIB 1 Ensure that there is a subnet manager running on the InfiniBand network. This can either be the embedded subnet manager on the switch or Open Subnet Manager (OpenSM) that is packaged with WinOF. If you decide to run the subnet manager on the head node, ensure that the subnet manager on the switch is disabled, then click Start Administrative Tools Services and start the OpenSM service on the head node.
book.book Page 24 Monday, September 20, 2010 1:36 PM Verifying Installation In order to ensure the InfiniBand network is setup correctly and to check the connectivity across the cluster, run the HPC Cluster Manager's built-in Message Passing Interface (MPI) Ping-Pong utility. This test validates the driver stack, the network protocol, MPI implementation and helps identify any anomalies in the node-to-node connection.
book.book Page 25 Monday, September 20, 2010 1:36 PM Installing the iSCSI Provider Software NOTE: iSCSI provider software is provided by the storage vendor. 1 Download the iSCSI provider software from the storage vendor’s website. 2 Double-click the downloaded setup.exe and install iSCSI provider software on the master node. Ensure that the HPC Cluster Manager is closed before installing the provider software.
book.book Page 26 Monday, September 20, 2010 1:36 PM 2 Navigate to HPC Cluster Manager Configuration menu and click iSCSI Deployment. 3 Navigate to Required iSCSI Deployment Tasks Base node image creation and click Add nodes for iSCSI deployment. The Add iSCSI Boot Nodes Wizard is displayed. 4 On the Select Method to Add Nodes window, select From a node XML file. 5 Type or browse to the location of the node XML file that you created in step 1 and click Next. 6 Click Finish.
book.book Page 27 Monday, September 20, 2010 1:36 PM iqn.1995-05.com.broadcom.%MAC-NODELIMITERS%.%HOSTNAME% 8 On the Specify Local Administrator Password for Compute Node window, select Use a specific password if you want to specify a password for the local administrator account on the compute nodes, and then click Next.
book.book Page 28 Monday, September 20, 2010 1:36 PM 4 Type a name for the base node image. 5 Click Create image to create a base node image. Create a Node Template for iSCSI Boot Nodes 1 Navigate to HPC Cluster Manager Configuration menu, click iSCSI Deployment. 2 Navigate to Required iSCSI Deployment Tasks Base node image creation and click Create a node template for iSCSI boot nodes. The Create Node Template Wizard is displayed.
book.book Page 29 Monday, September 20, 2010 1:36 PM b Click Next on the Welcome screen. 3 On the Assign Node Template window: a Select the node template you created in "Create a Node Template for iSCSI Boot Nodes" on page 28. b Select the nodes you want to deploy as iSCSI boot nodes. c Click Next. 4 On the Initiate Deployment window, click Deploy to initiate iSCSI deployment.
book.