Microsoft Windows Server 2019 for Dell EMC PowerEdge Servers Installation Guide December 2020 Rev.
Notes, cautions, and warnings NOTE: A NOTE indicates important information that helps you make better use of your product. CAUTION: A CAUTION indicates either potential damage to hardware or loss of data and tells you how to avoid the problem. WARNING: A WARNING indicates a potential for property damage, personal injury, or death. © 2019 Dell Inc. or its subsidiaries. All rights reserved. Dell, EMC, and other trademarks are trademarks of Dell Inc. or its subsidiaries.
Contents Chapter 1: Introduction................................................................................................................. 4 Chapter 2: Set up preinstalled Microsoft Windows Server 2019 operating system......................... 5 Chapter 3: Installing or reinstalling Microsoft Windows Server 2019............................................. 8 Install Windows Server 2019 by using Dell EMC Lifecycle Controller.....................................................................
1 Introduction This document provides instructions to install Microsoft Windows Server 2019 operating system for Datacenter, Standard, and the Essentials edition. NOTE: Unlike previous versions of Windows Server, Microsoft Windows Server 2019 does not support the conversion from Windows Server Core to Server with Desktop Experience and vice versa. For more information, see Installation options for Windows Server 2019.
2 Set up preinstalled Microsoft Windows Server 2019 operating system This section provides instructions for completing the setup of the Microsoft Windows Server 2019 Operating System (OS) that is preinstalled on your system. NOTE: Before you begin, see the documentation that is shipped with the operating system for important product information. For more information about completing the installation, see the documentation included with your software.
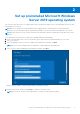
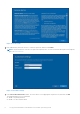
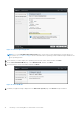
Figure 2. License terms 6. Enter administrator password, reenter to confirm the password, and then click Finish. NOTE: The password must conform to the password complexity rules. For more information about password complexity rules, see Password Policy. Figure 3. Customize settings 7. In the Select OS Partition Size window, move the slider to set an appropriate OS partition size, and then click Ok.
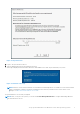
Figure 4. OS partition size 8. Log in to the system after it reboots. 9. Type the administrator password, and then press Enter. A message is displayed with information about the value added services that are provided with your system. Figure 5. Notification message NOTE: Windows Server 2019 Essentials do not include the Essentials Experience role. Windows Server 2019 Essentials can be configured as a domain controller by installing the Active Directory Domain Services role from the Server Manager.
3 Installing or reinstalling Microsoft Windows Server 2019 Use one of the following methods to install the Microsoft Windows Server 2019 OS: ● Install Windows Server 2019 by using Dell EMC Lifecycle Controller ● Install Windows Server 2019 by using operating system media NOTE: For information about using the Virtual Media function on iDRAC, see Using the Virtual Media function on iDRAC 6, 7, 8 and 9.
Figure 7. OS Deployment The Select Deployment path page is displayed, which contains the following options: ● Configure RAID First — Click to configure a RAID connected to the server. For information about configuring a RAID, see Using the optional RAID Configuration. NOTE: Configuring RAID is optional if an already-connected virtual disk is present. ● Go Directly to OS Deployment — Click to launch the operating system deployment wizard and start installing an operating system. 7.
Figure 9. Select an Operating System NOTE: If you select Any Other Operating System option, ensure that you have prepared the necessary drivers for your system. See www.dell.com/support for more information about operating system installation images and drivers for these operating systems. 10. Select whether you want to deploy the operating system in UEFI or BIOS mode, and then click Next. 11. On the Select Installation Mode page, select Manual Install, and then click Next. 12.
Figure 11. Reboot the System If a Windows operating system is already installed on your system, the following message is displayed: Press any key to boot from CD or DVD 14. After the files are loaded, select the language in which you want to install the operating system. Figure 12. Select language 15. Select the language, time and currency format, keyboard or input method, and then click Next.
Figure 13. Select the language, time and currency format, and keyboard or input method 16. Click Install now. Figure 14. Windows Setup 17. Select the required operating system, and then click Next.
Figure 15. Select the operating system you want to install 18. Read the license agreement information. Select the I accept the license terms check box, if you agree to the license terms, and then click Next. NOTE: If you do not accept the license agreement, you cannot proceed with operating system installation. Figure 16.
19. In the Which type of installation do you want? window, select Custom: Install Windows only (advanced). Figure 17. Which type of installation do you want 20. In the Where do you want to install Windows? window, select the unallocated space on which you want to install the operating system. To create a partition: a. Click New. Figure 18. Select the unallocated space b. In the Size box, enter or select the size of the partition in MB, and then click Apply.
Figure 19. Enter or select the size of the partition The following message is displayed: To ensure that all Windows features work correctly, Windows might create additional partition for system files c. Click OK. NOTE: The recommended minimum partition size for the primary partition is 40 GB and for the Essentials Edition is 60 GB. If you are installing additional memory module on your system, you may require extra primary partition space to accommodate the page file and hibernation file.
Figure 20. Windows might create additional partitions for system files 21. Select the newly created operating system partition, and then click Next. Figure 21. Enter or select the size of the partition The system reboots after the operating system is installed.
22. Enter administrator password, reenter to confirm the password, and then click Finish. Figure 22. Customize settings 23. After the system reboots, press Ctrl+Alt+Delete to log in to the system. 24. Type the administrator password, and then press Enter. NOTE: Windows Server 2019 Essentials do not include the Essentials Experience role. Windows Server 2019 Essentials can be configured as a domain controller by installing the Active Directory domain services role from Server Manager.
Figure 23. System Setup 4. On the System Setup page, click System BIOS, and then click Boot Settings. Figure 24. System Setup Main Menu 5. Ensure that UEFI is selected as the Boot Mode. Figure 25. Boot Settings NOTE: For yx4x PowerEdge servers and later, UEFI is the default boot mode. NOTE: The PowerEdge servers are represented using the generic naming convention. To identify the range of server models, see Identifying the series of your Dell EMC PowerEdge servers on page 30. 6.
Figure 26. System BIOS 7. In the Change Order window, ensure that Virtual Optical Drive: Virtual CD is selected as your boot device, and then click OK. Figure 27. Change Order 8. Click Back. 9. Click Finish, and then click Yes. The updates are saved. 10. Click Finish to exit the System Setup page, and then click Yes to reboot the system. 11. Insert the Microsoft Windows Server 2019 media into the DVD drive.
Figure 28. Select language 13. Select the language, time and currency format, keyboard or input method, and then click Next. Figure 29. Select language, time and currency format, and keyboard or input method 14. Click Install now.
Figure 30. Windows Setup 15. Select the required OS, and then click Next. Figure 31. Select the operating system you want to install 16. Read the license agreement information. Select the I accept the license terms check box if you agree to the license terms, and then click Next. NOTE: If you do not accept the license agreement, you cannot proceed with OS installation.
Figure 32. Applicable notices and license terms 17. In the Which type of installation do you want? window, select Custom: Install Windows only (advanced). Figure 33. Types of installation 18. In the Where do you want to install Windows? window, select the unallocated space where you want to install the OS. To create a partition: a. Click New.
Figure 34. Select the location to install b. In the Size box, enter or select the size of the partition in MB, and then click Apply. Figure 35.
The following message is displayed: To ensure that all Windows features work correctly, Windows might create additional partition for system files c. Click OK. NOTE: The recommended minimum partition size of the primary partition for Standard and Datacenter Edition is 40 GB and for the Essentials Edition is 60 GB. If you are installing additional memory module on your system, you may require extra primary partition space to accommodate the page file and the hibernation file.
Figure 37. Select the newly created operating system partition The system reboots after the operating system is installed. 20. Enter administrator password, and reenter to confirm the password, and then click Finish. Figure 38. Customize settings 21. After the system reboots, press Ctrl+Alt+Delete to log in to the system. 22. Type the administrator password, and then press Enter. NOTE: Windows Server 2019 Essentials do not include the Essentials Experience role.
It is recommended that you install the latest hotfixes and security updates from Microsoft after installing Microsoft Windows Server 2019. You can install these hotfixes and security updates by downloading them or by using the Windows updates available for your system. Dell EMC recommends that you install hotfixes and security update "1D" or newer form Microsoft on your system by using Windows update, or by downloading the latest updates after installing the operating system.
4 Drive partitioning Drive partitioning enables you to divide a hard drive disk space into multiple Virtual Drives (VDs). Each VD is called a partition.
5 Resources and support Topics: • • • • Operating system support matrix for Dell EMC PowerEdge servers Documentation and video resources Identifying the series of your Dell EMC PowerEdge servers Download drivers and firmware Operating system support matrix for Dell EMC PowerEdge servers Windows Server operating system can be installed only on selected Dell EMC PowerEdge servers.
Table 1. Additional documentation and video resources for your server (continued) Task Managing your server Description Location For information about updating drivers and firmware, see the "Download drivers and firmware" section in this document. www.dell.com/support/drivers For information about server www.dell.com/openmanagemanuals management software offered by Dell, see the Dell EMC OpenManage Systems Management Overview Guide.
Table 1. Additional documentation and video resources for your server (continued) Task Description Location Working with the Dell EMC PowerEdge RAID controllers For information about www.dell.com/storagecontrollermanuals understanding the features of the Dell EMC PowerEdge RAID controllers (PERC) and deploying the PERC cards, see the Storage controller documentation.
Table 2. PowerEdge servers naming convention and examples YX3X servers YX4X systems YX4XX systems YX5XX PowerEdge M630 PowerEdge M640 PowerEdge R6415 PowerEdge R6515 PowerEdge M830 PowerEdge R440 PowerEdge R7415 PowerEdge R7515 PowerEdge T130 PowerEdge R540 PowerEdge R7425 PowerEdge R6525 Download drivers and firmware It is recommended that you download and install the latest BIOS, drivers, and systems management firmware on your system.
6 Contacting Dell EMC Dell EMC provides several online and telephone-based support and service options. Availability varies by country, region, and product, and some services may not be available in your area. To contact Dell EMC for sales, technical support, or customer service issues, see www.dell.com/contactdell. If you do not have an active Internet connection, you can find contact information on your purchase invoice, packing slip, bill, or the product catalog.