
Owner's manual
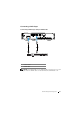
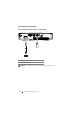
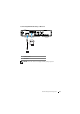

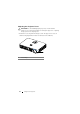
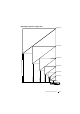
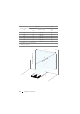
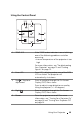
Table Of Contents
- Contents
- Your Dell Projector
- Connecting Your Projector
- Using Your Projector
- Turning Your Projector On
- Turning Your Projector Off
- Adjusting the Projected Image
- Adjusting the Projector Focus
- Adjusting Projection Image Size
- Using the Control Panel
- Using the Remote Control
- Installing the Remote Control Battery
- Operating Range with Remote Control
- Using the On-Screen Display
- Multimedia Introduction
- Photo Format
- Video Format
- Music Format
- How to set-up File Type for Multimedia with USB
- How to set-up File Type for Multimedia with SD Card
- How to set-up File Type for Multimedia with Internal Memory
- Office Viewer for the USB, SD, and Internal Memory
- Buttons Introduction
- Multimedia SETUP for USB, SD Card, and Internal Memory
- Intel® Wireless Display (WiDi) Installation
- Wi-Fi Display Installation
- Managing the Projector From Web Management
- Make Application Token
- Troubleshooting Your Projector
- Specifications
- Contacting Dell
- Appendix: Glossary

9
6 Down / Keystone
adjustment
Press to navigate through the On-Screen
Display (OSD) Menu items.
Press to adjust image distortion caused by
tilting the projector (+/-40 degrees).
7 Menu Press to activate the OSD. Use the directional
keys and the Menu button to navigate
through the OSD.
8 Left / Source Press to navigate through the On-Screen
Display (OSD) Menu items.
Press to toggle through Intel
®
WiDi, Wi-Fi,
DoUSB, HDMI, USB, SD, and Internal Memory
sources when multiple sources are
connected to the projector.
Enter Press to confirm the selected item.
Using Your Projector 20