LG7_bk0.
LG7_bk0.book Page 2 Monday, September 5, 2011 6:30 PM Notes, Cautions, and Warnings NOTE: A NOTE indicates important information that helps you make better use of your product. CAUTION: A CAUTION indicates potential damage to hardware or loss of data if instructions are not followed. WARNING: A WARNING indicates a potential for property damage, personal injury, or death. ____________________ Information in this document is subject to change without notice. © 2011 Dell Inc. All rights reserved.
LG7_bk0.book Page 3 Monday, September 5, 2011 6:30 PM Contents 1 Dell Streak 7 Tablet Features 2 Setting Up Your Dell Streak 7 Tablet . . . . . . 11 . . . . . . . . 11 Turning On Your Device . . . . . . . . . . . . . . 13 Turning Off Your Device . . . . . . . . . . . . . . 13 . . . . . . . . . . . . . . . 13 Getting Your Tablet Ready for Use Turning Off the Screen 3 About Your Dell Streak 7 Tablet Touch Screen . . . . . . . . . 14 . . . . . . . . . . . . . . . . . 17 . . . . . .
LG7_bk0.book Page 4 Monday, September 5, 2011 6:30 PM Managing Contacts . . . . . . . . . . . . . . . . . . . . . . . . . . 44 . . . . . . . . . . . . . . . . . . . . 50 Messaging (on 3G model only) Pop-up Menu . Swype Keyboard . . . . . . . . . . . . . . . . . . . 51 Dell Keyboard . . . . . . . . . . . . . . . . . . . . 55 Google Search . . . . . . . . . . . . . . . . . . . . 58 . . . . . . . . . . 59 Managing Your Device Settings 5 Internet . . . . . . . . . . . . 62 . . . . . . .
LG7_bk0.book Page 5 Monday, September 5, 2011 6:30 PM Protect Your Device Data with a Screen Unlock Pattern . . . . . . . . . . . . . . . . . . . 109 . . . . . . 111 . . 112 . . . 113 . . . . . . . . . . . . . . . . . . . . . . . 114 . . . . . . . . . . . . . . . . . . . . . . . 114 Protect Your Device Data with a PIN Protect Your Device Data with a Password Protect Your SIM Card with the SIM Lock Password (on 3G model only) . . . . . . . 8 Applications Camera Bluetooth® .
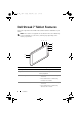
LG7_bk0.book Page 6 Monday, September 5, 2011 6:30 PM Dell Streak 7 Tablet Features This section provides information about the features available on your device. NOTE: The features or applications described in this User’s Manual may not be all available on your device, and may vary depending on the model you purchase. 3 4 5 6 7 8 9 2 1 Buttons/Ports/Parts Functionality 1 Headphone connector Connects to headphones. 2 Speaker Provides audio output for video and music playback.
LG7_bk0.book Page 7 Monday, September 5, 2011 6:30 PM Buttons/Ports/Parts 5 Power and Sleep/Wake button Functionality • Press and hold to turn on the device. • Press to turn the screen on or off. • While the device is on, press and hold to turn off the device. Touch OK when the Power off menu appears. 6 Battery status light Indicates the battery charge status and pending notifications. The different lights indicate the following: • Solid green — Battery is fully charged when connected to power.
LG7_bk0.book Page 8 Monday, September 5, 2011 Buttons/Ports/Parts 9 Home button 6:30 PM Functionality • When viewing other Home screens, you can touch this button to return to the central Home screen. • When performing any function on the device, such as working with applications, widgets, and so on, you can touch this button to return to the last Home screen you viewed, or touch this button again to return to the central Home screen.
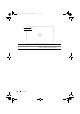
LG7_bk0.book Page 9 Monday, September 5, 2011 6:30 PM 9 8 7 1 2 3 4 1 30-pin port 5 6 • Connects to the supplied USB cable for transferring files to and from a computer. • Connects to the supplied USB cable and USB wall-charger adapter to charge the device. 2 Touch screen Touch the screen to use the onscreen controls including buttons, menu items, and the keyboard. 3 Force power-off button Push the button to force power off the device. 4 SD card slot Holds the SD card in place.
LG7_bk0.book Page 10 Monday, September 5, 2011 6:30 PM 1 2 10 1 Camera lens Captures pictures and videos. 2 Camera flash Used for capturing pictures and videos in dimly lit environments.
LG7_bk0.book Page 11 Monday, September 5, 2011 6:30 PM Setting Up Your Dell Streak 7 Tablet Getting Your Tablet Ready for Use Insert the SIM card on 3G model (Optional) 1 2 1 Pull out the slot door. 2 Hold the SIM card with the metal contacts facing down, and follow the SIM card illustration on the slot door label to insert the SIM card into the SIM card slot. Insert the SD card 1 2 1 Pull out the slot door.
LG7_bk0.book Page 12 2 Monday, September 5, 2011 6:30 PM Hold the SD card with the metal contacts facing down, and follow the SD card illustration on the slot door label to insert the SD card into the SD card slot. Charge the battery CAUTION: Charging your tablet when the ambient temperature is not between 0°C - 45°C can damage your tablet. NOTE: The battery cannot be charged by connecting your device to a computer. NOTE: The battery is not fully charged when first unpacked.
LG7_bk0.book Page 13 Monday, September 5, 2011 6:30 PM Turning On Your Device NOTE: Use this device in an environmental temperature between -10°C and 55°C. 1 Press and hold the Power and Sleep/Wake button your device. to turn on 2 If the lock screen appears, touch and hold the lock icon . When it turns into a circle, drag it to the edge of the larger circle that surrounds it to unlock the screen.
LG7_bk0.book Page 14 Monday, September 5, 2011 6:30 PM About Your Dell Streak 7 Tablet Touch Screen Your device has a multi-touch sensitive screen. You can touch the surface of the screen to operate the device. Finger Gestures Allows you to: Touch Tap gently on the screen with your fingertip. • Select the items on the screen including options, entries, images, and icons. • Start applications. • Press the buttons on the screen. • Input text using the on-screen keyboard.
LG7_bk0.book Page 15 Monday, September 5, 2011 6:30 PM Finger Gestures Allows you to: Drag 1 Touch and hold your finger on an item on the screen. 2 Keeping your finger in contact with the screen, move your fingertip to the desired location. 3 Take your finger off the screen to drop the item in the desired location. • Move items such as images and icons on the screen. • Scroll through Home screens, web pages, lists, entries, photo thumbnails, contacts, and so on.
LG7_bk0.book Page 16 Monday, September 5, 2011 Finger Gestures 6:30 PM Allows you to: Zoom out Move two fingers close together on the screen. Reduce the view of an image or web page (zoom out). Zoom in Move two fingers apart on the screen. Enlarge the view of an image or web page (zoom in).
LG7_bk0.book Page 17 Monday, September 5, 2011 6:30 PM Screen Orientation For optimal viewing experience, the screen orientation changes automatically to portrait or landscape format depending on how you hold the device. To modify the default rotating behavior, open the rotation settings by touching the Home button → Apps button → Settings → Screen→ Auto-rotate screen. • To enable Auto-rotate screen, touch the setting option to select the check box .
LG7_bk0.book Page 18 Monday, September 5, 2011 6:30 PM Home Screen When you turn on and unlock your device, or touch the Home button , the Home screen appears. You can start from the Home screen to access all the features of your device. The Home screen is composed of five panels. On the central Home screen, flick left/right or touch the screen edges to see more Home screen panels.
LG7_bk0.book Page 19 4 Monday, September 5, 2011 Customize 6:30 PM • Add items to your Home screen, such as widgets and application shortcuts. • Change the wallpaper of your Home screen. 5 Web Stage widget This is one of the Dell Stage widgets. From the Web Stage widget, you can access the bookmarked or frequently viewed websites. For more information on using Dell Stage widgets, see "The Dell Stage Widgets" on page 30.
LG7_bk0.book Page 20 Monday, September 5, 2011 6:30 PM NOTE: The Home button on the device and the Home button on the screen perform the same function. NOTE: The Back button on the device and the Back button the screen perform the same function. on To navigate across the Home screens Flick or drag the desktop horizontally until the desired Home screen is displayed. Navigation Buttons You can find the navigation buttons from the left side of the system bar.
LG7_bk0.book Page 21 2 Monday, September 5, 2011 Home 6:30 PM • When viewing other Home screens, you can touch this button to return to the central Home screen. • When performing any function on the device, such as working with applications, widgets, and so on, you can touch this button to return to the last Home screen you viewed, or touch this button again to return to the central Home screen. 3 Recent applications Open a list of thumbnail images of the applications you have accessed recently.
LG7_bk0.book Page 22 Monday, September 5, 2011 6:30 PM Managing Notifications • To view the details about a notification, touch a notification icon. • To remove a notification, touch . • To view all your current notifications, touch the Time area to open the Notifications list. You can touch a notification summary to respond to it.
LG7_bk0.book Page 23 Monday, September 5, 2011 6:30 PM Quick Settings The Quick Settings allow you to view or change the most common settings in your device conveniently. 1 Touch the Time area in the system bar to open the Status Details. 2 Touch anywhere in the Status Details. Then, the Quick Settings display below the Status Details. Status Details Quick Settings 3 View or change the desired settings. To close the Quick Settings, touch any other part of the screen.
LG7_bk0.book Page 24 Monday, September 5, 2011 6:30 PM • Notifications: Drag the switch to ON/OFF to enable/disable system or application notifications. When disabled, the icon appears. You can touch this icon to turn notifications back on. • Settings: Touch to open Settings. For more information, see "Customizing Your Dell Streak 7 Tablet" on page 104.
LG7_bk0.book Page 25 Monday, September 5, 2011 6:30 PM Customizing Your Home Screen Adding an Item to a Home Screen 1 Touch the Home button . 2 Flick to a Home screen where you want to add the item. 3 Either touch and hold an empty area on a Home screen, or touch the Customize button at the top-right corner of a Home screen, until the following screen appears. 4 Items that can be added to a Home screen are divided into four categories.
LG7_bk0.book Page 26 Monday, September 5, 2011 6:30 PM To add a widget to a Home screen You can add widgets to display active Home screen windows or controls for your favorite applications or web-based services, such as an analog clock, the music player, the Google Search widget, or a calendar showing upcoming events.
LG7_bk0.book Page 27 Monday, September 5, 2011 6:30 PM 1 Either touch and hold an empty area on a Home screen, or touch the Customize button at the top-right corner of a Home screen. 2 Touch the Wallpapers tab. 3 Select a desired wallpaper from the categories below, and touch the wallpaper to set it as the wallpaper of your Home screen. • Gallery: Open available photo albums on the device or on the web. Select a picture from the albums.
LG7_bk0.book Page 28 Monday, September 5, 2011 Items 6:30 PM Steps/Descriptions Contact 1 Flick through the Choose a contact shortcut screen to locate the desired contact. 2 Touch the desired contact entry to create the shortcut on the Home screen. Directions & Navigation Create a shortcut that you can touch to open Google Maps and view directions to a location. 1 Type your destination in the text box.
LG7_bk0.book Page 29 Monday, September 5, 2011 6:30 PM Adding an Application Shortcut from the Apps screen 1 Touch the Apps button to open the Apps screen. at the top-right of any Home screen 2 On the Apps screen, touch and hold a desired application and drag it onto a Home screen. The application’s icon appears on the Home screen. NOTE: If you pause before lifting your finger, the Home screen will enlarge, so you can drag to place the item on a specific position you want.
LG7_bk0.book Page 30 Monday, September 5, 2011 6:30 PM The Dell Stage Widgets NOTE: Availability and functionality of the Dell Stage widgets described in this section may vary depending on the software version pre-installed on your device. It is recommended to upgrade to the latest software version for full functionality. The Dell Stage widgets give you direct access to the following items from the Home screen: • Kindle Books (see "Using the Books Stage Widget" on page 31.
LG7_bk0.book Page 31 Monday, September 5, 2011 6:30 PM Removing a Stage Widget 1 Touch and hold a Stage widget that you want to remove from a Home screen, until it becomes movable. 2 Drag the Stage widget onto the top of the Trash icon . 3 When the Stage widget turns red, release your finger from the screen.
LG7_bk0.book Page 32 Monday, September 5, 2011 6:30 PM To select the book categories to display on the Books Stage widget 1 Touch to enter the BOOKS SETTINGS mode. 2 Touch to select the categories. 3 Touch when you have completed the settings. Using the Photo Stage Widget The Photo Stage widget displays the most recent photos and videos captured using the Camera application or stored in the “DCIM” folder on your device.
LG7_bk0.book Page 33 4 Monday, September 5, 2011 6:30 PM Touch to open the Camera application and capture a new photo or video. Using the Radio Stage Widget The Radio Stage widget displays a list of user presets or recently played streaming radio stations from the TuneIn Radio application. 1 2 5 3 4 1 The now-playing area displays the currently playing or last played station. 2 Touch to search for a radio station by typing keyword, such as its location or genre.
LG7_bk0.book Page 34 Monday, September 5, 2011 6:30 PM Using the Social Stage Widget The Social Stage widget displays your friends’ latest postings retrieved from your Twitter or Facebook account. To use the Twitter and Facebook widgets, you need to sign in to your Twitter or Facebook account with your e-mail address and password. NOTE: You can access both your Facebook and Twitter accounts from one Social Stage widget.
LG7_bk0.book Page 35 Monday, September 5, 2011 6:30 PM Using the Web Stage Widget The Web Stage widget displays thumbnails of bookmarked websites or the most visited websites. 4 1 2 3 1 Drag or flick through the thumbnails of web pages. Touch a web page thumbnail to load the web page in the Browser application. 2 Touch to open the Browser application. 3 Touch to enter the WEB SETTINGS mode. 4 Touch to find the desired web page using Google Search.
LG7_bk0.book Page 36 Monday, September 5, 2011 6:30 PM Using the Weather Stage Widget The Weather Stage widget provides real-time weather information and 5 day weather forecast from AccuWeather. 1 6 2 5 3 1 2 3 Touch 4 to manually update the weather information. • Displays the date. • Touch to open the Calendar application. Touch to open the browser and visit AccuWeather.com to see more weather information. 4 Touch to enter the WEATHER SETTINGS mode.
LG7_bk0.book Page 37 Monday, September 5, 2011 6:30 PM To display the weather information for a different location 1 Touch to enter the WEATHER SETTINGS mode. 2 Touch Current Location. 3 Enter a city or postal code in the search box and touch . Select the desired location from the search results. NOTE: To change the temperature unit that the widget uses to display weather, touch or .
LG7_bk0.book Page 38 Monday, September 5, 2011 6:30 PM Application Shortcuts To quickly launch applications on the Home screen, you can add shortcuts for frequently-used applications to the Home screen. For more information, see "Customizing Your Home Screen" on page 25. To open an application using the application shortcuts 1 Touch the Home button . 2 If the desired application shortcut displays on the Home screen, touch the shortcut to run the application.
LG7_bk0.book Page 39 Monday, September 5, 2011 6:30 PM The Screen Lock Wallpaper You can set the display to turn off automatically after a timeout period of inactivity, or turn it off manually by pressing the power button . When you press the power button to wake up the display, the screen lock wallpaper appears to help prevent unintentional touch of the screen. When the screen lock wallpaper appears, touch and hold the lock icon .
LG7_bk0.book Page 40 Monday, September 5, 2011 6:30 PM Using Your Dell Streak 7 Tablet Managing Contacts To view and manage your contacts, touch the Home button Apps button → Contacts → . To add a new contact 1 Touch New. 2 Select the account where you want to add this contact, such as your Gmail account. 11 10 9 8 1 2 7 3 6 5 4 1 2 This area shows the account in which the new contact is stored. • Take photo: Touch to take a photo to use as the contact’s visual caller ID.
LG7_bk0.book Page 41 Monday, September 5, 2011 6:30 PM 4 Touch to replace a default information label with another label that you can choose from the list. For example, you can change the label from Home phone number to Mobile phone number. 5 Touch to add a new item to the current information category. For example, you can add a second phone number. 6 Touch to remove an item from the current information category. 7 Touch to fill more information about the contact.
LG7_bk0.book Page 42 Monday, September 5, 2011 6:30 PM To edit a contact 1 On the Contacts list, find a desired contact. 2 Touch the contact entry to view the contact details. 3 Touch to edit the contact details. 4 Touch Done to save the changes. To share a contact 1 On the Contacts list, find a desired contact. 2 Touch the contact entry to view the contact details. 3 Touch the Menu button on the device or the Menu button on the screen→ Share contact.
LG7_bk0.book Page 43 Monday, September 5, 2011 6:30 PM NOTE: To separate the previously joined contacts, touch the contact entry→ → → Separate→ OK. Contacts settings In Contacts Menu button Settings , touch the Menu button on the device or the on the screen. Adjust the display options for your contacts.
LG7_bk0.book Page 44 Monday, September 5, 2011 6:30 PM Messaging (on 3G model only) To compose, send, and read text (SMS) or multimedia (MMS) messages, touch the Home button → Apps button → Messaging . The Messaging screen opens with a list of messages or message threads representing all the received, sent, and draft messages. NOTE: For information about the message thread, see "Receiving text and multimedia messages" on page 48.
LG7_bk0.book Page 45 Monday, September 5, 2011 6:30 PM To compose and send a multimedia message 1 In the To field, type the recipient’s mobile phone number, e-mail address, or contact name. Matching contacts with their mobile numbers or e-mail addresses appear below the To field. Touch a matched contact, or continue typing the desired phone number or e-mail address. 2 If you want to add a subject line to the message, touch the Menu button on the device or the Menu button Add subject.
LG7_bk0.book Page 46 Ringtone Monday, September 5, 2011 6:30 PM Open the Select audio menu. Touch a desired preloaded ringtone, and then touch OK to attach it to your message. You can also manually copy new ringtones to the SD card and attach a ringtone to your MMS. To do so, follow the steps below: 1 Create a folder named Ringtones in the SD card. 2 Open the Ringtones folder. 3 Copy the ringtone you want to attach to your MMS into the Ringtones folder.
LG7_bk0.book Page 47 Slideshow Monday, September 5, 2011 6:30 PM Open the Edit slideshow screen to create a slide show and attach it to your message. 1 Touch Add slide to create new slides. 2 Touch a created slide such as Slide 1 to open the slideshow editor screen. 3 Touch Add picture, and then select the picture you want to add to the slide. 4 You can touch the text field at the bottom of the screen to compose a caption for the displayed slide.
LG7_bk0.book Page 48 Monday, September 5, 2011 6:30 PM Receiving text and multimedia messages Depending on your notification settings, the device rings, vibrates, or displays a message briefly in the Status area of the system bar as a new text or multimedia message is received. A new message icon appears and stays in the notifications area of the system bar to remind you of a new message.
LG7_bk0.book Page 49 Monday, September 5, 2011 6:30 PM If the message includes a: • Website link — touch the link to open the Browser application and visit the website. • E-mail address — touch the e-mail address to open the Email/Gmail application and compose an e-mail to send to the address. To forward the message 1 Touch and hold the message. The Message options menu pops up. 2 Select Forward to forward the message.
LG7_bk0.book Page 50 Monday, September 5, 2011 6:30 PM To delete a message or a message thread 1 In the Messaging list, touch and hold the message thread that you want to delete. 2 To delete the entire thread, touch Delete thread and then touch Delete to confirm deletion. To delete a message within a thread, touch and hold the message to delete, and then touch Delete message on the Message options menu. Touch Delete to confirm deletion.
LG7_bk0.book Page 51 Monday, September 5, 2011 6:30 PM Swype Keyboard The Swype keyboard allows you to enter text by drawing a path through the letters of a word, instead of touching each key to type the word. The keyboard automatically rotates to either the portrait or landscape mode based on the device orientation. To set the Swype keyboard as the input keyboard 1 Touch the Home button Settings → Apps button → → Language & input. 2 Touch Current input method under the Keyboard settings section.
LG7_bk0.book Page 52 Monday, September 5, 2011 6:30 PM Swype Keyboard controls for composing an e-mail 2 1 11 10 9 3 4 1 5 6 7 8 To enter the word “Need” for example, place your finger on the first letter “N” and glide to the following letters. Lift your finger after the last letter “d”. The keyboard predicts and enters the word according to the letters that the path you drew goes through. Letters irrelevant to the spelling of the word are ignored.
LG7_bk0.book Page 53 5 Monday, September 5, 2011 6:30 PM • Touch to enter “,”. • Touch and hold and then release to enter “-”. • To find more symbols available from this key, touch and hold the key until the symbols appear, and then touch the symbol you want to type. 6 • Touch to enter a space. • Touch and hold and then release to enter a tab space. 7 • Touch to enter “.”. • Touch and hold and then release to enter “’”.
LG7_bk0.book Page 54 Monday, September 5, 2011 6:30 PM To add a word to the Swype dictionary 1 Touch the Home button → Apps button → → Language & input. Settings 2 Touch Configure input methods under the Keyboard settings section. 3 Touch Settings under the Swype section. 4 Scroll to locate Personal dictionary under the Swype Advanced Settings section. 5 Touch . 6 Type a desired word into the Personal dictionary text box. 7 Touch .
LG7_bk0.book Page 55 Monday, September 5, 2011 6:30 PM Dell Keyboard You can also type text using the Dell keyboard. The keyboard automatically rotates to either the portrait or landscape mode based on the device orientation. To set the Dell keyboard as the input keyboard 1 Touch the Home button Settings → Apps button → → Language & input. 2 Touch Current input method under the Keyboard settings section. 3 On the Select input method menu that appears, touch to select the Dell keyboard.
LG7_bk0.book Page 56 Monday, September 5, 2011 6:30 PM Keyboard controls for composing an e-mail 3 2 4 1 5 6 7 1 • Touch to type letters into the text box where the cursor appears. • Touch and hold to type accented letters for applicable languages. 2 • Touch to delete a typed character, symbol, or a space. • Touch and hold to quickly delete typed text. 3 4 ENTER key.
LG7_bk0.book Page 57 6 Monday, September 5, 2011 6:30 PM • Touch to show the keyboard for typing numbers, punctuation marks, and symbols. • Touch to switch back to the alphabet keyboard. 7 Touch to use voice input. Say the words you want to enter in the microphone. The device enters the words that it can recognize from your voice. To configure the Dell keyboard settings 1 Touch the Home button → Apps button → Settings → Language & input.
LG7_bk0.book Page 58 Monday, September 5, 2011 6:30 PM Google Search You can use the Google Search widget to find websites and information on Google, applications installed on your device, and contacts stored in your Contacts list. To search by typing 1 From the Google Search widget on the Home screen, touch to open the Google Search widget below. 2 Type a keyword or text into the box using the keyboard. As you type, the search results that fully or partially match the text being typed appear.
LG7_bk0.book Page 59 Monday, September 5, 2011 6:30 PM Managing Your Device Settings To check storage spaces Touch the Home button Settings → Apps button → → Storage. The screen displays the total and available space on the device and on the SD card. To erase unwanted application data to free storage space 1 Touch the Home button Settings → Apps button → → Applications→ Manage applications. 2 Touch the application whose cache or data you want to remove.
LG7_bk0.book Page 60 Monday, September 5, 2011 6:30 PM 4 Pull out the slot door and then remove the SD card from your device as illustrated. To erase all data from your device CAUTION: The following steps will erase all the data including your downloaded applications and Google account from your device. Ensure that you back up all the required data before you proceed. 1 Touch the Home button Settings → Apps button → → Privacy→ Factory data reset. 2 Touch Reset tablet.
LG7_bk0.book Page 61 Monday, September 5, 2011 6:30 PM To force power off your device Force power-off button 1 Pull out the slot door. 2 Push the force power-off button using a paper clip or other similar pointed objects. 3 Press and hold the Power and Sleep/Wake button your device.
LG7_bk0.book Page 62 Monday, September 5, 2011 6:30 PM Internet Connecting to the Internet To browse the web and access web-based utilities such as instant messaging, one of the following data networking connections must be available: • GPRS • EDGE • 3G • HSPA • Wi-Fi GPRS/EDGE/3G/HSPA (on 3G model only) To connect to the Internet using GPRS, EDGE, 3G, or HSPA Your device is configured with the GPRS, EDGE, 3G, or HSPA network available with the service provider of the SIM card installed in your device.
LG7_bk0.book Page 63 Monday, September 5, 2011 6:30 PM NOTE: Depending on whether a GPRS, EDGE, 3G, or HSPA network is currently in use, a corresponding data network icon appears on the status bar after a data connection is established. You can set the device to search for available networks if you are outside your home network or want to register to a different network.
LG7_bk0.book Page 64 Monday, September 5, 2011 6:30 PM To turn on Wi-Fi and connect to a network 1 Touch the Home button Settings → Apps button → → Wireless & networks→ Wi-Fi to select the Wi-Fi check box. The device scans for available wireless networks. 2 Touch Wi-Fi settings. The network names and security settings (Open network or Secured with WEP/WPA/WPA2/WPS) of discovered Wi-Fi networks display in the Wi-Fi networks list.
LG7_bk0.book Page 65 Monday, September 5, 2011 6:30 PM From the Wi-Fi network: 1 Touch the Home button Settings → Apps button → → Wireless & networks→ Wi-Fi settings. 2 Touch the Wi-Fi network that the device is currently connected to (labeled Connected). A window opens displaying the Wi-Fi network’s name, status, security information, signal strength, link speed, and IP address. NOTE: If you want to disconnect the Wi-Fi network from your device, touch Forget on this window.
LG7_bk0.book Page 66 Monday, September 5, 2011 6:30 PM Disable All Connections Using the Airplane Mode Selecting the Airplane mode disables all mobile, Bluetooth, and Wi-Fi connections. This feature is useful when wireless connectivity is strictly prohibited, such as on an airplane. 1 Touch the Time area in the system bar to open the Status Details. 2 Touch anywhere in the Status Details. Then, the Quick Settings display below the Status Details.
LG7_bk0.book Page 67 3 Monday, September 5, 2011 6:30 PM Touch the Menu button on the device or the Menu button the screen to access the following options: on • New tab: Open a web page in a new window under a new tab. • New incognito tab: Open a web page in a new window under a new tab, and the pages you view in this new window will not appear in your browsing history or search history. Read the on-screen instructions for more information. • Find on page: Search for contents on the current web page.
LG7_bk0.book Page 68 Monday, September 5, 2011 6:30 PM To go to a web page 1 On the browser screen, touch the web page address field on the screen. 2 Type the web page address using the on-screen keyboard. As you type the address, matching web page addresses appear. 3 Touch an address displayed on the screen to go directly to that web page. Or Complete typing the web page address, and then touch either the ENTER key ( or ) on the keyboard or on the browser controls bar.
LG7_bk0.book Page 69 Monday, September 5, 2011 6:30 PM Viewing Web Pages To navigate on a web page Flick your finger horizontally or vertically on the screen to scroll and view desired areas of a web page. To zoom in on a web page Pinch-out a desired area of a web page by moving two fingers apart on the screen. To zoom out on a web page Pinch-in a desired area of a web page by bringing two fingers closer together on the screen.
LG7_bk0.book Page 70 Monday, September 5, 2011 6:30 PM To switch between browser windows You can open multiple browser windows. Touch the tabs to easily switch from one web page to another. Tabs NOTE: To close a browser window, touch . To find text within a web page 1 When viewing a web page, touch the Menu button device or the Menu button on the on the screen→ Find on page. 2 Type the search item in the search bar. 3 Touch or to go to the previous or next matching item.
LG7_bk0.book Page 71 Monday, September 5, 2011 6:30 PM 5 Touch Copy to copy the selected text to the clipboard first. To paste the copied text to an e-mail or text message, open the application. Touch and hold the text field on a message or e-mail screen, and then touch Paste on the context menu. Using Web Links, History, and Downloads To select a link on a web page Move to a link you want on a web page. The link is framed by a highlighted box when you touch it.
LG7_bk0.book Page 72 Monday, September 5, 2011 6:30 PM To check the history of visited web pages 1 On the browser screen, touch . 2 Touch the History tab that display browsing history and the most visited web pages. 3 Select a page, such as Today, Yesterday, Last 7 days, Last month, Most visited, and so on, to locate when your desired web page was last visited. 4 Touch a web address to open the web page.
LG7_bk0.book Page 73 Monday, September 5, 2011 6:30 PM To check downloads • On the browser screen, touch the Menu button or the Menu button on the device on the screen→ Downloads. Or • Touch the Home button Downloads → Apps button → . Manage Bookmarks You can store as many bookmarks as you want on your device. To bookmark a web page 1 On the browser screen, go to the web page you want to bookmark. 2 Touch next to the web page address field. The Bookmark this page window opens.
LG7_bk0.book Page 74 • Monday, September 5, 2011 6:30 PM Touch and hold the bookmark you want to open. Then, on the context menu touch Open to open the bookmark in the same browser window, or touch Open in new tab to open the bookmark in a new window. To manage your bookmarks 1 On the browser window, touch . 2 On the Bookmarks window, touch and hold a desired bookmark to open the context menu that provides the following options: Open Open the bookmarked website in the same browser window.
LG7_bk0.book Page 75 Monday, September 5, 2011 Share link 6:30 PM Touch to share the bookmark’s address through Bluetooth, Email, Facebook, Gmail, Messaging (on 3G model only), Twitter, and so on. • Bluetooth: Turn on Bluetooth. Touch Scan for devices. Touch the device you want to share the link with under Found devices. • Gmail, Email: Touch to open the composing window with the bookmark’s address automatically pasted on the text field. Send the bookmark’s address to others through an e-mail.
LG7_bk0.book Page 76 Monday, September 5, 2011 6:30 PM E-mail You can create POP3, IMAP, and exchange e-mail accounts from web-based e-mail services on your device. To open the e-mail application Touch the Home button → Apps button → Email . To set up an e-mail account 1 On the Account setup screen, type the e-mail address and password of the e-mail account you want to add. 2 Check the account options and then touch Next.
LG7_bk0.book Page 77 Monday, September 5, 2011 6:30 PM To view your e-mails 1 2 3 4 5 1 Touch to display all the e-mail accounts you have added into the Email application. 2 The number of new e-mails received in this account. 3 Select an account to view e-mails received in the inbox of the account. 4 The Combined view contains all e-mails received in all your accounts. 5 Touch to view e-mails in the other folders of this account.
LG7_bk0.book Page 78 Monday, September 5, 2011 6:30 PM To compose and send e-mail 1 Touch the Home button → Apps button → Email . 2 Select an e-mail account to use if you have set up more than one account on your device. NOTE: If you do not select an account, the account set as default will be the one used for sending e-mail. 3 In an e-mail account inbox, touch to compose an e-mail. 4 Type the recipient’s e-mail address in the To field.
LG7_bk0.book Page 79 Monday, September 5, 2011 6:30 PM To delete or edit an e-mail account on your device 1 Touch the Home button → Apps button → Email 2 Touch the Menu button on the device or the Menu button . → Account settings. • To delete an e-mail account, touch to select the account you want to remove first. Scroll to the Remove account section, and then touch Remove account. When asked to confirm deletion, touch OK.
LG7_bk0.book Page 80 Monday, September 5, 2011 6:30 PM Gmail Gmail is a web-based e-mail service provided by Google. To open Gmail Touch the Home button → Apps button → Gmail . To set up your Google account You need to sign in to a Google account to use Google applications and services such as Gmail, Google Talk, and Android Market. Signing in to your Google account also synchronizes all e-mails, contacts, and calendar on your Google account with your device.
LG7_bk0.book Page 81 Monday, September 5, 2011 6:30 PM Your Gmail inbox opens as the default Gmail view. All your received emails are delivered to your inbox. 1 9 8 7 6 2 5 3 4 1 Touch to select an Gmail account if you have set up multiple accounts on your device. 2 Folder (or Label) and number of unread e-mails.
LG7_bk0.book Page 82 Monday, September 5, 2011 6:30 PM 7 Touch the Refresh button to send or receive e-mails and to synchronize your e-mails with your Gmail account on the Internet. 8 Touch to compose an e-mail. 9 Touch to search for e-mails. To read e-mails • When you receive a new e-mail in the Gmail application, the email icon appears in the notifications area of the system bar to alert you of a new e-mail. Touch the icon to open the new e-mail to view it in the Gmail application.
LG7_bk0.book Page 83 7 Monday, September 5, 2011 6:30 PM Touch to view previous e-mails with the same subject. To create and send an e-mail 1 Touch the Home button → Apps button → Gmail . 2 Select an e-mail account to use if you have set up more than one account on your device. 3 In an e-mail account inbox, touch to compose an e-mail. 4 Type the contact’s e-mail address in the To field. To send e-mail to multiple contacts, separate their e-mail addresses with a comma. 5 Type the e-mail subject.
LG7_bk0.book Page 84 Monday, September 5, 2011 6:30 PM To sign in automatically You can sign in to your Google Talk account automatically whenever you turn on the device. 1 In the friends list, touch the Menu button Menu button on the device or the on the screen→ Settings. 2 Select the Sign in automatically check box. To add a new friend to your friends list NOTE: You can only add users who have a Google Account. 1 In the friends list, touch the icon to add a friend.
LG7_bk0.book Page 85 Monday, September 5, 2011 6:30 PM To start a conversation 1 Touch to select a friend in the friends list. 2 Type your message in the text box. 3 Touch the to send the message. To add a friend to an active conversation 1 On the chat screen, close the on-screen keyboard, and then touch the icon→ Add to chat. 2 Select the friend you want to invite to the current conversation.
LG7_bk0.book Page 86 Monday, September 5, 2011 6:30 PM To block a friend from sending you messages 1 In the friends list, find the friend to block. 2 Touch the friend’s thumbnail, and then touch → Block friend. Your friend is removed from your friends list and is added to the blocked friends list. NOTE: To unblock a friend, touch the Menu button on the device or the Menu button on the screen→ Settings. Scroll to touch Blocked friends under the Account section.
LG7_bk0.book Page 87 Monday, September 5, 2011 6:30 PM → Apps button 1 Touch the Home button → → Location & security. Settings 2 Select Use wireless networks, Use GPS satellites, or both. NOTE: Selecting Use GPS satellites allows you to pinpoint locations down to the street-level. However, this mode requires a clear view of the sky and consumes battery power. To open Google Maps Touch the Home button → Apps button → Maps . To see your location on a map On the Maps screen, touch .
LG7_bk0.book Page 88 Monday, September 5, 2011 6:30 PM NOTE: As you enter information, previous searches or matching locations appear below the search box. You can touch a place name or address to show the location on the map. 3 The search results are marked on the map by lettered balloons. 1 3 2 88 1 Scroll the list to view search results. 2 The search result is marked by a lettered balloon. Touch the letter balloon to display the name of the place.
LG7_bk0.book Page 89 Monday, September 5, 2011 6:30 PM To view the details of a place 8 7 1 6 2 3 5 4 1 Touch to display the map view. 2 Touch to obtain directions. (For more information, see "To get directions" on page 91). 3 Touch to switch to street view for the location. (For more information, see "To view a map in street view" on page 91). 4 Scroll to view the address, details, and reviews for the place if the information is available. 5 Touch to rate and review this place.
LG7_bk0.book Page 90 Monday, September 5, 2011 6:30 PM To move around a map 1 Flick or drag the map in any direction on the screen to view desired areas. 2 If you spot a place of interest while navigating the map, touch and hold the place to display the address (a picture thumbnail is also displayed if the street view for the location is available). To zoom in or out on a map Move two fingers close together on the screen to zoom out; move two fingers further apart to zoom in.
LG7_bk0.book Page 91 Monday, September 5, 2011 6:30 PM To view a map in street view You can switch to street view for the location that you found on the map. The street view is composed of imagery captured from the streets. 1 Locate a place of interest on the map. For more information, see "To find a location on the map" on page 87 and "To move around a map" on page 90. 2 On the map, touch the name or address of the place. 3 On the location details screen, touch .
LG7_bk0.book Page 92 Monday, September 5, 2011 6:30 PM NOTE: By default, your current location is the starting point, and the place you found on the map is your destination. 1 8 7 6 2 3 4 5 1 Start point. 2 End point (Destination). 3 Choose how you want to get to your destination: driving, public transportation, or walking. 4 Touch to render directions. 5 Touch to cancel. 6 Touch to select a contact’s address, pin a place on the map, or select a starred place as the destination.
LG7_bk0.book Page 93 Monday, September 5, 2011 6:30 PM Using Google Latitude NOTE: To use Google Latitude, you will be required to sign in to a Google account. The Google Latitude location service allows you to share locations with your friends and family who have signed in to the service with their Google accounts. You can also send instant messages and emails, and get directions to your friends’ locations.
LG7_bk0.book Page 94 Monday, September 5, 2011 6:30 PM • Select from Contacts: Select friends from your contacts. Friends already using Latitude have an icon next to their names. • Add via email address: Enter an e-mail address. 3 When the Send sharing requests menu appears, touch Yes. 4 Your friends already using Latitude receive an e-mail request and a notification on Latitude requesting them to share locations.
LG7_bk0.book Page 95 Monday, September 5, 2011 6:30 PM To connect with your friends Touch a friend’s name in map view or list view to open the friend’s profile. In the profile screen, you can send messages to your friend and configure privacy options. 3 2 1 7 6 4 5 1 Switch to street view of the friend’s location. 2 Get directions to the friend’s location. 3 See a friend’s location on the map. 4 Sharing options: • Share best available location: Share street-level location with your friend.
LG7_bk0.book Page 96 Monday, September 5, 2011 6:30 PM To control what to share and change your public profile 1 In Latitude, touch your name on the list of friends to open your public profile window. 2 Set the following options to your preferences. View your location history Enable the Location History feature which helps store your past Latitude history. Send location to others Send the address of your current location using Twitter, Facebook, Bluetooth, text messaging, or e-mail, and so on.
LG7_bk0.book Page 97 Monday, September 5, 2011 6:30 PM Places Touch the Home button → Apps button → Places . Places automatically detects your current location and offers guide to nearby restaurants, coffee shops, bars, hotels, attractions, ATMs, gas stations, and more. 1 Touch to select a category. 2 From the list of places, touch the desired place to view more details. For more information on using the controls on this screen, see "To view the details of a place" on page 89.
LG7_bk0.book Page 98 Monday, September 5, 2011 6:30 PM Feature Description Searching along route Search for any kind of business along your route. Press the Menu button → Layers to access popular types of places. Satellite View Satellite view allows you to view your route overlaid on 3D satellite views with Google's high-resolution aerial imagery. Press the Menu button → Layers→ Satellite to turn on Satellite view.
LG7_bk0.book Page 99 Monday, September 5, 2011 6:30 PM YouTube YouTube is an Internet video streaming service that allows you to view videos uploaded by YouTube members. NOTE: Browsing and watching videos does not require you to sign in to a YouTube account. However, to use full YouTube features, such as commenting on videos, adding videos to your favorites, or uploading videos, you must create and sign in to a YouTube account. To open YouTube Touch the Home button → Apps button → YouTube .
LG7_bk0.book Page 100 Monday, September 5, 2011 6:30 PM 3 The videos that match the words you said are listed. 4 Touch the video to start playing the video. To watch videos in full screen 1 Hold the device in the Landscape orientation. 2 Select a video on the YouTube screen. Touch the video to start playback, and then touch to enable the full screen mode. 3 To control video playback, touch anywhere on the screen to view the controls. 4 Touch the screen to display the pause icon.
LG7_bk0.book Page 101 Monday, September 5, 2011 6:30 PM NOTE: Some of the features above may require signing in to your YouTube account. To customize YouTube settings To customize YouTube settings, touch the Menu button device or the Menu button on the on the screen→ Settings. NOTE: For more information on using YouTube, touch the Menu button on the device or the Menu button on the screen→ Help. Android Market You can use Android Market to download and install applications and games on your device.
LG7_bk0.book Page 102 Monday, September 5, 2011 6:30 PM 3 On the application details screen, you can read the descriptions about the application or game, user ratings and reviews, and developer information. 4 On the application details screen, touch DOWNLOAD or BUY to download a free application or purchase an application. The application’s screen will show the download and installation progress.
LG7_bk0.book Page 103 Monday, September 5, 2011 6:30 PM 3 Touch Uninstall. Synchronizing Your Google Data Through a web connection, your device can synchronize your Google data including Gmail, calendar, and contacts with your computer or any other device that you use to access your Google account. To select the applications to synchronize 1 Touch the Home button Settings → Apps button → → Accounts & sync.
LG7_bk0.book Page 104 Monday, September 5, 2011 6:30 PM Customizing Your Dell Streak 7 Tablet You can customize your device using the options available in the Settings application. Power Management Settings 1 Touch the Home button Settings → Apps button → → Power Management. 2 Select a desired timeout duration from the Timeout menu that appears.
LG7_bk0.book Page 105 Monday, September 5, 2011 6:30 PM Display Settings To change the display settings: 1 Touch the Home button → Apps button → → Screen. Settings 2 To enable a setting, touch the setting option to select the check box ; to disable a setting, touch the setting option to clear the check box Brightness . Manually adjust screen brightness. 1 Drag the brightness slider horizontally or touch the desired portion on the slider.
LG7_bk0.book Page 106 Monday, September 5, 2011 6:30 PM Sound and Ringtone Settings To change the sound and ringtone settings: 1 Touch the Home button → Apps button → → Sound. Settings 2 Flick the list to locate and touch a desired option. 3 To enable a setting, touch the setting option to select the check box ; to disable a setting, touch the setting option to clear the check box . General settings Vibrate Set the device to vibrate based on the available settings.
LG7_bk0.book Page 107 Monday, September 5, 2011 6:30 PM Notifications settings Notification ringtone 1 Select a desired ringtone for notifications from the Ringtones menu that appears. 2 Touch OK to confirm the selection. Feedback settings Audible selection Plays a tone as you touch the screen to select items. Screen lock sounds Plays a tone when the screen is locked and unlocked. Haptic feedback The device vibrates when you touch the buttons or when specific interactions with the device occur.
LG7_bk0.book Page 108 Monday, September 5, 2011 Set date 6:30 PM 1 Touch or touch and hold the up/down arrows to adjust the day, month, and year; you can also touch the day, month, or year to flick to the desired value. 2 Touch Set to confirm the date. Set time 1 Touch or touch and hold the up/down arrow keys to adjust the hour and minute; you can also touch the hour or minute to flick to the desired value. 2 Touch the AM/PM field if the 12-hour format is in use. 3 Touch Set to confirm the time.
LG7_bk0.book Page 109 Monday, September 5, 2011 6:30 PM Protecting Your Dell Streak 7 Tablet Protect Your Device Data with a Screen Unlock Pattern You can protect your device data against unauthorized access by locking the touch screen with a screen unlock pattern. Once the unlock pattern is enabled and the screen is locked, you need to draw the correct unlock pattern to unlock the screen.
LG7_bk0.book Page 110 Monday, September 5, 2011 6:30 PM 4 Drag your finger to draw the unlock pattern by connecting at least four dots in a vertical, horizontal and/or diagonal direction. Take your finger off the screen when a pattern is drawn. NOTE: You must touch and drag your finger on the screen to create the pattern. 5 The device records the pattern if it is correctly drawn. Touch Continue. 6 Draw the pattern again as prompted, and then touch Confirm.
LG7_bk0.book Page 111 Monday, September 5, 2011 6:30 PM Use visible pattern Clear this option if you do not want the lines of the unlock pattern to display on the screen when you draw it. Use tactile feedback Clear this option if you do not want the device to give you tactile feedback when drawing the unlock pattern. Protect Your Device Data with a PIN 1 Touch the Home button Settings → Apps button → → Location & security. 2 Touch Configure lock screen under the Lock screen section→ PIN.
LG7_bk0.book Page 112 Monday, September 5, 2011 6:30 PM Protect Your Device Data with a Password 1 Touch the Home button Settings → Apps button → → Location & security. 2 Touch Configure lock screen under the Lock screen section→ Password. 3 On the Choose your password page that appears, enter a password in the text box. A valid password consists of at least 4 characters and contains at least one letter. 4 Touch Continue to proceed. 5 Enter the password again to confirm. 6 Touch OK.
LG7_bk0.book Page 113 Monday, September 5, 2011 6:30 PM Protect Your SIM Card with the SIM Lock Password (on 3G model only) You can protect your SIM card against unauthorized use with a personal identification number (PIN). After a PIN is enabled to lock your SIM, you will need to enter the PIN each time you turn on the device in order to unlock your SIM. NOTE: The SIM card will be permanently locked if you enter the incorrect PIN for three consecutive times.
LG7_bk0.book Page 114 Monday, September 5, 2011 6:30 PM Applications Camera Your device has a camera with auto-focus feature that allows you to capture and share high-quality pictures and videos. To start the camera in picture mode Touch the Home button → Apps button → Camera . Camera controls 8 7 1 6 5 2 3 114 4 1 Viewfinder screen. 2 Touch the thumbnail view of the last taken picture to view and manage the picture using the Gallery application.
LG7_bk0.book Page 115 5 Monday, September 5, 2011 6:30 PM On-screen shutter button. To capture a picture: a Focus on the object in the viewfinder screen. b Touch the on-screen shutter button and release to capture the picture. 6 Camera setting indicator. Touch each indicator to open the camera settings, and touch to select the desired setting. 7 Zoom-in. 8 Zoom-out. To start the camcorder mode Touch to switch to the camcorder screen.
LG7_bk0.book Page 116 Monday, September 5, 2011 6:30 PM 6 Camcorder setting indicator. Touch each indicator to open the camcorder settings. 7 Zoom-in. 8 Zoom-out. Bluetooth® Bluetooth is a short-range wireless communications technology that allows your device to connect to other Bluetooth-enabled devices over a wireless network. Bluetooth on your device operates in three different modes: On Bluetooth is turned on.
LG7_bk0.book Page 117 Monday, September 5, 2011 6:30 PM To pair with a Bluetooth device 1 Touch the Home button Settings → Apps button → → Wireless & networks→ Bluetooth settings. NOTE: Ensure Bluetooth has been enabled on the device you want to pair with, and the device is in Discoverable state. 2 Touch Find nearby devices. Your device starts to scan for Bluetooth devices within range and then displays all detected devices below the Found devices list.
LG7_bk0.book Page 118 Monday, September 5, 2011 6:30 PM To terminate a pairing partnership 1 Touch the Home button Settings → Apps button → → Wireless & networks→ Bluetooth settings. 2 Under the Paired devices section, touch the icon next to a paired device. 3 Touch Unpair to erase all pairing information with that device. You need to re-enter the password if you want to restore a Bluetooth connection to that device.
LG7_bk0.book Page 119 Monday, September 5, 2011 6:30 PM Gallery To view and manage the pictures and videos stored on your device, touch the Home button → Apps button → Gallery . The Gallery application displays not only the pictures and videos stored on your SD card, but also those uploaded to the Picasa web album of your Gmail account which you signed in with on your device.
LG7_bk0.book Page 120 Monday, September 5, 2011 6:30 PM To browse picture and video thumbnails 1 Touch an album to display the thumbnails of all pictures and videos in the album. 2 To browse the thumbnails: • Flick thumbnails horizontally until the desired thumbnail is located. • From the action bar on the top of the screen, touch By album or Images and videos to sort the thumbnails as desired.
LG7_bk0.book Page 121 Monday, September 5, 2011 6:30 PM To display a full picture Touch a desired picture thumbnail to display the picture in full screen. • Flick the picture to view the next or previous one. • To bring up the picture viewing controls, touch anywhere on the screen.
LG7_bk0.book Page 122 Monday, September 5, 2011 6:30 PM Music To open Music Touch the Home button → Apps button → Music . The Music library screen opens, which is organized by Artists, Albums, Songs, and Playlists tabs. You can touch a tab to display your desired category. To select a song 1 3 2 1 All the available music files are grouped into these categories: Artists, Albums, Songs, and Playlists. Touch a category to view the list within it.
LG7_bk0.book Page 123 Monday, September 5, 2011 6:30 PM To control music playback 11 10 9 1 8 2 7 3 4 5 1 The album’s cover image if present. 2 The passing playback time. 3 6 • Touch the playback control bar to jump to any part of the song. • Drag and scroll the playback control bar forward to fast-forward the song. • Drag and scroll the playback control bar backward to rewind the song. 4 • Touch once to jump to the beginning of the song. • Touch twice quickly to play the previous song.
LG7_bk0.book Page 124 11 Monday, September 5, 2011 6:30 PM Go to the Now playing list. NOTE: Press the volume up button or volume down button to adjust the playback volume. To create a playlist 1 On the Music screen, touch the Artists, Albums, Songs tabs as needed. 2 Flick the screen until you reach the artist, album, or song that you want to add to the playlist. 3 Touch and hold the artist, album, or song that you want to add in the playlist. A pop-up menu opens. 4 Touch Add to playlist.
LG7_bk0.book Page 125 Monday, September 5, 2011 6:30 PM 4 If there is a time period for the event, touch and type the From and To date and time. If the event is a special occasion such as a birthday or spans a whole day, set the From and To date, and then select the All day check box. 5 Type the event location and description. 6 Decide whether it is a recurring event in Repetition and choose how often it occurs. 7 In Reminders, set when the reminder appears before the event.
LG7_bk0.book Page 126 Monday, September 5, 2011 6:30 PM 1 In Calendar, under the Day or Week view, the controls panel on the right displays all the calendars from the accounts you have on your device, indicated by tabs with different colors. 2 If you want to show the events from an account’s calendar, touch the account name to make it highlighted. 3 If you want to hide the events from an account’s calendar, touch the account name again to make it unhighlighted.
LG7_bk0.book Page 127 Monday, September 5, 2011 6:30 PM To view, dismiss, or snooze a reminder 1 Touch the upcoming event icon to open the notification. 2 Touch the upcoming event name to display the event. NOTE: If you have other pending event reminders, these events will also appear on the screen. 3 On the Calendar notifications menu that appears, you can do the following: • Touch Snooze all to put off all event reminders for five minutes. • Touch Dismiss all to turn off all event reminders.
LG7_bk0.book Page 128 Monday, September 5, 2011 6:30 PM Clock Your device can work as a desk alarm clock to display current time and date, local weather, and play picture slideshow and music. Touch the Home button → Apps button 10 → Clock 9 . 8 7 1 2 3 4 5 6 1 Displays the first active alarm time. 2 The current time and date. 3 Touch to set the alarm. 4 Touch to play the slideshow of the pictures available in the Gallery application.
LG7_bk0.book Page 129 Monday, September 5, 2011 6:30 PM 10 Alarms: Allows you to open the Alarms screen and view the alarms that have been set. To set an alarm You can set multiple alarms. 1 On the Clock main screen, touch . 2 On the Alarms screen, touch Add alarm. 3 Set the alarm time from the Set time menu that appears. Adjust the time by touching the up/down arrow keys, or touch the hour and minute fields to flick to the desired value.
LG7_bk0.book Page 130 Monday, September 5, 2011 6:30 PM To temporarily disable an alarm On the Alarms screen, clear the green check box of the alarm time you want to disable. To delete an alarm 1 On the Alarms screen, touch the alarm time you want to delete. 2 On the Set alarm screen, touch Delete. To enable the alarm in silent mode You can choose if the alarm should ring when the device is in silent mode.
LG7_bk0.book Page 131 Monday, September 5, 2011 6:30 PM Sound Recorder Open this application to record voice and sounds and then play them back. You can also set the recording as a ringtone for your device. NOTE: The sound recorder only supports recording in the amr format. 1 Touch the Home button → Apps button → Sound Recorder . • Touch to start recording. • Touch to end recording. • Touch to start playback of the recording; touch stop playback.
LG7_bk0.book Page 132 Monday, September 5, 2011 6:30 PM Connect and Sync with a Computer Using Dell Mobile Sync The Dell Mobile Sync (powered by Nero™) software allows you to copy or sync music, photos, videos, and Outlook contacts between your device and a computer. NOTE: The Dell Mobile Sync software is supported by Microsoft Windows XP (SP3), Windows Vista, and Windows 7 operating systems.
LG7_bk0.book Page 133 Monday, September 5, 2011 6:30 PM 3 If the Dell Mobile Sync installer does not start automatically: a Double-click the new Removable Disk that appears on your computer. b Navigate to the Dell Mobile Sync folder on the removable disk. c Double-click the InstallDellMSync.exe file to start the installation. NOTE: You can also download and install the Dell Mobile Sync software from support.dell.com/support/downloads.
LG7_bk0.book Page 134 Monday, September 5, 2011 6:30 PM Troubleshooting Problem Possible causes Possible solutions PIN Code is blocked You have entered an incorrect PIN code three consecutive times. Contact your service provider. If the service provider provides the SIM card's PUK code, use the PUK code to unlock the SIM card. System problems Battery does not charge The battery or battery Contact the dealer. charger is damaged. The environmental temperature is lesser than 0°C or higher than 45°C.
LG7_bk0.book Page 135 Monday, September 5, 2011 Problem 6:30 PM Possible causes Possible solutions Messaging problems Unable to send or receive text messages. Unable to send or receive e-mail. Your device is in Airplane mode with no wireless connectivity. 1 Touch the Time area in the system bar to open the Status Details. 2 Touch anywhere in the Status Details. Then, the Quick Settings display below the Status Details. 3 Drag the switch to OFF to disable the Airplane mode.
LG7_bk0.book Page 136 Monday, September 5, 2011 Problem 6:30 PM Possible causes Possible solutions Internet problems Unable to connect to the Invalid SIM card. network. Contact your service provider. You are not within the network’s service area. Check the service area with your service provider. Poor signal. Move to an open space or if you are inside a building, move closer to a window. Your device is in Airplane mode with no wireless connectivity.
LG7_bk0.book Page 137 Monday, September 5, 2011 6:30 PM The DELL logo appears twice as the device starts up. 3 When the DELL logo appears the second time, touch and hold the Menu button screen. until “Safe mode” appears at the bottom of the NOTE: To exit Safe mode, turn off your device and turn it on again.
LG7_bk0.book Page 138 Monday, September 5, 2011 6:30 PM 5 Wait for the device to restart. To upgrade the device software 1 Insert an SD card on your computer. 2 On your computer, go to support.dell.com and follow the instructions to download the software upgrade package “update.pkg” and save it on the SD card. NOTE: The device only recognizes the software upgrade package as “update.pkg”. Rename the downloaded package to “update.pkg” if it is not named so.
LG7_bk0.
LG7_bk0.
LG7_bk0.
LG7_bk0.