Dell Latitude 7400 2-in-1 Setup and specifications guide Regulatory Model: P110G Regulatory Type: P110G001
Notes, cautions, and warnings NOTE: A NOTE indicates important information that helps you make better use of your product. CAUTION: A CAUTION indicates either potential damage to hardware or loss of data and tells you how to avoid the problem. WARNING: A WARNING indicates a potential for property damage, personal injury, or death. © 2019 Dell Inc. or its subsidiaries. All rights reserved. Dell, EMC, and other trademarks are trademarks of Dell Inc. or its subsidiaries.
Contents 1 Set up your computer.....................................................................................................................................5 2 Create a USB recovery drive for Windows..................................................................................................... 7 3 Chassis.......................................................................................................................................................... 8 Front view.........................
6 System setup...............................................................................................................................................25 Boot menu........................................................................................................................................................................ 25 Navigation keys............................................................................................................................................................
1 Set up your computer 1 Connect the power adapter and press the power button. NOTE: To conserve battery power, the battery might enter power saving mode. 2 Finish the Windows system setup. 3 Follow the on-screen instructions to complete the setup. When setting up, Dell recommends that you: • Connect to a network for Windows updates. NOTE: If connecting to a secured wireless network, enter the password for the wireless network access when prompted.
Dell apps Details SupportAssist Proactively checks the health of your computer’s hardware and software. NOTE: Renew or upgrade your warranty by clicking the warranty expiry date in SupportAssist. Dell Update Updates your computer with critical fixes and important device drivers as they become available. Dell Digital Delivery Download software applications including software that is purchased but not pre-installed on your computer. 5 Create recovery drive for Windows.
2 Create a USB recovery drive for Windows Create a recovery drive to troubleshoot and fix problems that may occur with Windows. An empty USB flash drive with a minimum capacity of 16 GB is required to create the recovery drive. Prerequisites NOTE: This process may take up to an hour to complete. NOTE: The following steps may vary depending on the version of Windows installed. Refer to the Microsoft support site for latest instructions. Steps 1 Connect the USB flash drive to your computer.
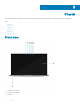
3 Chassis This chapter illustrates the multiple chassis views along with the ports and connectors and also explains the FN hot key combinations.
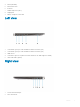
4 Camera (IR/RGB) 5 Camera status LED 6 IR emitter 7 Ambient Light Sensor (ALS) 8 Display panel 9 Battery / Diagnostics status LED Left view 1 USB 3.1 Gen2 Type-C port with Thunderbolt 3 and Power Delivery (PD) 2 USB 3.1 Gen2 Type-C port with Thunderbolt 3 and Power Delivery (PD) 3 HDMI 1.4 Port 4 USB 3.1 Gen 1 Type-A Port (With PowerShare and Power On /Wake support on WLAN ) 5 Smart card reader (optional) Right view 1 3.
3 microSD card reader 4 USB 3.
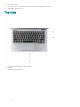
Bottom view 1 Service Tag label 2 Speakers Chassis 11
Chassis modes This section illustrates various supported modes for Latitude 7400 2-in-1: Stand, Notebook, Tablet, and Tent.
4 Keyboard shortcuts NOTE: Keyboard characters may differ depending on the keyboard language configuration. Keys that are used for shortcuts remain the same across all language configurations. Table 2. List of keyboard shortcuts Keys Description Fn + Esc Num Lock Fn + F1 Mute audio Fn + F2 Decrease volume Fn + F3 Increase volume Fn + F4 Mic Mute Fn + F5 Keyboard backlight NOTE: Not applicable for non-backlight keyboard.
5 System specifications NOTE: Offerings may vary by region. The following specifications are only those required by law to ship with your computer. For more information about the configuration of your computer, go to Help and Support in your Windows operating system and select the option to view information about your computer.
Feature Specifications FLASH EPROM SP1 32 MB PCIe bus Up to 8 GT/s (Gen3) External bus frequency OPI x8, up to 4 GT/s LPC (Low Pin Count) 24 MHz, no DMA Processor NOTE: Processor numbers are not a measure of performance. Processor availability is subject to change and may vary by region/ country. Table 4. Processor specifications Type UMA Graphics 8th Gen Intel Core Whiskey Lake processors.
Intel vPro and Intel Standard Manageability Intel vPro Available with Intel Core i5 and i7 processors and offers the most complete set of out-of-band management features including KVM, IPv6 support, graceful shutdown, and all the features from previous versions of vPro. It uses the latest version of Intel's Active Management Technology (AMT). To learn more about vPro, visit Intel's website at http://www.intel.com/content/www/us/en/architecture-and-technology/vpro/vprotechnology-general.html.
Media card reader Table 9. Media card reader specifications Feature Specifications Type One micro-SD card slot Supported cards • • • micro SD micro SDHC micro SDXC Audio Table 10.
Camera Table 12. Camera specifications Feature Specifications Resolution Infrared camera (optional): • • Still image: 0.30 megapixels Video: 340 x 340 at 30 fps NOTE: Infrared camera is Windows hello compliant. Diagonal viewing angle • • Camera - 77.7 degrees Infrared camera - 70 degrees Communication Specifications Table 13. WLAN (Wi-Fi) specifications Intel Dual Band Wireless-AC 9560 802.11ac 160 MHz (2x2) Wi-Fi + Bluetooth v5 M.2 Wireless Card Qualcomm QCA61x4A 802.
Feature Specifications • Noise reduction array microphones Video HDMI 1.4 SIM card reader One micro SIM card reader (WWAN version only) Smart card reader Table 16. Contactless smart card reader Type FIPS 201 Contacted / Contactless Smart Card reader ISO certification ISO14443A Display specifications Table 17.
Feature Specifications Response time (max) 35 ms Stylus support Yes, Active Keyboard Table 18. Keyboard specifications Feature Specifications Number of keys • • • 83 keys: US English, Thai, French-Canadian, Korean, Russian, Hebrew, English-International 84 keys: UK English, French Canadian Quebec, German, French, Spanish (Latin America), Nordic, Arabic, Canada Bilingual 85 keys: Brazilian Portuguese 87 keys: Japanese • • • X = 19.05 mm key pitch Y = 18.05 mm key pitch Z = 4.
Battery Table 21. Battery Specifications Feature Type Dimension Specifications • • 52 WHr lithium-polymer 4 cell battery 78 WHr lithium-polymer 6 cell battery 1 52 WHr • Length: 250 mm (9.84 inch) • Width: 85.80 mm (3.38 inch) • Height: 4.99 mm (0.20 inch) • Weight: 236.00 g (0.52 lb) 78 WHr • Length: 301.67 mm (11.88 inch) • Width: 111.36 mm (4.38 inch) • Height: 9.09 mm (0.36 inch) • Weight: 340 g (0.
Power adapter Table 22. Power adapter specifications Feature Specifications Type • • • 65 W (4-cell 52Whr) USB Type-C 90 W (6-cell 78 Whr) USB Type-C Via Dock supporting a NVDC charger architecture Input Voltage 100 V ca to 240 V ca Input current (maximum) 1.7 A Adapter size Input frequency Output current • • 65 W: 22 mm x 66 mm x 99 mm (0.87 inch x 2.6 inch x 3.9 inch) 90 W: 22 mm x 66 mm x 130 mm (0.87 inch x 2.6 inch x 5.12 inch) 50 Hz to 60 Hz • • 65 W - 3.25 A (continuous) 90 W - 4.
Table 24. Computer environment Operating Storage Temperature range 0°C to 35°C (32°F to 95°F) -40°C to 65°C (-40°F to 149°F) Relative humidity (maximum) 10% to 80% (non-condensing) 10% to 95% (non-condensing) NOTE: Maximum dew point temperature = 26°C NOTE: Maximum dew point temperature = 33°C Vibration (maximum) 0.26 GRMS 1.37 GRMS Shock (maximum) 105 G† 40 G‡ Altitude (maximum) -15.2 m to 3048 m (-50 ft to 10,000 ft) -15.
Chassis lock slot and loop support Yes, Noble wedge lock slot Finger print Reader Optional, on Power button (Windows Hello compliant) Contacted / Contactless Smartcard Optional Optional Security Hardware Authentication Bundles • • • • • Touch Fingerprint Reader (in Power Button) with Control Vault 3.
6 System setup CAUTION: Unless you are an expert computer user, do not change the settings in the BIOS Setup program. Certain changes can make your computer work incorrectly. NOTE: Before you change BIOS Setup program, it is recommended that you write down the BIOS Setup program screen information for future reference. Use the BIOS Setup program for the following purposes: • Get information about the hardware installed in your computer, such as the amount of RAM and the size of the hard drive.
Keys Navigation Up arrow Moves to the previous field. Down arrow Moves to the next field. Enter Selects a value in the selected field (if applicable) or follow the link in the field. Spacebar Expands or collapses a drop-down list, if applicable. Tab Moves to the next focus area. Esc Moves to the previous page until you view the main screen. Pressing Esc in the main screen displays a message that prompts you to save any unsaved changes and restarts the system.
Option Description Boot Sequence Allows you to change the order in which the computer attempts to find an operating system. The options are: • • Windows Boot Manager Boot List Option: Allows you to change the boot list options. Click one of the following options: – Legacy External Devices – UEFI—Default Advanced Boot Options Allows you to Enable Legacy Option ROMs.
Option Description USB Configuration Allows you to enable or disable the internal/integrated USB configuration. The options are: • • Enable USB Boot Support Enable External USB Ports All the options are set by default. NOTE: USB keyboard and mouse always work in the BIOS setup irrespective of these settings. Dell Type-C Dock Configuration Allows you to connect to Dell WD and TB family of docks(Type-C Docks) independent of USB and thunderbolt adapter configuration. This option is enabled by default.
Option Description Keyboard Illumination This field lets you choose the operating mode of the keyboard illumination feature. • • • Keyboard Backlight Timeout on AC Disabled: The Keyboard illumination will always be off or 0%. Dim: Enable the keyboard illumination feature at 50% brightness. Bright: Enable the keyboard illumination feature at 100% brightness level. This feature defines the timeout value for the keyboard backlight when an AC adapter is plugged into the system.
Video screen options Table 31. Video Option Description LCD Brightness Allows you to set the display brightness depending upon the power source. On Battery(50% is default) and On AC (100 % default). Dynamic Backlight Control This option Enables or Disables the Dynamic Backlight Control if the Panel supports this feature. Security Table 32. Security Option Description Admin Password Allows you to set, change, or delete the administrator(admin) password.
Option Description Click one of the options: • • Password Change Disabled—Default Reboot bypass Allows you to change the System password when the administrator password is set. • Allow Non-Admin Password Changes This option is set by default. Non-Admin Setup Changes Allows you to determine whether changes to the setup options are allowed when an Administrator Password is set. If disabled the setup options are locked by the admin password.
Option Description NOTE: Hard Disk password should be cleared before the settings can be changed. SMM Security Mitigation Allows you to enable or disable additional UEFI SMM Security Mitigation protection. • SMM Security Mitigation This option is not set by default. Secure boot Table 33. Secure Boot Option Description Secure Boot Enable Allows you to enable or disable the Secure Boot Feature.
Option Description • Enclave Memory Size Software controlled—Default This option sets SGX Enclave Reserve Memory Size Click one of the following options: • • • 32 MB 64 MB 128 MB—Default Performance Table 35. Performance Option Description Multi Core Support This field specifies whether the process has one or all cores enabled. The performance of some applications improves with the additional cores.
Power management Table 36. Power Management Option Description AC Behavior Allows you to enable or disable the computer from turning on automatically when an AC adapter is connected. • Wake on AC This option is not set by default. Enable Intel Speed Shift technology This option is used to enable/disable Intel Speed Shift Technology. Auto On Time Allows you to set the time at which the computer must turn on automatically. This option is not set by default.
Option Description Primary Battery Charge Configuration Allows you to select the charging mode for the battery. The options are: • • • • • Adaptive—Default Standard - Fully charges your battery at a standard rate. ExpressCharge- The battery charges over a shorter period of time using Dell’s fast charging technology. Primarily AC use Custom If Custom Charge is selected, you can also configure Custom Charge Start and Custom Charge Stop. NOTE: All charging mode may not be available for all the batteries.
Option Description Full Screen Logo Allows you to display full screen logo, if your image matches screen resolution. • Enable Full Screen Logo This option is not set by default. Warnings and Errors Allows you to select different options to either stop, prompt and wait for user input, continue when warnings are detected but pause on errors, or continue when either warnings or errors are detected during the POST process.
Option Description Trusted Execution This option specifies whether a Measured Virtual Machine Monitor (MVMM) can utilize the additional hardware capabilities provided by Intel® Trusted Execution Technology. NOTE: The TPM has to be enabled and activated and Virtualization Technology and VT for Direct I/O must be enabled to use this feature. Wireless options Table 40. Wireless Option Description Wireless Switch Allows to set the wireless devices that can be controlled by the wireless switch.
Option Description Data Wipe Allows you to securely erase data from all internal storage devices. • Wipe on Next Boot This option is not set by default. Bios Recovery BIOS Recovery from Hard Drive—This option is set by default. Allows you to recover the corrupted BIOS from a recovery file on the HDD or an external USB key. BIOS Auto-Recovery— Allows you to recover the BIOS automatically. NOTE: BIOS Recovery from Hard Drive field should be enabled.
The File Download window appears. 11 Click Save to save the file on your computer. 12 Click Run to install the updated BIOS settings on your computer. Follow the instructions on the screen. Updating BIOS on systems with BitLocker enabled CAUTION: If BitLocker is not suspended before updating the BIOS, the next time you reboot the system it will not recognize the BitLocker key. You will then be prompted to enter the recovery key to progress and the system will ask for this on each reboot.
System and setup password Table 43. System and setup password Password type Description System password Password that you must enter to log on to your system. Setup password Password that you must enter to access and make changes to the BIOS settings of your computer. You can create a system password and a setup password to secure your computer. CAUTION: The password features provide a basic level of security for the data on your computer.
The System Security screen is displayed. 2 In the System Security screen, verify that Password Status is Unlocked. 3 Select System Password, alter or delete the existing system password and press Enter or Tab. 4 Select Setup Password, alter or delete the existing setup password and press Enter or Tab. NOTE: If you change the System and/or Setup password, re-enter the new password when prompted. If you delete the System and/or Setup password, confirm the deletion when prompted.
Table 45. External monitor usage state behavior System state Description Yes If the system is connected to an external monitor, the proximity sensor checks whether the user is within the sensor FoV. No This is the default state and the system state remains unchanged even when the user is outside of sensor FoV.
System state Options the operating system settings page or use the Search option to view and start the ExpressSign-in. Dell ExpressSign-in Field of View (FoV) states The Field of View (FoV) defines the distance and the angle that the proximity sensor can detect while the proximity feature is enabled. The FoV includes range angle and range distance. Dell recommends the distance between you and the laptop display should be 70cm for optimum performance of the proximity sensor.
Table 47.
7 Software This chapter details the supported operating systems along with instructions on how to install the drivers. Downloading drivers 1 Turn on the notebook. 2 Go to Dell.com/support. 3 Click Product Support, enter the Service Tag of your notebook, and then click Submit. NOTE: If you do not have the Service Tag, use the auto detect feature or manually browse for your notebook model. 4 Click Drivers and Downloads. 5 Select the operating system installed on your notebook.
8 Getting help Contacting Dell Prerequisite NOTE: If you do not have an active Internet connection, you can find contact information on your purchase invoice, packing slip, bill, or Dell product catalog. About this task Dell provides several online and telephone-based support and service options. Availability varies by country and product, and some services may not be available in your area. To contact Dell for sales, technical support, or customer service issues: Steps 1 Go to Dell.com/support.