
Administrator Guide

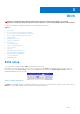
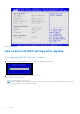
Table Of Contents
- Dell EMC BIOS User guide
- About this guide
- New in this release
- BIOS
- BIOS setup
- How to boot into BIOS settings after upgrade
- How to retrieve a VEP4600 product service tag
- How to change the default BIOS password
- Password reset
- Hardware flow control
- Super IO configuration
- Boot order
- Server management
- Option ROM dispatch policy
- SR-IOV support
- USB 3.0
- PXE and HTTP boot support
- Network interface configuration
- Advanced power management
- Trusted computing
- Embedded DIAGS
- Dell EMC support

BIOS
WARNING: Changing the BIOS may be detrimental to platform operations if the changes are not fully
understood. Before you change the BIOS, if you have questions, contact your Dell EMC technical representative.
For the most current BIOS update information, see the VEP4600 Release Notes.
Topics:
• BIOS setup
• How to boot into BIOS settings after upgrade
• How to retrieve a VEP4600 product service tag
• How to change the default BIOS password
• Password reset
• Hardware flow control
• Super IO configuration
• Boot order
• Server management
• Option ROM dispatch policy
• SR-IOV support
• USB 3.0
• PXE and HTTP boot support
• Network interface configuration
• Advanced power management
• Trusted computing
• Embedded DIAGS
BIOS setup
To enter the BIOS setup, press F2 or DEL key during the BIOS boot up.
By default, to enter the BIOS setup, you have three seconds to press the delete key during the BIOS boot up. To increase
the time allowed, from the BIOS setup screen, select the Boot tab, then change the Setup Prompt Timeout number. The
maximum prompt timeout is 10 seconds.
Figure 2. Setup prompt timout
The Main screen displays the BIOS and platform details such as the processor model, amount of memory, and so forth. Use the
Main tab to set the date and time, which is saved to the real time clock (RTC).
3
BIOS 9