
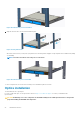
Install Guide


AC power supply replacement
CAUTION: Disconnect the power cord before removing the power supplies. Also, disconnect all power cords before
servicing.
NOTE: The PSU slides into the slot smoothly. Do not force a PSU into a slot as this action may damage the PSU or the
VEP4600.
NOTE: If a PSU fails, you must replace the PSU unit. There are no field serviceable components in the PSU. To request a
hardware replacement, see https://www.dell.com/support .
NOTE: If you use a single PSU, install a blank plate in the other PSU slot. If you are only using one power supply, install
the power supply in the first slot, PSU1. Install a blank plate in the second slot, PSU2.
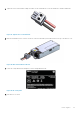
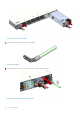
1. Disconnect the power cable from the PSU.
2. Push the lever towards the right and use the grab handle to pull the PSU out of power supply bay.
NOTE: The PSU is locked in place. Unlock for removal by pushing the orange lever to the right.
3. Use the grab handle on the replacement PSU to slide it into the power supply bay.
4. Attach the power cord to the replacement PSU.
NOTE: The platform powers up when the cables are connected between the power supply and the power source.
DC power supply installation
DC PSU customer kit instructions.
NOTE:
Before starting PSU DC power supply installation process, verify that your unit has a minimum version of BMC
2.20.
1. Use AC PSU to power-up the unit.
2. Download the latest Unified firmware updater from www.dell.com/drivers/ if your unit does not have the minimum BMC version 2.20.
3. Upgrade your BMC to version 2.20 using Unified firmware update 3.0 for DC PSU support.
4. Power down the system.
5. Remove the AC PSUs.
6. Insert number 10 to number 3 AWG wires into the Molex terminal block that comes with the DC PSU, maintaining correct polarity of
-48V and RTN wires.
Figure 22. Molex terminal block
26
Power supplies