OpenManage Integration for Microsoft System Center Version 7.1.
Notes, cautions, and warnings NOTE: A NOTE indicates important information that helps you make better use of your product. CAUTION: A CAUTION indicates either potential damage to hardware or loss of data and tells you how to avoid the problem. WARNING: A WARNING indicates a potential for property damage, personal injury, or death. © 2009 - 2019 Dell Inc. or its subsidiaries. All rights reserved. Dell, EMC, and other trademarks are trademarks of Dell Inc. or its subsidiaries.
Contents 1 Introduction to OMIMSSC..............................................................................................................................7 What's new ?...................................................................................................................................................................... 7 2 Use cases of OMIMSSC ...............................................................................................................................
System requirements for managed systems.......................................................................................................... 26 Discovering servers using auto discovery............................................................................................................... 26 Discovering servers using manual discovery...........................................................................................................27 Discovering MX7000 by using manual discovery............
Modifying custom update groups............................................................................................................................ 46 Deleting custom update groups................................................................................................................................47 About update sources......................................................................................................................................................
Windows component for the OMIMSSC console extension for SCVMM............................................................... 68 Non-Windows component for the OMIMSSC console extension for SCCM/SCVMM......................................... 68 Discovery in enrolled MSSC........................................................................................................................................... 69 Importing server profile............................................................................
1 Introduction to OMIMSSC OpenManage Integration for Microsoft System Center (OMIMSSC) provides integration into System Center suite of products. OMIMSSC enables full lifecycle management of Dell EMC PowerEdge servers by using integrated Dell Remote Access Controller (iDRAC) with Lifecycle Controller (LC), and of Modular Systems (Dell EMC PowerEdge MX7000) by using OpenManage Enterprise Modular Edition.
2 Use cases of OMIMSSC This chapter covers high-level details for discovering, deploying operating system, creating clusters, and maintaining Dell EMC devices using OMIMSSC. Use cases for deployment scenarios Use OMIMSSC to deploy Windows and non-Windows operating system in SCCM or SCVMM environments using Operational Templates. NOTE: Ensure that you upgrade the device firmware versions to the latest versions available at ftp.dell.com or downloads.dell.com before deploying the operating system.
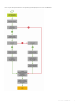
Here is a pictorial representation of the operating system deployment use cases in OMIMSSC.
Deploying Windows OS using OMIMSSC console extension for SCCM About this task To deploy Windows OS through SCCM console using OMIMSSC, perform the following steps: NOTE: Before deploying OS on a host server, ensure that in SCCM, the Client status of the server is No. Steps 1 Download the latest Dell EMC Deployment ToolKit (DTK) and create a Windows Preinstallation Environment (WinPE) boot WIM image. For more information, see the WinPE update. 2 Import this .
5 Create an Operational Template, by capturing all the details of the discovered server. For more information, see Creating Operational Template from reference servers. 6 Assign an Operational Template on managed device, and check for the template compliance. For more information, see Assigning Operational Template and running Operational Template compliance. 7 Deploy an Operational Template to make the device template compliant. For more information, see Deploying Operational Template.
Creating Storage Spaces Direct clusters by using predefined Operational Templates To create clusters by using OMIMSSC, perform the following steps: 1 Discover the reference server by using the Discovery page. For more information, see the Discovering servers using manual discovery. 2 Edit the predefined Operational Template. For more information, see Modifying Operational Template. 3 Create a logical switch. For more information, see Creating logical switch. 4 Create Storage Spaces Direct cluster.
Use cases for maintaining devices Maintain the discovered devices in OMIMSSC.
Updating the firmware of servers and MX7000 devices About this task Here is a pictorial representation of the firmware update workflow.
You can update the selected devices by using the following update sources: • Online FTP or local FTP source • Online HTTP or local HTTP source • Online HTTPS or local HTTPS source • Local Dell Repository Manager (DRM) source Steps 1 Create or select a default update source. For more information about update source, see Update source. NOTE: Ensure that you update the update source with the latest catalog by using the polling and notification feature.
3 Views in OMIMSSC View all the devices discovered in OMIMSSC in Configuration and Deployment page along with their hardware and firmware inventory information. Also, view all the jobs with status in Jobs and Logs Center page.
3 To view host servers, click Hosts tab. a To view host groups in nested format as grouped in SCCM or SCVMM, click Select Console Hosts drop-down menu. The Select Console Hosts drop-down menu lists all the host groups present in SCCM along with an internal group name. If you select the internal group name, all the hosts that are discovered and managed in SCCM and OMIMSSC are displayed.
• The Operational Template column is displayed as Not Assigned, after the Modular Systems are discovered. To update firmware and deploy operating system on these Modular Systems, assign and deploy Operational Templates. For more information, see Managing Operational Templates. • View the count of Input/Output, storage devices, and servers present in Modular Systems after a shallow discovery. Perform a deep discovery, to view more details about the components in a Modular System.
• To view latest clusters discovered, refresh the page To view cluster groups discovered in OMIMSSC: Steps 1 In OMIMSSC, click Configuration and Deployment, and then click Cluster View. All the different types of clusters are grouped and listed. 2 To view information about specific type of clusters, expand the cluster type. All the clusters of this type are listed on the left pane. 3 To view servers present in a cluster, click a cluster name.
The Maintenance Center page is displayed. Launching Jobs and Logs Center View information about jobs initiated in OMIMSSC along with status of job's progress, and its subtask. Also, you can filter and view jobs of a particular job category. About this task You can view jobs that are initiated from OMIMSSC, in OMIMSSC Admin Portal and OMIMSSC console extension.
4 Managing profiles Profiles contain all the data that is required for performing any operations in OMIMSSC. Topics: • About credential profile • About hypervisor profile (for SCVMM users) About credential profile Credential profiles simplify the use and management of user credentials by authenticating the role-based capabilities of the user. Each credential profile contains a user name and password for a single user account. OMIMSSC uses credential profiles to connect to the managed systems’ iDRAC.
Steps 1 In OMIMSSC, perform any of the following steps to create a Credential Profile: • In OMIMSSC dashboard, click Create Credential Profile. 2 • In the navigation pane, click Profiles > Credential Profile, and then click Create. In Credential Type, select the credential profile type that you want to use. 3 Provide a profile name and description. 4 In Credentials, provide the user name and password. NOTE: Default Profile for option is applicable only for a Device type credential profile.
Step Select the credential profile that you want to delete, and then click Delete. Next step To view the changes made, refresh the Credential Profile page. About hypervisor profile (for SCVMM users) A hypervisor profile contains a customized WinPE ISO (WinPE ISO is used for hypervisor deployment), host group, and host profile taken from SCVMM, and LC drivers for injection. Only OMIMSSC console extension for SCVMM users, can create and manage hypervisor profiles.
Next step To view the changes made, refresh the Hypervisor profile page. Modifying hypervisor profile About this task Consider the following when you are modifying a hypervisor profile: • You can modify host profile, host group, and drivers from Lifecycle Controller. • You can modify the WinPE ISO name. However, you cannot modify the ISO image. Steps 1 Select the profile that you want to modify and click Edit. 2 Provide the details, and click Finish.
5 Discovering devices and synchronizing servers with MSSC console Discovery is the process of adding supported modular systems and PowerEdge bare-metal servers or host servers or nodes in to OMIMSSC. Synchronization with MSSC console is the process of adding host servers from registered Microsoft console (SCCM or SCVMM) in to OMIMSSC. Hence, using any one of the processes, you can add devices in to OMIMSSC . Only after discovering the devices, you can manage them in OMIMSSC.
NOTE: The discovered device is marked as hardware compatible when it contains supported versions of LC firmware, iDRAC, and BIOS that are required to work with OMIMSSC. For information about supported versions, see OpenManage Integration for Microsoft System Center Release Notes. Discover Modular Systems with device IP address using Discovering modular systems using manual discovery method. Device discovery in OMIMSSC console extension for SCCM Discover devices in OMIMSSC console extension for SCCM.
Discovering servers using manual discovery To manually discover PowerEdge servers by using an IP address or an IP range. To discover servers, provide the iDRAC IP address and the device type credentials of a server. When you are discovering servers by using an IP range, specify an IP (IPv4) range within a subnet by including the start and end range and the device type credentials of a server. Prerequisite Ensure that a default credential profile is available.
Discovering MX7000 by using manual discovery To manually discover PowerEdge MX7000 Modular System by using an IP address or an IP range, provide a Modular System’s IP address and device type credentials of the Modular System. When you are discovering Modular Systems by using an IP range, specify an IP (IPv4) range within a subnet by including the start and end range and the device type credentials of the Modular Systems.
Synchronization of OMIMSSC console extension with enrolled SCVMM You can synchronize all hyper-V hosts, hyper-V host clusters, modular hyper-V hosts, and unassigned servers from SCVMM consoles with OMIMSSC console extension for SCVMM. Also, you get the latest firmware inventory information about the servers after synchronization. Consider the following before synchronizing OMIMSSC with SCVMM: • Have details of default iDRAC credential profile for servers.
• An unlocked image is displayed along with the servers’s iDRAC IP if the setting is disabled on that system. NOTE: Before launching the OMIMSSC console extensions, verify the iDRAC System Lockdown Mode setting on the managed servers. For more information about iDRAC System Lockdown Mode, see iDRAC documentation available at dell.com/support.
6 Preparing for operating system deployment Before deploying Windows operating system on the managed servers, update the WinPE image, create a task sequence, LC boot media file, and task sequence media bootable ISO file. The steps vary for SCCM and SCVMM console users. Refer the bellow section for more details. For deploying non-windows operating system remember the points mentioned in Preparing for non-Windows OS deployment section.
Steps 1 Double-click the DTK executable file. 2 To unzip the DTK drivers, select a folder. For example, C:\DTK501. 3 Copy the unzipped DTK folder to a share folder. For example, \\Shareip\sharefolder\DTK\DTK501 NOTE: If you are upgrading from SCVMM SP1 to SCVMM R2, and then upgrade to Windows PowerShell 4.0. and create a WinPE ISO image. Updating WinPE image About this task A unique job name is assigned to each WinPE update job. Steps 1 In OMIMSSC, select WinPE Update.
• Install the latest version of Lifecycle Controller on the system. • Install the latest version of iDRAC firmware on the system. NOTE: Always launch the Configuration Manager console with administrator privileges. Types of task sequence You can create a task sequence in two ways: • Create a Dell-specific task sequence using OMIMSSC Deployment template. • Create a custom task sequence. The task sequence goes to the next task sequence step irrespective of the success or failure of the command.
8 Click Close in the confirmation message box that is displayed. Editing a task sequence About this task NOTE: While editing task sequence on SCCM 2016, the missing objects references messages does not list Setup windows and ConfigMgr package. Add the package and then save the task sequence. Steps 1 Launch the Configuration Manager. The Configuration Manager screen is displayed. 2 In the left pane, select Software Library > Operating Systems > Task Sequence.
6 Browse and select PowerEdge server Deployment Boot Image. NOTE: Use the boot image created using DTK only. 7 Select the distribution point from the drop-down menu, and select the Show distribution points from child sites check box. 8 Click Next. The Summary screen is displayed with the task sequence media information. 9 Click Next. The progress bar is displayed. 10 On completion of creation of the image, close the wizard.
7 Managing Operational Templates Operational Templates contain complete device configuration and are used for deploying operating system and update firmware for PowerEdge servers and Modular Systems within Microsoft environment. Operational Templates capture the complete configurations from a reference server, or reference Modular System.
• Deploying Operational Template on servers • Assigning Operational Template for Modular Systems • Deploying Operational Template for Modular System • Unassigning Operational Template Predefined Operational Templates Predefined templates have all the configurations that are required to create Storage Spaces Direct clusters or Windows Server SoftwareDefined (WSSD). OMIMSSC supports creating clusters on R740XD and R640 Storage Spaces Direct Ready Node models along with their specific network adapters.
• In the OMIMSSC dashboard, click Create Operational Template. • In the navigation pane, click Profiles > Operational Template, and then click Create. The Operational Template wizard is displayed. 2 Enter a name and description for the template. 3 Select the type of device, and enter the IP address of reference device, and then click Next. NOTE: You can capture the configuration of reference server with iDRAC 2.0 and later.
Windows OS component for OMIMSSC console extension for SCCM About this task While creating or editing Operational Template for server, perform the following steps for windows component: Steps 1 Select a task sequence and deployment method. NOTE: Only the task sequences deployed on collections are listed in the drop-down menu. For information about task sequence, see Task sequence. 2 Select one of the following options for the Deployment method: • Boot to network ISO—reboots specified ISO.
• IP Address • Subnet Mask • Default Gateway • Primary DNS • Secondary DNS NOTE: Network File System (NFS) and Common Internet File System (CIFS) share types are supported for nonWindows operating system deployment. Creating Operational Template from reference Modular Systems Prerequisites Before creating Operational Template, ensure that you complete the following tasks: • Discover a Modular System by using the Discovery feature.
Viewing Operational Template To view Operational Templates created: In OMIMSSC console, click Profiles and Templates, and then click Operational Template. All the templates that are created are listed here. Modifying Operational Template About this task You can modify the update source, hardware configurations, and operating system of an operational template. Consider the following before modifying an Operational Template: • The values of few attributes depend on the values of other attributes.
Deleting Operational Template To delete an Operational Template, perform the following steps: About this task Before deleting an Operational Template, ensure that: • The selected Operational Template is not associated with any server or Modular System. If it is associated with a device, and then, unassign the template and then delete the template. • No jobs that are associated with Operational Template are running.
About this task You can deploy Windows and non-Windows operating system—ESXi and RHEL by deploying the Operational Template assigned to servers. NOTE: Download and install appropriate drivers from Dell.com/support if a yellow bang is displayed under Device Manager after you deploy Windows 2016 operating system on 12th generation of the servers. Steps 1 In OMIMSSC, click Configuration and Deployment, and click Server View.
• Yellow color warning symbol—non-compliance. represents that the configuration of the device does not match with the template values. • Red color box—represents that the component is not present on the device. Deploying Operational Template for Modular System About this task You can configure Modular System components, and update the Modular System firmware versions by deploying the assigned Operational Template.
8 Firmware update in OMIMSSC Maintain Dell EMC devices up-to-date by upgrading to the latest firmware to use security, issue fixes, and enhancements, using OMIMSSC. Update the firmware of devices using Dell EMC update repositories. Updating firmware is supported only on hardware compatible devices. For using the features available in OMIMSSC on the managed devices, the managed devices must have the minimum required firmware versions of iDRAC, Lifecycle Controller (LC), and BIOS.
Custom update groups Create custom update groups of type Generic update groups by adding the discovered devices into groups that require similar management. However, you can add a device into a custom update group only from Default unassigned update groups and Default host update groups. To add the servers in custom update group, search for the required device using their service tag.
Deleting custom update groups About this task Consider the following points when you are deleting a custom update group in the following circumstances: • You cannot delete an update group if it has a job that is scheduled, in-progress, or waiting. Hence, delete the scheduled jobs that are associated with a custom update group before deleting the server group. • You can delete an update group even if servers are present in that update group.
Predefined and default update source OMIMSSC includes three predefined update sources that are available after a fresh installation, or upgrade. DELL ONLINE FTP CATALOG is a predefined update source of type FTP, DELL ONLINE HTTP CATALOG is a predefined update source of type HTTP, and DELL ONLINE HTTPS CATALOG is a predefined default update source of type HTTPS. However, you can create another update source and mark it as a default update source.
3 Open the catalog.xml file and change the baseLocation to your local FTP URL, and compress the file with .gz extension. For example, change the baseLocation from ftp.dell.com to ftp.yourdomain.com. 4 Place the catalog file and the DUP files in your local FTP folder replicating the same structure as in ftp.dell.com. Setting up local HTTP About this task To set up local HTTP: Steps 1 Create a folder structure in your local HTTP that is an exact replica of downloads.dell.com. 2 Download the catalog.
• FTP Sources—select to create an online or local FTP update source. • NOTE: If you are creating an FTP source, provide your FTP credentials along with proxy credentials if the FTP site is reachable by using proxy credentials. HTTP Sources—select to create an online or local HTTP update source. • NOTE: If you are creating an update source of type HTTP, provide the complete path of catalog with the catalog name and your proxy credentials to access the update source.
• You cannot delete a predefined update source. • You cannot delete an update source if it is used in an in-progress, or a scheduled job. • You cannot delete an update source if it is a default update source. Step Select the update source that you want to delete, and click Delete. Integration with Dell EMC Repository Manager(DRM) OMIMSSC is integrated with DRM to create custom update sources in OMIMSSC. The integration is available from DRM version 2.2 onwards.
Viewing and refreshing device inventory View comparison report for devices against an update source in Maintenance Center page. On selecting an update source, a report is displayed comparing existing firmware to the firmware present in the selected update source. The report is generated dynamically on changing the update source. Server inventory is compared with update source, and suggestive actions are listed.
• Upgrade - Urgent—updates are critical, and used for resolving security, performance, or break-fix situations in components such as BIOS. • Upgrade - Recommended—updates are issue fixes, or any feature enhancements for components. Also, compatibility fixes with other firmware updates are included.
Consider the following points before upgrading or downgrading firmware: • When you start this task, the task takes considerable time based on the number of devices and device components present. • You can apply firmware updates on a single component of a device, or to the entire environment. • If there are no applicable upgrades or downgrades for a device, performing a firmware update on the devices cause no action on the devices.
• Configuration of automatic updates is not enabled to automatically install updates on any failover cluster node. • Enable firewall rule that enables remote shutdown on each node in the failover cluster. • Cluster group should have minimum of two nodes. • Check for cluster update readiness and ensure that there are no major errors and warnings in the Cluster Readiness report for applying the CAU method.
9 Creating clusters using Operational Template This chapter covers information about creating the Storage Spaces Direct clusters. Creating logical switch for Storage Spaces Direct clusters About this task Create logical switch from OMIMSSC in SCVMM. NOTE: The IP address that is entered in Configuration for Management section overrides the IP address that is entered in operating system component of Storage Spaces Direct predefined Operational Template.
About this task Consider the following before creating Storage Spaces Direct clusters: • You can create Storage Spaces Direct cluster in OMIMSSC by providing static IP address only. • Virtual disk size is displayed as zero in the Storage Spaces Direct predefined Operational Template. But, after applying the Storage Spaces Direct predefined Operational Template, the virtual drive is created only of size equal to the full size of the M.2 physical storage media.
10 Managing devices in OMIMSSC Maintain servers and Modular Systems up-to-date by scheduling jobs for upgrading firmware for server and Modular Systems components. Manage servers by recovering servers to an earlier state by exporting its earlier configuration, applying the configurations of the old component on replaced component, and exporting LC logs for troubleshooting.
Steps 1 In OMIMSSC, click Maintenance Center > Maintenance Settings > Protection Vault. 2 To modify the vault, select the vault and click Edit. Deleting protection vault About this task You cannot delete a protection vault in the following circumstances: • The protection vault is associated with a server or a group of servers. To delete such a protection vault, delete the server or group of servers, and then delete the protection vault. • There is a scheduled job associated with the protection vault.
– Once every 2 weeks—select to export the server profile once every two weeks. – Once every 4 weeks—select to export the server profile once every four weeks. Importing server profile You can import a server profile that was previously exported for that same server, or group of servers. Importing server profile is useful in restoring the configuration and firmware of a server to a state stored in the profile.
The Part Replacement Configuration window is displayed. 2 You can set CSIOR, Part Firmware Update, and Part Configuration Update, to any of the following options, and then click Finish: • Collect System Inventory On Restart (CSIOR)—collects all the component information on every system restart. – Enabled—the software and hardware inventory information of the server components are automatically updated during every system restart.
NOTE: Ensure that you update the firmware versions of iDRAC and LC before, exporting active LC logs for 11th generation of servers. • Schedule LC Log Collection—select select to export the active logs at regular intervals. In Schedule LC Log Collection, select a date and time to export the log files. Select a radio button depending on how frequently the files have to be exported.
NOTE: When using the search option, only the search results are exported to CSV file. NOTE: If the message is long, the message is truncated to 80 characters. NOTE: Click Message ID to view more information about the message. Exporting inventory Export the inventory of selected servers or a group of server to an XML or CSV format file. You can save this information in a Windows shared directory or on a management system.
11 Configuration and deployment About this task Discover Steps 1 In OMIMSSC console, perform any one of the following steps: • 2 In the dashboard, click Discover Servers. • In the navigation pane, click Configuration and Deployment, click Server View, and then click Discover. Click Discover. Next step To view the changes made, refresh the Credential Profile page.
5 View the job status for operating system deployment in the Jobs and Logs Center page. For more information, see Launching Jobs and Logs Center. Creating Operational Templates Prerequisites Before creating Operational Template, ensure that you complete the following tasks: • Discover a reference server by using the Discovery feature. For information about discovering servers, see Discovering servers using manual discovery. • Discover a Modular System by using the Discovery feature.
NOTE: In iDRAC Embedded 1 component, following are the privileges and their values for User Admin Privilege attribute. Table 5. Privilege value table 6 7 Value Privilege 1 Login 2 Configure 4 Configure Users 8 Logs 16 System Control 32 Access Virtual Console 64 Access Virtual Media 128 System Operations 256 Debug 499 Operator Privileges • Operating system—select either Windows, or ESXi, or RHEL. Use the horizontal scroll bar to locate a component.
The Assign Operational Template page is displayed. 4 Select the required Modular Systems, and click Assign Operational Template and Run Compliance. The Assign Operational Template page is displayed. 5 Select the template from Operational Template drop-down menu, enter a job name, and then click Assign. The Operational Template drop-down lists templates, of the same type as that of the devices selected in the previous step.
Windows OS component for the OMIMSSC console extension for SCCM 1 Select a task sequence and deployment method. NOTE: Only the task sequences deployed on collections are listed in the drop-down menu. For information about task sequence, see Task sequence-SCCM. 2 Select one of the following options for the Deployment method: • Boot to network ISO—reboots specified ISO. • Stage ISO to vFlash and Reboot—downloads the ISO to vFlash and reboots. • Reboot to vFlash—reboots to vFlash.
NOTE: Network File System (NFS) and Common Internet File System (CIFS) share types are supported for nonWindows operating system deployment. Discovery in enrolled MSSC After discovery, the server is added to the Hosts tab or the Unassigned tab. Also, the discovered server is marked as compliant or noncompliant when it contains minimum versions of LC firmware, iDRAC, and BIOS that are required to work with OMIMSSC.
The Part Replacement Configuration window is displayed. 2 Select the servers’ whose component you want to configure, and then click Part Replacement. NOTE: The option name expands to Configure Part Replacement when you hover over to Part Replacement. The Part Replacement Configuration window is displayed. Polling and notification 1 In OMIMSSC, click Maintenance Center, and then click Polling and Notification. 2 Click Polling and Notification.
Assign and deploy In OMIMSSC, click Configuration and Deployment, and then click Server View. Select the servers on which you want to deploy a template on, and then click Deploy Operational Template. The Deploy Operational Template page is displayed. Run update 1 In OMIMSSC, click Maintenance Center, select the servers or Modular System groups, and an update source, and then click Run Update. 2 Select the servers or Modular System groups, and an update source, and then click Run Update.
12 Appendix Provide the time zone attribute values manually in MX7000 devices by referring to the bellow table: Table 6.
Time zone ID Time zone difference TZ_ID_27 (GMT-03:00) Greenland TZ_ID_28 (GMT-03:00) Montevideo TZ_ID_29 (GMT-02:00) Mid-Atlantic TZ_ID_30 (GMT-01:00) Azores TZ_ID_31 (GMT-01:00) Cape Verde Is TZ_ID_32 (GMT+00:00) Casablanca TZ_ID_33 (GMT+00:00) Coordinated Universal Time TZ_ID_34 (GMT+00:00) Dublin, Edinburgh, Lisbon, London TZ_ID_35 (GMT+00:00) Monrovia, Reykjavik TZ_ID_36 (GMT+01:00) Amsterdam, Berlin, Bern, Rome, Stockholm, Vienna TZ_ID_37 (GMT+01:00) Belgrade, Bratislava, Budape
Time zone ID Time zone difference TZ_ID_61 (GMT+04:30) Kabul TZ_ID_62 (GMT+05:00) Ekaterinburg TZ_ID_63 (GMT+05:00) Islamabad, Karachi TZ_ID_64 (GMT+05:00) Tashkent TZ_ID_65 (GMT+05:30) Chennai, Kolkata, Mumbai, New Delhi TZ_ID_66 (GMT+05:30) Sri Jayawardenepura TZ_ID_67 (GMT+05:45) Kathmandu TZ_ID_68 (GMT+06:00) Astana TZ_ID_69 (GMT+06:00) Dhaka TZ_ID_70 (GMT+06:00) Novosibirsk TZ_ID_71 (GMT+06:30) Yangon (Rangoon) TZ_ID_72 (GMT+07:00) Bangkok, Hanoi, Jakarta TZ_ID_73 (GMT+07:00)
Time zone ID Time zone difference TZ_ID_95 (GMT+14:00) Kiritimati TZ_ID_96 (GMT+02:00) Athens, Bucharest Appendix 75
13 Accessing documents from the Dell EMC support site You can access the required documents using the following links: • For Dell EMC Enterprise Systems Management documents — www.dell.com/esmmanuals • For Dell EMC OpenManage documents — www.dell.com/openmanagemanuals • For Dell EMC Remote Enterprise Systems Management documents — www.dell.com/esmmanuals • For iDRAC and Dell Lifecycle Controller documents — www.dell.
4 Select the appropriate service or support link based on your need.