Dell OpenManage Mobile Version 1.
Notes, cautions, and warnings NOTE: A NOTE indicates important information that helps you make better use of your computer. CAUTION: A CAUTION indicates either potential damage to hardware or loss of data and tells you how to avoid the problem. WARNING: A WARNING indicates a potential for property damage, personal injury, or death. Copyright © 2016 Dell Inc. All rights reserved. This product is protected by U.S. and international copyright and intellectual property laws.
Contents 1 About OpenManage Mobile................................................................................ 6 What is new in this release....................................................................................................................6 Key features........................................................................................................................................... 6 2 Setting up OpenManage Mobile.................................................................
Sharing iDRAC Details....................................................................................................................31 Viewing the remote desktop......................................................................................................... 31 Editing connection details of an iDRAC............................................................................................. 32 Deleting an iDRAC.....................................................................................
10 Related documents and resources................................................................51 Other documents you may need........................................................................................................51 Contacting Dell....................................................................................................................................51 Accessing documents from Dell support site....................................................................................
About OpenManage Mobile 1 OpenManage Mobile is a systems management application that enables you to monitor your datacenter from an Android mobile device. OpenManage Mobile enables you to add one or more OpenManage Essentials consoles 1.3 or later and/or Integrated Dell Remote Access Controllers (iDRACs) 7 or later. OpenManage Mobile provides OpenManage Essentials alerts to your mobile device and enables you to troubleshoot your hardware in case of emergencies.
Setting up OpenManage Mobile 2 This chapter provides information about installing and starting OpenManage Mobile. Installing OpenManage Mobile Prerequisites to install OpenManage Mobile: • Ensure that you have Android version 4.0.3 or later on your mobile device. • Ensure that you have access to Google Play Store Application on your Android device. • To receive alert notifications in OpenManage Mobile on Android version 4.0.3, you must have a Google account registered on your device.
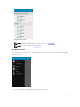
Figure 1. Analytics and Usage 3. Complete one of the following based on your preference: • Share with app developers: Your use data will be aggregated with data from other users. Dell will improve future versions of the application by collection data about which features are used most often by all users. • Don’t share: Disables use data collection. The Create a Password screen is displayed. 4.
Figure 2. Home screen NOTE: To add an OpenManage Essentials console, see Adding OME NOTE: To add an iDRAC, see Adding iDRAC Navigation menu The navigation menu allows you to quickly navigate to various screens. The following are the available navigation options: Figure 3. Navigation menu • Home — Navigates to the OpenManage Mobile home screen.
• Task Manager — Allows you to view the actions performed in OpenManage Mobile. • Settings — Navigates to the Settings screen. • Log — Allows you to view the application log. • About — Allows you to view the OpenManage Mobile version and links to related resources. Accessing the navigation menu To access the navigation menu: from any screen. Tap The navigation options are displayed. Enabling or disabling demo mode Demo mode allows you to explore the features of OpenManage Mobile.
Resetting OpenManage Mobile This feature allows you to reset OpenManage Mobile to original settings and start a new session. You can use the reset option if the OpenManage Mobile password is not retrievable. NOTE: Resetting OpenManage Mobile with delete all user entered information such as Login Password, Saved hosts, Logs, Analytics data, and so on. To reset OpenManage Mobile: 1. Tap the Navigation menu icon. 2. Tap Settings. The Settings screen is displayed. 3. Tap Reset OMM app.
Managing OpenManage Essentials console 3 This section provides information you require to add, edit, or delete an OpenManage Essentials console in OpenManage Mobile. Adding an OpenManage Essentials console Prerequisites to add an OME: • Ensure that you have OpenManage Essentials version 1.3 or later. • Ensure that you have VPN or internal Wi-Fi access to the OpenManage Essentials network on the Android device. To add an OpenManage Essentials console: 1. Start OpenManage Mobile. 2.
Figure 4. Adding OME 6. To save the connection details, tap Add OME. The OpenManage Essentials SSL certificate is displayed. 7. Tap Yes to accept the certificate and save the OpenManage Essentials console. 8. On the next screen, select the appropriate alert filter for push notifications . NOTE: To set a custom alert filter, see OpenManage Essentials User’s Guide. NOTE: If you do not want to receive push notifications, you can clear the enable push notifications check box.
Figure 5. OME dashboard 2. • indicates the number of devices or alerts that are critical. • indicates the number of devices or alerts that are with warning status. • indicates the number of devices or alerts that are healthy. • indicates the number of devices or alerts that are unknown. Tap Devices by health to view the devices managed by OpenManage Essentials and tap Alerts by severity to view the alerts.
The All Devices screen is displayed. Figure 6. All devices 3. Tap the appropriate device category (for example, RAC), and then tap to select the device you want to view. Figure 7. Device details The inventory information of the devices managed by OpenManage Essentials is displayed. 4.
• On the Device Details screen, tap Software details. The Software Details screen is displayed with the software information of an OME. Viewing hardware log To view the hardware log: • On the Device Details screen, tap Hardware Log. The Hardware log screen is displayed. Viewing the warranty information To view the warranty information: • On the Device Details screen, tap Warranty. The Warranty Information screen is displayed. NOTE: An internet connection is required to view the warranty information.
Figure 8. Alerts You can forward, acknowledge, or delete an alert. Performing an action on multiple alerts To Perform an action on multiple alerts: 1. On the OME Console screen, tap Alerts by severity. The Alerts screen is displayed. 2. Select multiple alerts by selecting the check box on the left of each alert and tap Delete to delete the alerts, tap Acknowledge to acknowledge the alerts, or tap Share to share the selected alerts. 3.
Figure 9. Confirm acknowledgment The alert is acknowledged, and the Alert Details screen is automatically refreshed. NOTE: To share the information using an application available on your device, tap the share option. Sharing an alert To share an alert: 1. On the Alert Details screen, tap 2. Select the option you want to use to share the alert details. 18 to share an alert.
Figure 10. Alert sharing options Deleting an alert To delete an alert: 1. On the Alert Details screen, select the alerts you want to delete and tap Delete to delete an alert. Figure 11. Deleting alerts 2. In the Delete Confirmation box, tap Yes to confirm. The alert is deleted, and you are returned to the Alerts list screen.
Editing connection details of an OpenManage Essentials console To edit the connection details of the OpenManage Essentials console: 1. On the OpenManage Mobile home screen, perform one of the steps: • Tap the OpenManage Essentials console you want to edit. The OpenManage Essentials dashboard is displayed. • 1. Tap 2. Tap Edit Connection. . Press and hold the OpenManage Essentials console. Tap Edit Conenction. The Edit Connection screen is displayed. 2.
1. Tap Edit Connection. 2. Tap Delete OME. NOTE: If OpenManage Mobile is unable to contact the OpenManage Essentials server when the console is deleted, the OpenManage Essentials server retains the device in its mobile subscribers list until it is manually deleted. For more information about deleting a mobile subscriber, see OpenManage Essentials User’s Guide. The Delete Confirmation screen is displayed. 2. Tap Yes. The OpenManage Essentials console is deleted from OpenManage Mobile.
4. Tap . The supported power control operations are displayed. Figure 12. Power control options 5. Type the Username and Password for the device, and then select the power control operation you want to perform. NOTE: The Enable All option allows you to perform a power control operation independent of the discovery protocol. Power On operation is performed through the iDRAC and all other power control operations are performed through the server host OS.
Managing iDRAC 4 This section provides information you require to add, edit, or delete an iDRAC in OpenManage Mobile. Adding an iDRAC Prerequisites to add an iDRAC: • Ensure that you have iDRAC 7 or later with Enterprise or Express edition license. • Ensure that you have VPN or internal Wi-Fi access to the iDRAC network from your Android device.
Figure 13. Adding iDRAC 6. To save the connection details, tap Add iDRAC. The iDRAC SSL certificate is displayed. 7. Tap Yes to accept the certificate and save the iDRAC. The iDRAC Details screen is displayed. Adding multiple iDRACs using the IP range This feature allows you to add multiple iDRACs using iDRAC range. NOTE: You can add multiple iDRACs only if the username and password is the same. To add multiple iDRACs: 1. Start OpenManage Mobile. 2.
7. Type the Username, Password, and Domain (if applicable) of the iDRAC and tap Add.The process of adding multiple iDRACs is initiated. You can check the status of the process in the task manager. 8. Select Discover iDRAC Range. 9. Type Range Start, Range End, Subnet Mask, Username, Password, and Domain (optional). 10. Tap Discover iDRACs. Figure 14. Adding multiple iDRACs The process of adding multiple iDRACs is initiated. You can check the status of the process in the task manager.
Figure 15. iDRAC Quick Sync Read 6. Turn on the iDRAC Quick Sync Bezel. 7. Place your mobile device in contact with the activation switch of the iDRAC Quick Sync Bezel on your server and hold your mobile for at least 3 seconds. NOTE: The Near-Field Communication (NFC) chip in the mobile device should be in contact with the iDRAC Quick Sync activation switch. Refer to your mobile device’s documentation to find the location of the NFC chip.
Figure 16. iDRAC dashboard (phone view) 2. Tap Hardware Logs to view the hardware logs, tap Firmware Details to view the firmware details, tap Network Details to view the network details, tap Health Status to view the health status, tap Warranty to view warranty information, and tap Online Resources to access the Dell Quick Resource Locator website. NOTE: To share the information using an application available on your device, tap select the share option.
Figure 17. Hardware logs NOTE: Retrieving hardware logs may take a few minutes. Viewing firmware details of an iDRAC To view the firmware details of an iDRAC: • In the iDRAC Details screen, tap Firmware Details. The Firmware Details screen is displayed. Figure 18.
Viewing network details of an iDRAC To view the network details of an iDRAC: 1. In the iDRAC Details screen, tap Network Details. The Network Details screen is displayed. Figure 19. Network details 2. Tap IPv4, IPv6, or MAC Addresses for additional network details. Viewing health status of an iDRAC To view the health status of an iDRAC: • In the iDRAC Details screen, tap Health Status. The Health Status screen is displayed with the Temperature and Power values.
Figure 20. Health status Viewing the warranty information of an iDRAC To view the warranty information of an iDRAC: • In the iDRAC Details screen, tap Warranty. The warranty information of the server is displayed. NOTE: An internet connection is required to view the warranty information. Accessing Dell Quick Resource Locator website through iDRAC To access the Dell Quick Resource Locator website: • In the iDRAC Details screen, tap Online Resources.
Sharing iDRAC Details To share the iDRAC details: 1. On the OpenManage Mobile home screen, tap the appropriate iDRAC console. The iDRAC dashboard is displayed. 2. Navigate to the details page you want to share. For example, tap Hardware Logs, Firmware Details, Network Details, or Health Status. 3. Tap the menu key and then tap Share to share the details using an email application. Viewing the remote desktop To view the remote desktop, your mobile device must have bVNC Viewer installed.
Figure 22. VNC configuration confirmation NOTE: Check the Use Secure Tunnel check box when the encryption is set to 128-bit or more in iDRAC. NOTE: If the iDRAC does not support remote desktop or if there is no remote desktop password set, bVNC displays an error message that it cannot connect to the remote desktop. Editing connection details of an iDRAC To edit the connection details of an iDRAC: 1.
Deleting an iDRAC To delete an iDRAC from OpenManage Mobile: 1. On the OpenManage Mobile home screen, perform one of the following steps: • Select the iDRAC that you want to remove. NOTE: If you want to remove multiple iDRACs, select each iDRAC that you want to remove. • 1. Tap 2. In the Delete Confirmation box, tap Yes. . Tap the iDRAC you want to remove. The iDRAC Details screen is displayed. • 1. Tap 2. Tap Edit Connection. 3. Tap Delete iDRAC. .
Information Description Operating System The name of the operating system. This may require OpenManage Server Administrator (OMSA) to be installed on the system Host name The host name of the server NOTE: Not all details are available for all managed devices. Viewing iDRAC details in web browser To view the iDRAC details in the web browser 1. On the iDRAC details screen, tap the 2. Tap View in browser. symbol. 3. The iDRAC details will be displayed in the device browser.
Figure 23. Power control options 4. Select the power control operation you want to perform, and tap Submit. NOTE: Shutdown OS First option is supported only for those power control operations that support a normal shutdown of the operating system. NOTE: The Power Options screen displays the task credentials used to add the iDRAC. If you want to use a different user name and password for the power control operations, edit the username and password fields.
4. Tap iDRAC Configuration. The iDRAC Configuration screen is displayed. Figure 25. iDRAC configuration 5. Type Username and Password of the iDRAC in the Task Credentials section. 6. Tap Sync Now to sync. 7. Turn on the iDRAC Quick Sync Bezel. 8. Place your mobile device in contact with the iDRAC Quick Sync Bezel activation switch on your server and hold your mobile for at least 3 seconds. NOTE: Configuration changes may take up to a minute to apply.
Push notifications 5 Push notifications enable OpenManage Mobile to notify you when a subscribed OpenManage Essentials console receives alerts from a monitored device The notification appears in the status bar of your mobile device, similar to notifications that are displayed for messages, downloads, and so on. OpenManage Mobile allows you to configure the type of push notification you want to receive. Configuring alert notifications settings To configure alert notification settings: 1.
Figure 27. Push notifications 2. If applicable, enter the OpenManage Mobile password and tap Login. The dashboard of the OpenManage Essentials console displays the newly received alert. 3. 38 Tap New alerts to view the alerts associated with the push notification.
6 Using the OpenManage Mobile Password To make sure that your OpenManage Mobile is secure, you can lock OpenManage Mobile by using a secret password. You can set a secret password by selecting the Enable Password option in the Settings screen. • If a password is set and you do not use the device for more than 15 minutes, OpenManage Mobile is automatically locked, and then the login page of OpenManage Mobile is displayed.
Figure 28. Retrieving password NOTE: If you forget your OpenManage Mobile password and cannot retrieve it, it is recommended to delete all of the application data and create a new password. All the added OpenManage Essentials consoles and iDRACs will be deleted and you need to add them again to OpenManage Mobile. To delete the application data, go to Settings → Apps → OMM, and then tap Clear data. 3. Enter your OpenManage Mobile password. 4. Tap Login.
Figure 29. Change password (phone view) 3. Type the current OpenManage Mobile password, new password, reconfirm the new password, and then type the password hint. 4. Tap Change. Disabling the OpenManage Mobile password To disable the OpenManage Mobile password: 1. On the OpenManage Mobile home screen, tap the overflow menu. 2. In the menu that is displayed, tap Settings. The Settings screen is displayed.
Figure 30. Settings 3. Clear the Enable Password option. A confirmation message is displayed. 4. 42 Tap Yes.
7 Viewing OpenManage Mobile information This section provides information about viewing the OpenManage Mobile log, version, and End User License Agreement (EULA). Viewing the OpenManage Mobile application log To view the OpenManage Mobile application log: 1. On the Home screen, tap 2. Tap Log. . The application log displays the following types of activities that are performed on the Open Manage Mobile: • Adding an OpenManage Mobile console or iDRAC.
The OpenManage Mobile DellTech Center page is displayed. Viewing the OpenManage Mobile manuals and documentation To view the OpenManage Mobile manuals and documentation: 1. On the Home screen, tap 2. Tap About. . The OpenManage Mobile product information is displayed. 3. Tap Manuals and Documentation. The OpenManage Mobile Manuals and Documentation is displayed.
Troubleshooting OpenManage Mobile 8 Unable to add OpenManage Essentials to OpenManage Mobile If you are unable to add an OpenManage Essentials to OpenManage Mobile, you can try the following workarounds: Workarounds: • Verify network configuration: To add an OpenManage Essentials server to OpenManage Mobile, OpenManage Essentials must be available on the specified web port (default 2607) and not stopped by any firewall or other security mechanism.
Workarounds: • Update the iDRAC firmware. For more information about updating the iDRAC firmware see, iDRAC User’s Guide. • Update the OpenManage Mobile to the latest available version. • The Near-Field Communication (NFC) chip in the mobile device should be in contact with the iDRAC Quick Sync activation switch. Refer to your mobile device’s documentation to find the location of the NFC chip. • Remove the protective casing from the mobile device.
Workaround: To register for push notifications from an OpenManage Essentials, you must have a GCM token installed in the OpenManage Mobile application. GCM token is installed during the initial setup of OpenManage Mobile. If GCM token is not installed, go to the Settings screen and tap Request to install the GCM token. You must have an internet connection for this request to be successful.
– To retrieve your OpenManage Mobile password, tap Forgot Password. Your password hint is displayed. – If you are unable to retrieve your OpenManage Mobile password using the password hint displayed, delete the OpenManage Mobile data, and then create a new password. To delete the OpenManage Mobile data, go to Settings → Apps → OMM, and then tap Clear data.
For iDRAC shown in OME OpenManage Mobile will not perform the operation with non-default values. • If the log in page appears again after you exit OpenManage Mobile, use home button to minimize the application. • If you have more than 100 devices in the All Devices group, the devices are sorted by health only on the first screen. From the next screen, you can view the devices but they are not sorted by health.
Uninstalling OpenManage Mobile To uninstall OpenManage Mobile: 1. Tap the Android operating system symbol. The Settings screen is displayed. 2. In Device section, tap Apps or Application Manager. 3. In the DOWNLOADED tab, tap OMM. 4. Tap Uninstall. 5. At the Do you want to uninstall this app? prompt, tap OK. The App info screen is displayed.
Related documents and resources 10 Other documents you may need Besides this you can find the following documents on the Dell OpenManage Mobile Support website at delltechcenter.com/omm • Dell OpenManage Essentials version 2.0 User’s Guide. • Dell Integrated Dell Remote Access Controller 8 User’s Guide. Contacting Dell NOTE: If you do not have an active Internet connection, you can find contact information on your purchase invoice, packing slip, bill, or Dell product catalog.
b. Under Select a product section, click Software & Security. c. In the Software & Security group box, click the required link from the following: – Enterprise Systems Management – Remote Enterprise Systems Management – Serviceability Tools – Dell Client Command Suite – Connections Client Systems Management d. • To view a document, click the required product version. Using search engines: – Type the name and version of the document in the search box.