Dell™ OpenManage™ Server Administrator Storage Management User's Guide Overview Getting Started Understanding RAID Concepts Quick Access to Storage Status and Tasks Storage Information and Global Tasks Controllers RAID Controller Batteries Connectors Enclosures and Backplanes Physical Disks Virtual Disks Protecting Your Virtual Disk with a Hot Spare Moving Physical and Virtual Disks from One System to Another Alert Messages Command Line Interface BIOS Terminology Troubleshooting Frequently Asked Questions
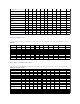
Back to Contents Page Supported Features Dell™ OpenManage™ Server Administrator Storage Management User's Guide Supported Features on the PERC 3/SC, 3/DC, 3/QC, 4/SC, 4/DC, 4/Di, 4e/Si, 4e/Di, 4e/DC, CERC ATA100/4ch, and 4/IM Controllers Supported Features on the PERC 3/Si, 3/Di, CERC SATA1.5/2s, and CERC SATA1.
Import Foreign Configuration No No No No No No No No No No No Import/Recover Foreign Configuration No No No No No No No No No No No Set Patrol Read Mode No No No Yes Yes Yes Yes Yes Yes No No Start Patrol Read No No No No No No No No No No No Stop Patrol Read No No No No No No No No No No No Battery Tasks Table A-2.
Table A-5.
Maximum Number of Physical Disks in a RAID 50 256 256 256 256 256 256 256 256 256 NA NA Minimum Number of Physical Disks that Can Be Concatenated 2 2 2 2 2 2 2 2 2 2 NA Minimum Number of Physical Disks in a RAID 0 1 1 1 1 1 1 1 1 1 1 NA Minimum Number of Physical Disks in a RAID 1 2 2 2 2 2 2 2 2 2 2 2 Minimum Number of Physical Disks in a RAID 5 3 3 3 3 3 3 3 3 3 3 NA Minimum Number of Physical Disks in a RAID 10 4 4 4 4 4 4 4 4 4 4 NA
Enclosure Support Table A-9. Enclosure Support on the PERC 3/SC, 3/DC, 3/QC, 4/SC, 4/DC, 4/Di, 4e/Si, 4e/Di, 4e/DC, CERC ATA100/4ch, and 4/IM Controllers Enclosure Support Can an enclosure be attached to this controller? PERC 3/SC PERC 3/DC PERC 3/QC PERC 4/SC PERC 4/DC PERC 4/DI Yes Yes Yes Yes Yes Yes PERC 4e/SI Yes PERC 4e/DI Yes PERC 4e/DC Yes CERC ATA 100/4ch No Supported Features on the PERC 3/Si, 3/Di, CERC SATA1.5/2s, and CERC SATA1.
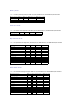
Battery Tasks Table A-11. Battery Tasks Supported by the PERC 3/Si, 3/Di, CERC SATA1.5/2s, and CERC SATA1.5/6ch Controllers Battery Task Name PERC 3/Si PERC 3/Di CERC SATA 1.5/2s CERC SATA 1.5/6ch Recondition Battery Yes Yes No No Start Learn Cycle No No No No Delay Learn Cycle No No No No Connector Tasks Table A-12. Connector Tasks Supported by the PERC 3/Si, 3/Di, CERC SATA1.5/2s, and CERC SATA1.
Cancel Check Consistency Yes Yes Yes Yes Pause Check Consistency Yes Yes No Yes Resume Check Consistency Yes Yes No Yes Cancel Background Initialization (BGI) No No No No Format Virtual Disk Yes Yes No Yes Cancel Format Virtual Disk No No No No Restore Dead Disk Segments Yes Yes No Yes Initialize Virtual Disk No No No No Fast Initialize Virtual Disk No No No No Slow Initialize Virtual Disk No No No No Cancel Initialize Virtual Disk No No No No Virtual D
Read, Write, and Disk Cache Policy Table A-17. Read, Write, and Cache Policy Supported by the PERC 3/Si, 3/Di, CERC SATA1.5/2s, and CERC SATA1.
Enable Alarm Yes No Yes NA NA Disable Alarm Yes No Yes NA NA Quiet Alarm Yes No Yes NA NA Test Alarm Yes No Yes NA NA Reset configuration Yes Yes Yes Yes Yes Set Rebuild Rate Yes Yes Yes Yes Yes Set Background Initialization Rate Yes Yes Yes Yes Yes Set Check Consistency Rate Yes Yes Yes Yes Yes Set Reconstruct Rate Yes Yes Yes Yes Yes Rescan Controller No No No No No Create Virtual Disk Yes Yes Yes Yes Yes Export Log File Yes Yes Yes Yes
Physical Disk Task Name PERC 5/E PERC 5/I PERC 6/E PERC 6/I CERC 6/I Blink/Unblink Yes Yes Yes Yes Yes Assign and Unassign Global Hot Spare Yes Yes Yes Yes Yes Prepare to Remove No No No No No Offline Yes Yes Yes Yes Yes Online Yes Yes Yes Yes Yes Initialize No No No No No Rebuild Yes Yes Yes Yes Yes Cancel Rebuild Yes Yes Yes Yes Yes Remove Dead Disk Segments No No No No No Format Disk No No No No No Clear Yes Yes Yes Yes Yes Cancel Clea
Maximum Number of Spans per Virtual Disk 8 8 8 8 8 Maximum Number of Physical Disks per Span 32 32 32 32 32 Minimum Stripe Size 8k 8k 8k 8k 8k Maximum Stripe Size 128k 128k 1MB 1MB 1MB Maximum Number of Virtual Disks per Physical Disk 16 64 16 16 16 256 Not Applicable Maximum Number of Physical Disks that Can Be Concatenated Not Applicable Not Applicable Not Applicable Maximum Number of Physical Disks in a RAID 0 32 100MB 32 32 32 Maximum Physical Disks in a RAID 1
Cache Policy No No No No No Disk Cache Policy Yes Yes Yes Yes No Cache I/O No No No No No Direct I/O No No No No No Enclosure Support Table A-27.
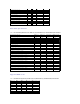
Stop Patrol Read No No Battery Tasks Table A-29. Battery Tasks Supported on the SAS 5/iR and SAS 6/iR Controller Battery Task Name SAS 5/iR SAS 6/iR Recondition Battery No No Start Learn Cycle No No Delay Learn Cycle No No Connector Tasks Table A-30. Connector Tasks Supported on the SAS 5/iR and SAS 6/iR Controllers Connector Task Name SAS 5/IR SAS 6/iR Connector Rescan No No Physical Disk Tasks Table A-31.
Blink/Unblink Yes Yes Reconfigure No No Change Policy No No Split Mirror No No Unmirror No No Delete Last Virtual Disk No Yes Delete (any) Virtual Disk No Yes Check Consistency No No Cancel Check Consistency No No Pause Check Consistency No No Resume Check Consistency No No Cancel Background Initialization (BGI) No No Format Virtual Disk No No Cancel Format Virtual Disk No No Restore Dead Disk Segments No No Initialize Virtual Disk No No Fast Initialize Virtua
Concatenation No No RAID 0 Yes Yes RAID 1 Yes Yes RAID 5 No No RAID 10 No No RAID 50 No No RAID 6 No No RAID 60 No No Read, Write, Cache and Disk Cache Policy Table A-35.
Table A-37.
Format Disk No No Clear No No Cancel Clear No No Virtual Disk Tasks Table A-41.
l "Supported Features on the PERC 5/E, PERC 5/i, PERC 6/E, PERC 6/I, and CERC 6/I Controllers" l "Supported Features on the SAS 5/iR and SAS 6/iR Controllers" l "Supported Features on the Non-RAID Controllers" Enclosure and Backplane Tasks Table A-43.
Back to Contents Page Determining the Health Status for Storage Components Dell™ OpenManage™ Server Administrator Storage Management User's Guide Health Status Rollup: Battery is Charging or Dead Health Status Rollup: Physical Disks in a Virtual Disk are Failed or Removed Health Status Rollup: Physical Disks in a Virtual Disk are Unsupported, Partially or Permanently Degraded Health Status Rollup: Enclosure Power Supply Failed or Power Connection Removed Health Status Rollup: One Enclosure Fan is Failed
Component Status Health Rollup Health Status Rollup: All Physical Disks in a Virtual Disk are in Foreign State Table B-4. Health Status Rollup: All Physical Disks in a Virtual Disk are in Foreign State (Enclosures Not Included) Storage Subsystem Controller Battery Connector Physical Disk(s) Firmware/ Virtual Disk(s) Driver Component Status Not Applicable Health Rollup Not Applicable Health Status Rollup: Some Physical Disks in a Virtual Disk are in Foreign State Table B-5.
Component Status Health Rollup Health Status Rollup: Unsupported Firmware Version Table B-8. Health Status Rollup: Unsupported Firmware Version (Enclosures Not Included) Storage Subsystem Controller Battery Connector Physical Disk(s) Firmware/Driver Virtual Disk(s) Component Status Health Rollup Health Status Rollup: Enclosure Power Supply Failed or Power Connection Removed Table B-9.
Health Status Rollup: One Enclosure Temperature Probe is Failed Table B-12. Health Status Rollup: One Enclosure Temperature Probe is Failed Storage Subsystem Controller Connector Enclosure Enclosure Temperature Probe Virtual Disks Physical Disks Component Status Health Rollup Not Applicable Health Status Rollup: Lost Both Power Connections to the Enclosure Table B-13.
Back to Contents Page Physical Disks Dell™ OpenManage™ Server Administrator Storage Management User's Guide Add a New Disk to Your System How to Avoid Removing the Wrong Disk Replacing a Physical Disk Receiving SMART Alerts Other Disk Procedures Physical Disk Properties and Tasks Assign and Unassign Global Hot Spare Online and Offline Clear Physical Disk and Cancel Clear Revertible Hot Spare Physical disks reside within an enclosure or are attached to the controller.
Replacing a Physical Disk Receiving SMART Alerts SMART alerts are messages predicting that a disk may fail in the near future. If a physical disk is receiving SMART alerts, you should replace the disk. Use the following procedures to replace a disk receiving SMART alerts. If the disk is part of a redundant virtual disk: 1. Select the redundant virtual disk that includes the physical disk that is receiving SMART alerts and perform the Check Consistency task. See "Check Consistency" for more information.
The following table describes properties that may be displayed for physical disks depending on the controller. Property Status Definition These icons represent the severity or health of the storage component. Normal/OK Warning/Non-critical Critical/Fatal See "Storage Component Severity" for more information. Name This property displays the name of the physical disk. The name is comprised of the connector number followed by the disk number.
"2109" "2110" "2111" Progress This property displays how close to completion an operation is that is being performed on the physical disk. For example, if the physical disk is being rebuilt, then a value of 52% indicates that the rebuild is 52% complete. This property is only displayed when an operation is being performed on the physical disk. Bus Protocol This property displays the technology that the physical disk is using.
l "Blink and Unblink (Physical Disk)" l "Remove Dead Segments" l "Assign and Unassign Global Hot Spare" l "Prepare to Remove" l "Online and Offline" l "Initialize" l "Rebuild" l "Cancel Rebuild" l "Clear Physical Disk and Cancel Clear" l "Revertible Hot Spare" Blink and Unblink (Physical Disk) Does my controller support this feature? See "Supported Features." The Blink task allows you to find a disk within an enclosure by blinking one of the light-emitting diodes (LEDs) on the disk.
A physical disk is no longer in Ready state after doing a Prepare to Remove. Removing the physical disk from the enclosure or backplane and replacing it causes the physical disk to spin up and return to Ready state. In some cases, a rescan is required for the controller to recognize configuration changes such as the removal of a disk. See "Rescan to Update Storage Configuration Changes" for more information.
spare is activated, it rebuilds the data for all redundant virtual disks that were using the failed physical disk. You can change the hot spare assignment by unassigning a disk and choosing another disk as needed. You can also assign more than one physical disk as a global hot spare. NOTE: On SAS 6/iR controllers, you cannot assign physical disks that have boot partitions, as hotspares. Global hot spares must be assigned and unassigned manually. They are not assigned to specific virtual disks.
Clear Physical Disk and Cancel Clear Does my controller support this feature? See "Supported Features." Use the clear physical disk task to erase data residing on a physical disk. The Clear task applies to physical disks that are in Ready state and that contain data or that are in Clear state. NOTE: A physical disk may display the Clear state if it is a member of a virtual disk that is being slow initialized.
To locate this task in Storage Management: 1. Expand the Storage tree object to display the controller objects. 2. Select a controller object on which you want to enable the revertible hot spare task and select the Information/Configuration tab. 3. From the Controller Task drop down menu, select Change Controller Properties and click Execute. NOTE: The Rebuild rate for Revertible Hot Spare will be the same as defined for the controller.
Back to Contents Page RAID Controller Batteries Dell™ OpenManage™ Server Administrator Storage Management User's Guide Battery Properties and Tasks Some RAID controllers have batteries. If the controller has a battery, Storage Management displays the battery under the controller object in the tree view. In the event of a power outage, the controller battery preserves data that is in the nonvolatile cache memory (NVRAM) but not yet written to disk.
Property Status Definition These icons represent the severity or health of the storage component. Normal/OK Warning/Non-critical Critical/Fatal See "Storage Component Severity" for more information. Name This property displays the name of the battery. State This property displays the current status of the battery. Possible values are: Ready — The battery is functioning normally. Degraded — The battery needs to be reconditioned. Reconditioning — The battery is being reconditioned.
1. Expand the Storage tree object to display the controller objects. 2. Expand a controller object. 3. Select the Battery object. 4. Select a task from the Available Tasks drop-down menu. 5. Click Execute. Drop-down Menu Battery Tasks: l "Recondition Battery" l "Start Learn Cycle" l "Battery Delay Learn Cycle" Recondition Battery Does my controller support this feature? See "Supported Features.
The battery Learn cycle discharges and then fully charges the controller battery. The Learn cycle recalibrates the battery integrated circuit so that the controller can determine whether the battery can maintain the controller cache for the prescribed period of time in the event of a power loss. For example, some controller batteries are required to maintain the controller cache for 72 hours. While the Learn cycle is in progress, the battery may not be able to maintain the cache during a power loss.
Back to Contents Page BIOS Terminology Dell™ OpenManage™ Server Administrator Storage Management User's Guide BIOS Terms and the PERC 3/SC, 3/DC, 3/QC, 4/SC, 4/DC, 4e/DC, 4/Di, and CERC ATA100/4ch Controllers BIOS Terms and the PERC 3/Si, 3/Di, CERC SATA1.5/6ch, and CERC SATA1.5/2s Controllers The terminology used by Storage Management can be different from the terminology used in the controller BIOS. The following sections show some of these differences.
Back to Contents Page Connectors Dell™ OpenManage™ Server Administrator Storage Management User's Guide Channel Redundancy and Thermal Shutdown Channel Redundancy on PERC 3/DC, 3/QC, 4/DC, 4e/DC, 4/Di, and 4e/Di Controllers Creating a Channel-redundant Virtual Disk Connector Health Connector Properties and Tasks Logical Connector Properties and Tasks A controller contains one or more connectors (channels or ports) to which you can attach disks.
NOTE: Channel redundancy only applies to controllers that have more than one channel and that attach to an external disk enclosure. 1. Launch the Create Virtual Disk Advanced Wizard by doing the following: a. 2. Locate the controller on which you are creating a channel-redundant virtual disk Expand the controller object until the Virtual Disks object is displayed. b. Select the Virtual Disks object and click Go To Create Virtual Disk Wizard. c. Click Virtual Disk Advanced Wizard.
c. d. Repeat "step b" until you have selected the desired number of disks. You must select the same number of physical disks on each channel that you use. Click Continue. Connector Health This screen displays the status of the connector and the components attached to the connector. Connector Status Component status is indicated by the severity. A component with a Warning or Critical/Failure status requires immediate attention to avoid data loss if possible.
Property Definition These icons represent the severity or health of the storage component. See "Storage Component Severity" for more information. A Warning or Critical severity may indicate that the connector is unable to communicate with attached devices such as an enclosure. Check the status of attached devices. See "Cables Attached Correctly" and "Isolate Hardware Problems" for more information. Name This property displays the connector number.
Use this window to view information about the logical connector (connector in redundant path mode) and to execute connector tasks. Logical Connector Properties The connector properties can vary depending on the model of the controller. Connector properties may include: Property Definition These icons represent the severity or health of the storage component. See "Storage Component Severity" for more information.
Back to Contents Page Command Line Interface Dell™ OpenManage™ Server Administrator Storage Management User's Guide CLI Command Syntax Syntax for Required, Optional, and Variable Command Elements User Privileges for omreport storage and omconfig storage omreport Command omconfig Virtual Disk Commands omconfig Physical Disk Commands omconfig Battery Commands omconfig Connector Commands omconfig Global Commands omconfig Enclosure Commands omconfig Controller Commands Storage Management has a fully-featu
omconfig name=value Pairs Following the command levels, the omreport and omconfig command syntax may require one or more name=value pairs. The name=value pairs specify exact objects (such as a specific physical disk) or options (such as blink or unblink) that the command will implement.
omconfig storage pdisk action=blink controller=1 pdisk=2:1 enclosure= Parameter The omconfig syntax for specifying an enclosure includes the enclosure= parameter followed by the variable. How you specify the variable depends on whether the controller is using SCSI, SATA, ATA, or SAS technology. enclosure= Parameter on SAS Controllers On a SAS controller, the enclosure= parameter is specified as follows.
omconfig storage pdisk action=blink controller=1 pdisk=2:3:1,2:3:2, 2:3:3 See "RAID Controller Technology: SCSI, SATA, ATA, and SAS" to identify which technology a controller uses. Syntax for Required, Optional, and Variable Command Elements The omreport and omconfig commands have multiple name=value pairs. These name=value pairs may include required, optional, and variable parameters. The following table describes the syntax used to indicate these parameters.
omreport Storage Help Table 15-2. omreport Storage Help Commands Required Command Levels (1, 2, 3) Use omreport storage -? Displays a list of storage components for which omreport commands are available. omreport storage pdisk -? Displays a list of the omreport storage pdisk parameters for displaying physical disk information. See "omreport Physical Disk Status" for more information.
Table 15-6. omreport Connector Commands Required Command Levels (1, 2, 3) and name=value Pair omreport storage connector controller=id Use Displays all connectors on the specified controller. where id is the controller number. For example: controller=0 omreport storage connector controller=id connector=id where id is the controller number. For example: controller=0 Displays information for the specified connector on the controller.
information on specifying enclosures. where id is the controller number and is the enclosure ID. Example for SCSI controllers: controller=0 enclosure=2 info=fans. Example for SAS controllers: controller=0 enclosure=1:2 info=fans. controller=id enclosure= info=fans index=n where id is the controller number and is the enclosure ID and n is the number of a fan. Example for SCSI controllers: controller=0 enclosure=2 info=fans index=1.
controller number. For example: controller=0 another disk as part of the replace member operation, the state of the physical disk is displayed as Replacing. See "Revertible Hot Spare" for more information. connector=id Displays all physical disks attached to the specified connector on the controller. where id is the connector number. For example: connector=1 vdisk=id Displays all physical disks included in the specified virtual disk on the controller. where id is the virtual disk number.
Use the following omconfig command syntax to enable smart thermal shutdown. Complete Syntax omconfig storage globalinfo action=enablests Example Syntax The omconfig command syntax for enabling thermal shutdown does not require that you specify a controller or enclosure ID. To enable thermal shutdown, enter the following: omconfig storage globalinfo action=enablests NOTE: You can use the omreport storage globalinfo command to determine whether smart thermal shutdown is currently enabled or disabled.
Use the following omconfig command syntax to rescan all controllers on the system. See "Rescan Controller" and "Rescan to Update Storage Configuration Changes" for more information about using this command. Complete Syntax omconfig storage globalinfo action=globalrescan Example Syntax The omconfig command syntax for rescanning all controllers on the system does not require that you specify a controller ID.
Foreign Configuration" action=importrecoverforeignconfig controller=id "omconfig Import/Recover Foreign Configuration" action=clearforeignconfig controller=id "omconfig Clear Foreign Configuration" action=setpatrolreadmode controller=id mode=manual|auto|disable "omconfig Set Patrol Read Mode" action=startpatrolread controller=id "omconfig Start Patrol Read" action=stoppatrolread controller=id "omconfig Stop Patrol Read" action=setchangecontrollerproperties controller= abortcheckconsistencyoner
omconfig storage controller action=enablealarm controller=id where id is the controller ID as reported by the omreport storage controller command. Example Syntax For example, to enable the alarm on controller 1, you would enter: omconfig storage controller action=enablealarm controller=1 omconfig Disable Controller Alarm Does my controller support this feature? See "Supported Features." Use the following omconfig command syntax to disable the controller alarm.
Example Syntax For example, to quiet the alarm on controller 1, you would enter: omconfig storage controller action=quietalarm controller=1 omconfig Test Controller Alarm Does my controller support this feature? See "Supported Features." Use the following omconfig command syntax to test whether the controller alarm is functional. The alarm will sound for about two seconds. See "Test Alarm (Controller)" for more information.
the [force=yes] parameter. In this case, the syntax is as follows: omconfig storage controller action=resetconfig controller=id [force=yes] Example Syntax For example, to reset the configuration on controller 1, you would enter: omconfig storage controller action=resetconfig controller=1 omconfig Create Virtual Disk Does my controller support this feature? See "Supported Features.
l "raid= Parameter (Required)" l "size= Parameter (Required)" l "pdisk= (Required)" l "[stripesize=< 2kb| 4kb| 8kb| 16kb| 32kb| 64kb| 128kb>] Parameter (Optional)" l "[cachepolicy=] Parameter (Optional)" l "[readpolicy=] Parameter (Optional)" l "[writepolicy=] Parameter (Optional)" l "[name=] Parameter (Optional)" l "[spanlength=] Parameter (Required for
where: PDISKID= Use this parameter to specify the physical disks that will be included in the virtual disk. When reconfiguring a virtual disk, you must specify all physical disks to be included in the reconfigured virtual disk. The physical disk specification applies to physical disks that were in the original virtual disk and will continue to be in the reconfigured virtual disk and to any new physical disks being added to the reconfigured virtual disk.
No read ahead Read cache No read cache readpolicy=nra readpolicy=rc readpolicy=nrc [writepolicy=] Parameter (Optional) Different controllers support different write policies. See "Write Policy" for more information. The following table indicates how to specify the [writepolicy=] parameter for each of the write policies.
The virtual disk will be 500MB with a stripe size of 16KB. The name of the virtual disk will be vd1 and it will reside on connector 0 of controller 1. Because the virtual disk will be a RAID 5, it requires at least three physical disks. In this example, you specify four physical disks. These are physical disks 0 through 3. On a SAS controller, the physical disks reside in enclosure 2.
omconfig Set Background Initialization Rate Does my controller support this feature? See "Supported Features." Use the following omconfig command syntax to set the background initialization rate. See "Set Background Initialization Rate" for more information. Complete Syntax omconfig storage controller action=setbgirate controller=id rate=<0 to 100> where id is the controller ID as reported by the omreport storage controller command.
Complete Syntax omconfig storage controller action= setcheckconsistency controller=id rate=<0 to 100> where id is the controller ID as reported by the omreport storage controller command. Example Syntax For example, to set the check consistency rate on controller 1 to 50, you would enter: omconfig storage controller action= setcheckconsistency controller=1 rate=50 omconfig Export the Controller Log Does my controller support this feature? See "Supported Features.
Use the following omconfig command syntax to import all virtual disks that reside on physical disks newly attached to the controller. See "Foreign Configuration Operations" for more information. Complete Syntax omconfig storage controller action= importforeignconfig controller=id where id is the controller ID as reported by the omreport storage controller command.
omconfig storage controller action=clearforeignconfig controller=id where id is the controller ID as reported by the omreport storage controller command. Example Syntax For example, to clear foreign configurations on controller 1, you would enter: omconfig storage controller action=clearforeignconfig controller=1 omconfig Set Patrol Read Mode Does my controller support this feature? See "Supported Features." Use the following omconfig command syntax to set the patrol read mode for the controller.
Example Syntax For example, to start the patrol read task on controller 1, you would enter: omconfig storage controller action=startpatrolread controller=1 omconfig Stop Patrol Read Does my controller support this feature? See "Supported Features." Use the following omconfig command syntax to stop the patrol read task on the controller. See "Start and Stop Patrol Read" for more information.
omconfig Storage Virtual Disk Does my controller support this feature? See "Supported Features." Use the following omconfig storage command syntax to replace a physical disk that is part of a virtual disk with another physical disk. See "Revertible Hot Spare" for more information.
omconfig Virtual Disk Commands The following sections provide the omconfig command syntax required to execute virtual disk tasks. CAUTION: The omconfig storage vdisk action=deletevdisk controller=id vdisk=id command deletes a virtual disk. Deleting a virtual disk destroys all information including file systems and volumes residing on the virtual disk. Table 15-16.
For example, to blink the physical disks in virtual disk 4 on controller 1, you would enter: omconfig storage vdisk action=blink controller=1 vdisk=4 omconfig Unblink Virtual Disk Does my controller support this feature? See "Supported Features." Use the following omconfig command syntax to unblink the physical disks included in a virtual disk.
omconfig Fast Initialize Virtual Disk Does my controller support this feature? See "Supported Features." Use the following omconfig command syntax to fast initialize a virtual disk. See "Format and Initialize; Slow and Fast Initialize" for more information. Complete Syntax omconfig storage vdisk action=fastinit controller=id vdisk=id where id is the controller ID and virtual disk ID as reported by the omreport command.
Use the following omconfig command syntax to cancel the initialization of a virtual disk. Complete Syntax omconfig storage vdisk action=cancelinitialize controller=id vdisk=id where id is the controller ID and virtual disk ID as reported by the omreport command. To obtain these values, you would enter omreport storage controller to display the controller IDs and then enter omreport storage vdisk controller=ID to display the IDs for the virtual disks attached to the controller.
omconfig storage vdisk action=restoresegments controller=id vdisk=id where id is the controller ID and virtual disk ID as reported by the omreport command. To obtain these values, you would enter omreport storage controller to display the controller IDs and then enter omreport storage vdisk controller=ID to display the IDs for the virtual disks attached to the controller.
where id is the controller ID and virtual disk ID as reported by the omreport command. To obtain these values, you would enter omreport storage controller to display the controller IDs and then enter omreport storage vdisk controller=ID to display the IDs for the virtual disks attached to the controller.
To assign the dedicated hot spare described in this example, you would enter: omconfig storage vdisk action=assigndedicatedhotspare controller=1 vdisk=4 pdisk=0:2:3 assign=yes See "pdisk= Parameter on SAS Controllers" and "Multiple Targets" for more information on physical disk specification. See "SAS RAID Controllers" to identify which controllers use SAS technology. omconfig Unassign Dedicated Hot Spare Does my controller support this feature? See "Supported Features.
identify which controllers use SAS technology. omconfig Check Consistency Does my controller support this feature? See "Supported Features." Use the following omconfig command syntax to initiate a check consistency on a virtual disk. The check consistency task verifies the virtual disk's redundant data. Complete Syntax omconfig storage vdisk action=checkconsistency controller=id vdisk=id where id is the controller ID and virtual disk ID as reported by the omreport command.
Does my controller support this feature? See "Supported Features." Use the following omconfig command syntax to pause a check consistency while it is in progress. See "Pause Check Consistency" for more information. Complete Syntax omconfig storage vdisk action=pausecheckconsistency controller=id vdisk=id where id is the controller ID and virtual disk ID as reported by the omreport command.
CAUTION: Deleting a virtual disk destroys all information including file systems and volumes residing on the virtual disk. You may receive a warning message if you attempt to delete the system or boot partition. However, this warning message is not generated in all circumstances. You should be certain that you are not deleting the system or boot partition or other vital data when using this command.
You can reconfigure a virtual disk in order to change the virtual disk's RAID level or increase its size by adding physical disks. On some controllers, you can also remove physical disks. Before continuing with the virtual disk reconfiguration, you should be familiar with the information in "Starting and Target RAID Levels for Virtual Disk Reconfiguration" and "Choosing RAID Levels and Concatenation.
omconfig storage vdisk action=changepolicy controller=id vdisk=id [readpolicy= | writepolicy= | cachepolicy= diskcachepolicy=] where id is the controller ID and virtual disk ID as reported by the omreport command. To obtain these values, you would enter omreport storage controller to display the controller IDs and then enter omreport storage vdisk controller=ID to display the IDs for the virtual disks attached to the controller.
Table 15-17.
Example for SAS Controllers: To blink the physical disk described in this example, you would enter: omconfig storage pdisk action=blink controller=1 pdisk=0:2:2 See "pdisk= Parameter on SAS Controllers" and "Multiple Targets" for more information on physical disk specification. See "SAS RAID Controllers" to identify which controllers use SAS technology. omconfig Unblink Physical Disk Does my controller support this feature? See "Supported Features.
See "pdisk= Parameter on SAS Controllers" and "Multiple Targets" for more information on physical disk specification. See "SAS RAID Controllers" to identify which controllers use SAS technology. omconfig Prepare to Remove Physical Disk Does my controller support this feature? See "Supported Features." Use the following omconfig command syntax to prepare a physical disk for removal. See "Prepare to Remove" for more information.
Does my controller support this feature? See "Supported Features." Use the following omconfig command syntax to initialize a physical disk. Complete Syntax omconfig storage pdisk action=initialize controller= id pdisk= where id is the controller ID. The variable specifies the physical disk. See "pdisk= Parameter" for more information.
omconfig storage pdisk action=offline controller=id pdisk= where id is the controller ID. The variable specifies the physical disk. See "pdisk= Parameter" for more information. To obtain these values, you would enter omreport storage controller to display the controller IDs and then enter omreport storage pdisk controller=ID to display the IDs for the physical disks attached to the controller.
Example Syntax In this example, you want to bring physical disk 3 on connector 0 of controller 1 back online. On a SAS controller, the physical disk resides in enclosure 2. Example for SCSI, SATA, and ATA Controllers: To online the physical disk described in this example, you would enter: omconfig storage pdisk action=online controller=1 pdisk=0:3 See "pdisk= Parameter on SCSI, SATA, and ATA Controllers" and "Multiple Targets" for more information on physical disk specification.
Example for SCSI, SATA, and ATA Controllers: To assign the physical disk described in this example as a global hot spare, you would enter: omconfig storage pdisk action=assignglobalhotspare controller=1 pdisk=0:3 assign=yes See "pdisk= Parameter on SCSI, SATA, and ATA Controllers" and "Multiple Targets" for more information on physical disk specification. See "RAID Controller Technology: SCSI, SATA, ATA, and SAS" to identify which technology a controller uses.
See "pdisk= Parameter on SCSI, SATA, and ATA Controllers" and "Multiple Targets" for more information on physical disk specification. See "RAID Controller Technology: SCSI, SATA, ATA, and SAS" to identify which technology a controller uses.
To rebuild the physical disk described in this example, you would enter: omconfig storage pdisk action=rebuild controller=1 pdisk=0:2:3 See "pdisk= Parameter on SAS Controllers" and "Multiple Targets" for more information on physical disk specification. See "SAS RAID Controllers" to identify which controllers use SAS technology. omconfig Cancel Rebuild Physical Disk Does my controller support this feature? See "Supported Features.
omconfig Remove Dead Segments Does my controller support this feature? See "Supported Features." Use the following omconfig command syntax to recover unusable disk space. See "Remove Dead Segments" for more information. Complete Syntax omconfig storage pdisk action=removedeadsegments controller=id pdisk= where id is the controller ID. The variable specifies the physical disk. See "pdisk= Parameter" for more information.
Complete Syntax omconfig storage pdisk action=clear controller=id pdisk= where id is the controller ID. The variable specifies the physical disk. See "pdisk= Parameter" for more information. To obtain these values, you would enter omreport storage controller to display the controller IDs and then enter omreport storage pdisk controller=ID to display the IDs for the physical disks attached to the controller.
omconfig Cancel Replace Member Does my controller support this feature? See "Supported Features." Use the following omconfig command syntax to cancel a replace member operation. Complete Syntax action=cancelreplacemember controller=id pdisk= where id is the physical disk IDs as reported by the omreport command.
Example Syntax For example, to recondition battery 0 on controller 1, you would enter: omconfig storage battery action=recondition controller=1 battery=0 omconfig Start Battery Learn Cycle Does my controller support this feature? See "Supported Features." Use the following omconfig command to start the battery learn cycle. Complete Syntax omconfig storage battery action=startlearn controller=id battery=id where id is the controller ID and battery ID as reported by the omreport command.
omconfig storage battery action=delaylearn controller=1 battery=0 days=3 hours=12 omconfig Connector Commands The following sections provide the omconfig command syntax required to execute connector tasks. Table 15-19.
action=setassetname controller=id enclosure= assetname= action=settempprobes controller=id enclosure= index=id minwarn=n maxwarn=n action=resettempprobes controller=id enclosure= index=id action=setalltempprobes controller=id enclosure= minwarn=n maxwarn=n action=resetalltempprobes controller=id enclosure= action=blink controller=id enclosure= "omconfig Set Enclosure Asset Name" "omconfig Set Temperature Probe Thresholds"
Use the following omconfig command syntax to disable the enclosure alarm. Complete Syntax omconfig storage enclosure action=disablealarm controller=id enclosure= where id is the controller ID. The variable specifies the enclosure. See "enclosure= Parameter" for more information.
omconfig storage enclosure action=setassettag controller=1 enclosure=2 assettag=encl20 See "enclosure= Parameter on SCSI, SATA, and ATA Controllers" for more information on enclosure specification. See "RAID Controller Technology: SCSI, SATA, ATA, and SAS" to identify which technology a controller uses.
See "enclosure= Parameter on SAS Controllers" for more information on enclosure specification. See "RAID Controller Technology: SCSI, SATA, ATA, and SAS" to identify which technology a controller uses. omconfig Set Temperature Probe Thresholds Does my enclosure support this feature? See "Supported Features." Use the following omconfig command syntax to set the minimum and maximum warning temperature thresholds for a specified temperature probe.
In this example, you want to reset the thresholds for temperature probe 3 to the default values. Temperature probe 3 resides in the enclosure attached to connector 2 on controller 1. To reset the thresholds for temperature probe 3 to the default values, you would enter: omconfig storage enclosure action=resettempprobes controller=1 enclosure=2 index=3 See "enclosure= Parameter on SCSI, SATA, and ATA Controllers" for more information on enclosure specification.
For example, you may want to reset the thresholds for all temperature probes in enclosure 2 on controller 1. Example for SAS Controllers: In this example, the temperature probes reside in enclosure 3 attached to connector 0 on controller 1. To reset the thresholds for all temperature probes, you would enter: omconfig storage enclosure action=resetalltempprobes controller=1 enclosure=0:3 See "enclosure= Parameter on SAS Controllers" for more information on enclosure specification.
Back to Contents Page
Back to Contents Page Controllers Dell™ OpenManage™ Server Administrator Storage Management User's Guide What is a Controller? RAID Controller Technology: SCSI, SATA, ATA, and SAS RAID Controller Features Controller-supported RAID Levels Controller-supported Stripe Sizes RAID Controller Read, Write, Cache, and Disk Cache Policy Cluster-enabled RAID Controllers Creating and Deleting Virtual Disks on Cluster-enabled Controllers Integrated Mirroring and the PERC 4/IM Controller Background Initialization on PE
CERC SATA RAID Controllers The following Cost Effective RAID Controller (CERC) controllers use Serial Advanced Technology Attachment (SATA) technology. l CERC SATA1.5/6ch l CERC SATA1.5/2s CERC ATA RAID Controllers The following Cost Effective RAID Controller (CERC) controllers use Advanced Technology Attachment (ATA) technology. l CERC ATA100/4ch l CERC 6/I controller family SAS RAID Controllers The following RAID controllers use Serial Attached SCSI (SAS) technology.
information. l Disk migration or foreign configurations. Some controllers enable you to move physical disks that contain one or more virtual disks to another controller. The receiving controller is able to recognize and import the foreign configuration (virtual disks). See "Foreign Configuration Operations" for more information. Controller-supported RAID Levels RAID controllers may support different RAID levels.
NOTE: Storage Management does not allow you to select the Write-Back policy for controllers that do not have a battery. This restriction protects a controller without a battery from the data loss that may occur in the event of a power failure. On some controllers, the Write-Back policy may be available in the controller BIOS even though it is not available in Storage Management. l Force Write Back.
This section applies to 3/DC, 4/DC, and 4e/DC controllers Storage Management supports PERC 3/DC, 4/DC, and 4e/DC controllers that have Microsoft Cluster Server (MSCS) enabled. A cluster refers to two or more servers that are connected so that their resources can be shared and accessed as if the clustered servers were a single machine.
Integrated Mirroring and the PERC 4/IM Controller The PERC 4/IM controller enables you to mirror a physical disk that resides internally in the server. This feature can be used to mirror the system's boot drive from one physical disk to another, ensuring that the system remains running in the event that one of the physical disks fails.
Firmware/Driver Versions Use this window to view information about the controller firmware and drivers. For more information on firmware and drivers, see "Installation Considerations for Storage Management." Firmware/Driver Properties The firmware and driver properties can vary depending on the model of the controller. On some controllers, Storage Management may not be able to obtain the driver or firmware version. In this case, Storage Management displays Not Applicable.
Controller Information For information on the controller, see the following topics: l "Controllers" l "Controller Properties and Tasks" Controller Components For information on attached components, see the following topics: l "RAID Controller Batteries" l "Firmware/Driver Versions" l "Connectors" NOTE: If you have connected the enclosure in Redundant path mode, the connectors are represented as Logical Connector.
firmware requirements. Driver Version This property displays the version of the driver that is currently installed on the controller. The 2.8.0.6085 driver install package for the PERC 3/Si, and 3/Di controllers contains the 6076 driver. For this driver, Storage Management displays 2.8.0.6076 whereas Microsoft® Windows® Device Manager displays 2.8.0.6085. NOTE: On some controllers, Storage Management may not be able to obtain the driver version. In this case, Storage Management displays Not Applicable.
Controller Tasks Do the following to execute a controller task: 1. Expand the Storage tree object to display the controller objects. 2. Select a controller object. 3. Select the Information/Configuration subtab. 4. Select a task from the Available Tasks drop-down menu. 5. Click Execute. NOTE: Different controllers support different features. For this reason, the tasks displayed on the Tasks drop-down menu can vary depending on which controller is selected in the tree view.
5. Click Execute. You can also locate this task from the Change Controller Properties drop down menu. For more information, see "Change Controller Properties." Create Virtual Disk Does my controller support this feature? See "Supported Features" Use the Create Virtual Disk task to launch the Create Virtual Disk Express Wizard. See "Create Virtual Disk Express Wizard (Step 1 of 2)" for more information.
Export Log File Does my controller support this feature? See "Supported Features." Use this task to export the controller log to a text file. See "Export Log" for more information.
2. Click Apply Changes. If you want to exit and cancel your changes, click Go Back to Previous Page. To locate this task in Storage Management: 1. Expand the Storage tree object to display the controller objects. 2. Select a controller object. 3. Select the Information/Configuration subtab. 4. Select Set Rebuild Rate from the Available Tasks drop-down menu. 5. Click Execute. You can also locate this task from the Change Controller Properties drop down menu.
On a Microsoft® Windows® system, the log file is exported to the windows or winnt directory. On a Linux system, the log file is exported to the /var/log directory. Depending on the controller, the log file name will be either afa_.log or lsi_.log where is the month and date. For example, a log file exported on September 21 will be named either afa_0921.log or lsi_0921.log. Exporting the controller log file clears the log file information from the controller log.
Normal/OK Warning/Non-critical Critical/Fatal See "Storage Component Severity" for more information. Name State This property displays the name of the foreign configuration and is available as a link. The link enables you to access the physical disks that constitute the foreign disk. This property displays the current state of the foreign configuration. Ready — The foreign disk can be imported and will function normally after import.
To be imported, the foreign configuration must contain a virtual disk that is in either Ready or Degraded state. In other words, all of the virtual disk data must be present, but if the virtual disk is using a redundant RAID level, the additional redundant data does not need to be present. For example, if the foreign configuration contains only one side of a mirror in a RAID 1 virtual disk, then the virtual disk is in Degraded state and can be imported.
2. Select a controller object. 3. Select the Information/Configuration subtab. 4. Select Import/Recover Foreign Configuration from the Controller tasks. Related Information: l "Foreign Configuration Operations" l "Importing Foreign Configurations" l "Clear Foreign Configuration" Clear Foreign Configuration Does my controller support this feature? See "Supported Features.
Physical Disks in Foreign Virtual Disks The Physical Disks in Foreign Virtual Disks page displays the physical disks and the dedicated hot spare, if any, included in the foreign configuration. The following table describes properties for physical disks in the foreign configuration. Property Status Definition These icons represent the severity or health of the storage component. Normal/OK Warning/Non-critical Critical/Fatal See "Storage Component Severity" for more information.
Hot Spare This property indicates whether the disk has been assigned as a hot spare. This property is not applicable for physical disks attached to non-RAID controllers. Vendor ID This property displays the disk's hardware vendor. Product ID This property displays the disk's product ID. Revision This property displays the disk's revision number. Serial No. This property displays the disk's serial number.
You can also locate this task from the Change Controller Properties drop down menu. For more information, see "Change Controller Properties." Set Check Consistency Rate Does my controller support this feature? See "Supported Features." The Set Check Consistency Rate task changes the amount of system resources dedicated to the check consistency task. See "Check Consistency" for more information about the check consistency task.
performance. To change the controller's reconstruct rate: 1. Type a numerical value in the New Reconstruct Rate text box. The value must be within the 0 – 100 range. 2. Click Apply Changes. If you want to exit and cancel your changes, click Go Back to Previous Page. To locate this task in Storage Management: 1. Expand the Storage tree object to display the controller objects. 2. Select a controller object. 3. Select the Information/Configuration subtab. 4.
If the communication channel between the connector and the first enclosure is lost, the redundant path configuration itself is lost. In this case, the health of the logical connector is displayed as critical. Navigate to the Information/Configuration subtab of the logical connector to view details of the "Path Health." See the table below for a brief outline of this scenario.
Set Patrol Read Mode Does my controller support this feature? See "Supported Features." Patrol Read is a feature for identifying disk errors in order to avoid disk failures and data loss or corruption. The Patrol Read only runs on disks that are being used in a virtual disk or that are hot spares. When possible, the Patrol Read corrects disk errors and restores the integrity of the data. The Patrol Read task runs in the background.
Related Information: l "Start and Stop Patrol Read" Start and Stop Patrol Read Does my controller support this feature? See "Supported Features." When the Patrol Read mode is set to manual, you can start the Patrol Read task or stop the task when it is running. There are certain conditions under which the Patrol Read task cannot be run. See "Set Patrol Read Mode" for more information. To start or stop the Patrol Read task: Click Start Patrol Read or Stop Patrol Read when ready.
l Loadbalance l Auto replace member on predictive failure l Re dundant path view NOTE: You can set these properties through the command line interface also. See "omconfig Controller Commands" for more information. To locate this task in Storage Management, do one of the following: 1. Select Storage in the Storage tree. 2. On the Storage Dashboard page, select Change Controller Properties... from the Available Tasks drop down menu. 3. Click Execute. Or: 1.
You can discard the preserved cache only if all of the following conditions are met: l The controller does not have any foreign configuration. Select Click for Preview to view details of the foreign configuration. See "Foreign Configuration Operations." l The controller does not have any offline or missing virtual disks. If there are offline or missing virtual disks, ensure you have a backup of these virtual disks. l Cables to any virtual disk are not disconnected.
Back to Contents Page Enclosures and Backplanes Dell™ OpenManage™ Server Administrator Storage Management User's Guide Backplanes Enclosure and Backplane Properties and Tasks Enclosures Set Asset Data Thermal Shutdown for Enclosures Set Temperature Probe Values Changing the Mode on PowerVault 220S and PowerVault 221S Enclosures EMM Properties Enclosure Management Power Supply Properties Enclosure and Backplane Health Temperature Probe Properties and Tasks Fan Properties Physical disks can be c
Enclosure Physical Disks The enclosure's physical disks are displayed under the enclosure object in the tree view. Selecting a disk in the tree view displays the disk's status information. Enclosure Fans The fans are a component of the enclosure's cooling module. The fans are displayed by expanding the enclosure object in the tree view. You can select the Fans object to display their status information.
Thermal Shutdown for Enclosures Does my enclosure support this feature? See "Supported Features." Enclosure management provides a feature which automatically shuts down the operating system, the server, and the enclosure when the enclosure's temperature reaches dangerous extremes. The temperature when shutdown occurs is determined by the enclosure temperature probe's Minimum Failure Threshold and the Maximum Failure Threshold. These thresholds are default settings that cannot be changed.
Enclosure and Backplane Health This screen displays the status of the enclosure or backplane and the components attached to the enclosure or backplane. Enclosure and Backplane Status Component status is indicated by the severity. A component with a Warning or Critical/Failure status requires immediate attention to avoid data loss if possible. A component's status may indicate the combined status of the component and its lower-level objects.
These icons represent the severity or health of the storage component. See "Storage Component Severity" for more information. NOTE: If the enclosure is connected to the controller in redundant path mode (see "Redundant Path Configuration" for more information), the loss of connection to any one EMM may cause the enclosure status to be displayed as degraded. Name This property displays the name of the enclosure or backplane. State This property displays the current status of the enclosure or backplane.
Drop-down Menu Enclosure Tasks: l "Enable Alarm (Enclosure)" l "Disable Alarm (Enclosure)" l "Set Asset Data" l "Blink" l "Set Temperature Probe Values" Enable Alarm (Enclosure) Does my enclosure support this feature? See "Supported Features." Use the Enable Alarm task to enable the enclosure alarm. When enabled, the audible alarm sounds whenever the fault LED lights. This may occur to signal events such as: l The enclosure temperature has exceeded the warning threshold.
Identifying an Open Connector for the Enclosure Does my controller support this feature? See "Supported Features." If you have not yet attached the enclosure to an open connector, you may need to identify a connector on the controller that can be used for this purpose. To identify an open connector: 1. Expand the Storage Management tree view until the controller object is expanded. When the controller object is expanded, the tree view displays the controller's connectors.
l "Fan Properties" l "Power Supply Properties" l "Temperature Probe Properties and Tasks" Set Asset Data Does my enclosure support this feature? See "Supported Features." You can change the enclosure's asset tag and asset name. The new asset tag and asset name that you specify are displayed on the enclosure's Information/Configuration subtab. To change the enclosure's asset tag and asset name: 1. Type the new asset tag name in the New asset tag text box.
If you want to return the temperature probe's Warning threshold to the default values, select the Reset to default values button and click Apply Changes. The default values are displayed in the Minimum Warning Threshold and Maximum Warning Threshold text boxes. NOTE: On some enclosures, Storage Management may experience a short delay before displaying the current enclosure temperature and temperature probe status.
Use this window to view information about the enclosure's fans. The fans are a component of the enclosure's cooling module. The following table describes the fan properties. Property Status Definition These icons represent the severity or health of the storage component. Normal/OK Warning/Non-critical Critical/Fatal See "Storage Component Severity" for more information. Name This property displays the name of the fan. State This property displays the current status of the fan.
Part Number This property displays the part number of the power supply. This property is not displayed for the PowerVault™ 22xS enclosures that have E.17 firmware or later. Temperature Probe Properties and Tasks Does my enclosure support this feature? See "Supported Features." Use this window to view information about the enclosure's temperature probes. Temperature Probe Properties and Tasks Property Status Definition These icons represent the severity or health of the storage component.
5. Select the Temperatures object. 6. Click Set Temperature Probe.
Back to Contents Page Alert Messages Dell™ OpenManage™ Server Administrator Storage Management User's Guide Alert Monitoring and Logging Viewing Alerts Alert Severity Levels Alert Message Format with Substitution Variables Configuring an Automated Response to Alerts Alert Message Change History SNMP Support for Storage Management Alerts Alert Descriptions and Corrective Actions Storage Management's alert or event management features let you monitor the health of storage resources such as controllers, encl
Each alert message in the Storage Management alert log has a severity level. The severity level is displayed in the Severity field of the alert message. The severity level indicates the nature of the alert. The alert severity levels are as follows: Alert Severity Component Status OK/Normal/Informational. No action is required. The alert is provided for informational purposes and does not indicate an error condition. For example, the alert may indicate the normal start or stop of an operation.
Example: 2049 Physical disk removed: Physical Disk 0:14 Controller 1, Connector 0 SAS Physical Disk Message Format: Physical Disk X:Y:Z Controller A, Connector B Example: 2049 Physical disk removed: Physical Disk 0:0:14 Controller 1, Connector 0 Virtual Disk Message Format: Virtual Disk X (Name) Controller A (Name) Message Format: Virtual Disk X Controller A Example: 2057 Virtual disk degraded: Virtual Disk 11 (Virtual Disk 11) Controller 1 (PERC 5/E Adapter) NOTE: The virtual disk and controller names a
The following table describes changes made to the Storage Management alerts from the previous release of Storage Management to the current release. Table 14-3. Alert Message Change History Alert Message Change History Storage Management 2.3 Product Versions to which Changes Apply Storage Management 2.3 Comments NA Server Administrator 3.2 Dell OpenManage™ 5.3 New Alerts 2369 Modified Alerts 2095 Obsolete Alerts Documentation Changes NA Added SNMP traps 751 and 851.
Administrator Alert Log and documented in the Storage Management online help. Severity for alert 2318 changed from Critical/Failure/Error to Warning/Non-critical. Removed alert 2344. Replaced by alert 2070. Documentation change only made in the Dell OpenManage Server Administrator Messages Reference Guide to reflect existing Storage Management online help. Removed alert 2345. Replaced by alert 2079.
Refer to your operating system documentation for information on configuring the operating system to forward SNMP traps. This information may be located under such topics as "setting up SNMP" or "SNMP traps." When configuring SNMP, be sure that the SNMP traps are forwarded to the correct server. For information on configuring an application to receive SNMP traps, refer to the documentation for that application.
SNMP Trap Number: 754, 804, 854, 904, 954, 1004, 1054, 1104, 1154, 1204. See "SNMP Support for Storage Management Alerts" for more information. NOTE: In certain circumstances, this alert is not generated when a physical disk fails. See "Physical Disk State, Alert Messages and Hot Spares on PERC 3/SC, 3/DC, 3/QC, 4/SC, 4/DC, 4e/DC, 4/Di, 4e/Si, 4e/Di, and CERC ATA100/4ch Controllers" for more information. 2049 Description: Physical disk removed Cause: A physical disk has been removed from the disk group.
2051 Description: Physical disk degraded Cause: A physical disk has reported an error condition and may be degraded. The physical disk may have reported the error condition in response to a check consistency or other operation. Action: Replace the degraded physical disk. You can identify which disk is degraded by locating the disk that has a red X for its status. Perform a rescan after replacing the disk. Severity: Warning/Noncritical. See "Alert Severity Levels" for more information.
Cause: This alert is provided for informational purposes. Action: None. Severity: OK/Normal/Informational. See "Alert Severity Levels" for more information. Clear Alert Number: None. Related Alert Number: None. Local Response Agent (LRA) Alert Number: None. SNMP Trap Number: 1201. See "SNMP Support for Storage Management Alerts" for more information. 2054 Description: Virtual disk deleted Cause: A virtual disk has been deleted.
Clear Alert Number: None. Related Alert Number: None. Local Response Agent (LRA) Alert Number: None. SNMP Trap Number: 1201. See "SNMP Support for Storage Management Alerts" for more information. 2056 Description: Virtual disk failed Cause: One or more physical disks included in the virtual disk have failed. If the virtual disk is nonredundant (does not use mirrored or parity data), then the failure of a single physical disk can cause the virtual disk to fail.
Clear Alert Number: None. The clear alert is generated when the conditions producing the current alert have returned to normal. Related Alert Number: 2048, 2049, 2050, 2076, 2079, 2081, 2123, 2129, 2346 Local Response Agent (LRA) Alert Number: 2080 SNMP Trap Number: 1203. See "SNMP Support for Storage Management Alerts" for more information. 2058 Description: Virtual disk Check Consistency started Cause: This alert is provided for informational purposes. Action: None.
SNMP Trap Number: 1201. See "SNMP Support for Storage Management Alerts" for more information. 2060 Description: Copy of data started on physical disk %2 from physical disk %1 Cause: This alert is provided for informational purposes. Action: None. Severity: OK/Normal/Informational. See "Alert Severity Levels" for more information. Clear Alert Number: None. Related Alert Number: 2075. Local Response Agent (LRA) Alert Number: None. SNMP Trap Number: 901.
Cause: This alert is provided for informational purposes. Action: None. Severity: OK/Normal/Informational. See "Alert Severity Levels" for more information. Clear Alert Number: 2089. The clear alert is generated when the conditions producing the current alert have returned to normal. Related Alert Number: None. Local Response Agent (LRA) Alert Number: None. SNMP Trap Number: 901. See "SNMP Support for Storage Management Alerts" for more information.
Clear Alert Number: 2091. The clear alert is generated when the conditions producing the current alert have returned to normal. Related Alert Number: None. Local Response Agent (LRA) Alert Number: None. SNMP Trap Number: 1201. See "SNMP Support for Storage Management Alerts" for more information. 2065 Description: Physical disk rebuild started Cause: This alert is provided for informational purposes. Action: None. Severity: OK/Normal/Informational. See "Alert Severity Levels" for more information.
Local Response Agent (LRA) Alert Number: None. SNMP Trap Number: 1201. See "SNMP Support for Storage Management Alerts" for more information. 2070 Description: Virtual disk initialization cancelled Cause: The virtual disk initialization cancelled because a physical disk included in the virtual disk has failed or because a user cancelled the virtual disk initialization. Action: If a physical disk failed, then replace the physical disk.
Description: Copy of data completed on physical disk %2 from physical disk %1 Cause: This alert is provided for informational purposes. Action: None. Severity: OK/Normal/Informational. See "Alert Severity Levels" for more information. Clear Alert Number: None. Related Alert Number: 2060. Local Response Agent (LRA) Alert Number: None. SNMP Trap Number: 901. See "SNMP Support for Storage Management Alerts" for more information.
Action: Replace the failed physical disk. You can identify which physical disk has failed by locating the disk that has a red X for its status. Rebuild the physical disk. When finished, restart the virtual disk format operation. Severity: Critical/Failure/Error. See "Alert Severity Levels" for more information. Clear Alert Number: None. Related Alert Number: None. Local Response Agent (LRA) Alert Number: 2081 SNMP Trap Number: 1204. See "SNMP Support for Storage Management Alerts" for more information.
Related Alert Number: None. Local Response Agent (LRA) Alert Number: 2071 SNMP Trap Number: 904. See "SNMP Support for Storage Management Alerts" for more information. 2081 Description: Virtual disk reconfiguration failed Cause: A physical disk included in the virtual disk has failed or is corrupt. A user may also have cancelled the reconfiguration. Action: Replace the failed or corrupt disk. You can identify a disk that has failed by locating the disk that has a red X for its status.
SNMP Trap Number: 1204. See "SNMP Support for Storage Management Alerts" for more information. 2083 Description: Physical disk rebuild failed Cause: A physical disk included in the virtual disk has failed or is corrupt. A user may also have cancelled the rebuild. Action: Replace the failed or corrupt disk. You can identify a disk that has failed by locating the disk that has a red X for its status. Rebuild the virtual disk rebuild. Severity: Critical/Failure/Error.
Cause: This alert is provided for informational purposes. Action: None. Severity: OK/Normal/Informational. See "Alert Severity Levels" for more information. Clear Alert Status: Alert 2086 is a clear alert for alert 2059. Related Alert Number: None. Local Response Agent (LRA) Alert Number: None. SNMP Trap Number: 1201. See "SNMP Support for Storage Management Alerts" for more information.
Clear Alert Status: Alert 2088 is a clear alert for alerts 2061 and 2136. Related Alert Number: None. Local Response Agent (LRA) Alert Number: None. SNMP Trap Number: 1201. See "SNMP Support for Storage Management Alerts" for more information. 2089 Description: Physical disk initialize completed Cause: This alert is provided for informational purposes. Action: None. Severity: OK/Normal/Informational. See "Alert Severity Levels" for more information.
SNMP Trap Number: 1201. See "SNMP Support for Storage Management Alerts" for more information. 2091 Description: Virtual disk rebuild completed Cause: This alert is provided for informational purposes. Action: None. Severity: OK/Normal/Informational. See "Alert Severity Levels" for more information. Clear Alert Status: Alert 2091 is a clear alert for alert 2064. Related Alert Number: None. Local Response Agent (LRA) Alert Number: None. SNMP Trap Number: 1201.
Cause: The physical disk is predicted to fail. Many physical disks contain Self Monitoring Analysis and Reporting Technology (SMART). When enabled, SMART monitors the health of the disk based on indications such as the number of write operations that have been performed on the disk. Action: Replace the physical disk. Even though the disk may not have failed yet, it is strongly recommended that you replace the disk.
Description: Global hot spare assigned Cause: A user has assigned a physical disk as a global hot spare. This alert is provided for informational purposes. Action: None. Severity: OK/Normal/Informational. See "Alert Severity Levels" for more information. Clear Alert Number: None. Related Alert Number: 2277 Local Response Agent (LRA) Alert Number: None. SNMP Trap Number: 901. See "SNMP Support for Storage Management Alerts" for more information.
Cause: The physical disk enclosure is too hot. A variety of factors can cause the excessive temperature. For example, a fan may have failed, the thermostat may be set too high, or the room temperature may be too hot. Action: Check for factors that may cause overheating. For example, verify that the enclosure fan is working. You should also check the thermostat settings and examine whether the enclosure is located near a heat source.
Severity: Critical/Failure/Error. See "Alert Severity Levels" for more information. Clear Alert Number: None. Related Alert Number: None. Local Response Agent (LRA) Alert Number: 2091 SNMP Trap Number: 1054. See "SNMP Support for Storage Management Alerts" for more information. 2103 Description: Temperature dropped below the minimum failure threshold. Cause: The physical disk enclosure is too cool. Action: Check whether the thermostat setting is too low and whether the room temperature is too cool.
Local Response Agent (LRA) Alert Number: None. SNMP Trap Number: 1151. See "SNMP Support for Storage Management Alerts" for more information. 2105 Description: Controller battery recondition is completed. Cause: This alert is provided for informational purposes. Action: None. Severity: OK/Normal/Informational. See "Alert Severity Levels" for more information. Clear Alert Status: Alert 2105 is a clear alert for alert 2104. Related Alert Number: None. Local Response Agent (LRA) Alert Number: None.
2107 Description: SMART configuration change. Cause: A disk has received a SMART alert (predictive failure) after a configuration change. The disk is likely to fail in the near future. Action: Replace the disk that has received the SMART alert. If the physical disk is a member of a nonredundant virtual disk, then back up the data before replacing the disk. CAUTION: Removing a physical disk that is included in a nonredundant virtual disk will cause the virtual disk to fail and may cause data loss.
Description: SMART warning temperature. Cause: A disk has reached an unacceptable temperature and received a SMART alert (predictive failure). The disk is likely to fail in the near future. Action 1: Determine why the physical disk has reached an unacceptable temperature. A variety of factors can cause the excessive temperature. For example, a fan may have failed, the thermostat may be set too high, or the room temperature may be too hot or cold.
Description: Failure prediction threshold exceeded due to test – No action needed. Cause: A disk has received a SMART alert (predictive failure) due to test conditions. Action: None. Severity: Warning/Noncritical. See "Alert Severity Levels" for more information. Clear Alert Number: None. Related Alert Number: None. Local Response Agent (LRA) Alert Number: 2070 SNMP Trap Number: 903. See "SNMP Support for Storage Management Alerts" for more information. 2112 Description: Enclosure was shut down.
Action: To resume the check consistency operation, right-click the virtual disk in the tree view and select Resume Check Consistency. Severity: OK/Normal/Informational. See "Alert Severity Levels" for more information. Clear Alert Number: 2115. The clear alert is generated when the conditions producing the current alert have returned to normal. Related Alert Number: None. Local Response Agent (LRA) Alert Number: None. SNMP Trap Number: 1201.
Related Alert Number: None. Local Response Agent (LRA) Alert Number: None. SNMP Trap Number: 1201. See "SNMP Support for Storage Management Alerts" for more information. 2117 Description: A mirrored virtual disk has been unmirrored. Cause: This alert is provided for informational purposes. A user has caused a mirrored virtual disk to be unmirrored. When a virtual disk is mirrored, its data is copied to another virtual disk in order to maintain redundancy.
SNMP Trap Number: 1201. See "SNMP Support for Storage Management Alerts" for more information. 2120 Description: Enclosure firmware mismatch Cause: The firmware on the enclosure management modules (EMMs) is not the same version. It is required that both modules have the same version of the firmware. This alert may be caused when a user attempts to insert an EMM module that has a different firmware version than an existing module. Action: Download the same version of the firmware to both EMM modules.
Cause: One or more of the enclosure components has failed. For example, a fan or power supply may have failed. Although the enclosure is currently operational, the failure of additional components could cause the enclosure to fail. Action: Identify and replace the failed component. To identify the failed component, select the enclosure in the tree view and click the Health subtab. Any failed component will be identified with a red X on the enclosure's Health subtab.
Cause: This alert is provided for informational purposes. Data redundancy has been restored to a virtual disk or an enclosure that previously suffered a loss of redundancy. Action: None. Severity: OK/Normal/Informational . See "Alert Severity Levels" for more information. Clear Alert Number: Alert 2124 is a clear alert for alerts 2122 and 2123. Related Alert Number: None. Local Response Agent (LRA) Alert Number: None. SNMP Trap Number: 1304.
If the disk is part of a redundant virtual disk, then any data residing on the corrupt portion of the disk will be reallocated elsewhere in the virtual disk. Severity: OK/Normal/Informational. See "Alert Severity Levels" for more information. Clear Alert Number: None. Related Alert Number: None. Local Response Agent (LRA) Alert Number: None. SNMP Trap Number: 903. See "SNMP Support for Storage Management Alerts" for more information.
Related Alert Number: None. Local Response Agent (LRA) Alert Number: None. SNMP Trap Number: 1201. See "SNMP Support for Storage Management Alerts" for more information. 2129 Description: Background initialization failed Cause: Background initialization of a virtual disk has failed. Action: None. Severity: Critical/Failure/Error. See "Alert Severity Levels" for more information. Clear Alert Number: None.
2131 Description: Firmware version mismatch Cause: The firmware on the controller is not a supported version. Action: Install a supported version of the firmware. If you do not have a supported version of the firmware available, it can be downloaded from the Dell Support website at support.dell.com. Severity: Warning/Noncritical. See "Alert Severity Levels" for more information. Clear Alert Number: None. Related Alert Number: None. Local Response Agent (LRA) Alert Number: 2060 SNMP Trap Number: 753.
Cause: Storage Management has been installed on a system that has an Array Manager installation. Action: Installing Storage Management and Array Manager on the same system is not a supported configuration. Uninstall either Storage Management or Array Manager. Severity: Warning/Noncritical. See "Alert Severity Levels" for more information. Clear Alert Number: None. Related Alert Number: None. Local Response Agent (LRA) Alert Number: 2050 SNMP Trap Number: 103.
Action: Check for problems with the cables. See "Cables Attached Correctly" for more information on checking the cables. You should also check to see if the enclosure has degraded or failed components. To do so, select the enclosure object in the tree view and click the Health subtab. The Health subtab displays the status of the enclosure components.
Clear Alert Number: None. Related Alert Number: None. Local Response Agent (LRA) Alert Number: None. SNMP Trap Number: 851. See "SNMP Support for Storage Management Alerts" for more information. 2140 Description: Dead disk segments restored Cause: Disk space that was formerly "dead" or inaccessible to a redundant virtual disk has been restored. This alert is provided for informational purposes. Action: None. Severity: OK/Normal/Informational. See "Alert Severity Levels" for more information.
SNMP Trap Number: 901. See "SNMP Support for Storage Management Alerts" for more information. 2142 Description: Controller rebuild rate has changed Cause: A user has changed the controller rebuild rate. This alert is provided for informational purposes. Action: None. Severity: OK/Normal/Informational. See "Alert Severity Levels" for more information. Clear Alert Number: None. Related Alert Number: None. Local Response Agent (LRA) Alert Number: None. SNMP Trap Number: 751.
Cause: A user has disabled the controller alarm. This alert is provided for informational purposes. Action: None. Severity: OK/Normal/Informational. See "Alert Severity Levels" for more information. Clear Alert Number: None. Related Alert Number: None. Local Response Agent (LRA) Alert Number: None. SNMP Trap Number: 751. See "SNMP Support for Storage Management Alerts" for more information. 2145 Description: Controller battery low. Cause: The controller battery charge is low.
Severity: Warning/Noncritical. See "Alert Severity Levels" for more information. Clear Alert Number: None. Related Alert Number: None. Local Response Agent (LRA) Alert Number: 2060 SNMP Trap Number: 753. See "SNMP Support for Storage Management Alerts" for more information. 2147 Description: Bad block sense error Cause: A portion of a physical disk is damaged. See "Receive a "Bad Block" Alert with "Replacement," "Sense," or "Medium" Error" for more information.
Local Response Agent (LRA) Alert Number: 2060 SNMP Trap Number: 753. See "SNMP Support for Storage Management Alerts" for more information. 2149 Description: Bad block extended sense error Cause: A portion of a physical disk is damaged. See "Receive a "Bad Block" Alert with "Replacement," "Sense," or "Medium" Error" for more information. Action: See "Receive a "Bad Block" Alert with "Replacement," "Sense," or "Medium" Error" for more information. Severity: Warning/Noncritical.
Description: Enclosure asset tag changed. Cause: A user has changed the enclosure asset tag. This alert is provided for informational purposes. Action: None. Severity: OK/Normal/Informational. See "Alert Severity Levels" for more information. Clear Alert Number: None. Related Alert Number: None. Local Response Agent (LRA) Alert Number: None. SNMP Trap Number: 851. See "SNMP Support for Storage Management Alerts" for more information. 2152 Description: Enclosure asset name changed.
Severity: OK/Normal/Informational. See "Alert Severity Levels" for more information. Clear Alert Number: None. Related Alert Number: None. Local Response Agent (LRA) Alert Number: None. SNMP Trap Number: 851. See "SNMP Support for Storage Management Alerts" for more information. 2154 Description: The temperature probe maximum warning value changed Cause: A user has changed the value for the maximum temperature probe warning threshold. This alert is provided for informational purposes. Action: None.
Local Response Agent (LRA) Alert Number: None. SNMP Trap Number: 1051. See "SNMP Support for Storage Management Alerts" for more information. 2156 Description: Controller alarm has been tested Cause: The controller alarm test has run successfully. This alert is provided for informational purposes. Action: None. Severity: OK/Normal/Informational. See "Alert Severity Levels" for more information. Clear Alert Number: None. Related Alert Number: None. Local Response Agent (LRA) Alert Number: None.
Description: Physical disk online. Cause: An offline physical disk has been made online. This alert is provided for informational purposes. Action: None. Severity: OK/Normal/Informational. See "Alert Severity Levels" for more information. Clear Alert Status: Alert 2158 is a clear alert for alert 2050. Related Alert Number: 2048, 2050, 2065, 2099, 2121, 2196, 2201, 2203 Local Response Agent (LRA) Alert Number: None. SNMP Trap Number: 901.
Action: None. Severity: OK/Normal/Informational. See "Alert Severity Levels" for more information. Clear Alert Status: Alert 2162 is a clear alert for alerts 2137 and 2292. Related Alert Number: None. Local Response Agent (LRA) Alert Number: None. SNMP Trap Number: 851. See "SNMP Support for Storage Management Alerts" for more information. 2163 Description: Rebuild completed with errors Cause: See "A Rebuild Completes with Errors" for more information.
Clear Alert Number: None. Related Alert Number: None. Local Response Agent (LRA) Alert Number: None. SNMP Trap Number: 101. See "SNMP Support for Storage Management Alerts" for more information. 2165 Description: The RAID controller firmware and driver validation was not performed. The configuration file cannot be opened. Cause: Storage Management is unable to determine whether the system has the minimum required versions of the RAID controller firmware and drivers.
SNMP Trap Number: 753. See "SNMP Support for Storage Management Alerts" for more information. 2167 Description: The current kernel version and the non-RAID SCSI driver version are older than the minimum required levels. See readme.txt for a list of validated kernel and driver versions. Cause: The version of the kernel and the driver do not meet the minimum requirements.
Description: The controller battery needs to be replaced. Cause: The controller battery cannot recharge. The battery may have been already recharged the maximum number of times. In addition, the battery charger may not be working. Action: Replace the battery pack. Severity: Critical/Failure/Error. See "Alert Severity Levels" for more information. Clear Alert Number: None. Related Alert Number: 2118 Local Response Agent (LRA) Alert Number: 2101 SNMP Trap Number: 1154.
Action: Verify that the room temperature is normal. See the hardware documentation for acceptable operating temperatures. Verify that system components such as the fan are functioning properly. Severity: Warning/Noncritical. See "Alert Severity Levels" for more information. Clear Alert Number: 2172. The clear alert is generated when the conditions producing the current alert have returned to normal. Related Alert Number: None. Local Response Agent (LRA) Alert Number: 2100 SNMP Trap Number: 1153.
Clear Alert Number: None. Related Alert Number: None. Local Response Agent (LRA) Alert Number: 2090 SNMP Trap Number: 853 2174 Description: The controller battery has been removed. Cause: The controller cannot communicate with the battery. The battery may be removed. The contact point between the controller and the battery may also be degraded. Action: Verify whether the battery is present. Replace the battery if it is not present.
SNMP Trap Number: 1151. See "SNMP Support for Storage Management Alerts" for more information. 2176 Description: The controller battery Learn cycle has started. Cause: This alert is provided for informational purposes. Action: None. Severity: OK/Normal/Informational. See "Alert Severity Levels" for more information. Clear Alert Number: 2177. The clear alert is generated when the conditions producing the current alert have returned to normal. Related Alert Number: None.
Description: The controller battery Learn cycle has timed out. Cause: The controller battery must be fully charged before the Learn cycle can begin. The battery may be unable to maintain a full charge causing the Learn cycle to timeout. In addition, the battery must be able to maintain cached data for a specified period of time in the event of a power loss. For example, some batteries maintain cached data for 24 hours.
Severity: OK/Normal/Informational. See "Alert Severity Levels" for more information. Clear Alert Number: None. Related Alert Number: None. Local Response Agent (LRA) Alert Number: None. SNMP Trap Number: 1151. See "SNMP Support for Storage Management Alerts" for more information. 2181 Description: The controller battery Learn cycle will start in %1 hours. Cause: This alert is provided for informational purposes. The %1 indicates a substitution variable.
Related Alert Number: None. Local Response Agent (LRA) Alert Number: 2061 SNMP Trap Number: 754. See "SNMP Support for Storage Management Alerts" for more information. 2183 Description: Replace member operation failed on physical disk %1 Cause: The replaced physical disk has failed. Action: None. Severity: Critical/Failure/Error. See "Alert Severity Levels" for more information. Clear Alert Number: None. Related Alert Number: 2060.
2185 Description: Replace member operation stopped for rebuild of hot spare on physical disk Cause: This alert is provided for informational purposes. Action: None. Severity: Warning/Noncritical. See "Alert Severity Levels" for more information. Clear Alert Number: None. Related Alert Number: 2060. Local Response Agent (LRA) Alert Number: None SNMP Trap Number: 903. See "SNMP Support for Storage Management Alerts" for more information. 2186 Description: The controller cache has been discarded.
Action: Contact technical support to replace the controller memory. See your system documentation for information about contacting technical support by using telephone, fax, and Internet services. Severity: Warning/Noncritical. See "Alert Severity Levels" for more information. Clear Alert Number: None. Related Alert Number: None. Local Response Agent (LRA) Alert Number: 2060 SNMP Trap Number: 753. See "SNMP Support for Storage Management Alerts" for more information.
Clear Alert Number: None. Related Alert Number: None. Local Response Agent (LRA) Alert Number: None. SNMP Trap Number: 1151. See "SNMP Support for Storage Management Alerts" for more information. 2190 Description: The controller has detected a hot-plugged enclosure. Cause: This alert is provided for informational purposes. The SAS controller with firmware version 6.1 or later has detected a hot-plugged enclosure. Action: None. Severity: OK/Normal/Informational.
SNMP Trap Number: 854. See "SNMP Support for Storage Management Alerts" for more information. 2192 Description: The virtual disk Check Consistency has made corrections and completed. Cause: The virtual disk Check Consistency has identified errors and made corrections. For example, the Check Consistency may have enountered a bad disk block and remapped the disk block to restore data consistency. This alert is provided for informational purposes.
Description: The virtual disk read policy has changed. Cause: This alert is provided for informational purposes. Action: None. Severity: OK/Normal/Informational. See "Alert Severity Levels" for more information. Clear Alert Number: None. Related Alert Number: None. Local Response Agent (LRA) Alert Number: None. SNMP Trap Number: 1201. See "SNMP Support for Storage Management Alerts" for more information. 2195 Description: Dedicated hot spare assigned.
Severity: OK/Normal/Informational. See "Alert Severity Levels" for more information. Clear Alert Status: Alert 2196 is a clear alert for alert 2195. Related Alert Number: None. Local Response Agent (LRA) Alert Number: None. SNMP Trap Number: 1201 2197 Description: Replace member operation has stopped for rebuild. Cause: This alert is provided for informational purposes. Action: None. Severity: OK/Normal/Informational. See "Alert Severity Levels" for more information. Clear Alert Number: None.
Local Response Agent (LRA) Alert Number: None. SNMP Trap Number: 903. See "SNMP Support for Storage Management Alerts" for more information. 2199 Description: The virtual disk cache policy has changed. Cause: This alert is provided for informational purposes. Action: None. Severity: OK/Normal/Informational. See "Alert Severity Levels" for more information. Clear Alert Number: None. Related Alert Number: None. Local Response Agent (LRA) Alert Number: None. SNMP Trap Number: 1201.
Description: A global hot spare failed. Cause: The controller is not able to communicate with a disk that is assigned as a global hot spare. The disk may have failed or been removed. There may also be a bad or loose cable. Action: Verify that the disk is healthy and that it has not been removed. Check the cables. See "Cables Attached Correctly" for more information on checking the cables. If necessary, replace the disk and reassign the global hot spare. Severity: Warning/Noncritical.
also be a bad or loose cable. Action: Verify that the disk is healthy and that it has not been removed. Check the cables. See "Cables Attached Correctly" for more information on checking the cables. If necessary, replace the disk and reassign the dedicated hot spare. Severity: Warning/Noncritical. See "Alert Severity Levels" for more information. Clear Alert Number: None. Related Alert Number: 2048 Local Response Agent (LRA) Alert Number: 2070 SNMP Trap Number: 903.
Clear Alert Number: None. Related Alert Number: 2098, 2161, 2196 Local Response Agent (LRA) Alert Number: None. SNMP Trap Number: 901. See "SNMP Support for Storage Management Alerts" for more information. 2206 Description: The only hot spare available is a SATA disk. SATA disks cannot replace SAS disks. Cause: The only physical disk available to be assigned as a hot spare is using SATA technology. The physical disks in the virtual disk are using SAS technology.
Local Response Agent (LRA) Alert Number: 2070 SNMP Trap Number: 903. See "SNMP Support for Storage Management Alerts" for more information. 2210 Description: Battery requires reconditioning. Initiate the battery learn cycle. Cause: Battery requires reconditioning. Action: Initiate the battery learn cycle. Severity: Warning/Noncritical. See "Alert Severity Levels" for more information. Clear Alert Number: None. Related Alert Number: None.
Description: The controller battery temperature is above normal. Cause: This alert is provided for informational purposes. Action: None. Severity: OK/Normal/Informational. See "Alert Severity Levels" for more information. Clear Alert Number: None. Related Alert Number: None. Local Response Agent (LRA) Alert Number: None. SNMP Trap Number: 1151 2213 Description: Recharge count maximum exceeded Cause: The battery has been recharged more times than the battery recharge limit allows.
Severity: OK/Normal/Informational. See "Alert Severity Levels" for more information. Clear Alert Number: None. Related Alert Number: None. Local Response Agent (LRA) Alert Number: None. SNMP Trap Number: 1151 2215 Description: Battery charge process interrupted. Cause: This alert is provided for informational purposes. Action: None. Severity: OK/Normal/Informational. See "Alert Severity Levels" for more information. Clear Alert Number: None. Related Alert Number: None.
Local Response Agent (LRA) Alert Number: None. SNMP Trap Number: 1151. See "SNMP Support for Storage Management Alerts" for more information. 2217 Description: The battery learn mode has changed to warn . Cause: This alert is provided for informational purposes. Action: None. Severity: OK/Normal/Informational. See "Alert Severity Levels" for more information. Clear Alert Number: None. Related Alert Number: None. Local Response Agent (LRA) Alert Number: None. SNMP Trap Number: 1151.
Description: Abort Check Consistency on Error, Allow Revertible Hot Spare and Replace Member, Auto Replace Member on Predictive Failure, and Loadbalance changed. Cause: This alert is provided for informational purposes. Action: None. Severity: OK/Normal/Informational. See "Alert Severity Levels" for more information. Clear Alert Number: None. Related Alert Number: None. Local Response Agent (LRA) Alert Number: None. SNMP Trap Number: 751.
Action: None. Severity: OK/Normal/Informational. See "Alert Severity Levels" for more information. Clear Alert Number: None. Related Alert Number: None. Local Response Agent (LRA) Alert Number: None. SNMP Trap Number: 751. See "SNMP Support for Storage Management Alerts" for more information. 2222 Description: Loadbalance and Auto Replace Member operation on Predictive Failure changed. Cause: This alert is provided for informational purposes. Action: None. Severity: OK/Normal/Informational.
Related Alert Number: None. Local Response Agent (LRA) Alert Number: None. SNMP Trap Number: 751. See "SNMP Support for Storage Management Alerts" for more information. 2224 Description: Allow Revertible Hot Spare and Replace Member and Loadbalance changed. Cause: This alert is provided for informational purposes. Action: None. Severity: OK/Normal/Informational. See "Alert Severity Levels" for more information. Clear Alert Number: None. Related Alert Number: None.
2226 Description: Loadbalance changed. Cause: This alert is provided for informational purposes. Action: None. Severity: OK/Normal/Informational. See "Alert Severity Levels" for more information. Clear Alert Number: None. Related Alert Number: None. Local Response Agent (LRA) Alert Number: None. SNMP Trap Number: 751. See "SNMP Support for Storage Management Alerts" for more information.
Action: None. Severity: OK/Normal/Informational. See "Alert Severity Levels" for more information. Clear Alert Number: None. Related Alert Number: None. Local Response Agent (LRA) Alert Number: None. SNMP Trap Number: 751. See "SNMP Support for Storage Management Alerts" for more information. 2229 Description: Abort Check Consistency on Error and Auto Replace Member operation on Predictive Failure changed. Cause: This alert is provided for informational purposes. Action: None.
Related Alert Number: None. Local Response Agent (LRA) Alert Number: None. SNMP Trap Number: 751. See "SNMP Support for Storage Management Alerts" for more information. 2231 Description: Allow Revertible Hot Spare and Replace Member and Abort Check Consistency on Error changed. Cause: This alert is provided for informational purposes. Action: None. Severity: OK/Normal/Informational. See "Alert Severity Levels" for more information. Clear Alert Number: None. Related Alert Number: None.
2233 Description: The background initialization (BGI) rate has changed. Cause: This alert is provided for informational purposes. Action: None. Severity: OK/Normal/Informational. See "Alert Severity Levels" for more information. Clear Alert Number: None. Related Alert Number: None. Local Response Agent (LRA) Alert Number: None. SNMP Trap Number: 751. See "SNMP Support for Storage Management Alerts" for more information. 2234 Description: The Patrol Read rate has changed.
Action: None. Severity: OK/Normal/Informational. See "Alert Severity Levels" for more information. Clear Alert Number: None. Related Alert Number: None. Local Response Agent (LRA) Alert Number: None. SNMP Trap Number: 751. See "SNMP Support for Storage Management Alerts" for more information. 2236 Description: Allow Revertible Hot Spare and Replace Member property changed. Cause: This alert is provided for informational purposes. Action: None. Severity: OK/Normal/Informational.
Related Alert Number: None. Local Response Agent (LRA) Alert Number: None. SNMP Trap Number: 751. See "SNMP Support for Storage Management Alerts" for more information. 2238 Description: The controller debug log file has been exported. Cause: This alert is provided for informational purposes. Action: None. Severity: OK/Normal/Informational. See "Alert Severity Levels" for more information. Clear Alert Number: None. Related Alert Number: None. Local Response Agent (LRA) Alert Number: None.
2240 Description: A foreign configuration has been imported. Cause: This alert is provided for informational purposes. Action: None. Severity: OK/Normal/Informational. See "Alert Severity Levels" for more information. Clear Alert Number: None. Related Alert Number: None. Local Response Agent (LRA) Alert Number: None. SNMP Trap Number: 751. See "SNMP Support for Storage Management Alerts" for more information. 2241 Description: The Patrol Read mode has changed.
Cause: This alert is provided for informational purposes. Action: None. Severity: OK/Normal/Informational. See "Alert Severity Levels" for more information. Clear Alert Number: 2243. The clear alert is generated when the conditions producing the current alert have returned to normal. Related Alert Number: None. Local Response Agent (LRA) Alert Number: None. SNMP Trap Number: 751. See "SNMP Support for Storage Management Alerts" for more information. 2243 Description: The Patrol Read has stopped.
Clear Alert Number: None. Related Alert Number: None. Local Response Agent (LRA) Alert Number: None. SNMP Trap Number: 1201. See "SNMP Support for Storage Management Alerts" for more information. 2245 Description: A virtual disk blink has ceased. Cause: This alert is provided for informational purposes. Action: None. Severity: OK/Normal/Informational. See "Alert Severity Levels" for more information. Clear Alert Number: None. Related Alert Number: None.
SNMP Trap Number: 1153. See "SNMP Support for Storage Management Alerts" for more information. 2247 Description: The controller battery is charging. Cause: This alert is provided for informational purposes. Action: None. Severity: OK/Normal/Informational. See "Alert Severity Levels" for more information. Clear Alert Number: 2358. The clear alert is generated when the conditions producing the current alert have returned to normal. Related Alert Number: None.
Cause: This alert is provided for informational purposes. Action: None. Severity: OK/Normal/Informational. See "Alert Severity Levels" for more information. Clear Alert Number: None. Related Alert Number: None. Local Response Agent (LRA) Alert Number: None. SNMP Trap Number: 901. See "SNMP Support for Storage Management Alerts" for more information. 2250 Description: Redundant Path is broken Cause: This alert is provided for informational purposes.
Clear Alert Number: None. Related Alert Number: None. Local Response Agent (LRA) Alert Number: None. SNMP Trap Number: 901. See "SNMP Support for Storage Management Alerts" for more information. 2252 Description: The physical disk blink has ceased. Cause: This alert is provided for informational purposes. Action: None. Severity: OK/Normal/Informational. See "Alert Severity Levels" for more information. Clear Alert Number: None. Related Alert Number: None.
SNMP Trap Number: 751. See "SNMP Support for Storage Management Alerts" for more information. 2254 Description: The Clear operation has cancelled. Cause: This alert is provided for informational purposes. Action: None. Severity: OK/Normal/Informational. See "Alert Severity Levels" for more information. Clear Alert Number: None. Related Alert Number: None. Local Response Agent (LRA) Alert Number: None. SNMP Trap Number: 901. See "SNMP Support for Storage Management Alerts" for more information.
Cause: This alert is provided for informational purposes. Action: None. Severity: OK/Normal/Informational. See "Alert Severity Levels" for more information. Clear Alert Number: None Related Alert Number: None. Local Response Agent (LRA) Alert Number: None. SNMP Trap Number: 751. See "SNMP Support for Storage Management Alerts" for more information. 2258 Description: Controller has preserved cache. Cause: This alert is provided for informational purposes. Action: None.
Clear Alert Number: 2260 Related Alert Number: None. Local Response Agent (LRA) Alert Number: None. SNMP Trap Number: 851. See "SNMP Support for Storage Management Alerts" for more information. 2260 Description: An enclosure blink has ceased. Cause: This alert is provided for informational purposes. Action: None. Severity: OK/Normal/Informational. See "Alert Severity Levels" for more information. Clear Alert Number: None. Related Alert Number: None. Local Response Agent (LRA) Alert Number: None.
SNMP Trap Number: 101. See "SNMP Support for Storage Management Alerts" for more information. 2262 Description: Smart thermal shutdown is enabled. Cause: This alert is provided for informational purposes. Action: None. Severity: OK/Normal/Informational. See "Alert Severity Levels" for more information. Clear Alert Number: None. Related Alert Number: None. Local Response Agent (LRA) Alert Number: None. SNMP Trap Number: 101. See "SNMP Support for Storage Management Alerts" for more information.
Cause: The controller cannot communicate with a device. The device may be removed. There may also be a bad or loose cable. Action: Verify that the device is present and not removed. If it is present, then check the cables. See "Cables Attached Correctly" for more information on checking the cables. You should also check the connection to the controller battery and the battery health. A battery with a weak or depleted charge may cause this alert. Severity: Warning/Noncritical.
Action: None. Severity: OK/Normal/Informational. See "Alert Severity Levels" for more information. Clear Alert Number: None. Related Alert Number: None. Local Response Agent (LRA) Alert Number: None. SNMP Trap Number: 751, 801, 851, 901, 951, 1001, 1051, 1101, 1151, 1201. See "SNMP Support for Storage Management Alerts" for more information. 2267 Description: The controller reconstruct rate has changed. Cause: This alert is provided for informational purposes. Action: None.
Related Alert Number: None. Local Response Agent (LRA) Alert Number: 2051 SNMP Trap Number: 104. See "SNMP Support for Storage Management Alerts" for more information. 2269 Description: The physical disk Clear operation has completed. Cause: This alert is provided for informational purposes. Action: None. Severity: OK/Normal/Informational. See "Alert Severity Levels" for more information. Clear Alert Number: None. Related Alert Number: None. Local Response Agent (LRA) Alert Number: None.
SNMP Trap Number: 904. See "SNMP Support for Storage Management Alerts" for more information. 2271 Description: The Patrol Read corrected a media error. Cause: The Patrol Read task has encountered an error such as a bad disk block and remapped data to correct the error. Action: None. Severity: OK/Normal/Informational. See "Alert Severity Levels" for more information. Clear Alert Number: None. Related Alert Number: None. Local Response Agent (LRA) Alert Number: None. SNMP Trap Number: 901.
Cause: The controller encountered an unrecoverable medium error when attempting to read a block on the physical disk and marked that block as invalid. If the controller encountered the unrecoverable medium error on a source physical disk during a rebuild or reconfigure operation, it will also puncture the corresponding block on the target physical disk. The invalid block will be cleared on a write operation. Action: Back up your data.
Clear Alert Number: None. Related Alert Number: None. Local Response Agent (LRA) Alert Number: 2070 SNMP Trap Number: 903. See "SNMP Support for Storage Management Alerts" for more information. 2277 Description: The global hot spare is too small. Cause: The global hot spare is not large enough to protect all virtual disks that reside on the controller. Action: Assign a larger disk as the global hot spare. Severity: Warning/Noncritical. See "Alert Severity Levels" for more information.
Related Alert Number: 2199 Local Response Agent (LRA) Alert Number: None. SNMP Trap Number: 1151. See "SNMP Support for Storage Management Alerts" for more information. 2279 Description: The controller battery charge level is operating within normal limits. Cause: This alert is provided for informational purposes. This alert indicates that the battery is recharging during the battery Learn cycle. Action: None. Severity: OK/Normal/Informational. See "Alert Severity Levels" for more information.
2281 Description: Virtual disk has inconsistent data. Cause: This alert is provided for informational purposes. The virtual disk has inconsistent data. This may be caused when a power loss or system shutdown occurs while data is being written to the virtual disk. Action: None. Severity: OK/Normal/Informational. See "Alert Severity Levels" for more information. Clear Alert Number: None. Related Alert Number: 2127 Local Response Agent (LRA) Alert Number: None. SNMP Trap Number: 1201.
Cause: This alert is provided for informational purposes. Action: None. Severity: OK/Normal/Informational. See "Alert Severity Levels" for more information. Clear Alert Number: None. Related Alert Number: None. Local Response Agent (LRA) Alert Number: None. SNMP Trap Number: 901. See "SNMP Support for Storage Management Alerts" for more information. 2286 Description: A Learn cycle start is pending while the battery charges. Cause: This alert is provided for informational purposes. Action: None.
Clear Alert Number: 2288. The clear alert is generated when the conditions producing the current alert have returned to normal. Related Alert Number: None. Local Response Agent (LRA) Alert Number: None. SNMP Trap Number: 751. See "SNMP Support for Storage Management Alerts" for more information. 2288 Description: The Patrol Read has resumed. Cause: This alert is provided for informational purposes. Action: None. Severity: OK/Normal/Informational. See "Alert Severity Levels" for more information.
Local Response Agent (LRA) Alert Number: 2061 SNMP Trap Number: 754. See "SNMP Support for Storage Management Alerts" for more information. 2290 Description: Single-bit ECC error on controller DIMM. Cause: An error involving a single bit on the controller memory (the dual in-line memory module or DIMM) has been encountered during a read or write operation. The error correction algorithm has corrected this error. Action: None. Severity: Warning/Noncritical.
2292 Description: Communication with the enclosure has been lost. Cause: The controller has lost communication with an enclosure management module (EMM). The cables may be loose or defective. Action: Make sure the cables are attached securely. See "Cables Attached Correctly" for more information on checking the cables. Reboot the system. Severity: Critical/Failure/Error. See "Alert Severity Levels" for more information. Clear Alert Number: 2162.
Action: None. Severity: OK/Normal/Informational. See "Alert Severity Levels" for more information. Clear Alert Number: None. Related Alert Number: None. Local Response Agent (LRA) Alert Number: None. SNMP Trap Number: 851. See "SNMP Support for Storage Management Alerts" for more information. 2295 Description: A device has been removed. Cause: A device has been removed. Action: Replace the device. Severity: Critical/Failure/Error. See "Alert Severity Levels" for more information.
Related Alert Number: None. Local Response Agent (LRA) Alert Number: None. SNMP Trap Number: 951. See "SNMP Support for Storage Management Alerts" for more information. 2297 Description: An enclosure management module (EMM) has been removed. Cause: An enclosure management module (EMM) has been removed. Action: Reinsert the EMM. Severity: Critical/Failure/Error. See "Alert Severity Levels" for more information. Clear Alert Number: None. Related Alert Number: None.
2299 Description: Bad PHY %1 Cause: There is a problem with a physical connection or PHY. The %1 indicates a substitution variable. The text for this substitution variable is displayed with the alert in the Alert Log and can vary depending on the situation. Action: Contact Dell technical support. Severity: Critical/Failure/Error. See "Alert Severity Levels" for more information. Clear Alert Number: None. Related Alert Number: None. Local Response Agent (LRA) Alert Number: 2091 SNMP Trap Number: 854.
Cause: The enclosure or an enclosure component is in a Failed or Degraded state. Action: Verify the health of the enclosure and its components. Run diagnostics and check the LEDs to identify hardware that has failed or that is degraded. Replace any hardware that is in a Failed state. See the hardware documentation for more information on replacing components and for additional troubleshooting information. Severity: Critical/Failure/Error. See "Alert Severity Levels" for more information.
Action: None. Severity: OK/Normal/Informational. See "Alert Severity Levels" for more information. Clear Alert Number: None. Related Alert Number: None. Local Response Agent (LRA) Alert Number: None. SNMP Trap Number: 851. See "SNMP Support for Storage Management Alerts" for more information. 2304 Description: An attempt to hot plug an enclosure management module (EMM) has been detected. This type of hot plug is not supported. Cause: This alert is provided for informational purposes. Action: None.
Related Alert Number: 2326 Local Response Agent (LRA) Alert Number: 2070 SNMP Trap Number: 903. See "SNMP Support for Storage Management Alerts" for more information. 2306 Description: Bad block table is 80% full. Cause: The bad block table is the table used for remapping bad disk blocks. This table fills as bad disk blocks are remapped. When the table is full, bad disk blocks can no longer be remapped which means that disk errors can no longer be corrected and data loss can occur.
Local Response Agent (LRA) Alert Number: 2071 SNMP Trap Number: 904. See "SNMP Support for Storage Management Alerts" for more information. 2309 Description: A physical disk is incompatible. Cause: You have attempted to replace a disk with another disk that is using an incompatible technology. For example, you may have replaced one side of a mirror with a SAS disk when the other side of the mirror is using SATA technology. Action: Refer to the hardware documentation for information on replacing disks.
Description: The firmware on the enclosure management modules (EMMs) is not the same version. EMM0 %1 EMM1 %2 Cause: The firmware on the EMM modules is not the same version. It is required that both modules have the same version of the firmware. This alert may be caused when a user attempts to insert an EMM module that has a different firmware version than an existing module. The %1 and %2 indicate a substitution variable.
Cause: The power supply has a DC failure. Action: Replace the power supply. Severity: Warning/Noncritical. See "Alert Severity Levels" for more information. Clear Alert Number: 2323. The clear alert is generated when the conditions producing the current alert have returned to normal. Related Alert Number: 2122, 2322. Local Response Agent (LRA) Alert Number: 2090 SNMP Trap Number: 1003. See "SNMP Support for Storage Management Alerts" for more information.
Clear Alert Number: None. Related Alert Number: None. Local Response Agent (LRA) Alert Number: None. SNMP Trap Number: 751. See "SNMP Support for Storage Management Alerts" for more information. 2316 Description: Diagnostic message %1 Cause: A diagnostics test failed. The %1 indicates a substitution variable. The text for this substitution variable is generated by the utility that ran the diagnostics and is displayed with the alert in the Alert Log. This text can vary depending on the situation.
SNMP Trap Number: 1153. See "SNMP Support for Storage Management Alerts" for more information. 2319 Description: Single-bit ECC error on controller DIMM. Cause: The controller memory (the dual in-line memory module or DIMM) is beginning to malfunction. Action: Contact technical support to replace the controller memory. See your system documentation for information about contacting technical support by using telephone, fax, and Internet services. Severity: Warning/Noncritical.
Description: Single-bit ECC error. The controller DIMM is nonfunctional. There will be no further reporting. Cause: The controller memory (the dual in-line memory module or DIMM) is malfunctioning. The DIMM must be replaced immediately. No further alerts will be generated. Action: Contact technical support to replace the controller memory. See your system documentation for information about contacting technical support by using telephone, fax, and Internet services. Severity: Critical/Failure/Error.
Action: None. Severity: OK/Normal/Informational. See "Alert Severity Levels" for more information. Clear Alert Status: Alert 2323 is a clear alert for alerts 2313 and 2322. Related Alert Number: None. Local Response Agent (LRA) Alert Number: None. SNMP Trap Number: 1001. See "SNMP Support for Storage Management Alerts" for more information. 2324 Description: The AC power supply cable has been removed. Cause: The power cable may be pulled out or removed. Action: Reinsert the power cable.
Related Alert Number: None. Local Response Agent (LRA) Alert Number: None. SNMP Trap Number: 1001. See "SNMP Support for Storage Management Alerts" for more information. 2326 Description: A foreign configuration has been detected. Cause: This alert is provided for informational purposes. The controller has physical disks that were moved from another controller. These physical disks contain virtual disks that were created on the other controller.
2328 Description: The NVRAM is corrupt. Cause: The nonvolatile random access memory (NVRAM) is corrupt. Action: None. The controller is taking the required corrective action. Severity: Warning/Noncritical. See "Alert Severity Levels" for more information. Clear Alert Number: None. Related Alert Number: None. Local Response Agent (LRA) Alert Number: 2060 SNMP Trap Number: 753. See "SNMP Support for Storage Management Alerts" for more information.
Cause: This alert is provided for informational purposes. The %1 indicates a substitution variable. The text for this substitution variable is generated by the controller and is displayed with the alert in the Alert Log. This text can vary depending on the situation. Action: None. Severity: OK/Normal/Informational. See "Alert Severity Levels" for more information. Clear Alert Number: None. Related Alert Number: None. Local Response Agent (LRA) Alert Number: None. SNMP Trap Number: 751.
Clear Alert Number: None. Related Alert Number: None. Local Response Agent (LRA) Alert Number: None. SNMP Trap Number: 751. See "SNMP Support for Storage Management Alerts" for more information. 2334 Description: Controller event log: %1 Cause: This alert is provided for informational purposes. The %1 indicates a substitution variable. The text for this substitution variable is generated by the controller and is displayed with the alert in the Alert Log.
Local Response Agent (LRA) Alert Number: 2060 SNMP Trap Number: 753. See "SNMP Support for Storage Management Alerts" for more information. 2336 Description: Controller event log: %1 Cause: The %1 indicates a substitution variable. The text for this substitution variable is generated by the controller and is displayed with the alert in the Alert Log. This text is from events in the controller event log that were generated while Storage Management was not running.
2338 Description: The controller has recovered cached data from the battery backup unit (BBU). Cause: This alert is provided for informational purposes. Action: None. Severity: OK/Normal/Informational. See "Alert Severity Levels" for more information. Clear Alert Number: None. Related Alert Number: None. Local Response Agent (LRA) Alert Number: None. SNMP Trap Number: 1151. See "SNMP Support for Storage Management Alerts" for more information.
Action: Back up data from the physical disks. Check the Alert Log for alerts indicating why the failure occurred. In particular, look for alerts relating to disk failures or disk and media errors. Replace the physical disks if necessary. If you replace one or more physical disks, then recreate the virtual disk and restore your data from backup. If you do not replace a physical disk, then reinitialize the virtual disk and restore your data from backup. Severity: Critical/Failure/Error.
Clear Alert Number: None. Related Alert Number: 2341, 2343 Local Response Agent (LRA) Alert Number: 2080 SNMP Trap Number: 1203. See "SNMP Support for Storage Management Alerts" for more information. 2343 Description: The Check Consistency logging of inconsistent parity data is disabled. Cause: The Check Consistency can no longer report errors in the parity data. Action: See the hardware documentation for more information. Severity: Warning/Noncritical.
Local Response Agent (LRA) Alert Number: 2070 SNMP Trap Number: 903. See "SNMP Support for Storage Management Alerts" for more information. 2347 Description: The rebuild failed due to errors on the source physical disk. Cause: You are attempting to rebuild data that resides on a defective disk. Action: Restore your data from backup. Review the Alert Log to see if you have received alert "2095.
Description: A bad disk block could not be reassigned during a write operation. Cause: A write operation could not complete because the disk contains bad disk blocks that could not be reassigned. Data loss may have occurred on a nonredundant virtual disk. Data redundancy may also be lost. Action: Replace the disk. Severity: Critical/Failure/Error. See "Alert Severity Levels" for more information. Clear Alert Number: None.
Action: None. Severity: OK/Normal/Informational. See "Alert Severity Levels" for more information. Clear Alert Number: 2352. The clear alert is generated when the conditions producing the current alert have returned to normal. Related Alert Number: None. Local Response Agent (LRA) Alert Number: None. SNMP Trap Number: 901. See "SNMP Support for Storage Management Alerts" for more information. 2352 Description: A physical disk that was marked as missing has been replaced.
Related Alert Number: None. Local Response Agent (LRA) Alert Number: None. SNMP Trap Number: 851. See "SNMP Support for Storage Management Alerts" for more information. 2356 Description: SAS SMP communications error %1. Cause: The %1 indicates a substitution variable. The text for this substitution variable is generated by the firmware and is displayed with the alert in the Alert Log. This text can vary depending on the situation. The reference to SMP in this text refers to SAS Management Protocol.
SNMP Trap Number: 754. See "SNMP Support for Storage Management Alerts" for more information. 2358 Description: The battery charge cycle is complete. Cause: This alert is provided for informational purposes. Action: None. Severity: OK/Normal/Informational. See "Alert Severity Levels" for more information. Clear Alert Number: None. Related Alert Number: None. Local Response Agent (LRA) Alert Number: None. SNMP Trap Number: 1151. See "SNMP Support for Storage Management Alerts" for more information.
Cause: This alert is provided for informational purposes. Action: None. Severity: OK/Normal/Informational. See "Alert Severity Levels" for more information. Clear Alert Number: None. Related Alert Number: None. Local Response Agent (LRA) Alert Number: None. SNMP Trap Number: 751. See "SNMP Support for Storage Management Alerts" for more information. 2361 Description: Physical disk(s) that are part of a virtual disk have been removed while the system was shut down.
Clear Alert Number: None. Related Alert Number: None. Local Response Agent (LRA) Alert Number: None. SNMP Trap Number: 751. See "SNMP Support for Storage Management Alerts" for more information. 2364 Description: All virtual disks are missing from the controller. This situation was discovered during system start-up. Cause: This alert is provided for informational purposes. Action: None. Severity: OK/Normal/Informational. See "Alert Severity Levels" for more information. Clear Alert Number: None.
SNMP Trap Number: 901. See "SNMP Support for Storage Management Alerts" for more information. 2367 Description: Rebuild not possible as SAS/SATA is not supported in the same virtual disk. Cause: The physical disk is using an incompatible technology. Action: All physical disks in the virtual disk must use the same technology. You cannot use both SAS and SATA physical disks in the same virtual disk. Remove the physical disk and insert a new physical disk that uses the correct technology.
Description: Virtual Disk Redundancy has been degraded. Cause: A physical disk in a RAID 6 virtual disk has either failed or been removed. Action: Replace the missing or failed physical disk. Severity: OK/Normal/Informational. See "Alert Severity Levels" for more information. Clear Alert Number: 2121. Related Alert Number: 2048, 2049, 2050, 2076, 2346 Local Response Agent (LRA) Alert Number: None. SNMP Trap Number: 1201. See "SNMP Support for Storage Management Alerts" for more information.
Severity: OK/Normal/Informational. See "Alert Severity Levels" for more information. Clear Alert Number: None. Related Alert Number: None. Local Response Agent (LRA) Alert Number: None. SNMP Trap Number: 751. See "SNMP Support for Storage Management Alerts" for more information. 2373 Description: Attempted import of unsupported Virtual Disk type RAID %1 Cause: This alert is provided for informational purposes.
Local Response Agent (LRA) Alert Number: None. SNMP Trap Number: 751. See "SNMP Support for Storage Management Alerts" for more information. 2375 Description: Attempted import of Virtual Disk with missing physical disk Cause: This alert is provided for informational purposes. User has attempted to import a foreign virtual disk with a missing physical disk. Action: None. Severity: OK/Normal/Informational. See "Alert Severity Levels" for more information. Clear Alert Number: None.
Description: Attempted import of an orphan drive Cause: This alert is provided for informational purposes. User has attempted to import an orphan drive. Action: None. Severity: OK/Normal/Informational. See "Alert Severity Levels" for more information. Clear Alert Number: None. Related Alert Number: None. Local Response Agent (LRA) Alert Number: None. SNMP Trap Number: 751. See "SNMP Support for Storage Management Alerts" for more information.
Severity: OK/Normal/Informational. See "Alert Severity Levels" for more information. Clear Alert Number: None. Related Alert Number: None. Local Response Agent (LRA) Alert Number: None. SNMP Trap Number: 751. See "SNMP Support for Storage Management Alerts" for more information. 2380 Description: Foreign configuration has been partially imported. Some configuration failed to import. Cause: This alert is provided for informational purposes. Action: None. Severity: OK/Normal/Informational.
Local Response Agent (LRA) Alert Number: None. SNMP Trap Number: 751. See "SNMP Support for Storage Management Alerts" for more information. 2382 Description: An unsupported configuration was detected. The controller does not support physical disks of type SSD: ,, Cause: A physical disk of media type SSD is attached to a controller that does not support SSD disks. Action: Replace the unsupported physical disk with a physical disk of media type HDD.
Back to Contents Page Frequently Asked Questions Dell™ OpenManage™ Server Administrator Storage Management User's Guide Why is a rebuild not working? How can I safely remove or replace a physical disk? How do I recover from removing the wrong physical disk? How do I know what firmware is installed? What controllers do I have? How do I turn off an alarm? What RAID level is best for me? This section provides frequently asked questions that address situations commonly experienced in a storage environment.
To display the firmware version of all controllers: 1. 2. Select the Storage object in the tree view. Click the Information/Configuration subtab. The Firmware Version column on the Information/Configuration subtab displays the firmware version for all controllers attached to the system.
Back to Contents Page Getting Started Dell™ OpenManage™ Server Administrator Storage Management User's Guide Launching Storage Management User Privileges Using the Graphical User Interface Using the Storage Management Command Line Interface Displaying the Online Help Common Storage Tasks Dell™ OpenManage™ Server Administrator Storage Management is designed for system administrators who implement hardware RAID solutions and understand corporate and small business storage environments.
https://:1311 where is the assigned name for the managed system and 1311 is the default port or https://:1311 where is the IP address for the managed system and 1311 is the default port. NOTE: You must type https:// (not http://) in the address field to receive a valid response in your browser. User Privileges Server Administrator provides security through the User, Power User, and Administrator user groups.
Drop-down Menus and Wizards for Running Tasks Many of the storage objects displayed in the tree view have tasks. Examples of these tasks include creating virtual disks, assigning hot spares, reconditioning a battery, and so on. To access a storage object's task, select the component in the tree view and then select the Information/Configuration subtab. The Information/Configuration subtabs have task drop-down menus or buttons for launching a task.
Back to Contents Page Protecting Your Virtual Disk with a Hot Spare Dell™ OpenManage™ Server Administrator Storage Management User's Guide Understanding Hot Spares Considerations for Hot Spares on PERC 3/SC, 3/DC, 3/QC, 4/SC, 4/DC, 4e/DC, 4/Di, 4e/Si, 4e/Di, CERC ATA100/4ch, PERC 5/E, PERC 5/i, PERC 6/E, PERC 6/I, and CERC 6/I Controllers Considerations for Hot Spares on PERC 3/Si, 3/Di, and CERC SATA1.
A dedicated hot spare can only be assigned to the set of virtual disks that share the same physical disks. A global hot spare is assigned to all redundant virtual disks on the controller. A global hot spare must be the same size (or larger) as the smallest physical disk included in any virtual disk on the controller.
When assigning a physical disk as a global hot spare on a PERC 3/Si, 3/Di, and CERC SATA1.5/6ch controller, the physical disk should be as large or larger than the largest physical disk on the controller. Dedicated Hot Spare Considerations on PERC 3/Si, 3/Di, and CERC SATA1.5/6ch Controllers You can assign the same dedicated hot spare to more than one virtual disk. In this case, the hot spare attempts to rebuild all portions of redundant virtual disks that reside on a failed physical disk.
Back to Contents Page Moving Physical and Virtual Disks from One System to Another Dell™ OpenManage™ Server Administrator Storage Management User's Guide Required Conditions Migrating SCSI Virtual Disks to Another System Migrating SAS Virtual Disks to Another System This section describes how to move physical and virtual disks from one system to another.
This section applies to the PERC 3/SC, 3/DC, 3/QC, 4/SC, 4/DC, 4e/DC, 4/Di, 4e/Si, 4e/Di, and CERC ATA100/4ch controllers The following describes how to migrate virtual disks and volumes from one system to another. Completing the migration requires the following activities: l "Moving the Disks" l "Saving the New Controller Configuration" Moving the Disks 1. 2. Shut down the system that the physical disks are being moved from.
Back to Contents Page Overview Dell™ OpenManage™ Server Administrator Storage Management User's Guide What's New in this Release? Installation Considerations for Storage Management Supported Controllers Supported Enclosures Support for Disk and Volume Management Dell™ OpenManage™ Server Administrator Storage Management provides enhanced features for configuring a system's locally-attached RAID and non-RAID disk storage.
Compatibility With Linux Utilities Installing Storage Management on a Linux system that has RAID storage management utilities provided by Dell™ or other vendors is an unsupported configuration. It is recommended that you uninstall these utilities before installing Storage Management. Storage Management replaces the storage management features provided by these utilities.
NOTE: Integrated mirroring on the PERC 4/IM controller enables you to mirror a physical disk that resides internally in the server. You can implement the integrated mirror using the PERC 4/IM BIOS. When implemented, Storage Management recognizes the integrated mirror as a virtual disk. You cannot, however, use Storage Management to create a virtual disk on the PERC 4/IM controller. Storage Management supports other functions provided by the PERC 4/IM controller.
Back to Contents Page Quick Access to Storage Status and Tasks Dell™ OpenManage™ Server Administrator Storage Management User's Guide Storage Dashboard and Storage Health Using Alarms to Detect Failures Storage Health Using Enclosure Temperature Probes Storage Component Severity Rescan to Update Storage Configuration Changes Storage Properties and Current Activity Time Delay in Displaying Configuration Changes Alerts or Events I/O and Reboot Requirements for Detecting Physical Disk Status Changes
Warning/Non-critical. A probe or other monitoring device has detected a reading for the component that is above or below the acceptable level. The component may still be functioning, but it could fail. The component may also be functioning in an impaired state. Data loss is possible. Critical/Failure/Error. The component has either failed or failure is imminent. The component requires immediate attention and may need to be replaced. Data loss may have occurred.
Using Alarms to Detect Failures Some storage components have alarms. When enabled, these alarms alert you when a component fails. See the following sections for more information: l "Enable Alarm (Controller)" l "Enable Alarm (Enclosure)" Using Enclosure Temperature Probes Physical disk enclosures have temperature probes that warn you when the enclosure has exceeded an acceptable temperature range.
I/O and Reboot Requirements for Detecting Physical Disk Status Changes This section applies to PERC 3/SC, 3/DC, 3/QC, 4/SC, 4/DC, 4e/DC, 4/Di, 4e/Si, 4e/Di, and CERC ATA100/4ch controllers Because of hardware restrictions, the PERC 3/SC, 3/DC, 3/QC, 4/SC, 4/DC, 4e/DC, 4/Di, 4e/Si, 4e/Di, and CERC ATA100/4ch controllers will not detect a physical disk status change until I/O is attempted or the system is rebooted.
Back to Contents Page Storage Information and Global Tasks Dell™ OpenManage™ Server Administrator Storage Management User's Guide Storage Properties Global Tasks Storage Controllers Use this window to view high-level information about your system's storage. This window also enables you to launch global tasks that affect all controllers attached to the system. Storage Properties The Storage tree-view object has the following properties.
To do a global rescan: 1. Select the Storage tree view object. 2. Click the Information/Configuration subtab. 3. Select Global Rescan from the Global Tasks drop-down menu. 4. Click Execute. Enable/Disable Smart Thermal Shutdown By default, the operating system and server shut down when the PowerVault™ 220S and PowerVault 221S enclosures reach a critical temperature of 0 or 50 degrees Celsius.
The firmware and drivers listed in the Readme file refer to the minimum supported version for these controllers. Later versions of the firmware and drivers are also supported. See the Dell Support website at support.dell.com for the most recent driver and firmware requirements. Number of Connector Rebuild Rate Alarm State Cluster Mode SCSI Initiator ID This property displays the number of connectors the controller has. Each connector can be attached to physical disks or an enclosure.
Back to Contents Page Understanding RAID Concepts Dell™ OpenManage™ Server Administrator Storage Management User's Guide What Is RAID? Organizing Data Storage for Availability and Performance Choosing RAID Levels and Concatenation Comparing RAID Level and Concatenation Performance Storage Management uses Redundant Array of Independent Disks (RAID) technology to provide storage management capability.
RAID Levels Each RAID level uses some combination of mirroring, striping, and parity to provide data redundancy or improved read and write performance. For specific information on each RAID level, see "Choosing RAID Levels and Concatenation." Organizing Data Storage for Availability and Performance RAID provides different methods or RAID levels for organizing the disk storage. Some RAID levels maintain redundant data so that you can restore data after a disk failure.
Data stored on a single disk can be considered a simple volume. This disk could also be defined as a virtual disk that comprises only a single physical disk. Data that spans more than one physical disk can be considered a spanned volume. Multiple concatenated disks can also be defined as a virtual disk that comprises more than one physical disk. A dynamic volume that spans to separate areas of the same disk is also considered concatenated.
RAID 0 Characteristics: l Groups n disks as one large virtual disk with a capacity of (smallest disk size)*n disks. l Data is stored to the disks alternately. l No redundancy data is kept. When a disk fails, the large virtual disk fails with no means of rebuilding the data. l Better read and write performance.
l Data is replicated on the two disks. l When a disk fails, the virtual disk still works. The data will be read from the failed disk's mirror. l Better read performance, but slightly slower write performance. l Redundancy for protection of data. l RAID 1 is more expensive in terms of disk space since twice the number of disks are used than required to store the data without redundancy.
l "Number of Physical Disks per Virtual Disk" l "Maximum Number of Virtual Disks per Controller" RAID Level 6 (Striping with additional distributed parity) RAID 6 provides data redundancy by using data striping in combination with parity information. Similar to RAID 5, the parity is distributed within each stripe. RAID 6, however, uses an additional physical disk to maintain parity, such that each stripe in the disk group maintains two disk blocks with parity information.
Figure 3-6. RAID 50 RAID 50 Characteristics: l Groups n*s disks as one large virtual disk with a capacity of s*(n-1) disks, where s is the number of spans and n is the number of disks within each span. l Redundant information (parity) is alternately stored on all disks of each RAID 5 span. l Better read performance, but slower write performance. l Requires as much parity information as standard RAID 5. l Data is striped across all spans. RAID 50 is more expensive in terms of disk space.
RAID 60 Characteristics: l Groups n*s disks as one large virtual disk with a capacity of s*(n-2) disks, where s is the number of spans and n is the number of disks within each span. l Redundant information (parity) is alternately stored on all disks of each RAID 6 span. l Better read performance, but slower write performance. l Increased redundancy provides greater data protection than a RAID 50. l Requires proportionally as much parity information as RAID 6.
RAID 10 Characteristics: l Groups n disks as one large virtual disk with a capacity of (n/2) disks, where n is an even integer. l Mirror images of the data are striped across sets of physical disks. This level provides redundancy through mirroring. l When a disk fails, the virtual disk is still functional. The data will be read from the surviving mirrored disk. l Improved read performance and write performance. l Redundancy for protection of data.
Related Information: See the following: l "Organizing Data Storage for Availability and Performance" l "Comparing RAID Level and Concatenation Performance" l "Controller-supported RAID Levels" l "Number of Physical Disks per Virtual Disk" l "Maximum Number of Virtual Disks per Controller" Considerations for RAID 10 and 50 on PERC 3/SC, 3/DC, 3/QC, 4/SC, 4/DC, 4e/DC, 4/Di, 4e/Si, 4e/Di, and CERC ATA100/4ch Controllers On the PERC 3/SC, 3/DC, 3/QC, 4/SC, 4/DC, 4e/DC, 4/Di, 4e/Si, 4e/Di, and CERC A
RAID Level Data Read Performance Availability Write Performance Rebuild Performance Minimum Disks Required Suggested Uses 1 or 2 depending on the controller. More cost efficient than redundant RAID levels. Use for noncritical data.
Back to Contents Page Troubleshooting Dell™ OpenManage™ Server Administrator Storage Management User's Guide Common Troubleshooting Procedures Virtual Disk Troubleshooting Specific Problem Situations and Solutions This section contains troubleshooting procedures for common situations as well as for specific problems. Common Troubleshooting Procedures This section describes commands and procedures that can be used in troubleshooting.
Isolate Hardware Problems If you receive a "timeout" alert related to a hardware device or if you otherwise suspect that a device attached to the system is experiencing a failure, then do the following to confirm the problem: l l Verify that the cables are correctly attached. If the cables are correctly attached and you are still experiencing the problem, then disconnect the device cables and reboot the system. If the system reboots successfully, then one of the devices may be defective.
If the failed physical disk is part of a nonredundant virtual disk (such as RAID 0), then the failure of a single physical disk will cause the entire virtual disk to fail. To proceed, you need to verify when your last backup was, and if there is any new data that has been written to the virtual disk since that time. If you have backed up recently and there is no new data on the disks that would be missed, you can restore from backup.
If the physical disk that you removed is part of a redundant virtual disk that does not have a hot spare, then replace the physical disk and do a rebuild.
l l l l A physical disk has been removed, and the system has not yet attempted to write data to the removed disk. In this case, the system will not recognize the removal of a physical disk until it attempts a write operation to the disk. If the physical disk is part of a redundant virtual disk, then the system will rebuild the disk after attempting a write operation. This situation applies to PERC 3/SC, 3/DC, 3/QC, 4/SC, 4/DC, 4e/DC, 4/Di, and CERC ATA100/4ch controllers.
If you have created a virtual disk that exceeds the 1TB limitation, you should do the following: 1. Back up your data. 2. Delete the virtual disk. 3. Create one or more virtual disks that are smaller than 1TB. 4. Restore your data from backup. Whether or not your Linux operating system limits virtual disk size to 1TB depends on the version of the operating system and any updates or modifications that you have implemented. See your operating system documentation for more information.
l "Storage Management May Delay Before Updating Temperature Probe Status" l "You are Unable to Log into a Remote System" l "Cannot Connect to Remote Windows Server™ 2003 System" l "Reconfiguring a Virtual Disk Displays Error in Mozilla Browser" l "Physical Disks Display Under Connector Not Enclosure Tree Object" Physical Disk is Offline or Displays an Error Status A physical disk may display an error status if it has been damaged, taken offline, or was a member of a virtual disk that has been del
If you receive an alerts 2146 through 2150 as the result of doing a rebuild or while the virtual disk is in a degraded state, then data cannot be recovered from the damaged disk without restoring from backup. If you receive alerts 2146 through 2150 under circumstances other than a rebuild, then data recovery may be possible. The following describes each of these situations.
Erroneous Status and Error Messages after a Windows Hibernation Activating the Windows hibernation feature may cause Storage Management to display erroneous status information and error messages. This problem resolves itself when the Windows operating system recovers from hibernation.
Back to Contents Page Virtual Disks Dell™ OpenManage™ Server Administrator Storage Management User's Guide Considerations Before Creating Virtual Disks Span Edit Creating Virtual Disks Virtual Disk Task: Reconfigure (Step 1 of 3) Reconfiguring/Migrating Virtual Disks Virtual Disk Task: Reconfigure (Step 2 of 3) Starting and Target RAID Levels for Virtual Disk Reconfiguration Virtual Disk Task: Reconfigure (Step 3 of 3) Maintain Integrity of Redundant Virtual Disks Format and Initialize; Slow and F
In addition to the considerations described in this section, you should also be aware of the controller limitations described in "Number of Physical Disks per Virtual Disk." Be aware that the following considerations apply when creating virtual disks: l Creating virtual disks on PERC 3/SC, 3/DC, 3/QC, 4/SC, 4/DC, 4e/DC, 4/Di, 4e/Si, 4e/Di, CERC ATA100/4ch, PERC 5/E, PERC 5/i, PERC 6/E, and PERC 6/I controllers.
On some versions of the Linux operating system, the virtual disk size is limited to 1TB. Before creating a virtual disk that is larger than 1TB, you should make sure that your operating system supports this virtual disk size. The support provided by your operating system depends on the version of the operating system and any updates or modifications that you have implemented. In addition, you should investigate the capacity of your peripheral devices to support a virtual disk that is larger than 1TB.
NOTE: Channel redundancy only applies to controllers that have more than one channel and that attach to an external disk enclosure. Creating Virtual Disks Does my controller support this feature? See "Supported Features." In order to implement RAID functions, you need to create a virtual disk. A virtual disk refers to storage created by a RAID controller from one or more physical disks.
Table 11-1 Virtual Disk Reconfiguration Controller Starting RAID Level Target RAID Level Comments PERC 3/SC, 3/DC, 3/QC, 4/SC, PERC 4/DC, PERC 4e/DC, 4/Di, 4e/Si, PERC 4e/Di, CERC ATA100/4ch, PERC 5/E and PERC 5/i RAID 0 RAID 0 Add at least one additional disk PERC 3/SC, 3/DC, 3/QC, 4/SC, PERC 4/DC, PERC 4e/DC, 4/Di, 4e/Si, PERC 4e/Di, CERC ATA100/4ch, PERC 5/E and PERC 5/i RAID 0 (on a single disk) RAID 1 Add a single disk PERC 3/SC, 3/DC, 3/QC, 4/SC, 4/DC, 4e/DC, 4/Di, 4e/Si, PERC 4e/Di, CERC
Does my controller support this feature? See "Supported Features." The virtual disk Check Consistency task verifies the accuracy of the redundant (parity) information. This task only applies to redundant virtual disks. When necessary, the Check Consistency task rebuilds the redundant data. To verify a virtual disk's redundant information: 1. Locate the controller on which the virtual disk resides in the tree view. Expand the controller object until the Virtual Disks object is displayed. 2.
Resynching Paused — A consistency check has been paused on the virtual disk. Regenerating — A physical disk in the virtual disk is rebuilding. Reconstructing — The virtual disk configuration has changed. The physical disks included in the virtual disk are being modified to support the new configuration. Failed — The virtual disk has encountered a failure of one or more components and is no longer functioning.
menu displays No Task Available.
Does my controller support this feature? See "Supported Features." On PERC 3/SC, 3/DC, 3/QC, 4/SC, 4/DC, 4e/DC, 4/Di, 4e/Si, and 4e/Di controllers, background initialization of redundant virtual disks begins automatically after the virtual disk is created. Because the initialization is run in the background, other processes can continue while the initialization completes.
Does my controller support this feature? See "Supported Features." Use the Cancel Check Consistency task to stop a check consistency operation that is in progress. NOTE: On the PERC 3/Si, 3/Di, and CERC SATA1.5/6ch controllers, reconfiguring a concatenated virtual disk to a RAID 1 may cause the virtual disk to be in Resynching state.
Does my controller support this feature? See "Supported Features." Use the Cancel Rebuild task to cancel a rebuild while it is in progress. Change Policy Does my controller support this feature? See "Supported Features." Use the Change Policy task to change a virtual disk's read, write, or cache policy. Changes to the read, write, and cache policy only apply to the virtual disk that you have selected. This task does not change the policy for all virtual disks on the controller.
system must have at least four disks to use RAID 6. 2. ¡ Select RAID 10 for striping over mirror sets. This selection groups n disks together as one large virtual disk with a total capacity of (n/2) disks. Data is striped across the replicated mirrored pair disks. When a disk fails, the virtual disk continues to function. The data is read from the surviving mirrored pair disk. This feature provides the best failure protection, read and write performance.
virtual disk. See "Protecting Your Virtual Disk with a Hot Spare" for more information. Select the Physical Disk check box if you want to assign a dedicated hot spare. The Physical Disk check box is not available if the controller does not have a physical disk that is a suitable hot spare for the virtual disk you are creating. For example, the available physical disks may be too small to protect the virtual disk.
3. Select the Virtual Disks object. 4. Click Go To Create Virtual Disk Wizard. 5. Click Go To Advanced Wizard. Create Virtual Disk Advanced Wizard (Step 2 of 4) Does my controller support this feature? See "Supported Features." This screen enables you to select which disks will be used to create the virtual disk. The items displayed on this screen depend on the selections you made in "Create Virtual Disk Advanced Wizard (Step 1 of 4).
NOTE: On a SAS controller with firmware version 6.1 and later, RAID 10 supports only even number of disks per span and a maximum of 8 spans with 32 disks. Let us consider that the controller has three enclosures with six physical disks each (total number of available disks = 3 x 6 =18 disks). If you select four disks per span, the controller will create four spans (18 disks/4 disks per span = 4 spans). The last two disks of the last enclosure will not be part of RAID 10.
It is recommended that you specify a unique name for each virtual disk. If you have virtual disks with the same name, it will be hard to differentiate the alerts generated for these virtual disks. NOTE: The CERC SATA1.5/2s controller does not allow you to specify a name for concatenated virtual disks. The concatenated virtual disk will be created with a default name. 2. The Size text box displays the default size of the virtual disk, depending upon the RAID configuration you selected.
Span Edit In the edit mode, you cannot alter the number of physical disks per span. If there are enough available physical disks, you can reduce or increase the number of spans. You can also alter the contents of a span by removing that span and selecting a new physical disk to comprise that span. To successfully create a virtual disk, a minimum of two spans must exist at all times. Click Continue to return to "Create Virtual Disk Advanced Wizard (Step 4 of 4).
Does my controller support this feature? See "Supported Features." This screen enables you to select the RAID level and size for the reconfigured virtual disk. To Reconfigure a Virtual Disk: Step 2 of 3 1. 2. Select the new RAID level for the virtual disk. The available RAID levels depend on the number or physical disks selected and the controller.
controller perceives this operation as similar to resynching a mirror, and therefore may display the Resynching state. Performing a controller rescan during the virtual disk reconfiguration may also cause the virtual disk to display a Resynching state. While the virtual disk displays a Resynching state, the "Pause Check Consistency" and "Cancel Check Consistency" tasks will be available.
If you have had trouble with a physical disk or suspect that it has bad disk blocks, you may want to perform a Slow Initialize task, as this task remaps bad blocks and writes zeroes to all disk blocks. Considerations for Slow Initialize Use the Slow Initialize task to initialize all physical disks included in the virtual disk. The Slow Initialize task updates the metadata on the physical disks and erases all existing data and file systems.
To delete a virtual disk: To identify which physical disks are included in the virtual disk, click Blink. The LED lights on the physical disks will blink for 30 to 60 seconds. When deleting a virtual disk, the following considerations apply: l There are particular considerations for deleting a virtual disk from a cluster-enabled controller. Review the "Creating and Deleting Virtual Disks on Cluster-enabled Controllers" before attempting to delete the virtual disk.
Virtual Disk Task: Change Policy Does my controller support this feature? See "Supported Features." Use the Change Policy task to change a virtual disk's read, write, or cache policy. See "RAID Controller Read, Write, Cache, and Disk Cache Policy" for more information. To change a virtual disk's read, write, or disk cache policy: 1. Select the new policy from the Read Policy, Write Policy, and Disk Cache Policy drop-down menus. 2. Click Apply Changes.
1. Expand the Storage tree object to display the controller objects. 2. Expand a controller object. 3. Select the Virtual Disks object. 4. Select Split Mirror from the Available Tasks drop-down menu. 5. Click Execute. Related Information: l "Rescan to Update Storage Configuration Changes" l "Time Delay in Displaying Configuration Changes" Unmirror Does my controller support this feature? See "Supported Features.
Does my controller support this feature? See "Supported Features." A dedicated hot spare is an unused backup disk that is assigned to a single virtual disk. When a physical disk in the virtual disk fails, the hot spare is activated to replace the failed physical disk without interrupting the system or requiring your intervention. For more information on hot spares including size requirements, see "Protecting Your Virtual Disk with a Hot Spare.
CAUTION: If you choose a hot spare as the destination physical disk, your virtual disk will be without a hot spare, unless you assign one. NOTE: You can select only one source/destination physical disk at a time. 3. Click Apply Changes. If you want to exit without replacing the member disk, click Go Back To Virtual Disk Page. You can view the progress of the Replace Member Disk task on the Physical Disk Details page. For more information, see "Physical Disk Properties and Tasks.