
Installation manual

108 Using Microsoft Active Directory
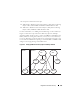
6
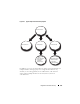
Add User1 and User2 as Members in Association Object 1 (AO1), Priv1 as
Privilege Objects in AO1, and both sys1 and Group1 as Products in AO1.
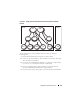
7
Add User3 as a Member in Association Object 2 (AO2), Priv2 as a Privilege
object in AO2, and Group1 as a Product in AO2.
Note that neither of the Association objects needs to be of Universal scope in
this case.
Configuring Active Directory to Access Your Systems
Before you can use Active Directory to access your systems, you must
configure both the Active Directory software and the systems.
1
Extend the Active Directory schema (For more information, see
"Extending the Active Directory Schema.")
2
Extend the Active Directory Users and Computers Snap-in (For more
information, see "Installing the Dell Extension to the Active Directory
Users and Computers Snap-In.")
3
Add system users and their privileges to Active Directory (For more
information, see "Adding Users and Privileges to Active Directory.")
4
For RAC systems, enable SSL on each of your domain controllers.
5
Configure the system’s Active Directory properties using either the
Web-based interface or the CLI (For more information, see "Configuring
Your Systems or Devices.")
Configuring the Active Directory Product Name
To configure the Active Directory product name:
1
Locate the
omsaoem.ini
file in your installation directory.
2
Edit the file to add the line
adproductname=text
, where
text
is the
name of the product object that you created in Active Directory.
For example, the
omsaoem.ini
file contains the following syntax if the
Active Directory product name is configured to
omsaApp
.
productname=Server Administrator
startmenu=Dell OpenManage Applications
autdbid=omsa
accessmask=3