Server Administrator Version 8.
Anmerkungen, Vorsichtshinweise und Warnungen ANMERKUNG: Eine ANMERKUNG macht auf wichtige Informationen aufmerksam, mit denen Sie Ihr Produkt besser einsetzen können. VORSICHT: Ein VORSICHTSHINWEIS macht darauf aufmerksam, dass bei Nichtbefolgung von Anweisungen eine Beschädigung der Hardware oder ein Verlust von Daten droht, und zeigt auf, wie derartige Probleme vermieden werden können.
Inhaltsverzeichnis 1 Einführung....................................................................................................................... 6 Was ist neu in dieser Version?............................................................................................................................................ 6 Software-Verfügbarkeit...............................................................................................................................................
Unbeaufsichtigte Deinstallation der Managed System-Software................................................................................32 4 Installation von Managed System-Software auf Microsoft Windows Server 2008 Core und Microsoft Hyper-V-Server................................................................................33 Ausführung der Voraussetzungsprüfung im CLI-Modus...................................................................................................
Ich sehe eine Warnmeldung beim Deinstallieren von Server Administrator unter Windows Server 2008, wenn das Installationsprogramm versucht, die Verknüpfung zu entfernen.......................................................................... 49 Wo kann ich die MSI-Protokolldateien finden? ..........................................................................................................
1 Einführung Diese Anleitung enthält Informationen zu folgenden Themen: • Installieren von Server Administrator auf Managed Systems. • Installieren und Verwenden der Remote-Aktivierungsfunktion. • Verwalten von Remote-Systemen unter Verwendung von Server Administrator Web Server. • Konfiguration des Systems vor und während einer Bereitstellung oder einer Aktualisierung.
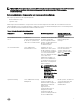
ANMERKUNG: Weitere Informationen zu diesen DVDs finden Sie in der Systems Management Tools And Documentation Installation Guide (Systems Management Tools und Documentation Installationsanleitung). Server Administrator-Komponenten auf einem verwalteten System Das Setup-Programm bietet die folgenden Optionen: • Benutzerdefiniertes Setup • Typisches Setup Mit der Option „Benutzerdefiniertes Setup“ können Sie die Softwarekomponenten auswählen, die Sie installieren möchten.
Komponente Was installiert ist Bereitstellungsszenario Systeme, auf denen die Installation vorgenommen werden soll Storage ManagementBenutzerhandbuch in dem docs-Verzeichnis.
Komponente Was installiert ist Bereitstellungsszenario Systeme, auf denen die Installation vorgenommen werden soll Windows, um die gesammelten Ereignisse lokal anzuzeigen. DRAC Befehlszeilen-Tools HardwareAnwendungsprogrammierschni ttstelle und iDRAC12G oder iDRAC, DRAC 5 oder DRAC 4 (je nach System-Typ) Installieren Sie Remote Access Controller, um E-MailWarnungen zu erhalten, wenn Warn- oder Fehlerereignisse hinsichtlich Spannung, Temperatur und Lüftergeschwindigkeit auftreten.
Weitere Informationen über die Sicherheitsverwaltung finden Sie im Server Administrator-Benutzerhandbuch unter dell.com/ openmanagemanual. Weitere nützliche Dokumente Zusätzlich zu diesem Handbuch können Sie für weitere Informationen auf die folgenden Handbücher zugreifen. • Das Benutzerhandbuch Lifecycle Controller 2 Version 1.00.00 liefert Informationen zur Verwendung des Lifecycle Controller.
2 Installationsvorbereitungen Stellen Sie sicher, dass Sie vor dem Installieren von Server Administrator folgendes durchführen: • Lesen Sie die Installationsanweisungen für Ihr Betriebssystem. • Lesen Sie die Installationsvoraussetzungen, um sicherzustellen, dass Ihr System die Mindestanforderungen erfüllt oder überschreitet. • Lesen Sie die jeweiligen Infodateien und die Systems Software Support Matrix.
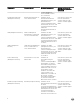
Rückgabeco Beschreibung de 3 Ein Fehlerzustand bzw. -zustände sind mit der Software verbunden. Es ist notwendig, diese Zustände zu beheben, die den Fehler verursachen, bevor Sie mit der Installation dieser Software fortfahren. Wenn Sie die Probleme nicht lösen, wird die Software nicht installiert. —1 Ein Microsoft Windows Script Host (WSH)-Fehler. Die Voraussetzungsprüfung wird nicht ausgeführt. —2 Das Betriebssystem wird nicht unterstützt. Die Voraussetzungsprüfung wird nicht ausgeführt.
Stellen Sie sicher, dass jede Fehler- oder Warnmeldung behoben wird, bevor Sie mit der Installation von SystemverwaltungsSoftwarekomponenten von Dell fortfahren. Zugehöriger Link Anpassungsparameter Voraussetzungen für die Installation Dieser Abschnitt beschreibt die allgemeinen Anforderungen von Server Administrator und stellt Informationen zu unterstützten Betriebssystemen und Webbrowsern bereit.
• Mindestens 2 GB RAM • Mindestens 512 MB freier Festplattenspeicherkapazität • Administratorrechte • TCP/IP-Verbindung zum verwalteten System und zum Remote-System, um die Remote-Systemverwaltung zu ermöglichen. • Einer der unterstützten Systems Management-Protokollstandards • Für den Monitor ist eine Mindestauflösung von 800 x 600 erforderlich. Die empfohlene Bildschirmauflösung ist 1 024 x 768.
Die Buchstaben im Wertefeld können in einer beliebigen Reihenfolge sein. Jeder Buchstabe schaltet einen anderen Protokollierungsmodus ein. Die tatsächliche Funktion jedes Buchstaben ist für MSI Version 3.
Sie können den SNMP-Agenten zur Änderung des Community-Namens, Aktivierung von Set-Vorgängen und Senden von Traps an eine Management Station konfigurieren. Zur Konfiguration des SNMP-Agenten für die korrekte Interaktion mit Verwaltungsanwendungen führen Sie die im Benutzerhandbuch zum Server Administrator beschriebenen Verfahren aus.
• Windows Remote Management (WinRM) • Durch Zertifizierungsstelle/Selbstsigniertes Zertifikat • WinRM HTTPS-Listener-Port • Autorisierung für WinRM- und Windows Management Instrumentation-Server (WMI) Installieren von WinRM Auf Windows Server 2008 R2, Windows Server 2008 R2 SP1, Windows 7, Windows 8 and Windows Server 2012 wird WinRM 2.0 standardmäßig installiert. Auf Windows Server 2008 wird standardmäßig WinRM 1.1 installiert.
ANMERKUNG: Der Administrator ist standardmäßig konfiguriert. WinRM So konfigurieren Sie die Zugriffsberechtigungen für WinRM-Server: 1. Klicken Sie auf Start → Run (Ausführen). 2. Geben Sie winrm configsddl ein und klicken Sie auf OK. Geben Sie bei Verwendung von WinRM 2.0 winrm configsddl default ein. 3. Klicken Sie auf Hinzufügen und fügen Sie die erforderlichen Benutzer oder Gruppen (lokal/Domäne) zur Liste hinzu. 4.
3 Installieren von Managed System-Software auf Microsoft Windows-Betriebssystemen Bei Microsoft Windows erscheint ein Autorun-Dienstprogramm, wenn Sie die DVD Systems Management Tools and Documentation (Dell Systems Management Hilfsprogramme und Dokumentation) einlegen. Dieses Dienstprogramm erlaubt es Ihnen, die Systemverwaltungssoftware auszuwählen, die Sie auf dem System installieren wollen.
Sie möchten: Auswählen Für Systeme, die unter Microsoft Windows ausgeführt werden, befindet sich Remoteaktivierung unter der Option Server Instrumentation. Sie müssen dann Server Administrator Web Server auf dem Remote-System installieren. Den Zustand von lokalem Speicher und an ein verwaltetes System remote angeschlossenem Speicher anzuzeigen und Speicherverwaltungsinformationen in einer integrierten grafischen Ansicht abzurufen. Storage Management.
Das Setup-Programm ruft die Voraussetzungsprüfung auf, die den PCI (Peripheral Component Interconnect)-Bus des Systems zum Suchen nach installierter Hardware wie z. B. Controller-Karten verwendet. Das Systems Management-Installationsprogramm enthält die Optionen Typisches Setup und Benutzerdefiniertes Setup für die Installation von Server Administrator und anderer Managed System-Software.
So führen Sie eine benutzerdefinierte Installation durch: 1. Melden Sie sich an dem System, auf dem Sie die Systemverwaltungssoftware installieren wollen als integrierter Administrator, Domänenadministrator oder als Benutzer an, der Mitglied der Gruppe Domänen-Admins und Domänenbenutzer ist. 2. Schließen Sie alle geöffneten Anwendungsprogramme und deaktivieren Sie eventuell vorhandene Virenerkennungssoftware. 3.
Starten Sie das System neu, wenn Sie dazu aufgefordert werden, um die installierten Managed System-Softwaredienste für den Gebrauch bereitzustellen. Wählen Sie eine der folgenden Neustartoptionen: • Ja, das System jetzt neu starten. • Nein, das System später neu starten. ANMERKUNG: Wenn Sie während der Installation Remote-Aktivierung ausgewählt haben, wird die Fehlermeldung A provider, WinTunnel, has been registered in the Windows Management Instrumentation namespace ROOT\dcim\sysman to use the LocalSyst
ANMERKUNG: Wenn eine unbeaufsichtigte Installation abgeschlossen ist, können Sie die Befehlszeilenschnittstellenfunktion (CLI) von Server Administrator nur verwenden, wenn Sie ein neues Konsolenfenster öffnen und CLI-Befehle von dort ausführen. Die Ausführung von CLI-Befehlen von demselben Konsolenfenster, in dem Server Administrator installiert wurde, wird nicht funktionieren.
Bestimmen der Speicherorte für Protokolldateien Bei einer Managed System-MSI-Installation führen Sie den folgenden Befehl aus, um eine unbeaufsichtigte Installation mit festgelegtem Speicherort der Protokolldatei auszuführen msiexec.exe /i .msi /l*v "C:\openmanage\logs\SysMgmt.
Einstellung Ergebnis /fd – Diese Option installiert ein Produkt neu, wenn eine Datei fehlt, oder wenn eine andere Version einer Datei installiert ist. /fc – Diese Option installiert ein Produkt neu, wenn eine Datei fehlt, oder wenn der gespeicherte Prüfsummenwert nicht mit dem berechneten Wert übereinstimmt. /fa – Diese Option zwingt alle Dateien zur Neuinstallation. /fu – Diese Option schreibt alle erforderlichen benutzerspezifischen Registrierungseinträge neu.
Sie können den Anpassungsparameter REMOVE in die Befehlszeile aufnehmen und die Funktions-ID (oder IDs) der SoftwareFunktion zuweisen, die Sie deinstallieren möchten. Zum Beispiel, msiexec.exe /i SysMgmt.msi REMOVE=BRCM /qb Mithilfe dieses Befehls wird Systems Management installiert und nur der Broadcom-Agent deinstalliert. Diese Vorgänge laufen ohne Benutzereingriff, aber nicht im Hintergrund ab. Sie können auch Funktionen mit einer Ausführung des Programms msiexec.
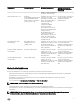
Tabelle 7. Windows Installer-Rückgabecodes Fehlercode Value Beschreibung ERROR_SUCCESS 0 Die Maßnahme wurde erfolgreich abgeschlossen. ERROR_INVALID_PARAMETER 87 Einer der Parameter ist ungültig. ERROR_INSTALL_USEREXIT 1602 Der Benutzer hat die Installation abgebrochen. ERROR_SUCCESS_REBOOT_REQUIRED 3010 Ein Neustart ist zum Abschluss der Installation erforderlich. Diese Meldung weist auf eine erfolgreiche Installation hin.
Erweitern der Managed System-Software Das Systems Management-Installationsprogramm bietet eine Upgrade-Option für die Erweiterung von Server Administrator und anderer Managed System-Software. Das Setup-Programm führt die Voraussetzungsprüfung aus, die den PCI-Bus des Systems zum Suchen nach installierter Hardware wie z. B. Controller-Karten verwendet. Das Setup-Programm installiert oder aktualisiert alle Managed System-Softwarefunktionen, die der spezifischen Hardwarekonfiguration des Systems entsprechen.
Das Dialogfeld Setup-Typ wird angezeigt. 6. Setzen Sie die Installation ab Schritt 8 fort, wie im Abschnitt Benutzerdefinierte Installation aufgeführt wird. Ändern Wenn Sie Server Administrator-Komponenten hinzufügen/entfernen möchten: 1. Wechseln Sie zur Windows Systemsteuerung. 2. Klicken Sie auf Programme hinzufügen/entfernen. 3. Klicken Sie auf Server Administrator und auf Ändern. Das Dialogfeld Willkommen beim Installationsassistenten des Server Administrator wird geöffnet. 4.
6. Klicken Sie auf Installieren, um die ausgewählten Softwarefunktionen zu installieren. Der Bildschirm Server Administrator installieren wird angezeigt, der den Status und Fortschritt der Softwarefunktioneninstallation bereitstellt. Bei der Installation der ausgewählten Funktionen wird das Dialogfeld Installationsassistent abgeschlossen geöffnet. 7. Klicken Sie auf Fertigstellen, um die Installation von Server Administrator abzuschließen.
4. Klicken Sie auf Ja, um die Deinstallation von Server Administrator zu bestätigen. Der Bildschirm Server Administrator wird angezeigt und bietet Aufschluss über den Status und Fortschritt der SoftwareFunktionen, die deinstalliert werden. Wenn Sie zu einem Sytemneustart aufgefordert werden, wählen Sie von folgenden Neustartoptionen aus: • Ja, das System jetzt neu starten. • Nein, das System später neu starten. Alle Server Administrator-Funktionen werden deinstalliert.
4 Installation von Managed System-Software auf Microsoft Windows Server 2008 Core und Microsoft Hyper-V-Server Die Installationsoption Server Core des Microsoft Windows Server 2008- und Hyper-V-Server-Betriebssystems bietet eine minimale Umgebung für die Ausführung von spezifischen Serverrollen, die die Wartungs- und Verwaltungsanforderungen sowie die Angriffsfläche für diese Serverrollen reduziert.
in die Eingabeaufforderung. Ersetzen Sie .mst mit der entsprechenden Sprachdatei. • 1031.mst (Deutsch) • 1034.mst (Spanisch) • 1036.mst (Französisch) • 1041.mst (Japanisch) • 2052.mst (Vereinfachtes Chinesisch) Verwandte Links: Optionale Befehlszeileneinstellungen Deinstallation der Systems Management-Software Geben Sie zur Deinstallation der Managed System Software in der Eingabeaufforderung den Befehl msiexec /x .msi ein.
5 Verwenden von Microsoft Active Directory Wenn Sie die Active Directory Service-Software verwenden, können Sie diese konfigurieren, um den Zugriff auf Ihr Netzwerk zu kontrollieren. Die Active Directory-Datenbank wurde so geändert, dass Remote-Verwaltungsauthentifizierung und -genehmigung unterstützt werden. Server Administrator kann jetzt ebenso wie iDRAC (Integrated Remote Access Controllers) und RAC (Remote Access Controllers) über eine Schnittstelle mit Active Directory verbunden werden.
Namen konfigurieren, so dass Benutzer Authentifizierung und Genehmigung mit Active Directory ausführen können. Darüber hinaus muss der Administrator das System zu mindestens einem Zuordnungsobjekt hinzufügen, damit sich Benutzer authentifizieren können. Das folgende Diagramm zeigt, dass das Zuordnungsobjekt die Verbindung bereitstellt, die für die gesamte Authentifizierung und Genehmigung erforderlich ist. Abbildung 1.
Abbildung 2. Active Directory-Objekte in einer einzelnen Domäne einrichten Objekte in einer einzelnen Domäne einrichten Gehen Sie folgendermaßen vor, um die Objekte für das Szenario mit einer einzelnen Domäne einzurichten: 1. Erstellen Sie zwei Zuordnungsobjekte. 2. Erstellen Sie zwei RAC-Produktobjekte, RAC1 und RAC2, die die zwei DRAC 4-Karten darstellen. 3.
Abbildung 3. Einrichten von Active Directory-Objekten von RAC in mehreren Domänen Einrichten von Active Directory-Objekten von RAC in mehreren Domänen Um die Objekte für dieses mehrfache Domänenszenario einzurichten, führen Sie die folgenden Aufgaben aus: 1. Stellen Sie sicher, dass sich die Gesamtstrukturfunktion der Domäne im systemeigenen Modus befindet. 2. Erstellen Sie in einer beliebigen Domäne zwei Zuordnungsobjekte, ZO1 (mit der Reichweite Universell) und ZO2. 3.
Abbildung 4. Einrichten von Active Directory-Objekten von Server Administrator in mehreren Domänen Einrichten von Active Directory-Objekten von Server Administrator in mehreren Domänen Um die Objekte für dieses mehrfache Domänenszenario einzurichten, führen Sie die folgenden Aufgaben aus: 1. Stellen Sie sicher, dass sich die Gesamtstrukturfunktion der Domäne im systemeigenen Modus befindet. 2. Erstellen Sie in einer beliebigen Domäne zwei Zuordnungsobjekte, ZO1 und ZO2.
Konfigurieren des Active Directory-Produktnamens So konfigurieren Sie den Active Directory-Produktnamen: 1. Suchen Sie die Datei omsaoem.ini im Installationsverzeichnis. 2. Bearbeiten Sie die Datei, indem Sie die Zeile adproductname=text hinzufügen, wobei text dem Namen des Produktobjekts entspricht, das Sie im Active Directory erstellt haben. Die Datei omsaoem.ini enthält z. B. die folgende Syntax, wenn der Active Directory-Produktname auf omsaApp konfiguriert ist.
VORSICHT: Der Dell Schema Extender verwendet die Datei SchemaExtenderOem.ini. Damit sichergestellt ist, dass das Dienstprogramm Dell Schema Extender richtig funktioniert, sollten Sie den Namen oder den Inhalt der Datei nicht verändern. 1. Klicken Sie im Startbildschirm auf Weiter. 2. Lesen Sie die Warnung und klicken Sie wieder auf Weiter. 3. Wählen Sie Aktuelle Anmeldeinformationen verwenden aus, oder geben Sie einen Benutzernamen und ein Kennwort mit Schema-Administratorrechten ein. 4.
dellRAC3Privileges dellOmsaAuxClass Tabelle 12. dellProduct Class OID 1.2.840.113556.1.8000.1280.1.1.1.5 Beschreibung Das ist die Hauptklasse, aus der alle Produkte von Dell abgeleitet werden. Klassentyp Strukturklasse SuperClasses Computer Attribute dellAssociationMembers Tabelle 13. dellOmsa2AuxClass Class OID 1.2.840.113556.1.8000.1280.1.2.1.1 Beschreibung Diese Klasse wird verwendet, um die Berechtigungen (Genehmigungsrechte) für den Server Administrator zu definieren.
Attributname/Beschreibung Zugewiesener OID/SyntaxObjektkennzeichner Einzelbewertung Eindeutiger Name (LDAPTYPE_DN 1.3.6.1.4.1.1466.115.121.1.12) dellProductMembers Die Liste von dellRacDevices-Objekten, die zu dieser Funktion gehören. Dieses Attribut ist die Vorwärtsverbindung zur dellAssociationMembersRückwärtsverbindung. 1.2.840.113556.1.8000.1280.1.1.2.2 FALSE Eindeutiger Name (LDAPTYPE_DN 1.3.6.1.4.1.1466.115.121.1.12) Link-ID: 12070 dellAssociationMembers 1.2.840.113556.1.8000.1280.1.1.2.
ANMERKUNG: Sie müssen das Administrator Pack auf jeder Management Station installieren, die die neuen Active Directory-Objekte verwaltet. Wenn Sie das Administrator Pack nicht installieren, können Sie das neue Objekt nicht im Container anzeigen. ANMERKUNG: Weitere Informationen über Active Directory-Benutzer- und Computer-Snap-in erhalten Sie in Ihrer Microsoft-Dokumentation.
Das Fenster Neues Objekt wird angezeigt. 4. Geben Sie einen Namen für das neue Objekt ein. 5. Wählen Sie das entsprechende Berechtigungsobjekt. 6. Klicken Sie auf OK. 7. Klicken Sie mit der rechten Maustaste auf das Berechtigungsobjekt, das Sie erstellt haben, und wählen Sie Eigenschaften aus. 8. Klicken Sie auf das Register Berechtigungen und wählen Sie die Berechtigungen aus, die der Benutzer haben soll.
So fügen Sie Produkte hinzu 1. Wählen Sie die Registerkarte Produkte und klicken Sie auf Hinzufügen. 2. Geben Sie den System-, Geräte- oder Gruppennamen ein und klicken Sie auf OK. 3. Klicken Sie im Fenster Eigenschaften auf Anwenden und anschließend auf OK. Konfigurieren von Systemen oder Geräten Anleitungen zur Konfiguration von Server Administrator-Systemen mit CLI-Befehlen finden Sie unter Konfigurieren von Active Directory mit CLI auf Systemen, die Server Administrator ausführen.
6 Häufig gestellte Fragen Welche Schnittstellen verwenden Systems ManagementAnwendungen? Der von Server Administrator verwendete sichere Standardanschlusserver ist 1311. Diese Schnittstellen sind konfigurierbar. Schnittstelleninformationen einer bestimmten Komponente finden Sie im Benutzerhandbuch zur jeweiligen Komponente.
Was muss ich tun, wenn die Erstellung von WinRM Listener mit der folgenden Meldung fehlschlägt? The CertificateThumbprint property must be empty when the SSL configuration will be shared with another service Wenn der Internet Information Server (IIS) bereits installiert und für HTTPS-Kommunikation konfiguriert ist, tritt der obige Fehlercode auf. Einzelheiten über die Koexistenz von IIS und WinRM sind verfügbar unter: technet.microsoft.com/en-us/library/ cc782312.aspx.
Muss ich vor der Installation von Citrix Metaframe frühere Versionen von Server Administrator deinstallieren? Ja. Deinstallieren Sie frühere Versionen von Server Administrator, bevor Sie Citrix Metaframe installieren (alle Versionen). Da nach der Installation von Citrix Metaframe Fehler in der Registry vorliegen können, müssen Sie Server Administrator neu installieren.
Unterstützt das Installationsprogramm von Systems Management „Windows AdvertisedInstallation“? Nein. Das Installationsprogramm von Systems Management unterstützt Windows Advertised-Installation nicht. Windows Advertised-Installation ist das Verfahren der automatischen Verteilung eines Programms an Client-Computer für nachträgliche Installation über die Windows-Gruppenrichtlinien.
Sind die durch Windows-Installationsdienste während einer Installation/Deinstallation angezeigten Zeitangaben genau? Nein. Der Windows-Installationsdienst zeigt während einer Installation/Deinstallation möglicherweise die restliche Laufzeit der aktuell ausgeführten Aufgabe an. Dies ist lediglich eine auf verschiedenen Faktoren basierende Schätzung der Windows Installer Engine. Kann ich meine Installation starten, ohne die Voraussetzungsprüfung auszuführen? Wie mache ich dies? Ja, das können Sie.