Server Administrator バージョン 8.
メモ、注意、警告 メモ: 製品を使いやすくするための重要な情報を説明しています。 注意: ハードウェアの損傷やデータの損失の可能性を示し、その問題を回避するための方法を説明しています。 警告: 物的損害、けが、または死亡の原因となる可能性があることを示しています。 著作権 © 2016 Dell Inc. 無断転載を禁じます。この製品は、米国および国際著作権法、ならびに米国および国際知的財産法で保護されています。 Dell、および Dell のロゴは、米国および / またはその他管轄区域における Dell Inc. の商標です。本書で使用されているその他すべての商標 および名称は、各社の商標である場合があります。 2016 - 10 Rev.
目次 1 はじめに..........................................................................................................................6 本リリースの新機能......................................................................................................................................................... 6 ソフトウェア可用性................................................................................................................................................... 6 Systems Management Software............................
製品 GUID を使用した無人アンインストール......................................................................................................... 31 Managed System Software の無人アンインストール..............................................................................................32 4 Microsoft Windows Server 2008 Core および Microsoft Hyper-V Server への Managed System Software のインストール.................................................................... 33 必要条件チェッカーの CLI モードでの実行.....................................................
Windows Server 2008 上でリモート Server Administrator 導入を使用して Server Administrator をインスト ールしたところ、Server Administrator アイコンがデスクトップに表示されません。........................................ 47 Windows Server 2008 の Server Administrator をアンインストール中、インストーラがショートカットを削 除しようとすると警告メッセージが表示されます。.............................................................................................47 MSI ログファイルはどこにありますか? ................................................................................................................
1 はじめに 本トピックには、次に関する説明が記載されています。 • 管理下システムへの Server Administrator のインストール。 • Remote Enablement 機能のインストールと使用。 • Server Administrator Web Server を使用したリモートシステムの管理。 • 導入およびアップグレード前、およびその最中におけるシステムの設定。 メモ: 管理ステーションと管理下システムソフトウェアを同じシステムにインストールする場合は、システムの競合を 避けるために、同じバージョンのソフトウェアをインストールしてください。 本リリースの新機能 Server Administrator の本リリースに新しく追加された主な機能は次のとおりです。 • 次のオペレーティングシステムのサポート: – Microsoft Windows Server 2016 • 次のウェブブラウザのサポート: – Google Chrome バージョン 50 – Mozilla Firefox バージョン 45 関連ドキュメントは、 その他のドキュメントを参照して
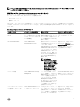
メモ: これらの DVD の詳細については、 『Systems Management Tools And Documentation < バージョン番号 > インスト ールガイド』を参照してください。 管理下システム上の Server Administrator コンポーネント セットアッププログラムでは、次のオプションが提供されます。 • カスタムセットアップ • 標準セットアップ カスタムセットアップオプションを使用すると、インストールするソフトウェアコンポーネントを選択することができます。 この表は、カスタムインストール中にインストールできる、さまざまな Managed System Software コンポーネントをリスト しています。 表 1.
コンポーネント インストールされる機能 導入シナリオ インストールするシステム モートシステム管理ソリュー ションを提供します。 WMI(管理インタフェース) Server Instrumentation の Windows Management Instrumentation インタフェー ス これをインストールして、 WMI プロトコルを使用した、 サーバーデータを管理するた めの管理ソリューションを、 ローカルおよびリモートシス テムに提供します。 対応システム。対応システム のリストは、『Systems Software サポートマトリク ス』を参照してください。 SNMP(管理インタフェース) Server Instrumentation のシン これをインストールして、コ 対応システム。対応システム プルネットワーク管理プロト マンドラインインタフェース のリストは、『Systems を使用した、サーバーおよび Software サポートマトリク コルインタフェース ストレージ計装データを管理 ス』を参照してください。 するための管理ソリューショ ンを、ローカルおよびリモー トシステ
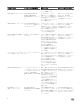
コンポーネント インストールされる機能 導入シナリオ インストールするシステム Broadcom SNMP エージェン ト(NIC インタフェース) Broadcom SNMP エージェン ト Server Administrator が Broadcom NIC に関する情報 を入手できるようにインスト ールします。 Server Instrumentation がイン ストールされ、Windows オペ レーティングシステムが実行 されているシステムのみ。 QLogic SNMP エージェント Server Administrator が QLogic NIC に関する情報を入 手できるようにインストール します。 Server Instrumentation がイン ストールされ、Windows オペ レーティングシステムが実行 されているシステムのみ。 QLogic SNMP エージェント (NIC インタフェース) セキュリティ機能 Systems Management Software のコンポーネントは、次のセキュリティ機能を提供しています。 • 異なる特権レベルを使用
• 『Integrated Remote Access Controller ユーザーズガイド』では、システムとその共有リソースをネットワークを介してリ モートから管理 / 監視するために組み込まれた Dell Remote Access Controller の設定と使用法について詳しく説明してい ます。 • 『Update Packages ユーザーズガイド』は、システムアップデート対策の一環として、Windows および Linux 用 Update Packages の入手と使用法について説明しています。 • 『Server Update Utility ユーザーズガイド』は、Server Update Utility の使用についての情報を提供します。 • 『Systems Management ツールとマニュアル』DVD には、メディア上にあるアプリケーションの readme ファイルが含まれ ます。 メモ: 製品が予期した通りに動作しない、または本書で説明されている手順が理解できない場合は、システムの『ハー ドウェアオーナーズマニュアル』で「困ったときは」を参照してください。 10
2 インストール前のセットアップ Server Administrator をインストールする前に、次のタスクを実行してください。 • オペレーティングシステムのインストール手順をお読みください。 • 「インストール要件」を読み、ご使用のシステムが最小要件を満たしていることを確認してください。 • 該当する readme ファイルおよび『Systems Software サポートマトリクス』をお読みください。 • Server Administrator アプリケーションをインストールする前に、システムで実行されているすべてのアプリケーションを 閉じてください。 必要条件チェッカー setup.exe(場所は \SYSMGMT\srvadmin\windows)は、必要条件チェッカープログラムを開始します。必要条件チェッカー プログラムは、実際のインストールを開始せずにソフトウェアコンポーネントの必要条件を調べます。このプログラムは、 ソフトウェア機能のインストールおよび動作に影響する可能性のあるシステムのハードウェアおよびソフトウェアに関する 情報が記載された状態ウィンドウを表示します。 メモ:
戻りコード 説明 —3 ユーザーは システム管理者 権限を持っていません。必要条件チェッカーは実行されません。 —4 実装された戻りコードではありません。 —5 必要条件チェッカーは実行されません。ユーザーは、作業ディレクトリを %TEMP% に変更しませんでした。 —6 目的のディレクトリが存在しません。必要条件チェッカーは実行されません。 —7 内部エラーが発生しました。必要条件チェッカーは実行されません。 —8 ソフトウェアはすでに実行中です。必要条件チェッカーは実行されません。 —9 WSH が壊れている、誤まったバージョンである、またはインストールされていません。必要条件チェッカー は実行されません。 —10 スクリプト実行環境でエラーが発生しました。必要条件チェッカーは実行されません。 メモ: 負の戻りコード(-1~-10)は、必要条件チェッカーツールの実行の失敗を示します。負の戻りコードの推定原因 にはソフトウェアポリシーの制限、スクリプトの制限、フォルダのアクセス許可がない、およびサイズの制限が含まれ ます。 メモ: 戻りコード が 2 または 3 の場合は、
インストール要件 本項では、Server Administrator の一般的な要件を説明し、対応オペレーティングシステムおよびウェブブラウザについての 情報を提供します。 メモ: オペレーティングシステム固有の必要条件がインストール手順として記載されています。 対応オペレーティングシステムとウェブブラウザ 対応オペレーティングシステムとウェブブラウザについての情報は、 『Systems Software サポートマトリクス』を参照してく ださい。 メモ: ウェブブラウザがローカルアドレス用のプロキシサーバーをバイパスするように設定されていることを確認して ください。 Multilingual User Interface のサポート このインストーラは、次のオペレーティングシステムで使用可能な Multilingual User Interface(MUI)のサポートを提供しま す。 • Windows Server 2008 (32 ビットおよび 64 ビット) • Windows Server 2008(64 ビット)R2 • Windows Server 2008(64 ビット)R2 S
• • • • 対応システム管理プロトコル規格のうち 1 つ。 最小画面解像度が 800 x 600 のモニタ。推奨される画面解像度は最小 1024 x 768 です。 Server Administrator Remote Access Controller サービスは、管理下システムにインストールされたリモートアクセスコント ローラ(RAC)を必要とします。完全なソフトウェアおよびハードウェア要件については、『Remote Access Controller ユ ーザーズガイド』を参照してください。 メモ: 管理下システムが RAC インストールのすべての必要条件を満たす場合、RAC ソフトウェアは 標準セットアッ プ インストールオプションの一部としてインストールされます。 Server Administrator Storage Management Service は、管理下システムにインストールされた Server Administrator を必要と します。完全なソフトウェアおよびハードウェア要件については、 『Server Administrator Storage Management
i - 状態メッセージ c - 初期 UI パラメータ e - すべてのエラーメッセージ w - 致命的でない警告 a - 処置の開始 r - 処置固有の記録 m - メモリ不足または致命的終了の情報 u - ユーザー要求 p - ターミナルプロパティ + - 既存ファイルに追加 ! - 各行をログにフラッシュ "*" - ワイルドカード。v オプションを除くすべての情報をログに記録します。v オプションを含めるには、「/l*v」と指定し ます。 アクティブ化されると、%TEMP% ディレクトリにログファイルが生成されます。このディレクトリに生成されるログファイ ルの一部は次のとおりです。 • 管理下システムのインストール – SysMgmt_< タイムスタンプ >.
• インストール要件 • 対応システム管理プロトコル標準 セキュアポートサーバーとセキュリティのセットアップ 本項には次のトピックが含まれています。 • ユーザーおよびサーバープリファランスの設定 • X.509 証明書管理 ユーザーおよびサーバープリファランスの設定 Server Administrator のユーザーおよびセキュアポートサーバーのプリファランスは、各 プリファランス ウェブページから設 定できます。一般設定 をクリックし、ユーザー タブまたは Web Server タブのいずれかをクリックします。 X.509 証明書管理 ウェブ証明書は、リモートシステムとの間でやり取りされる ID および情報を、他人が閲覧または変更できないようにするた めに必要です。システムのセキュリティを確保するには、新しい X.509 証明書を生成するか、既存の X.
WinRM のインストール Windows Server 2008 R2、Windows Server 2008 R2 SP1、Windows 7、Windows 8 および Windows Server 2012 では、デフォル トで WinRM 2.0 がインストールされます。Windows Server 2008 では、デフォルトで WinRM 1.1 がインストールされます。 認証局署名 / 自己署名証明書 お使いのシステムに Remote Enablement 機能をインストールして設定するには、CA 署名付き証明書または自己署名証明書 (SelfSSL ツールで生成)が必要になります。 メモ: CA 署名付き証明書の使用をお勧めします。 CA 署名付き証明書の使用 CA 署名付き証明書を使用するには、次の手順を実行します。 1. 有効な CA 署名付き証明書をリクエストします。 2. CA 署名付き証明書で HTTP リスナーを作成します。 有効な CA 署名付き証明書のリクエスト 有効な CA 署名付き証明書をリクエストするには、次の手順を実行します。 1.
3. 追加 をクリックし、必要なユーザーまたはグループ(ローカル / ドメイン)をリストに追加します。 4. 各ユーザーに適切な許可を与え、OK をクリックします。 WMI WMI サーバーのためのユーザー認証を設定するには、次の手順を実行します。 1. スタート → ファイル名を指定して実行 をクリックします。 2. wmimgmt.msc と入力し、OK をクリックします。 3. 左ペインの WMI コントロール(ローカル) ノードを右クリックし、プロパティ をクリックします。 Windows Management Infrastructure(WMI) 画面が表示されます。 WMI コントロール(ローカル)のプロパティ 画面が表示されます。 4. セキュリティ をクリックし、名前空間ツリーで Root ノードを展開します。 5. Root → DCIM → sysman と移動します。 6. セキュリティ をクリックします。 セキュリティ 画面が表示されます。 7. 追加 をクリックし、必要なユーザーまたはグループ(ローカル / ドメイン)をリストに追加します。 8.
3 Microsoft Windows オペレーティングシステムへ の Managed System Software のインストール Microsoft Windows では、『Systems Management ツールとマニュアル』DVD を挿入すると、autorun ユーティリティが表示さ れます。このユーティリティによって、システムにインストールするシステム管理ソフトウェアを選択できます。 自動実行プログラムが自動的に開始されない場合、DVD ルートからの自動実行プログラム、または『Systems Management ツールとマニュアル』DVD の SYSMGMT\srvadmin\windows ディレクトリにあるセットアッププログラムを使用します。現 在サポートされているオペレーティングシステムのリストについては、 『Systems Software サポートマトリクス』を参照して ください。 メモ: 『Systems Management ツールとマニュアル』DVD を使用して、Managed System Software の無人およびスクリ プト記述されたサイレントインストールを実行しま
Select(選択) 目的 下にあります。この場合は、リモートシステムに Server Administrator Web Server をインストールする必要がありま す。 管理下システムに取り付けられたローカルおよびリモートス Storage Management。 トレージのステータスを表示し、統合グラフィカル表示でス トーレジ管理情報を取得する。 システムが停止した場合に、操作不能なシステムにリモート DRAC Command Line Tools。 アクセスし、アラート通知を受信して、システムをリモート から再起動する。 メモ: Managed System Software をインストールする前に、オペレーティングシステムメディアを使用して、管理下シ ステムにシンプルネットワーク管理プロトコル(SNMP)エージェントをインストールする。 インストーラの場所 32 ビットおよび 64 ビット用のインストーラの場所は、次のとおりです。 • • 32 ビット:DVD Drive\SYSMGMT\srvadmin\windows\SystemsManagement\SysMgmt.
• Server Administrator の導入シナリオ • オプションのコマンドライン設定 標準インストール 必要条件チェッカーから Server Administrator のインストールを開始し、標準セットアップ オプションを選択すると、セット アッププログラムは次の Managed System Software 機能をインストールします。 • Server Administrator Web Server • Server Instrumentation • ストレージ管理 • コマンドラインインタフェース • WMI • snmp • オペレーティングシステムロギング • DRAC Command Line Tools • Intel SNMP エージェント • Broadcom SNMP エージェント • SNMP エージェント() 標準 インストール中に、固有のハードウェアおよびソフトウェア要件を満たさない個々の管理ステーションサービスは、管 理下システムにインストールされません。たとえば、Server Administrator Rem
Server Administrator インストールウィザードへようこそ 画面が表示されます。 6. 次へ をクリックします。 ソフトウェア製品ライセンス契約 が表示されます。 7. ライセンス契約の条件に同意します をクリックしてから、次へ をクリックします。 セットアップタイプ ダイアログボックスが表示されます。 8. カスタム を選択して次へ をクリックします。 カスタムセットアップ ダイアログボックスが表示されます。 9.
Citrix Application Server を使用した Server Administrator のインストール Citrix は、インストール時にすべてのハードディスクドライブ文字を再マップします。たとえば、Server Administrator をドラ イブ C: にインストールし、次に Citrix をインストールする場合は、ドライブ文字 C: が M: に変更されることがあります。こ の再マップのため、Server Administrator は正常に動作しない場合があります。 この問題を回避するには、次のオプションのいずれかを選択します。 オプション 1: 1. Server Administrator をアンインストールします。 2. Citrix をインストールします。 3. Server Administrator を再インストールします。 オプション 2: Citrix のインストール後に、コマンド msiexec.exe /fa SysMgmt.
標準無人インストールパッケージとしての DVD 全体の配布 1. 『Systems Management ツールとマニュアル』DVD のイメージ全体をターゲットシステムに配布します。 2. DVD イメージから msiexec.exe /i DVD Drive\<32–bit or 64–bit MSI path on the DVD>/qb コマンドを 実行するように ISV 配布ソフトウェアを設定します。 プログラムを実行すると、各リモートシステムに Server Administrator がインストールされます。 3. 各リモートシステムを再起動して、Server Administrator を有効にします。 カスタム無人インストールパッケージの作成 カスタム無人インストールパッケージを作成するには、次の手順を実行します。 1. DVD からシステムのハードドライブに SYSMGMT\srvadmin\windows ディレクトリをコピーします。 2. Windows インストーラエンジン(msiexe.
表 5. MSI インストーラのコマンドライン設定 設定 結果 /i このコマンドを使用すると、製品がインストールまたは設定 されます。 /i .msi – Server Administrator ソ フトウェアがインストールされます。 /i .msi /qn このコマンドは新規のインストールとして実行されます。 /x このコマンドを使用すると、製品がアンインストールされま す。 /x.
設定 結果 /fs – このオプションを使用すると、すべての既存のショート カットが上書きされます。 /fv – このオプションを使用すると、ソースから実行し、ロ ーカルパッケージを再キャッシュします。アプリケーション または機能の初めてのインストールには、この再インストー ルオプションを使用しないでください。 INSTALLDIR= このコマンドを使用すると、特定の場所にある製品がインス トールされます。インストールディレクトリをこのスイッチ で指定する場合は、CLI インストールコマンドを実行する前 に手動で作成する必要があります。さもなければ、エラーメ ッセージを表示しないで失敗します。 /i .msi INSTALLDIR=c: \OpenManage /qn – インストール先が c:\OpenManage で ある特定の場所に製品をインストールします。 CP_MESSAGE_FORMAT= このコマンドを実行すると、警告メッセージを設定します(推 奨)、または 拡張メッセージフォーマ
表 6.
インストール失敗後のシステム回復 Microsoft Software Installer(MSI)によって、インストールが失敗した後にシステムを完全に動作する状態に戻すことができ ます。MSI は、インストール、アップグレード、またはアンインストール中に実行するすべてのスタンダードアクションに 対して、取り消し動作を維持することによってこれを行います。この動作には、削除または上書きされたファイル、レジス トリキー、およびその他のリソースの復元が含まれます。Windows は、必要に応じて、ロールバックとして回復できるよう に、インストールまたは削除処理の間に削除または上書きされたすべてのファイルを一時的に保存します。インストールが 正常に完了した後で、Windows は一時的なバックアップファイルをすべて削除します。 MSI スタンダードアクションのロールバックに加えて、ライブラリでもロールバックが発生した場合に、各アプリケーショ ンに対して INI ファイルに記載されたコマンドの取り消しができます。インストールアクションによって変更されたすべて のファイルは、ロールバックが発生した場合、元の状態に復元され
• • • • Linux 詳細インストールが含まれた Server Administrator の最新バージョンにアップグレードすることが可能です。Linux 詳細インストールオプションが必要な場合は、既存バージョンの Server Administrator をアンインストールして、最新バー ジョンの Server Administrator をインストールする必要があります。 6.
選択した機能には、その隣にハードドライブアイコンが描かれています。選択解除した機能には、隣に赤い X が付いて います。デフォルトで、必要条件チェッカーがサポートハードウェアのないソフトウェア機能を発見した場合、チェッ カーはその機能を選択解除します。 7. 選択したソフトウェア機能のインストールを許可するには、次へ をクリックします。 プログラムの変更準備完了 ダイアログボックスが表示されます。 8. 選択したソフトウェア機能をインストールするには、インストール をクリックします。 Server Administrator のインストール 画面が表示されます。メッセージによってインストール中のソフトウェア機能の ステータスおよび進行状況が提供されます。選択した機能がインストールされると、インストールウィザードの完了 ダ イアログボックスが表示されます。 9.
セットアッププログラムが自動的に起動しない場合は、DVD の SYSMGMT\srvadmin\windows ディレクトリの setup.exe を実行します。 Server Administrator 必要条件 ステータス画面が表示され、管理下システムについて必要条件チェックを実行します。チ ェック中に検出されたすべての関連する情報メッセージ、警告メッセージ、またはエラーメッセージが表示されます。 エラーおよび警告の問題があれば、解決します。 2. Server Administrator のインストール、変更、修復、または削除 オプションをクリックします。 Server Administrator インストールウィザードへようこそ 画面が表示されます。 3. 次へ をクリックします。 このダイアログで、プログラムの変更、修復、削除などを実行できます。 プログラムメンテナンス ダイアログボックスが表示されます。 4. 削除 オプションを選択して 次へ をクリックします。 プログラムの削除 ダイアログボックスが表示されます。 5.
• 64 ビット用 msiexec.exe /x {BC9A6F51-98C3-4186-BF16-C73117D9CAFD} Managed System Software の無人アンインストール Systems Management インストーラには、無人アンインストール機能が備わっています。無人アンインストールでは、複数の システムから Managed Systems Software を同時にアンインストールできます。無人アンインストールパッケージは、ISV の ソフトウェア配布ツールを使用してリモートシステムに配布されます。パッケージが配布されると、ソフトウェアをアンイ ンストールするアンインストールスクリプトが実行されます。 無人アンインストールパッケージの配布 『Systems Management ツールとマニュアル』DVD は、無人アンインストールパッケージとして機能するよう事前に設定され ています。このパッケージを 1 つまたは複数のシステムに配布するには、次の手順を実行します。 1. DVD を使用している場合は、無人アンインストールパッケージが配布された後で、msiexec.
4 Microsoft Windows Server 2008 Core および Microsoft Hyper-V Server への Managed System Software のインストール Microsoft Windows Server 2008 および Hyper-V Server オペレーティングシステムの Server Core インストールオプションは、 特定のサーバー役割を実行するために最低限の環境を提供し、これらのサーバー役割のメンテナンスと管理要件、および攻 撃可能な部分を削減します。Windows Server 2008 Core または Hyper-V Server インストールは、対応サーバー役割によって 必要とされるバイナリのサブセットのみをインストールします。例えば、Explorer シェルは Windows Server 2008 Core また は Hyper-V Server インストールの一環としてインストールされず、その代わりに Windows Server 2008 Core または Hyper-V Server インストールのデフォルトユーザーインタフェース
.mst は、次の適切な言語ファイルに置き換えます。 • 1031.mst(ドイツ語) • 1034.mst(スペイン語) • 1036.mst(フランス語) • 1041.mst(日本語) • 2052.mst(簡体字中国語) 関連リンク: オプションのコマンドライン設定 システム管理ソフトウェアのアンインストール Managed System Softoware をアンインストールするには、コマンドプロンプトで msiexec /x .
5 Microsoft Active Directory の使用 Active Directory サービスソフトウェアを使用する場合は、ネットワークへのアクセスを制御するために Active Directory サー ビスソフトウェアを設定します。Active Directory データベースは、リモート管理認証および承認をサポートするように変更 、Remote Access Controllers(RAC) されています。Server Administrator の他、Integrated Dell Remote Access Controllers(iDRAC) も Active Directory と連動するようになりました。このツールを利用して、ひとつの中央データベースからユーザーと特権を 追加および制御できます。 Active Directory スキーマ拡張 Active Directory データは、属性 および クラス の分散データベースに存在します。Active Directory の クラス の一例は ユーザ ー クラスで、ユーザークラスの属性の例は、ユーザーの姓、名前、電話番号などで
次の図は、関連オブジェクトが、すべての認証および承認に必要な接続を提供することを示しています。 図 1. Active Directory オブジェクトの標準的なセットアップ さらに、Active Directory オブジェクトを単一のドメインまたは複数のドメインでセットアップすることもできます。RAC オ ブジェクト、または Server Administrator オブジェクトをセットアップするかしないかに関係なく、単一のドメインでのオブ ジェクトのセットアップ方法に違いはありません。ただし、複数のドメインが関係する場合は、若干違いがあります。 次の図は、単一ドメインでの Active Directory オブジェクトのセットアップを示しています。このシナリオでは、2 つの DRAC 4 カード(RAC1 および RAC2)と 3 人の既存の Active Directory ユーザー(User1、User2、および User3)が存在します。ま た、両方の DRAC 4 カードで User1 と User2 に管理者特権を与え、RAC2 カードで User3 にログイン特権を与えます。 図 2.
6. Group1 を関連オブジェクト 1(AO1)のメンバー、Priv1 を AO1 の特権オブジェクト、そして RAC1 と RAC2 の両方を AO1 の製品としてそれぞれ追加します。 7.
システムにアクセスするための Active Directory の設定 Active Directory を使用してシステムにアクセスする前に、Active Directory ソフトウェアとシステムの両方を設定する必要が あります。 1. Active Directory スキーマを拡張します。 2. Active Directory ユーザーとコンピュータスナップインを拡張します。 3. Active Directory にシステムユーザーとその特権を追加します。 4. RAC システムの場合は、各ドメインコントローラで SSL を有効にします。 5.
表 8.
SuperClasses グループ 属性 dellProductMembers dellPrivilegeMember 表 11. dellPrivileges クラス OID 1.2.840.113556.1.8000.1280.1.1.1.4 説明 このクラスは、Dell 特権(認証権限)のコンテナクラスと して使用されます。 クラスの種類 構造体クラス SuperClasses ユーザー 属性 dellRAC4Privileges dellRAC3Privileges dellOmsaAuxClass 表 12. dellProduct クラス OID 1.2.840.113556.1.8000.1280.1.1.1.5 説明 すべての Dell 製品が派生する主要クラスです。 クラスの種類 構造体クラス SuperClasses コンピュータ 属性 dellAssociationMembers 表 13. dellOmsa2AuxClass クラス OID 1.2.840.113556.1.8000.1280.1.2.1.
クラスの種類 構造体クラス SuperClasses dellProduct 属性 dellAssociationMembers 表 15. Active Directory スキーマに追加される一般的な属性 属性名 / 説明 割り当てられた OID/ 構文オブジェク ト識別子 単一値 dellPrivilegeMember 1.2.840.113556.1.8000.1280.1.1.2.1 FALSE この属性に属する dellPrivilege オブジ ェクトのリスト。 dellProductMembers 識別名(LDAPTYPE_DN 1.3.6.1.4.1.1466.115.121.1.12) 1.2.840.113556.1.8000.1280.1.1.2.2 FALSE この役割に属する dellRacDevices オブ 識別名(LDAPTYPE_DN ジェクトのリスト。この属性は、 dellAssociationMembers バックワード 1.3.6.1.4.1.1466.115.121.1.
Active Directory ユーザーとコンピュータスナップインへの拡張のインストール 『Systems Management ツールとマニュアル』DVD を使用してシステム管理ソフトウェアをインストールする場合は、インス トール時に Active Directory スナップイン オプションを選択してスナップインをインストールすることができます。 64 ビット Windows オペレーティングシステムの場合、スナップインのインストーラは :\SYSMGMT \x64\ManagementStation\windows\ADSnapIn にあります。 メモ: 新しい Active Directory オブジェクトを管理している各管理ステーションに Administrator Pack をインストール します。Administrator Pack をインストールしない場合は、コンテナ内の新しいオブジェクトを参照できません。 メモ: Active Directory ユーザーとコンピュータスナップインの詳細については、Microsoft のマニュアルを参照してく ださい。 関連リンク: A
権限オブジェクトの作成 権限オブジェクトは、それに関連付けられる関連オブジェクトと同じドメインに作成する必要があります。 1. コンソールのルート(MMC)ウィンドウでコンテナを右クリックします。 2. 新規作成 を選択します。 3. インストールしたコンポーネントに応じて、RAC または Server Administrator のオブジェクトを選択します。 新規オブジェクト ウィンドウが表示されます。 4. 新しいオブジェクトの名前を入力します。 5. 該当する 権限オブジェクト を選択します。 6. OK をクリックします。 7. 作成した権限オブジェクトを右クリックして プロパティ を選択します。 8.
製品 タブをクリックして 1 つ、または複数のシステムあるいはデバイスを関連付けに追加します。関連付けられたオブ ジェクトは、定義済みのユーザーまたはユーザーグループが使用できる、ネットワークに接続された製品を指定します。 メモ: 関連オブジェクトに、複数のシステムまたは RAC デバイスを追加します。 製品を追加するには 1. 製品 タブを選択して 追加 をクリックします。 2. システム、デバイス、またはグループ名を入力して、OK をクリックします。 3.
6 よくあるお問い合わせ(FAQ) Systems Management アプリケーションはどのポートを使用します か? Server Administrator が使用するデフォルトポートは 1311 です。これらのポートは設定可能です。特定のコンポーネントのポ ート情報は、そのコンポーネントのユーザーガイドを参照してください。 低帯域幅、低レイテンシの WAN 上で DRAC コントローラで仮想メデ ィアを実行するとき、Systems Management のインストールを仮想メ ディアで直接起動すると、失敗します。どうすればよいですか? ローカルシステムにウェブインストールパッケージをコピーしてから、Systems Management インストールを起動してくださ い。 Server Administrator Storage Management サービスをインストール する前に、システムにインストールされている Adaptec Fast Console アプリケーションをアンインストールする必要はありますか? はい。Adaptec Fast Console がすでにシステム上にインストールされ
このエラーは、Internet Information Server(IIS)がすでにインストールされ、HTTPS 通信用に設定されている場合に発生しま す。IIS と WinRM の共存の詳細については、technet.microsoft.com/en-us/library/cc782312.
Server Administrator とオンライン診断を同じディレクトリにインストールすると、オンライ ン診断が正常に機能しません。どうすればよいですか? Server Administrator とオンライン診断を同じディレクトリにインストールした場合、オンライン診断は正常に機能しない可 能性があります。Server Administrator をアンインストールすると、オンライン診断のファイルをすべて失うこともあります。 この不具合を回避するには、Server Administrator とオンライン診断を異なるディレクトリにインストールします。一般に、 複数のアプリケーションを同じディレクトリにインストールすることは推奨されません。 Windows Server 2008 上でリモート Server Administrator 導入を使用して Server Administrator をインストールしたところ、Server Administrator アイコンがデスクトップに表 示されません。 Windows 2008 が稼動するサーバー上での、リモートの Server Administrator
最新バージョンが既にインストールされているというメッセージが表示される場合、どうすれ ばよいですか? MSP を使用して、バージョン X からバージョン Y にアップグレードし、次にバージョン Y の DVD(フルインストール)を 使用しようとすると、バージョン Y の DVD の必要条件チェッカーは最新バージョンが既にインストールされていることを通 知します。続行するとインストールは メンテナンス モードで実行されず、変更、修復、または 削除 オプションは表示され ません。インストールの続行によって、MSP は削除され、バージョン Y パッケージに存在する MSI ファイルのキャッシュが 作成されます。2 回目に実行する場合は、インストーラは メンテナンス モードで実行されます。 必要条件チェッカーの情報を最も有効に使用する方法を教えてください。 必要条件チェッカーは Windows で使用可能です。必要条件チェッカーの使用の詳細については、 『Systems Management ツー ルとマニュアル』DVD の SYSMGMT\srvadmin\windows\PreReqChecker\readme
システムにインストールされているシステム管理ソフトウェアのバージョンを知る方法を教 えてください。 Windows の コントロールパネル へ移動し、プログラムの追加と削除 をダブルクリックして Systems Management ソフトウ ェア を選択します。サポート情報 へのリンクを選択します。 Systems Management のアップグレード後に、システムを再起動する必要はありますか? アップグレードでは、アップグレードするファイルが使用中の場合、再起動を必要とする可能性があります。これは標準の Windows インストーラの動作です。プロンプトが表示されたらシステムを再起動することを推奨します。 現在システムにインストールされている Server Administrator の機能は、どこに表示されます か? Windows の コントロールパネル に移動し、プログラムの追加と削除 をダブルクリックして、現在インストールされている Server Administrator 機能を表示します。 Windows で使用される Systems Management の機能名をすべて教えてくださ