Dell™ OptiPlex™ 170L Quick Reference Guide Models MTC2 and DHS w w w. d e l l . c o m | s u p p o r t . d e l l .
Notes, Notices, and Cautions NOTE: A NOTE indicates important information that helps you make better use of your computer. NOTICE: A NOTICE indicates either potential damage to hardware or loss of data and tells you how to avoid the problem. CAUTION: A CAUTION indicates a potential for property damage, personal injury, or death. If you purchased a Dell™ n Series computer, any references in this document to Microsoft® Windows® operating systems are not applicable.
Contents Finding Information for Your Computer About Your Small Desktop Computer . . . . . . . . . . . . . . . . . . . 5 . . . . . . . . . . . . . . . . . . . . 8 . . . . . . . . . . . . . 8 9 10 . . . . . . . . . . . . . . . . . . . . . 11 . . . . . . . . . . . . . . . . . . . . . . . . . . . . . . . . . . . . . . . . . . . . . . . . 11 12 . . . . . . . . . . . . . . . . . . . . . . . . . 13 Front and Back Views . . . . . . . . . . . . Inside Your Computer . . . . . . . . . . . .
Contents
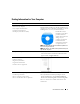
Finding Information for Your Computer What Are You Looking For? Find It Here • • • • • Drivers and Utilities CD (also known as the ResourceCD) A diagnostic program for my computer Drivers for my computer My computer documentation My device documentation Desktop System Software (DSS) • OS updates and patches Documentation and drivers are already installed on your computer. You can use the CD to reinstall drivers, run the Dell Diagnostics, or access your documentation.
www.dell.com | support.dell.com What Are You Looking For? Find It Here • Service Tag and Express Service Code • Microsoft Windows License Label Service Tag and Microsoft Windows License These labels are located on your computer. • Use the Service Tag to identify your computer when you use support.dell.com or contact technical support. • Enter the Express Service Code to direct your call when contacting technical support. The Express Service Code is not available in all countries.
What Are You Looking For? Find It Here • How to use Windows XP • Documentation for my computer • Documentation for devices (such as a modem) Windows Help and Support Center 1 Click the Start button and click Help and Support. 2 Type a word or phrase that describes your problem and click the arrow icon. 3 Click the topic that describes your problem. 4 Follow the instructions on the screen.
www.dell.com | support.dell.com About Your Small Desktop Computer Front and Back Views front panel door service tag headphone connector USB 2.
Inside Your Computer CAUTION: Before you begin any of the procedures in this section, follow the safety instructions in the Product Information Guide. CAUTION: To avoid electrical shock, always unplug your computer from the electrical outlet before opening the cover. NOTICE: Be careful when opening the computer cover to ensure that you do not accidently disconnect cables from the system board.
www.dell.com | support.dell.com Attaching and Removing the Computer Stand CAUTION: Before you begin any of the procedures in this section, follow the safety instructions in the Product Information Guide. NOTE: Place your computer on a soft surface to prevent scratching the top cover. Your computer can be used in either a vertical or horizontal position.
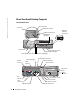
About Your Mini-Tower Computer Front and Back Views CD or DVD drive activity light service tag CD or DVD eject button second drive bay floppy drive light floppy drive eject button power light hard-drive activity light power button USB 2.0 connectors (2) headphone connector power connector voltage selection switch serial connector video connector keyboard connector parallel connector diagnostic lights (4) mouse connector line-out connector line-in connector microphone connector USB 2.
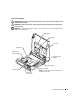
www.dell.com | support.dell.com Inside Your Computer CAUTION: Before you begin any of the procedures in this section, follow the safety instructions in the Product Information Guide. CAUTION: To avoid electrical shock, always unplug your computer from the electrical outlet before opening the cover. NOTICE: Be careful when opening the computer cover to ensure that you do not accidently disconnect cables from the system board.
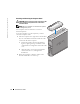
Setting Up Your Computer CAUTION: Before performing any of the procedures in this section, follow the safety instructions in the Product Information Guide. NOTICE: If your computer has an expansion card installed (such as a modem card), connect the appropriate cable to the card, not to the connector on the back panel. You must complete all steps to properly set up your computer. See the appropriate illustrations that follow the instructions. 1 Connect the keyboard and mouse.
www.dell.com | support.dell.
Mini-tower Computer Setup Without Cards monitor keyboard mouse speakers headphones network USB Setup With Cards speakers telephony/ modem Quick Reference Guide 15
www.dell.com | support.dell.
Solving Problems Dell provides a number of tools to help you if your computer does not perform as expected. For the latest troubleshooting information available for your computer, see the Dell Support website at support.dell.com. If computer problems occur that require help from Dell, write a detailed description of the error, beep codes, or diagnostics light patterns; record your Express Service Code and Service Tag below; and then contact Dell from the same location as your computer.
www.dell.com | support.dell.com Starting the Dell Diagnostics From the Optional Drivers and Utilities CD 1 Insert the Drivers and Utilities CD. 2 Shut down and restart the computer. When the DELL logo appears, press immediately. If you wait too long and the Windows logo appears, continue to wait until you see the Windows desktop. Then shut down your computer and try again. NOTE: The next steps change the boot sequence for one time only.
3 If you run a test from the Custom Test or Symptom Tree option, click the applicable tab described in the following table for more information. Tab Function Results Displays the results of the test and any error conditions encountered. Errors Displays error conditions encountered, error codes, and the problem description. Help Describes the test and may indicate requirements for running the test. Configuration Displays your hardware configuration for the selected device.
www.dell.com | support.dell.com Power Light Problem Description Suggested Resolution Blinking yellow A power supply or system board failure has occurred. Check "Diagnostic Lights" on page 20 to see if the specific problem is identified. See "Power Problems" in your online User’s Guide. Solid green and a beep code during POST A problem was detected while the BIOS was executing. See "Beep Codes" on page 22 for instructions on diagnosing the beep code.
Light Pattern yellow green yellow yellow green green yellow yellow yellow yellow green yellow yellow green green yellow green green green yellow Problem Description Suggested Resolution A possible processor failure has occurred. • Reinstall the processor and restart the computer. Memory modules are detected, but a • If you have one memory module installed, reinstall it and memory failure has occurred. restart the computer.
www.dell.com | support.dell.com Light Pattern yellow yellow yellow green yellow green yellow green yellow green green green green green green green Problem Description Suggested Resolution No memory modules are detected. • Reinstall all memory modules and restart the computer. • To eliminate the possibility of a faulty memory connector, remove all memory modules, reinstall one memory module (if the computer supports a single module), and then restart the computer.
Code Cause Code Cause 1-1-2 Microprocessor register failure 3-1-4 Slave interrupt mask register failure 1-1-3 NVRAM read/write failure 3-2-2 Interrupt vector loading failure 1-1-4 ROM BIOS checksum failure 3-2-4 Keyboard Controller Test failure 1-2-1 Programmable interval timer failure 3-3-1 NVRAM power loss 1-2-2 DMA initialization failure 3-3-2 Invalid NVRAM configuration 1-2-3 DMA page register read/write failure 3-3-4 Video Memory Test failure 1-3 Video Memory Test failure 3
www.dell.com | support.dell.com Resolving Software and Hardware Incompatibilities If a device is either not detected during the operating system setup or is detected but incorrectly configured, you can use the Hardware Troubleshooter to resolve the incompatibility. In the Microsoft® Windows® 2000 operating system, you can also use Device Manager to resolve incompatibilities. Windows XP To resolve incompatibilities using the Hardware Troubleshooter: 1 Click the Start button and click Help and Support.
Using Microsoft® Windows® XP System Restore The Microsoft® Windows® XP operating system provides System Restore to allow you to return your computer to an earlier operating state (without affecting data files) if changes to the hardware, software, or other system settings have left the computer in an undesirable operating state. See the Windows Help and Support Center for information on using System Restore. NOTICE: Make regular backups of your data files.
www.dell.com | support.dell.com Undoing the Last System Restore NOTICE: Before you undo the last system restore, save and close all open files and exit any open programs. Do not alter, open, or delete any files or programs until the system restoration is complete. 1 Click the Start button, point to All Programs→ Accessories→ System Tools, and then click System Restore. 2 Click Undo my last restoration and click Next. 3 Click Next. The System Restore screen appears and the computer restarts.
Reinstalling Windows XP NOTICE: You must use Windows XP Service Pack 1 or later when you reinstall Windows XP. To reinstall Windows XP, perform all the steps in the following sections in the order in which they are listed. The reinstallation process can take 1 to 2 hours to complete. After you reinstall the operating system, you must also reinstall the device drivers, virus protection program, and other software. NOTICE: The Operating System CD provides options for reinstalling Windows XP.
www.dell.com | support.dell.com NOTICE: Do not press any key when the following message appears: Press any key to boot from the CD. 6 When the Regional and Language Options screen appears, select the settings for your location and click Next. 7 Enter your name and organization (optional) in the Personalize Your Software screen, and click Next. 8 At the Computer Name and Administrator Password window, enter a name for your computer (or accept the one provided) and a password, and click Next.
Using the Drivers and Utilities CD To use the Drivers and Utilities CD (also known as the ResourceCD) while you are running the Windows operating system: NOTE: To access device drivers and user documentation, you must use the Drivers and Utilities CD while you are running Windows. 1 Turn on the computer and allow it to boot to the Windows desktop. 2 Insert the Drivers and Utilities CD into the CD drive.
Quick Reference Guide www.dell.com | support.dell.
Index B beep codes, 22 C CD operating system, 7 computer beep codes, 22 restore to previous state, 25 diagnostics beep codes, 22 Dell, 17 Drivers and Utilities CD, 5 lights, 19-20 documentation device, 5 online, 6 Quick Reference, 5 ResourceCD, 5 User’s Guide, 5 I IRQ conflicts, 24 L labels Microsoft Windows, 6 Service Tag, 6 light, 19 lights back of computer, 20 diagnostic, 19-20 front of computer, 19 power button, 19 system, 19 conflicts software and hardware incompatibilities, 24 drivers ResourceCD
Index P S U power light, 19 Service Tag, 6 User’s Guide, 5 problems beep codes, 22 conflicts, 24 Dell Diagnostics, 17 diagnostic lights, 19-20 restore to previous state, 25 software conflicts, 24 stand attach, 10 remove, 10 system lights, 19 System Restore, 25 R reinstalling Drivers and Utilities CD, 5 ResourceCD, 5 Windows XP, 26 ResourceCD Dell Diagnostics, 17 32 Index T troubleshooting conflicts, 24 Dell Diagnostics, 17 diagnostic lights, 19-20 Hardware Troubleshooter, 24 Help and Support
Dell™ OptiPlex™ 170L Guide de référence rapide Modèles MTC2 et DHS w w w. d e l l . c o m | s u p p o r t . d e l l .
Remarques, avis et précautions REMARQUE : Une REMARQUE fournit des informations importantes qui vous aident à mieux utiliser votre ordinateur. AVIS : Un AVIS vous avertit d'un risque de dommage matériel ou de perte de données et vous indique comment éviter le problème. PRÉCAUTION : Une PRÉCAUTION indique un risque potentiel d'endommagement du matériel, de blessure corporelle ou de mort. Dell recommande de ne pas installer la version originale de Windows XP (Gold) sur cette plate-forme.
Sommaire Trouver des informations relatives à votre ordinateur À propos des petits ordinateurs de bureau . . . . . . . . . . . . 37 . . . . . . . . . . . . . . . . . 40 . . . . . . . . . . . . . 40 41 42 . . . . . . . . . . . . . . . . . . . 43 . . . . . . . . . . . . . . . . . . . . . . . . . . . . . . . . . . . . . . . . 43 44 . . . . . . . . . . . . . . . . . . . . . 45 . . . . . . . . . . . . . . . . . . . . . . . . . . . . . . . . . . . . . . . . . . . . 46 47 . . . . . . . . . . . . . .
Sommaire
Trouver des informations relatives à votre ordinateur Que recherchez-vous ? Consultez les éléments suivants • • • • • CD Drivers and Utilities (Pilotes et utilitaires) (également appelé ResourceCD) Programme de diagnostics pour mon ordinateur Pilotes pour mon ordinateur Documentation concernant mon ordinateur Documentation concernant mon périphérique Logiciel DSS (Desktop System Software) La documentation et les pilotes sont déjà installés sur votre ordinateur.
www.dell.com | support.dell.com Que recherchez-vous ? Consultez les éléments suivants • • • • Guide d'utilisation des systèmes Dell™ OptiPlex™ Comment retirer et remplacer des pièces Caractéristiques techniques Comment configurer les paramètres système Comment dépanner et résoudre les problèmes Centre d'aide et de support Microsoft® Windows® XP 1 Cliquez sur le bouton Start (Démarrer), puis sur Help and Support (Aide et support).
Que recherchez-vous ? Consultez les éléments suivants • État des appels au service clients et historique du support • Principaux problèmes techniques concernant mon ordinateur • Questions fréquemment posées • Téléchargements de fichiers • Détails sur la configuration de mon ordinateur • Contrat de service pour mon ordinateur Site Web de support technique de Dell Premier — premiersupport.dell.
www.dell.com | support.dell.com À propos des petits ordinateurs de bureau Vues avant et arrière porte du panneau avant numéro de service connecteur du casque Microsoft Windows Clé du produit connecteurs USB 2.
À l'intérieur de votre ordinateur PRÉCAUTION : Avant de commencer les procédures de cette section, suivez les consignes de sécurité du Guide d'informations du produit. PRÉCAUTION : Pour éviter tout risque d'électrocution, débranchez toujours votre ordinateur de la prise électrique avant de retirer le capot. AVIS : Faites attention lorsque vous retirez le capot de l'ordinateur afin de ne pas déconnecter par inadvertance des câbles de la carte système.
www.dell.com | support.dell.com Fixation et retrait du piédestal de l'ordinateur PRÉCAUTION : Avant de commencer les procédures de cette section, suivez les consignes de sécurité du Guide d'informations du produit. REMARQUE : Placez votre ordinateur sur une surface souple pour éviter de rayer le capot supérieur. Votre ordinateur peut être utilisé en position verticale ou horizontale.
À propos de votre ordinateur mini-tour Vues avant et arrière voyant d'activité du lecteur CD ou DVD numéro de service bouton d'éjection des CD ou DVD deuxième baie voyant du lecteur de disquette voyant d'alimentation bouton d'éjection du lecteur de disquette voyant d'activité de l'unité de disque dur bouton d'alimentation connecteurs USB 2.
www.dell.com | support.dell.com À l'intérieur de votre ordinateur PRÉCAUTION : Avant de commencer les procédures de cette section, suivez les consignes de sécurité du Guide d'informations du produit. PRÉCAUTION : Pour éviter tout risque d'électrocution, débranchez toujours votre ordinateur de la prise électrique avant de retirer le capot. AVIS : Faites attention lorsque vous retirez le capot de l'ordinateur afin de ne pas déconnecter par inadvertance des câbles de la carte système.
Configuration de votre ordinateur PRÉCAUTION : Avant d'effectuer les procédures de cette section, suivez les consignes de sécurité du Guide d'informations du produit. AVIS : Si une carte d'expansion est installée sur votre ordinateur (une carte modem, par exemple), connectez le câble approprié à la carte et non pas au connecteur situé sur le panneau arrière de l'ordinateur. Votre ordinateur ne sera correctement configuré qu'une fois toutes ces étapes réalisées.
www.dell.com | support.dell.
Ordinateur mini-tour Configuration sans cartes moniteur clavier souris haut-parleurs casque réseau USB Configuration avec cartes hautparleurs téléphonie /modem Guide de référence rapide 47
www.dell.com | support.dell.
Résolution des problèmes Dell fournit un certain nombre d'outils qui vous aideront si votre ordinateur ne fonctionne pas de la manière escomptée. Pour obtenir les dernières informations sur le dépannage disponibles pour votre ordinateur, consultez le site Web du support technique de Dell à l'adresse support.dell.com.
www.dell.com | support.dell.com 3 Lorsque la liste des périphériques d'amorçage s'affiche, sélectionnez Boot to Utility Partition (Initialiser à partir de l'utilitaire de diagnostics) et appuyez sur . 4 Lorsque le menu principal des Diagnostics Dell s'affiche, sélectionnez le test à exécuter. Démarrage des Diagnostics Dell à partir du CD Drivers and Utilities (Pilotes et utilitaires) en option 1 Insérez le CD Drivers and Utilities (Pilotes et utilitaires).
Option Fonction (suite) Extended Test (Test complet) Exécute un test approfondi des périphériques. En règle générale, ce test prend une heure ou plus et nécessite que vous répondiez régulièrement à des questions. Custom Test (Test personnalisé) Teste un périphérique spécifique. Vous pouvez personnaliser les tests que vous souhaitez exécuter.
www.dell.com | support.dell.com Voyants du système Le voyant d'alimentation peut indiquer un problème concernant l'ordinateur. Voyant d'alimentation Description du problème Solution proposée Vert fixe L'ordinateur est sous tension et fonctionne normalement. Aucune action corrective n'est requise. Vert clignotant L'ordinateur est en mode suspension (Microsoft® Windows® 2000 et Windows XP).
Voyant d'alimentation Description du problème Solution proposée Voyant d'alimentation vert fixe et aucun code sonore, mais l'ordinateur se verrouille durant le POST Un périphérique intégré de la carte système peut être défaillant. Consultez la section « Voyants de diagnostic » page 53 pour savoir si le problème spécifique est identifié. Si le problème n'est pas identifié, contactez Dell pour obtenir une assistance technique.
www.dell.com | support.dell.com Comportement des voyants vert vert jaune jaune jaune jaune vert jaune jaune vert vert jaune vert vert vert jaune 54 Description du problème Solution proposée Des modules de mémoire sont détectés mais une panne de mémoire s'est produite. • Si un module de mémoire est installé, réinstallez-le et redémarrez l'ordinateur. • Si deux modules de mémoire sont installés, retirez-les, réinstallez un module, puis redémarrez l'ordinateur.
Comportement des voyants jaune jaune jaune vert jaune vert jaune vert jaune vert vert vert vert vert vert vert Description du problème Solution proposée Aucun module de mémoire n'est détecté. • Réinstallez tous les modules de mémoire et redémarrez l'ordinateur. • Pour éliminer toute éventualité de connecteur de mémoire défectueux, supprimez tous les modules de mémoire, réinstallez un module de mémoire (si l'ordinateur prend en charge un seul module), puis redémarrez l'ordinateur.
www.dell.com | support.dell.com Si votre ordinateur émet un signal lors du démarrage : 56 1 Notez le code du signal sonore. 2 Reportez-vous à la section « Diagnostics Dell » page 49 pour identifier une cause plus sérieuse. 3 Contactez Dell pour obtenir une assistance technique.
Exécution de l'utilitaire Dell™ IDE Hard Drive Diagnostics (Diagnostics de disque dur IDE Dell™) Dell IDE Hard Drive Diagnostics (Diagnostics de disque dur IDE) est un utilitaire qui permet de tester le disque dur afin de le réparer ou de confirmer un échec de celui-ci. 1 Allumez l'ordinateur (si ce dernier est déjà allumé, redémarrez-le). 2 Lorsque F2= Setup s'affiche dans l'angle supérieur droit de l'écran, appuyez sur . 3 Suivez les instructions qui s'affichent à l'écran.
www.dell.com | support.dell.com 5 Cliquez sur View (Afficher), puis sur Resources by connection (Ressources par connexion). 6 Double-cliquez sur Interrupt request (IRQ) [Requête d'interruption (IRQ)]. Les périphériques qui ne sont pas correctement configurés sont signalés par un point d'exclamation jaune (!), ou par un X rouge si le périphérique a été désactivé. 7 Double-cliquez sur un périphérique marqué d'un point d'exclamation pour afficher la fenêtre Properties (Propriétés).
Restauration de l'ordinateur à un état antérieur AVIS : Avant de restaurer l'ordinateur à un état antérieur, enregistrez et fermez tous les fichiers ouverts et quittez tous les programmes en cours d'exécution. Ne modifiez, n'ouvrez ou ne supprimez en aucun cas des fichiers ou des programmes tant que la restauration du système n'est pas terminée.
www.dell.com | support.dell.com Activation de la fonctionnalité Restauration du système Si vous réinstallez Windows XP avec moins de 200 Mo d'espace disponible sur le disque dur, la fonction Restauration du système est automatiquement désactivée. Pour vérifier si la fonction Restauration du système est activée : 1 Cliquez sur le bouton Start (Démarrer), puis sur Control Panel (Panneau de configuration). 2 Cliquez sur Performance and Maintenance (Performances et maintenance).
Réinstallation de Windows XP AVIS : Vous devez utiliser Windows XP Service Pack 1 ou version ultérieure lorsque vous réinstallez Windows XP. Pour réinstaller Windows XP, suivez toutes les étapes des sections suivantes, dans l'ordre indiqué. Le processus de réinstallation peut prendre de 1 à 2 heures pour s'effectuer. Après avoir réinstallé le système d'exploitation, vous devez également réinstaller les pilotes de périphériques, le programme anti-virus et d'autres logiciels.
www.dell.com | support.dell.com 5 Appuyez sur pour sélectionner la partition en surbrillance (recommandé), puis suivez les instructions qui s'affichent à l'écran. L'écran Windows XP Setup (Installation de Windows XP) s'affiche, et le système d'exploitation commence à copier les fichiers et à installer les périphériques. L'ordinateur redémarre automatiquement à plusieurs reprises.
15 Lorsque l'écran Ready to register with Microsoft? (Voulez-vous enregistrer Windows en ligne en même temps que vous procédez à son activation ?) s'affiche, sélectionnez No, not at this time (Non, pas maintenant), puis cliquez sur Next (Suivant). 16 Lorsque l'écran Who will use this computer? (Qui va utiliser cet ordinateur ?) s'affiche, vous pouvez entrer le nom de cinq utilisateurs. 17 Cliquez sur Next (Suivant). 18 Cliquez sur Finish (Terminer) pour terminer l'installation, puis retirez le CD.
www.dell.com | support.dell.com Des pilotes pour votre ordinateur Pour afficher une liste de pilotes périphériques pour votre ordinateur : 1 Cliquez sur My Drivers (Mes pilotes) dans le menu déroulant Topic (Rubrique). Le CD Drivers and Utilities (Pilotes et utilitaires) recherche le système d'exploitation et les éléments matériels de votre ordinateur, puis une liste de pilotes de périphériques pour la configuration de votre système s'affiche à l'écran.
Index C CD Système d'exploitation, 39 CD du Système d'exploitation, 39 CD-ROM Drivers and Utilities, 37 centre d'aide et de support, 39 codes sonores, 55 conflits incompatibilités logicielle et matérielle, 57 diagnostic CD-ROM Drivers and Utilities, 37 codes sonores, 55 Dell, 49 voyants, 52-53 Diagnostics Dell, 49 documentation en ligne, 38-39 Guide d'utilisation, 38 périphérique, 37 Référence rapide, 37 ResourceCD, 37 conflits IRQ, 57 M matériel codes sonores, 55 conflits, 57 Diagnostics Dell, 49 messag
Index Problèmes codes sonores, 55 conflits, 57 Diagnostics Dell, 49 restauration à l'état précédent, 58 voyants de diagnostic, 52-53 Système d'exploitation CD, 39 Guide d'installation, 39 réinstallation de Windows XP, 60 W U Windows XP centre d'aide et de support, 39 réinstallation, 60 Restauration du système, 58 utilitaire de résolution des problèmes matériel, 57 R utilitaire de résolution des problèmes matériel, 57 réinstallation CD-ROM Drivers and Utilities, 37 ResourceCD, 37 Windows XP, 60
Dell™ OptiPlex™ 170L Schnellreferenzhandbuch Modelle MTC2 und DHS w w w. d e l l . c o m | s u p p o r t . d e l l .
Hinweise, Vorsichtshinweise und Warnungen HINWEIS: Ein HINWEIS macht auf wichtige Informationen aufmerksam, mit denen Sie das System besser einsetzen können. VORSICHT: VORSICHT warnt vor möglichen Beschädigungen der Hardware oder vor Datenverlust und zeigt, wie diese vermieden werden können. WARNUNG: Eine WARNUNG weist auf Gefahrenquellen hin, die materielle Schäden, Verletzungen oder sogar den Tod von Personen zur Folge haben können.
Inhaltsverzeichnis Suchen nach Informationen über den Computer . . . . . . . . . . . . . . . Wissenswertes über den Small Desktop-Computer . . . . . . . . . . . . . . . . . . . . . . . . . . . . . . . . . . . . . 78 . . . . . . . . . . . . . . . . . . . . . . . . . . . . . . . . . . . . . . . . . . . . . . . . 78 79 . . . . . . . . . . . . . . . . . . . . . . . . . 80 Wissenswertes über den Minitower-Computer Vorder- und Rückseite . Interne Komponenten . . . . . . . . . . 81 82 . . . . . . . .
Inhaltsverzeichnis
Suchen nach Informationen über den Computer Wonach suchen Sie? Hier finden Sie das Gesuchte: • • • • • Drivers and Utilities-CD (diese wird auch als ResourceCD bezeichnet) Ein Diagnoseprogramm für den Computer Treiber für den Computer Die Dokumentation für den Computer Die Dokumentation für das Gerät Desktop System Software (DSS) Dokumentation und Treiber, sind bereits auf dem Computer installiert.
www.dell.com | support.dell.com Wonach suchen Sie? Hier finden Sie das Gesuchte: • Informationen zum Entfernen und Austauschen von Teilen • Technische Daten • Informationen zum Konfigurieren von Systemeinstellungen • Informationen zur Fehlerbeseitigung und Problemlösung Dell™ OptiPlex™ Benutzerhandbuch Microsoft® Windows® XP-Hilfe- und Supportcenter 1 Auf die Schaltfläche Start und anschließend auf Help and Support (Hilfe und Support) klicken.
Wonach suchen Sie? Hier finden Sie das Gesuchte: • Aktuellste Treiber für den Computer • Informationen zum technischen Support und Kundendienst • Onlinediskussionen mit anderen Benutzern und dem technischen Support • Dokumentation für den Computer Support-Website von Dell – support.dell.com HINWEIS: Wählen Sie zum Anzeigen der entsprechenden Support-Website Ihre Region aus. • • • • • • Dell Premier Support-Website – premiersupport.dell.
www.dell.com | support.dell.com Wonach suchen Sie? Hier finden Sie das Gesuchte: • Informationen zur Neuinstallation des Betriebssystems Betriebssystem-CD Das Betriebssystem ist bereits auf dem Computer installiert. Um das Betriebssystem neu zu installieren, verwenden Sie die Betriebssystem-CD. Anleitungen dazu finden Sie im OptiPlex-Benutzerhandbuch.
Wissenswertes über den Small Desktop-Computer Vorder- und Rückseite Frontabdeckung Kopfhöreranschluss ServiceKennnummer USB 2.
www.dell.com | support.dell.com Interne Komponenten WARNUNG: Bevor Sie Arbeiten an den in diesem Abschnitt beschriebenen Komponenten ausführen, lesen Sie erst die Sicherheitshinweise im Produktinformationshandbuch. WARNUNG: Um elektrische Schläge zu vermeiden, trennen Sie vor dem Entfernen der Abdeckung den Computer immer von der Steckdose. VORSICHT: Gehen Sie beim Öffnen der Systemabdeckung sehr vorsichtig vor, um nicht versehentlich Kabelverbindungen der Systemplatine zu trennen.
Anbringen und Entfernen des Gehäusestandrahmens WARNUNG: Bevor Sie Arbeiten an den in diesem Abschnitt beschriebenen Komponenten ausführen, lesen Sie erst die Sicherheitshinweise im Produktinformationshandbuch. HINWEIS: Der Computer sollte auf eine weiche Oberfläche gestellt werden, damit die äußere Abdeckung nicht zerkratzt wird. Der Computer kann senkrecht oder waagrecht verwendet werden.
www.dell.com | support.dell.com Wissenswertes über den Minitower-Computer Vorder- und Rückseite Aktivitätsanzeige für CD- bzw. DVD-Laufwerk Service-Kennnummer Auswurftaste für CD bzw. DVD Zweiter Laufwerkschacht Diskettenlaufwerkanzeige Stromanzeige Auswurftaste für Diskettenlaufwerk Festplattenlaufwerkanzeige Netzschalter USB 2.
Interne Komponenten WARNUNG: Bevor Sie Arbeiten an den in diesem Abschnitt beschriebenen Komponenten ausführen, lesen Sie erst die Sicherheitshinweise im Produktinformationshandbuch. WARNUNG: Um elektrische Schläge zu vermeiden, trennen Sie vor dem Entfernen der Abdeckung den Computer immer von der Steckdose. VORSICHT: Gehen Sie beim Öffnen der Systemabdeckung sehr vorsichtig vor, um nicht versehentlich Kabelverbindungen der Systemplatine zu trennen.
www.dell.com | support.dell.com Einrichten des Computers WARNUNG: Bevor Sie die in diesem Abschnitt beschriebenen Arbeiten ausführen, lesen Sie erst die Sicherheitshinweise im Produktinformationshandbuch. VORSICHT: Wenn der Computer mit einer Erweiterungskarte (z. B. einer Modemkarte) ausgestattet ist, schließen Sie das entsprechende Kabel an die Karte, und nicht an den Anschluss auf der Rückseite an. Sie müssen alle Schritte ausführen, um den Computer korrekt einzurichten.
Small Desktop-Computer Setup ohne Karten Monitor Tastatur A B C D Maus Lautsprecher Netzwerk USB Setup mit Karten Netzwerk Schnellreferenzhandbuch 81
www.dell.com | support.dell.
Abgeschlossenes Setup Small Desktop-Computer Microsoft Windows-Produktschlüssel Netzschalter Minitower-Computer Microsoft Windows-Produktschlüssel Netzschalter Schnellreferenzhandbuch 83
www.dell.com | support.dell.com Problemlösung Dell stellt eine Reihe von Hilfewerkzeugen zur Verfügung, die Ihnen bei Problemen mit dem Computer weiterhelfen. Neueste Informationen zur Fehlerbehebung finden Sie auf der Support-Website von Dell unter support.dell.com. Wenn Probleme mit dem Computer auftreten, für deren Lösung Sie die Hilfe von Dell benötigen, erstellen Sie eine detaillierte Beschreibung der Fehler, des Signaltoncodes oder der Diagnoseanzeigen.
3 Wenn die Liste der Startgeräte erscheint, die Option Boot to Utility Partition (In Dienstprogrammpartition starten) markieren und drücken. 4 Wenn das Main Menu (Hauptmenü) des Programms „Dell Diagnostics“ erscheint, den gewünschten Test auswählen. Starten des Programms „Dell Diagnostics“ von der optionalenDrivers and Utilities-CD 1 Die Drivers and Utilities-CD einlegen. 2 Computer herunterfahren und erneut starten. Wenn das DELL-Logo angezeigt wird, sofort drücken.
www.dell.com | support.dell.com Hauptmenü des Programms „Dell Diagnostics“ 1 Wenn das Programm „Dell Diagnostics“ geladen wurde und das Main Menu (Hauptmenü) erscheint, auf die Schaltfläche für die gewünschte Option klicken. Option Funktion Express Test (Schnelltest) Es wird ein Schnelltest der Geräte durchgeführt. Dieser Test dauert normalerweise etwa 10 bis 20 Minuten. Es ist keine Benutzeraktion erforderlich.
Registerkarte Funktion (Fortsetzung) Configuration (Konfiguration) Die Hardware-Konfiguration der ausgewählten Geräte wird angezeigt. Das Programm „Dell Diagnostics“ sammelt über das System-SetupProgramm, den Speicher und verschiedene interne Tests Konfigurationsinformationen für alle Geräte. Diese werden in der Geräteliste auf der linken Seite angezeigt. In der Geräteliste werden möglicherweise nicht alle Namen von Geräten angezeigt, die im Computer installiert oder daran angeschlossen sind.
www.dell.com | support.dell.com Stromanzeige Problembeschreibung Lösungsvorschlag Gelb blinkend Es ist ein Ausfall bei der Stromversorgung oder der Systemplatine aufgetreten. Lesen Sie unter „Diagnoseanzeigen“ auf Seite 88 nach, ob das spezifische Problem bereits identifiziert wurde. Lesen Sie im Online-Benutzerhandbuch unter „Probleme mit der Stromversorgung“ nach. Stetig grün Während der Ausführung des BIOS leuchtend und ein wurde ein Problem ermittelt.
Anzeigemuster Aus Aus Aus Aus Gelb Grün Gelb Gelb Grün Grün Gelb Gelb Gelb Gelb Grün Gelb Problembeschreibung Lösungsvorschlag Der Computer befindet sich in einem normalen Aus-Zustand oder es ist möglicherweise ein Fehler vor der BIOSAktivierung aufgetreten. • Stellen Sie sicher, dass der Computer an eine funktionierende Steckdose angeschlossen ist und der Netzschalter betätigt wurde. Möglicherweise ist ein Fehler beim Prozessor aufgetreten.
www.dell.com | support.dell.com Anzeigemuster Gelb Grün Grün Gelb Grün Grün Grün Gelb Gelb Gelb Gelb Grün Gelb Grün Gelb Grün 90 Problembeschreibung Lösungsvorschlag Möglicherweise ist ein IDE-Treiberfehler aufgetreten. • Schließen Sie alle Strom- und Datenkabel des IDETreibers neu an und starten Sie den Computer neu. Möglicherweise ist ein USB-Fehler aufgetreten. • Installieren Sie alle USB-Geräte neu, prüfen Sie die Kabelverbindungen und starten Sie dann den Computer neu.
Anzeigemuster Gelb Grün Grün Grün Grün Grün Grün Grün Problembeschreibung Lösungsvorschlag Ein anderes Problem ist aufgetreten. • Vergewissern Sie sich, dass die Kabel von allen installierten Festplattenlaufwerken richtig an der Systemplatine angeschlossen sind. • Prüfen Sie die auf dem Bildschirm angezeigte Computermeldung. • Besteht das Problem weiterhin, wenden Sie sich an Dell. Der Computer befindet sich nach dem POST im normalen Betriebszustand. • Keine Aktion erforderlich.
www.dell.com | support.dell.
Windows XP So beheben Sie Inkompatibilitäten mithilfe des Hardware-Ratgebers: 1 Auf die Schaltfläche Start und anschließend auf Help and Support (Hilfe und Support) klicken. 2 Im Feld Search (Suchen) Hardware troubleshooter (Hardware-Ratgeber) eingeben und anschließend auf den Pfeil klicken, um mit der Suche zu beginnen. 3 In der Liste Search Results (Suchergebnisse) auf Hardware-Ratgeber klicken.
www.dell.com | support.dell.com So beheben Sie Inkompatibilitäten mithilfe des Hardware-Ratgebers: 1 Auf die Schaltfläche Start und anschließend auf Help (Hilfe) klicken. 2 Auf der Registerkarte Contents (Inhalt) auf Troubleshooting and Maintenance (Problembehandlung und Verwaltung) klicken, danach auf Windows 2000 troubleshooters (Windows 2000-Ratgeber) und anschließend auf Hardware klicken.
3 Auf das Kalenderdatum klicken, für das der Computer wiederhergestellt werden soll. Im Bildschirm Select a Restore Point (Einen Wiederherstellungspunkt wählen) können Sie den Kalender verwenden, um Wiederherstellungspunkte anzuzeigen und auszuwählen. Alle Kalenderdaten, für die Wiederherstellungspunkte vorhanden sind, werden fett formatiert dargestellt. 4 Einen Wiederherstellungspunkt wählen und auf Weiter klicken.
www.dell.com | support.dell.com Aktivieren der Systemwiederherstellung Wenn Sie Windows XP bei weniger als 200 MB freiem Festplattenspeicherplatz installieren, ist die Systemwiederherstellung automatisch deaktiviert. So überprüfen Sie, ob die Systemwiederherstellung aktiviert ist: 1 Auf die Schaltfläche Start und anschließend auf Control Panel (Systemsteuerung) klicken. 2 Auf Performance and Maintenance (Leistung und Wartung) klicken. 3 Auf System klicken.
VORSICHT: Die Betriebssystem-CD bietet Optionen zur Neuinstallation von Windows XP. Durch diese Optionen können Dateien überschrieben werden. Das kann zu Problemen bei auf der Festplatte installierten Programmen führen. Installieren Sie deshalb Windows XP nur dann neu, wenn Sie von einem Mitarbeiter des technischen Supports von Dell dazu angewiesen wurden.
www.dell.com | support.dell.com HINWEIS: Wie lange der Setup-Vorgang dauert, hängt von der Größe des Festplattenlaufwerks und der Geschwindigkeit des Computers ab. VORSICHT: Drücken Sie keine Taste, wenn folgende Meldung angezeigt wird: Press any key to boot from the CD (Eine beliebige Taste drücken, um den Computer von CD zu starten). 6 Im Fenster Regional and Language Options (Regions- und Sprachoptionen) die Einstellungen für Ihren Standort vornehmen und dann auf Next (Weiter) klicken.
18 Auf Finish (Fertig stellen) klicken, um das Setup abzuschließen, und die CD aus dem Laufwerk entnehmen. 19 Die entsprechenden Treiber mit der Drivers and Utilities-CD erneut installieren. 20 Die Virenschutzprogramme erneut installieren. 21 Die Programme erneut installieren.
Schnellreferenzhandbuch www.dell.com | support.dell.
Stichwortverzeichnis A Anzeigen Computerrückseite, 88 Diagnose, 87-88 Netzschalter, 87 System, 87 Vorderseite Computer, 87 Dell Premier SupportWebsite, 73 Diagnose Anzeigen, 87-88 Dell, 84 Drivers and Utilities-CD, 71 Signaltoncodes, 91 Fehlermeldungen Diagnoseanzeigen, 87-88 Signaltoncodes, 91 G Geräte-Manager, 93 Diagnoseanzeigen, 87-88 B Benutzerhandbuch, 72 Betriebssystem CD, 74 Installationshandbuch, 74 Neuinstallieren von Windows XP, 96 Betriebssystem-CD, 74 C CD Betriebssystem, 74 Computer Auf
Stichwortverzeichnis N R T Neu installieren Drivers and Utilities-CD, 71 ResourceCD, 71 Windows XP, 96 ResourceCD Programm „Dell Diagnostics“, 84 Treiber ResourceCD, 71 S P Service-Kennnummer, 72 Probleme Auf vorherigen Stand zurücksetzen, 94 Diagnoseanzeigen, 87-88 Konflikt, 93 Programm „Dell Diagnostics“, 84 Signaltoncodes, 91 Signaltoncodes, 91 Programm „Dell Diagnostics“, 84 Systemanzeigen, 87 102 Stichwortverzeichnis Software Konflikt, 93 Standrahmen Anbringen, 77 Entfernen, 77 Str
Dell™ OptiPlex™ 170L Guida di consultazione rapida Modello MTC2 e DHS w w w. d e l l . c o m | s u p p o r t . d e l l .
Note, avvisi e messaggi di attenzione NOTA: una NOTA evidenzia informazioni importanti per un uso ottimale del computer. AVVISO: un AVVISO può indicare un potenziale danno a livello di hardware o una perdita di dati e consiglia come evitare il problema. ATTENZIONE: un messaggio di ATTENZIONE indica un rischio di danni alla proprietà, lesioni personali o morte.
Sommario Ricerca di informazioni relative al computer . . . . . . . . . . . . . . . Informazioni sul computer desktop di piccole dimensioni 107 . . . . . . . . . 110 . . . . . . . . . . . . . . . . . . 110 111 112 Informazioni sul computer mini tower . . . . . . . . . . . . . . . . . . 113 Vista fronte e retro . . . . . . . Componenti interni del computer . . . . . . . . . . . . . . . . . . . . . . . . . . . . . . . . . . . . . 113 114 . . . . . . . . . . . . . . . . . . . . . . .
Sommario
Ricerca di informazioni relative al computer Tipo di informazioni Dove cercare • • • • • CD Drivers and Utilities (noto anche come ResourceCD) Un programma di diagnostica per il computer Driver per il computer Documentazione per il computer Documentazione per le periferiche Software di sistema per desktop (DSS) La documentazione e i driver sono già installati sul computer. È possibile usare il CD per reinstallare i driver, eseguire Dell Diagnostics o accedere alla documentazione.
www.dell.com | support.dell.com Tipo di informazioni Dove cercare • Procedure di rimozione e sostituzione di componenti • Specifiche tecniche • Procedure di configurazione delle impostazioni di sistema • Procedure di risoluzione dei problemi Guida dell’utente per Dell™ OptiPlex™ Guida in linea e supporto tecnico di Microsoft® Windows® XP 1 Fare clic sul pulsante Start, quindi scegliere Guida in linea e supporto tecnico.
Tipo di informazioni Dove cercare • Stato delle chiamate al servizio di assistenza e cronologia dell’assistenza • Informazioni sui problemi tecnici più frequenti del computer • Domande frequenti • Scaricamento di file • Dettagli sulla configurazione del computer • Contratto di assistenza per il computer Sito Web Dell Premier Support — premiersupport.dell.
www.dell.com | support.dell.com Informazioni sul computer desktop di piccole dimensioni Vista fronte e retro Sportello del pannello frontale Numero di servizio Connettore della cuffia Connettori USB 2.
Componenti interni del computer ATTENZIONE: prima di eseguire le procedure descritte in questa sezione, seguire le istruzioni di sicurezza riportate nella guida Informazioni sul prodotto. ATTENZIONE: per evitare il rischio di scariche elettriche, scollegare sempre il computer dalla presa elettrica prima di aprire il coperchio. AVVISO: quando si apre il coperchio del computer, fare attenzione a non scollegare involontariamente i cavi dalla scheda di sistema.
www.dell.com | support.dell.com Installazione e rimozione del sostegno del computer ATTENZIONE: prima di eseguire le procedure descritte in questa sezione, seguire le istruzioni di sicurezza riportate nella guida Informazioni sul prodotto. NOTA: appoggiare il computer su una superficie morbida per evitare di graffiare il coperchio superiore. Il computer può essere usato in posizione verticale oppure orizzontale. Per usare il computer in posizione verticale, è necessario installare l’apposito sostegno.
Informazioni sul computer mini tower Vista fronte e retro Indicatore di attività dell’unità CD o DVD Numero di servizio Pulsante di espulsione dell’unità CD o DVD Alloggiamento dell’unità aggiuntiva Indicatore dell’unità a dischetti Indicatore di alimentazione Pulsante di espulsione dell’unità a dischetti Indicatore di attività del disco rigido Pulsante di accensione Connettori USB 2.
www.dell.com | support.dell.com Componenti interni del computer ATTENZIONE: prima di eseguire le procedure descritte in questa sezione, seguire le istruzioni di sicurezza riportate nella guida Informazioni sul prodotto. ATTENZIONE: per evitare il rischio di scariche elettriche, scollegare sempre il computer dalla presa elettrica prima di aprire il coperchio. AVVISO: quando si apre il coperchio del computer, fare attenzione a non scollegare involontariamente i cavi dalla scheda di sistema.
Installazione del computer ATTENZIONE: prima di eseguire le procedure descritte in questa sezione, seguire le istruzioni di sicurezza riportate nella guida Informazioni sul prodotto. AVVISO: se nel computer è installata una scheda di espansione, ad esempio una scheda modem, collegare il rispettivo cavo direttamente alla scheda e non al connettore sul pannello posteriore. Per installare correttamente il computer, seguire tutti i punti della procedura descritta.
www.dell.com | support.dell.
Computer mini tower Installazione senza schede Monitor Tastiera Mouse Altoparlanti Cuffie Rete USB Installazione con schede Altoparlanti Modem/ periferica di telefonia Guida di consultazione rapida 117
www.dell.com | support.dell.
Soluzione di problemi Dell fornisce una serie di strumenti per assistere l’utente se il computer non funziona nel modo previsto. Per ottenere le informazioni più aggiornate per la risoluzione di problemi relativi al computer in uso, visitare il sito Web del supporto tecnico di Dell all’indirizzo support.dell.com.
www.dell.com | support.dell.com Avvio del programma Dell Diagnostics dal CD opzionale Drivers and Utilities 1 Inserire il CD Drivers and Utilities. 2 Arrestare il sistema e riavviare il computer. Quando viene visualizzato il logo DELL, premere immediatamente. Se si attende troppo a lungo e viene visualizzato il logo di Windows, attendere la visualizzazione del desktop di Windows. Arrestare quindi il sistema e riprovare.
2 Se viene riscontrato un problema durante la prova, verrà visualizzato un messaggio contenente il codice di errore e la descrizione del problema. Annotare il codice di errore e la descrizione del problema e seguire le istruzioni visualizzate. Se non è possibile risolvere la condizione di errore, contattare Dell. NOTA: il numero di servizio del computer viene visualizzato nella parte superiore dello schermo di ciascuna prova.
www.dell.com | support.dell.com Indicatori di sistema L’indicatore di alimentazione può indicare un problema del computer. Indicatore di alimentazione Descrizione del problema Soluzione consigliata Verde fisso L’alimentazione è presente e il computer funziona correttamente. Non è richiesta alcuna azione correttiva. Verde lampeggiante Il computer è in una modalità di risparmio energia (Microsoft® Windows® 2000 e Windows XP).
Indicatori di diagnostica ATTENZIONE: prima di eseguire le procedure descritte in questa sezione, seguire le istruzioni di sicurezza riportate nella guida Informazioni sul prodotto. Per fornire assistenza all’utente in merito alla risoluzione dei problemi, sul pannello posteriore del computer sono situate quattro spie luminose contrassegnate dalle lettere “A”, “B”, “C” e “D” che possono essere di colore giallo o verde.
www.dell.com | support.dell.com Configurazione spie Giallo Giallo Verde Giallo Giallo Verde Verde Giallo Verde Verde Verde Giallo Giallo Giallo Giallo Verde 124 Descrizione del problema Soluzione consigliata Possibile guasto della scheda di espansione PCI. • Per determinare se è presente un conflitto, rimuovere una scheda diversa dalla scheda video e riavviare il computer. • Se il problema persiste, reinstallare la scheda appena rimossa, rimuoverne un’altra, quindi riavviare il computer.
Configurazione spie Giallo Verde Giallo Verde Giallo Verde Verde Verde Verde Verde Verde Verde Descrizione del problema Soluzione consigliata I moduli di memoria sono stati rilevati, ma si è verificato un errore di configurazione o compatibilità della memoria. • Accertarsi che non esistano requisiti speciali di posizionamento dei connettori o dei moduli di memoria (per ulteriori informazioni vedere Memoria della Guida dell’utente in linea).
www.dell.com | support.dell.
Risoluzione delle incompatibilità software e hardware Se durante la configurazione del sistema operativo una periferica non viene rilevata oppure viene rilevata e configurata in modo errato, è possibile usare l’utilità Risoluzione dei problemi dell’hardware per risolvere il problema di compatibilità. Nei sistemi operativi Microsoft® Windows® 2000, è possibile usare Gestione periferiche per risolvere il problema di compatibilità.
www.dell.com | support.dell.com Per risolvere le incompatibilità mediante l’utilità Risoluzione dei problemi dell’hardware, seguire la procedura descritta. 1 Fare clic sul pulsante Start, quindi scegliere Guida in linea. 2 Fare clic su Risoluzione dei problemi e manutenzione nella scheda Sommario, fare clic su Risoluzione dei problemi relativi a Windows 2000, quindi fare clic su Hardware.
5 Fare clic su Avanti. Al termine della raccolta dei dati, verrà visualizzato il messaggio Ripristino completato e il computer verrà riavviato. 6 Al riavvio del computer, fare clic su OK. Per ripristinare il sistema a una configurazione diversa, è possibile ripetere la procedura usando un altro punto di ripristino oppure annullare il ripristino.
www.dell.com | support.dell.com AVVISO: prima di procedere con l’installazione, eseguire il backup di tutti i file di dati presenti sul disco rigido primario. Nelle configurazioni standard, il disco rigido primario è la prima unità rilevata dal computer. Per reinstallare Windows XP sono necessari i seguenti supporti.
Installazione di Windows XP 1 Quando viene visualizzata la finestra Installazione di Windows XP, premere per selezionare Premere INVIO per installare Windows. 2 Leggere le informazioni nella schermata del contratto di licenza di Microsoft Windows, quindi premere per accettare il contratto.
www.dell.com | support.dell.com 13 Quando viene visualizzata la finestra Microsoft Windows XP fare clic su Avanti. 14 Quando viene visualizzato il messaggio Tipo di connessione a Internet, fare clic su Ignora. 15 Quando viene visualizzata la finestra Effettuare la registrazione con Microsoft?, selezionare No, non adesso, quindi fare clic su Avanti. 16 Quando viene visualizzata la finestra Utenti del computer, è possibile immettere cinque utenti al massimo. 17 Fare clic su Avanti.
Driver per il computer Per visualizzare un elenco di driver di periferica per il computer, seguire la procedura descritta. 1 Fare clic su Cerca driver nella casella di riepilogo a discesa Argomento. Viene effettuata la scansione dell’hardware e del sistema operativo del computer e, al termine, viene visualizzato l’elenco dei driver di periferica per l’attuale configurazione del sistema. 2 Fare clic sul driver desiderato e seguire le istruzioni per scaricare il file sul computer.
www.dell.com | support.dell.
Indice C CD sistema operativo, 7 CD del sistema operativo, 7 cd Drivers and Utilities, 5 codici bip, 23 Computer codici bip, 23 ripristino configurazione precedente, 26 conflitti incompatibilità software e hardware, 25 D Dell sito del supporto tecnico, 6 sito Web del supporto premier, 7 Dell Diagnostics, 17 diagnostica, 20 cd Drivers and Utilities, 5 codici bip, 23 Dell, 17 indicatori, 21 documentazione consultazione rapida, 5 Guida dell’utente, 6 in linea, 6-7 periferica, 5 ResourceCD, 5 H driver Resou
Indice N Numero di servizio, 6 P problemi codici bip, 23 Dell Diagnostics, 17 Indicatori di diagnostica, 20-21 ripristino configurazione precedente, 26 R reinstallazione cd Drivers and Utilities, 5 ResourceCD, 5 Windows XP, 27 136 Indice ResourceCD Dell Diagnostics, 17 sito Web Dell Premier Support, 7 Ripristino configurazione di sistema, 26 sostegno collegamento, 10 rimozione, 10 risoluzione dei problemi conflitti, 25 Dell Diagnostics, 17 Guida in linea e supporto tecnico, 7 Indicatori di di
Dell™ OptiPlex™ 170L Guía de referencia rápida Modelos MTC2 y DHS w w w. d e l l . c o m | s u p p o r t . d e l l .
Notas, avisos y precauciones NOTA: una NOTA proporciona información importante que le ayuda a utilizar su equipo de la mejor manera posible. AVISO: un AVISO indica un posible daño en el hardware o la pérdida de datos y le explica cómo evitar el problema. PRECAUCIÓN: una PRECAUCIÓN indica un posible daño material, lesión corporal o muerte. Si ha adquirido un equipo Dell™ de la serie n, las referencias al sistema operativo Microsoft® Windows® que aparezcan en este documento no tendrán aplicación.
Contenido Localización de información del equipo . . . . . . . . . . . . . . . . . Acerca del equipo de escritorio pequeño . . . . . . . . . . . . . . . . . . . . . . . . . . . . . . . . . . . . . . . . . . 147 . . . . . . . . . . . . . . . . . . . . . . . . . . . . . . . . . . . . . . . . . . . . 147 148 . . . . . . . . . . . . . . . . . . . . . . . . 149 Acerca del equipo de minigabinete vertical. Vistas anterior y posterior Interior del equipo. . . . Configuración completada . . . . . . . .
Contenido
Localización de información del equipo Si busca Aquí lo encontrará • • • • • El CD Drivers and Utilities (Controladores y utilidades) (también conocido como ResourceCD [CD de recursos]) Un programa de diagnóstico para el equipo Controladores para el equipo La documentación del ordenador La documentación del dispositivo Desktop System Software (DSS, Software de sistema de escritorio) La documentación y los controladores ya están instalados en su equipo.
www.dell.com | support.dell.com Si busca Aquí lo encontrará • • • • Guía del usuario de Dell™ OptiPlex™ Cómo quitar y sustituir componentes Especificaciones técnicas Cómo configurar los valores del sistema Cómo diagnosticar y solucionar problemas Centro de ayuda y soporte técnico de Microsoft® Windows® 1 Haga clic en Start (Inicio) y, a continuación, haga clic en Help and Support (Ayuda y soporte técnico).
Si busca Aquí lo encontrará • Estado de la llamada de reparación e historial de asistencia técnica • Principales problemas técnicos del equipo • Preguntas frecuentes • Descargas de archivos • Detalles sobre la configuración del equipo • Contrato de servicio del equipo Sitio Web Dell Premier Support: premiersupport.dell.
www.dell.com | support.dell.com Acerca del equipo de escritorio pequeño Vistas anterior y posterior puerta del panel anterior etiqueta de servicio conector de auriculares conectores USB 2.
Interior del equipo PRECAUCIÓN: Antes de comenzar cualquiera de los procedimientos de esta sección, siga las instrucciones de seguridad que se muestran en la Guía de información del producto. PRECAUCIÓN: Para evitar las descargas eléctricas, desconecte siempre el equipo del enchufe eléctrico antes de abrir la cubierta. AVISO: Asegúrese de que al abrir la cubierta del equipo no ha desconectado inadvertidamente los cables de la placa base.
www.dell.com | support.dell.com Acoplamiento y extracción de la base del equipo PRECAUCIÓN: Antes de comenzar cualquiera de los procedimientos de esta sección, siga las instrucciones de seguridad que se muestran en la Guía de información del producto. NOTA: Coloque el equipo sobre una superficie suave para evitar que se raye la cubierta superior. El equipo se puede utilizar en posición vertical u horizontal.
Acerca del equipo de minigabinete vertical Vistas anterior y posterior indicador de actividad de la unidad de CD o DVD etiqueta de servicio botón de expulsión de CD o DVD compartimiento para segunda unidad indicador de unidad de disquete indicador de alimentación botón de expulsión de la unidad de disco indicador de actividad de la unidad de disco duro botón de encendido conectores USB 2.
www.dell.com | support.dell.com Interior del equipo PRECAUCIÓN: Antes de comenzar cualquiera de los procedimientos de esta sección, siga las instrucciones de seguridad que se muestran en la Guía de información del producto. PRECAUCIÓN: Para evitar las descargas eléctricas, desconecte siempre el equipo del enchufe eléctrico antes de abrir la cubierta. AVISO: Asegúrese de que al abrir la cubierta del equipo no ha desconectado inadvertidamente los cables de la placa base.
Configuración del equipo PRECAUCIÓN: Antes de realizar cualquiera de los procedimientos de esta sección, siga las instrucciones de seguridad que se muestran en la Guía de información del producto. AVISO: Si el equipo tiene instalada una tarjeta de expansión de red (como una tarjeta de módem), conecte el cable apropiado a la tarjeta, no al conector situado en el panel posterior del equipo. Para configurar correctamente el equipo, siga todos los pasos indicados.
www.dell.com | support.dell.
Equipo de minigabinete vertical Configuración sin tarjetas monitor teclado ratón altavoces auriculares red USB Configuración con tarjetas altavoces módem y telefonía Guía de referencia rápida 151
www.dell.com | support.dell.
Solución de problemas Dell proporciona una serie de herramientas para ayudarle en el caso de que el equipo no funcione como es de esperar. Para obtener la información más actualizada sobre solución de problemas de su ordenador, consulte el sitio Web de asistencia técnica de Dell en support.dell.com.
www.dell.com | support.dell.com Inicio de los Diagnósticos Dell desde la unidad de disco duro 1 Encienda (o reinicie) el equipo. 2 Cuando aparezca el logotipo de DELL™, pulse inmediatamente. NOTA: Si recibe un mensaje indicando que no se ha encontrado ninguna partición para la utilidad de diagnóstico, ejecute los Diagnósticos Dell desde el CD Drivers and Utilities (Controladores y utilidades).
Menú principal de los Diagnósticos Dell 1 Después de cargar los Diagnósticos Dell y aparecer la pantalla Main Menu (Menú principal), haga clic en el botón de la opción que desee. Opción Función Express Test (Prueba rápida) Realiza una prueba rápida de los dispositivos. Esta prueba dura normalmente de 10 a 20 minutos y no requiere su interacción. Ejecute Express Test (Prueba rápida) primero para aumentar la posibilidad de realizar un seguimiento del problema rápidamente.
www.dell.com | support.dell.com 4 Cuando finalicen las pruebas, si está ejecutando los Diagnósticos Dell desde el CD Drivers and Utilities (Controladores y utilidades), extráigalo. 5 Cierre la pantalla de la prueba para volver a la pantalla Main Menu (Menú principal). Para salir de los Diagnósticos Dell y reiniciar el equipo, cierre la pantalla Main Menu (Menú principal). Indicadores del sistema Es posible que el indicador de alimentación indique un problema en el equipo.
Indicador de alimentación Descripción del problema Solución sugerida Indicador de El monitor o la tarjeta gráfica alimentación iluminado puede que esté defectuoso o de verde y ningún instalado incorrectamente. código de sonido ni vídeo durante la prueba POST (Power-On SelfTest [autoprueba de encendido]) Consulte “Indicadores de diagnóstico” en la página 157 para ver si se identifica el problema concreto.
www.dell.com | support.dell.com Patrón de indicadores verde verde amarillo amarillo amarillo amarillo verde amarillo amarillo verde verde amarillo verde verde verde amarillo 158 Descripción del problema Solución sugerida Se detectaron los módulos de memoria, pero se produjo un fallo de la memoria. • Si tiene instalado un módulo de memoria, vuelva a instalarlo y, a continuación, reinicie el equipo. • Si tiene instalados dos módulos de memoria, extráigalos, vuelva a instalar uno y reinicie el equipo.
Patrón de indicadores amarillo amarillo amarillo verde amarillo verde amarillo verde amarillo verde verde verde verde verde verde verde Descripción del problema Solución sugerida No se detectó ningún módulo de memoria. • Vuelva a instalar todos los módulos de memoria y reinicie el equipo. • Para eliminar la posibilidad de que exista un conector de memoria defectuoso, extraiga todos los módulos de memoria, vuelva a instalar uno (si el equipo admite uno solo) y reinicie el equipo.
www.dell.com | support.dell.com Códigos de sonido El equipo puede emitir una serie de sonidos durante el inicio si el monitor no puede mostrar errores o problemas. Esta serie de sonidos, denominada código de sonido, identifica un problema. Un código de sonido posible (código 1-3-1) consta de un sonido, una secuencia de tres sonidos y, a continuación, otro sonido. Este código de sonido indica que el equipo encontró un problema de memoria.
Código Causa Código Causa 4-3-1 Fallo de memoria por encima de la dirección 0FFFFh 4-4-3 Fallo de la prueba del coprocesador matemático 4-3-3 Fallo en el contador 2 del chip del temporizador 4-4-4 Fallo de la prueba de la memoria caché 4-3-4 El reloj de hora se ha parado Ejecución de Dell™ IDE Hard Drive Diagnostics Se trata de un programa que prueba la unidad de disco duro para solucionar problemas o confirmar la existencia de fallos en ésta.
www.dell.com | support.dell.com En Windows 2000 Para solucionar incompatibilidades con Device Manager (Administrador de dispositivos): 1 Haga clic sobre el botón Start (Inicio), elija Settings (Configuración) y, después, haga clic en Control Panel (Panel de control). 2 En la ventana Control Panel (Panel de control), haga doble clic en System (Sistema). 3 Pulse sobre la ficha Hardware. 4 Haga clic en Device Manager (Administrador de dispositivos).
Creación de un punto de restauración 1 Haga clic en el botón Start (Inicio) y, a continuación, en Help and Support (Ayuda y asistencia). 2 Pulse sobre System Restore (Restaurar sistema). 3 Siga las instrucciones que aparecen en pantalla. Cómo volver a un estado anterior del equipo AVISO: antes de restaurar el equipo a un estado operativo anterior, guarde y cierre los archivos abiertos y salga de los programas activos.
www.dell.com | support.dell.com Cómo deshacer la última operación de Restaurar sistema AVISO: antes de deshacer la última restauración del sistema, guarde y cierre todos los archivos abiertos y cierre todos los programas. No cambie, abra ni elimine ningún archivo o programa hasta que haya restaurado totalmente el sistema.
Para volver a instalar Windows XP, necesita los siguientes elementos: • El CD Operating System (Sistema operativo) de Dell™ • CD Drivers and Utilities (Controladores y utilidades) de Dell NOTA: El CD Drivers and Utilities (Controladores y utilidades) de Dell contiene controladores que se instalaron en la fábrica durante el ensamblaje del equipo. Utilice el CD Drivers and Utilities (Controladores y utilidades) o visite el sitio Dell | Support para cargar los controladores necesarios.
www.dell.com | support.dell.com Programa de instalación de Windows XP 1 Cuando aparezca la pantalla Configuración de Windows XP, pulse para seleccionar To set up Windows now (Configurar Windows ahora). 2 Lea la información en la pantalla Microsoft Windows Licensing Agreement (Contrato de licencia de Microsoft Windows) y, a continuación, presione para aceptar el contrato de licencia.
13 Cuando aparezca la pantalla Welcome to Microsoft (Bienvenido a Microsoft), haga clic en Next (Siguiente). 14 Cuando aparezca el mensaje How will this computer connect to the Internet? (¿Cómo se conectará este equipo a Internet?), haga clic en Skip (Omitir). 15 Cuando aparezca la pantalla Ready to register with Microsoft? (¿Está listo para registrarse con Microsoft?), seleccione No, not at this time (No en este momento) y haga clic en Next (Siguiente).
www.dell.com | support.dell.com Controladores para el ordenador Para ver una lista de los controladores de dispositivo para su equipo: 1 Pulse sobre My Drivers (Mis controladores) en el menú desplegable Topic (Tema). El CD Drivers and Utilities (Controladores y utilidades) examina el hardware y el sistema operativo del ordenador y, a continuación, muestra una lista de controladores de dispositivos para la configuración del sistema en la pantalla.
Índice A D Administrador de dispositivos, 162 del equipo códigos de sonido, 160 restaurar al estado anterior, 162 B base acoplamiento, 146 extracción, 146 C CD sistema operativo, 143 CD Drivers and Utilities (Controladores y utilidades), 141 CD Operating System (Sistema operativo), 143 Centro de ayuda y soporte técnico, 143 códigos de sonido, 160 conflictos incompatibilidad entre software y hardware, 161 conflictos de IRQ, 161 controladores Resource CD (CD de recursos), 141 Dell sitio de asistencia té
Índice I P S indicador de alimentación, 156 problemas códigos de sonido, 160 conflictos, 161 Diagnósticos Dell, 153 indicadores de diagnóstico, 156-157 restaurar al estado anterior, 162 Service Tag (Etiqueta de servicio), 142 indicadores botón de encendido, 156 diagnóstico, 156-157 parte anterior del equipo, 156 parte posterior del equipo, 157 sistema, 156 indicadores de diagnóstico, 156-157 indicadores del sistema, 156 M mensajes de error códigos de sonido, 160 indicadores de diagnóstico, 156-
Dell™ OptiPlex™ 170L Hızlı Başvuru Kılavuzu MTC2 ve DHS Modelleri w w w. d e l l . c o m | s u p p o r t . d e l l .
Not, Uyarı ve Dikkat başlıklı açıklamalar NOT: NOT başlıklı açıklamalar, bilgisayarınızı daha iyi kullanmanıza yardımcı olacak önemli bilgileri belirtir. UYARI: UYARI başlıklı açıklamalar, donanımınızda meydana hasar veya veri kaybına neden olabilecek tehlikeleri belirtir ve sorundan nasıl kaçınabileceğinizi anlatır. DİKKAT: DİKKAT başlıklı açıklamalar, yaralanma, mal veya can kaybına neden olabilecek tehlikeleri belirtir.
İçindekiler Bilgisayarınızla İlgili Bilgi Bulma . . . . . . . . . . . . . . . . . . . 175 Küçük Masaüstü Bilgisayarınız Hakkında . . . . . . . . . . . . . . 178 Ön ve Arka Görünümler . . . . . . . . . Bilgisayarınızın İçi . . . . . . . . . . . . Bilgisayar Altlığını Takma ve Çıkartma . . . . . . . . . . . . . . . . . . . . . . . . . . . . . . . . . . . . . . . . . . . 178 179 180 . . . . . . . . . . . . . . . . . . 181 . . . . . . . . . . . . . . . . . . . . . . . . . . . . . . . . . . . . . . .
İçindekiler
Bilgisayarınızla İlgili Bilgi Bulma Aradığınız Ne? • • • • • Bilgisayarım için tanı programı Bilgisayarım için sürücüler Bilgisayarımın belgeleri Aygıtımın belgeleri Desktop System Software (DSS) Burada Bulabilirsiniz Drivers and Utilities (Sürücüler ve Yardımcı Programlar) CD'si (ResourceCD (Kaynak CD'si) olarak da bilinir) Belgeler ve sürücüler bilgisayarınıza önceden yüklenmiştir.
w w w. d e l l . c o m | s u p p o r t . d e l l . c o m Aradığınız Ne? • Parçaları nasıl çıkartacağım ve değiştireceğim hakkında bilgi • Teknik özellikler • Sistem ayarlarını nasıl yapılandıracağım hakkında bilgi • Sorunları nasıl gidereceğim hakkında bilgi Burada Bulabilirsiniz Dell™ OptiPlex™ Kullanma Kılavuzu Microsoft® Windows® XP Yardım ve Destek Merkezi 1 Start (Başlat) düğmesini ve Help and Support (Yardım ve Destek) öğesini tıklatın.
Aradığınız Ne? • • • • • • Servis arama durumu ve destek tarihçesi Bilgisayarımla ilgili en önemli teknik konular Sık sorulan sorular Dosya indirmeleri Bilgisayar yapılandırması hakkındaki ayrıntılar Bilgisayarımın servis kontratı Burada Bulabilirsiniz Dell Premier Support (Dell Ana Destek) Web sitesi — premiersupport.dell.com Dell Premier Support (Dell Ana Destek) Web sitesi, şirket, devlet ve eğitim amaçlı müşterileri için ayrı ayrı özelleştirilmiştir.
w w w. d e l l . c o m | s u p p o r t . d e l l . c o m Küçük Masaüstü Bilgisayarınız Hakkında Ön ve Arka Görünümler ön panel kapağı servis etiketi kulaklık konektörü USB 2.
Bilgisayarınızın İçi DİKKAT: Bu bölümdeki işlemlere başlamadan önce Ürün Bilgisi Kılavuzu'ndaki güvenlik talimatlarını yerine getirin. DİKKAT: Elektrik çarpmasından korunmak için, kapağı açmadan önce mutlaka bilgisayarınızın elektrik fişini prizden çekin. UYARI: Kabloları yanlışlıkla sistem kartından çıkartmamak için bilgisayar kapağını açarken dikkatli olun.
w w w. d e l l . c o m | s u p p o r t . d e l l . c o m Bilgisayar Altlığını Takma ve Çıkartma DİKKAT: Bu bölümdeki işlemlere başlamadan önce Ürün Bilgisi Kılavuzu bölümündeki güvenlik talimatlarını yerine getirin. NOT: Üst kapağın çizilmesini önlemek için bilgisayarınızı yumuşak bir yüzeye yerleştirin. Bilgisayarınız dikey veya yatay konumda kullanılabilir.
MiniTower Bilgisayarınız Hakkında Ön ve Arka Görünümler CD veya DVD sürücüsü etkinlik ışığı servis etiketi CD veya DVD çıkarma düğmesi ikinci sürücü yuvası disket sürücüsü ışığı güç ışığı disket sürücüsü çıkarma düğmesi sabit sürücü etkinlik ışığı güç düğmesi USB 2.
w w w. d e l l . c o m | s u p p o r t . d e l l . c o m Bilgisayarınızın İçi DİKKAT: Bu bölümdeki işlemlere başlamadan önce Ürün Bilgisi Kılavuzu'ndaki güvenlik talimatlarını yerine getirin. DİKKAT: Elektrik çarpmasından korunmak için, kapağı açmadan önce mutlaka bilgisayarınızın elektrik fişini prizden çekin. UYARI: Kabloları yanlışlıkla sistem kartından çıkartmamak için bilgisayar kapağını açarken dikkatli olun.
Bilgisayarınızı Kurma DİKKAT: Bu bölümdeki herhangi bir işlemi gerçekleştirmeden önce Ürün Bilgisi Kılavuzu'ndaki güvenlik talimatlarını yerine getirin. UYARI: Bilgisayarınız takılı modem kartı gibi bir genişletme kartı varsa, uygun kabloyu bilgisayarın arka panelindeki bağlayıcıya değil, karta takın. Bilgisayarınızın düzgün biçimde kurmak için tüm adımları tamamlamalısınız. Yönergeleri izleyen ilgili resimlere bakın. 1 Klavye ile fareyi bağlayın.
w w w. d e l l . c o m | s u p p o r t . d e l l .
MiniTower Bilgisayar Kartlar Olmadan Kurulum monitör klavye fare hoparlörler kulaklık ağ USB Kartlarla Kurulum hoparlörler telefon/m odem Hızlı Başvuru Kılavuzu 185
w w w. d e l l . c o m | s u p p o r t . d e l l .
Sorunların Çözülmesi Dell, bilgisayarınızın beklendiği şekilde çalışmadığı taktirde size yardımcı olmak üzere birçok araç sunmuştur. Bilgisayarınız için hazırlanmış olan en son sorun giderme bilgileri için support.dell.com adresindeki Dell Support (Dell Destek) web sitesine bakın.
w w w. d e l l . c o m | s u p p o r t . d e l l . c o m 3 Önyükleme aygıtları listesi belirdiğinde Boot to Utility Partition (Yardımcı Program Bölümü’ne önyükle) seçeneğini vurgulayın ve tuşuna basın. 4 Dell Diagnostics (Dell Tanıları) Main Menu (Ana Menü) belirdiğinde, çalıştırmak istediğiniz testi seçin.
Seçenek İşlev (devam) Symptom Tree (Belirti Ağacı) Karşılaşılan en yaygın belirtileri listeler ve yaşadığınızın sorunun belirtilerine göre bir test seçmenizi sağlar. 2 Test sırasında bir sorunla karşılaşılırsa, içinde hata kodu ve sorunun açıklamasının bulunduğu bir hata iletisi belirir. Hata kodu ile sorunun açıklamasını bir yere not edin ve ekrandaki talimatları izleyin. Hata durumunu çözemezseniz, Dell’e başvurun. NOT: Bilgisayarınızın Servis Etiketi, tüm test sayfalarının en üstünde bulunur.
w w w. d e l l . c o m | s u p p o r t . d e l l . c o m Güç Işığı Sorun Açıklaması Önerilen Çözüm Yanıp sönen yeşil Bilgisayar askıya alınmış durumda (Microsoft® Windows® 2000 ve Windows XP). Güç düğmesine basın, fareyi hareket ettirin veya bilgisayarı uyandırmak için klavyedeki bir tuşa basın. Birkaç kez yeşil yanıp söndükten sonra kapanıyor Bir yapılandırma hatası var. Belirli sorunun tanımlanıp tanımlanmadığını görmek için "Tanı Işıkları" sayfa 190 bölümüne bakın.
Bir sorunu gidermenize yardımcı olmak üzere, bilgisayarınızın arka panelinde "A," "B," "C" ve "D" etiketli dört ışık vardır. Işıklar sarı veya yeşil olabilir. Bilgisayar normal şekilde çalışmaya başladığında, önyükleme işlemi tamamlanırken ışıklardaki desenler veya kodlar değişir. Sistem önyüklemesinin POST kısmı başarıyla tamamlanırsa, dört ışığın hepsi sürekli yeşil yanar.
w w w. d e l l . c o m | s u p p o r t . d e l l . c o m Işık Deseni Sorun Açıklaması sarı yeşil yeşil sarı yeşil yeşil yeşil sarı sarı sarı sarı yeşil sarı yeşil sarı yeşil sarı yeşil yeşil yeşil yeşil yeşil yeşil yeşil 192 Önerilen Çözüm Bir IDE sürücüsü hatası oluşmuş olabilir. • Tüm IDE sürücüsü güç ve veri kablolarını yeniden yerleştirin ve bilgisayarı yeniden başlatın. Bir USB hatası oluşmuş olabilir.
Sesli Uyarı Kodları Monitör hataları veya sorunları görüntüleyemezse, bilgisayarınız başlangıç sırasında bir dizi sesli uyarı verir. Sesli uyarı kodu denen bu sesli uyarı dizisi, bir sorun belirtir. Olası sesli uyarı kodlarından biri (1-3-1 kodu), bir sesli uyarı, üç sesli uyarı içeren bir veri bloğu ve ardından bir sesli uyarıdan oluşur. Bu sesli uyarı kodu, bilgisayarın bir bellek sorunuyla karşılaştığını size bildirir. Başlatma sırasında bilgisayarınız sesli uyarı verirse: 1 Sesli uyarı kodunu yazın.
w w w. d e l l . c o m | s u p p o r t . d e l l . c o m Dell™ IDE Hard Drive Diagnostics Programını Çalıştırma Dell IDE Hard Drive Diagnostics, bir sabit sürücü hatasını gidermek veya doğrulamak için sabit sürücüyü sınayan bir yardımcı programdır. 1 Bilgisayarınızı açın (bilgisayarınız zaten açıksa yeniden başlatın). 2 Ekranın sağ üst köşesinde F2= Setup belirince tuşlarına basın. 3 Ekrandaki talimatları uygulayın.
7 Properties (Özellikler) penceresini görüntülemek için, ünlem işaretiyle işaretlenen bir aygıtı çift tıklatın. Properties (Özellikler) penceresindeki Device (Aygıt) durum alanı, yeniden yapılandırılması gereken kartları veya aygıtları bildirir. 8 Aygıtları yeniden yapılandırın veya aygıtları Device Manager (Aygıt Yöneticisi) yardımcı programından kaldırın. Aygıtı yapılandırma hakkındaki bilgiler için, aygıtla birlikte gelen belgelere bakın.
w w w. d e l l . c o m | s u p p o r t . d e l l . c o m 1 Start (Başlat) düğmesini tıklatın, All Programs (Tüm Programlar) → Accessories (Donatılar) → System Tools (Sistem Araçları) öğesinin üzerine gelin ve sonra System Restore (Sistem Geri Yükleme) öğesini tıklatın. 2 Restore my computer to an earlier time (Bilgisayarımı daha önceki bir zamanda geri yükle) seçeneğini belirleyin ve Next (İleri) düğmesini tıklatın. 3 Bilgisayarınızı geri yüklemek istediğiniz bir takvim tarihini tıklatın.
1 Start (Başlat) düğmesini ve Control Panel (Denetim Masası) öğesini tıklatın. 2 Performance and Maintenance (Performans ve Bakım) öğesini tıklatın. 3 System (Sistem) öğesini tıklatın. 4 System Restore (Sistem Geri Yükleme) sekmesini tıklatın. 5 Turn off System Restore (Sistem Geri Yüklemeyi Kapat) seçeneğinin belirlenmemiş olmasına dikkat edin.
w w w. d e l l . c o m | s u p p o r t . d e l l . c o m UYARI: Windows XP ile çakışmaları engellemek için, Windows XP'yi yeniden yüklemeden önce bilgisayarınızda yüklü olan virüs koruma yazılımını devre dışı bırakın. Yönergeler için, yazılımla birlikte gelen belgelere bakın. İşletim Sistemi CD'sinden Önyükleme 1 Tüm açık dosyaları kaydedip kapatın ve açık programlardan çıkın. 2 İşletim Sistemi CD'sini takın. Install Windows XP (Windows XP Yükle) iletisi görünürse Exit (Çık) düğmesini tıklatın.
8 Computer Name and Administrator Password (Bilgisayar Adı ve Yönetici Parolası) penceresinde bilgisayarınız için bir ad girin (veya sağlanan adı kabul edin) ve bir parola girin, ardından Next (İleri) düğmesini tıklatın. 9 Modem Dialing Information (Modem Çevirme Bilgileri) ekranı belirirse, istenen bilgileri girin ve Next (İleri) düğmesini tıklatın. 10 Date and Time Settings (Tarih ve Saat Ayarları) penceresinde tarih, saat ve saat dilimini girin ve Next (İleri) düğmesini tıklatın.
w w w. d e l l . c o m | s u p p o r t . d e l l . c o m Drivers and Utilities (Sürücüler ve Yardımcı Programlar) CD'si Kullanma Windows işletim sistemini çalıştırırken Drivers and Utilities (Sürücüler ve Yardımcı Programlar) CD'sini (ResourceCD (Kaynak CD’si olarak da bilinir) kullanmak için: NOT: Aygıt sürücülerine ve kullanma belgelerine erişmek için Drivers and Utilities (Sürücüler ve Yardımcı Programlar) CD'sini, Windows’un içinden kullanmanız gerekir.
Dizin A D H altlık çıkartma, 180 takma, 180 Dell ana destek sitesi, 177 destek sitesi, 176 hata iletileri sesli uyarı kodları, 193 tanı ışıkları, 189-190 Aygıt Yöneticisi, 194 Dell Diagnostics (Dell Tanıları), 187 Help and Support Center (Yardım ve Destek Merkezi), 177 B belgeler aygıt, 175 çevrimiçi, 176-177 Hızlı Başvuru, 175 Kullanma Kılavuzu, 176 ResourceCD (Kaynak CD'si), 175 bilgisayar önceki duruma geri yükleme, 195 sesli uyarı kodları, 193 Dell Premier Support (Dell Ana Destek) Web sitesi,
Dizin K Microsoft® Windows® etiketi, 176 sorunlar çakışmalar, 194 Dell Diagnostics (Dell Tanıları), 187 önceki duruma geri yükleme, 195 sesli uyarı kodları, 193 tanı ışıkları, 189-190 R sürücüler ResourceCD (Kaynak CD'si), 175 Kullanma Kılavuzu, 176 M ResourceCD (Kaynak CD'si) Dell Diagnostics (Dell Tanıları), 187 S Servis Etiketi, 176 sesli uyarı kodları, 193 sistem ışıkları, 189 sorun giderme çakışmalar, 194 Dell Diagnostics (Dell Tanıları), 187 Hardware Troubleshooter (Donanım Sorun Gideric