Dell™ OptiPlex™ 745c Quick Reference Guide Model DCSM w w w. d e l l . c o m | s u p p o r t . d e l l .
Notes, Notices, and Cautions NOTE: A NOTE indicates important information that helps you make better use of your computer. NOTICE: A NOTICE indicates potential damage to hardware or loss of data and tells you how to avoid the problem. CAUTION: A CAUTION indicates a potential for property damage, personal injury, or death. If you purchased a Dell™ n Series computer, any references in this document to Microsoft® Windows® operating systems are not applicable.
Contents Finding Information System Views . . . . . . . . . . . . . . . . . . . . . . . . . . . . . . . . 5 . . . . . . . . . . . . . . . . . . . . . . . . . . . . . . . . . . . 8 . . . . . . . . . . . . 8 10 11 . . . . . . . . . . . . . . . . . . . . . . . . . 13 . . . . . . . . . . . . . . . . . . . . . . . . . . . . . . . . . . . . . . . . . . . . . . . . . . . . . . 13 14 . . . . . . . . . . . . . . . . . . . . . . . . . . . . . . 16 Mini Tower Computer — Front View . . . . . . . .
Contents
Finding Information NOTE: Some features or media may be optional and may not ship with your computer. Some features or media may not be available in certain countries. NOTE: Additional information may ship with your computer. What Are You Looking For? Find It Here • • • • • Drivers and Utilities CD (ResourceCD) NOTE: The Drivers and Utilities CD may be optional and may not ship with your computer.
What Are You Looking For? Find It Here • • • • • • Dell™ Product Information Guide Warranty information Terms and Conditions (U.S. only) Safety instructions Regulatory information Ergonomics information End User License Agreement • How to reinstall my operating system Operating System CD NOTE: The Operating System CD may be optional and may not ship with your computer. The operating system is already installed on your computer.
What Are You Looking For? Find It Here • Service Tag and Express Service Code • Microsoft Windows Product Key Label Service Tag and Microsoft® Windows® Product Key • Solutions — Troubleshooting hints and tips, articles from technicians, online courses, and frequently asked questions • Community — Online discussion with other Dell customers • Upgrades — Upgrade information for components, such as the memory, hard drive, and operating system • Customer Care — Contact information, service call and order st
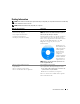
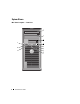
System Views Mini Tower Computer — Front View 1 2 3 11 10 4 5 6 9 7 8 8 Quick Reference Guide
1 5.25-inch drive bay Can contain an optical drive. Insert a CD or DVD (if supported) into this drive. 2 5.25-inch drive bay Can contain an optical drive. Insert a CD or DVD (if supported) into this drive. 3 3.5-inch drive bay Can contain an optional floppy drive or optional media card reader. 4 USB 2.
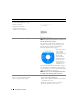
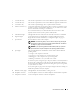
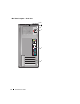
Mini Tower Computer — Back View 1 2 3 4 5 6 10 Quick Reference Guide
1 cover-release latch This latch allows you to open the computer cover. 2 padlock ring Insert a padlock to lock the computer cover. 3 voltage selection switch Your computer is equipped with a manual voltage-selection switch. To help avoid damaging a computer with a manual voltage-selection switch, set the switch for the voltage that most closely matches the AC power available in your location.
1 parallel connector Connect a parallel device, such as a printer, to the parallel connector. If you have a USB printer, plug it into a USB connector. NOTE: The integrated parallel connector is automatically disabled if the computer detects an installed card containing a parallel connector configured to the same address. For more information, see your online User’s Guide. 2 link integrity light • Green — A good connection exists between a 10-Mbps network and the computer.
Removing the Computer Cover CAUTION: Before you begin any of the procedures in this section, follow the safety instructions in the Product Information Guide. CAUTION: To guard against electrical shock, always unplug your computer from the electrical outlet before removing the cover. Before You Begin NOTICE: To avoid losing data, save and close any open files and exit any open programs before you turn off your computer.
3 Disconnect your computer and all attached devices from their electrical outlets, and then press the power button to ground the system board. 4 If applicable, remove the computer stand (for instructions, see the documentation that came with the stand). CAUTION: To guard against electrical shock, always unplug your computer from the electrical outlet before removing the cover. 5 Remove the computer cover. See "Mini Tower Computer" on page 14.
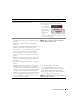
1 2 3 1 security cable slot 2 cover release latch 3 padlock ring Quick Reference Guide 15
Inside Your Computer Mini Tower Computer 3 2 4 1 5 6 7 16 1 optical drive 2 floppy drive 3 power supply 4 chassis-intrusion switch 5 system board 6 heat-sink assembly 7 hard drive Quick Reference Guide
System Board Components 21 2 1 3 20 4 19 18 5 6 17 7 16 MFG_MODE 15 8 14 9 13 12 11 10 Quick Reference Guide 17
1 fan connector (FAN) 12 internal USB (INTERNAL_USB) 2 processor connector (CPU) 13 battery socket (BATT) 3 processor power connector (12VPOWER) 14 PCI Express x16 connector (SLOT1) 4 memory module connectors (DIMM_1, DIMM_2, DIMM_3, DIMM_4) 15 PCI Express x1 connector (SLOT4) 5 RTC reset jumper (RTCRST) 16 PCI connector (SLOT2) 6 password jumper (PSWD) 17 PCI connector (SLOT3) 7 SATA drive connectors (SATA0, SATA1, SATA4, SATA5) 18 serial connector (SER2) 8 manufacturing mode j
Setting Up Your Computer CAUTION: Before performing any of the procedures in this section, follow the safety instructions in Product Information Guide. NOTICE: If your computer has an expansion card installed (such as a modem card), connect the appropriate cable to the card, not to the connector on the back panel.
Set Up Your Keyboard and Mouse Set Up Your Monitor 20 Quick Reference Guide
Power Connections Solving Problems Dell provides a number of tools to help you if your computer does not perform as expected. For the latest troubleshooting information available for your computer, see the Dell Support website at support.dell.com. If computer problems occur that require help from Dell, write a detailed description of the error, beep codes, or diagnostics light patterns, record your Express Service Code and Service Tag below, and then contact Dell from the same location as your computer.
Enter system setup (see "System Setup" in your online User’s Guide for instructions), review your computer’s configuration information, and ensure that the device you want to test displays in system setup and is active. Start the Dell Diagnostics from either your hard drive or from the optional Drivers and Utilities CD (ResourceCD). Starting the Dell Diagnostics From Your Hard Drive 1 Turn on (or restart) your computer. 2 When the DELL logo appears, press immediately.
Dell Diagnostics Main Menu 1 After the Dell Diagnostics loads and the Main Menu screen appears, click the button for the option you want. Option Function Express Test Performs a quick test of devices. This test typically takes 10 to 20 minutes and requires no interaction on your part. Run Express Test first to increase the possibility of tracing the problem quickly. Extended Test Performs a thorough check of devices.
4 When the tests are completed, if you are running the Dell Diagnostics from the Drivers and Utilities CD (optional), remove the CD. 5 Close the test screen to return to the Main Menu screen. To exit the Dell Diagnostics and restart the computer, close the Main Menu screen. System Lights Your power light may indicate a computer problem. Power Light Problem Description Suggested Resolution Solid green Power is on, and the computer is operating normally. No corrective action is required.
Diagnostic Lights CAUTION: Before you begin any of the procedures in this section, follow the safety instructions in the Product Information Guide. To help you troubleshoot a problem, your computer has four lights labeled "1," "2," "3," and "4" on the front or back panel. The lights can be "off" or green. When the computer starts normally, the patterns or codes on the lights change as the boot process completes.
Light Pattern 26 Problem Description Suggested Resolution A possible graphics card failure has occurred. • If the computer has a graphics card, remove the card, reinstall it, and then restart the computer. • If the problem still exists, install a graphics card that you know works and restart the computer. • If the problem persists or the computer has integrated graphics, contact Dell. For information on contacting Dell, see your online User’s Guide.
Light Pattern Problem Description Suggested Resolution Memory modules are detected, but a memory configuration or compatibility error exists. • Ensure that no special memory module/memory connector placement requirements exist. • Verify that the memory modules that you are installing are compatible with your computer. • If the problem persists, contact Dell. For information on contacting Dell, see your online User’s Guide. A failure has occurred.
Code Cause Code Cause 1-3-1 through 2-4-4 Memory not being properly identified or used 3-4-2 Screen retrace failure 3-1-1 Slave DMA register failure 3-4-3 Search for video ROM failure 3-1-2 Master DMA register failure 4-2-1 No timer tick 3-1-3 Master interrupt mask register failure 4-2-2 Shutdown failure 4-2-3 Gate A20 failure 4-4-1 Serial or parallel port test failure 4-2-4 Unexpected interrupt in protected mode 4-4-2 Failure to decompress code to shadowed memory 4-3-1 Memory f
Restoring the Computer to an Earlier Operating State NOTICE: Before you restore the computer to an earlier operating state, save and close any open files and exit any open programs. Do not alter, open, or delete any files or programs until the system restoration is complete. 1 Click the Start button, point to All Programs→ Accessories→ System Tools, and then click System Restore. 2 Ensure that Restore my computer to an earlier time is selected, and click Next.
Reinstalling Microsoft Windows XP Getting Started NOTE: The procedures in this document were written for the Windows default view in Windows XP Home Edition, so the steps will differ if you set your Dell computer to the Windows Classic view or are using Windows XP Professional. If you are considering reinstalling the Windows XP operating system to correct a problem with a newly installed driver, first try using Windows XP Device Driver Rollback. 1 Click the Start button and click Control Panel.
Booting From the Operating System CD 1 Save and close any open files and exit any open programs. 2 Insert the Operating System CD. Click Exit if the Install Windows XP message appears. 3 Restart the computer. 4 Press immediately after the DELL logo appears. If the operating system logo appears, wait until you see the Windows desktop, and then shut down the computer and try again. 5 Press the arrow keys to select CD-ROM, and press .
12 If you are reinstalling Windows XP Professional and you are prompted to provide further information regarding your network configuration, enter your selections. If you are unsure of your settings, accept the default selections. Windows XP installs the operating system components and configures the computer. The computer automatically restarts. NOTICE: Do not press any key when the following message appears: Press any key to boot from the CD. 13 When the Welcome to Microsoft screen appears, click Next.
Upgrading to Microsoft Windows Vista NOTE: The version of Microsoft Windows Vista installed on your computer is determined by the product key associated with the upgrade. Your product key is located on the back of the Windows Vista Install DVD package. During the Windows Vista upgrade process, you will: • Use the Dell Windows Vista Upgrade Assistant DVD to check your system for compatibility and perform any required updates to your Dell-installed applications and drivers.
For information on how to back up your data, or to find Windows Vista compatible drivers/updates for your Dell-installed applications: 1 Go to support.dell.com, select your country/region, and then click Drivers and Downloads. 2 Enter your Service Tag or product model, and then click Go. 3 Select your operating system and language, and then click Find Downloads, or search by keyword for topics relevant to the information you are looking for. The support.dell.
Index B beep codes, 27 C CDs operating system, 6 conflicts software and hardware incompatibilities, 28 cover removing, 13 D Dell Diagnostics, 21 Dell support site, 7 diagnostics beep codes, 27 Dell Diagnostics, 21 documentation End User License Agreement, 6 ergonomics, 6 online, 7 Product Information Guide, 6 regulatory, 6 safety, 6 User’s Guide, 5 warranty, 6 drivers list of, 34 L Drivers and Utilities CD, 5 labels Microsoft Windows, 7 Service Tag, 7 E lights diagnostic, 25 system, 24 End User Lic
Index R W regulatory information, 6 warranty information, 6 reinstalling Windows XP, 30 Windows XP Hardware Troubleshooter, 28 Help and Support Center, 6 reinstalling, 6, 30 setup, 31 System Restore, 28 S safety instructions, 6 Service Tag, 7 software conflicts, 28 support website, 7 system board, 17 System Restore, 28 T troubleshooting beep codes, 27 conflicts, 28 Dell Diagnostics, 21 diagnostic lights, 25 Hardware Troubleshooter, 28 Help and Support Center, 6 restore computer to previous opera
Dell™ OptiPlex™ 745c 快速參考指南 型號 DCSM w w w. d e l l . c o m | s u p p o r t . d e l l .
註、注意與警告 註 : 註是表示能幫助您更好使用電腦的資訊。 注意 : 注意是表示可能的硬體損壞或數據遺失,並告訴您如何避免這些問題。 警告 : 警告表示可能的財產損失、人身傷害或死亡。 如果您購買了 Dell™ n 系列電腦,則本文件中任何有關 Microsoft® Windows® 作業系統的引用皆不適用。 ____________________ 本文件中的資訊如有變更,恕不另行通知。 © 2007 Dell Inc. 版權所有,翻印必究。 未經 Dell Inc. 的書面許可,不得以任何形式進行複製。 本文件中使用的商標:Dell、DELL 徽標與 OptiPlex 是 Dell Inc. 的商標;Intel 是 Intel Corporation 的註冊商標;Microsoft、Windows 與 Vista 是 Microsoft Corporation 的註冊商標。 本文件中使用的其他商標與商品名稱是指擁有這些標誌及名稱的公司或其產品。Dell Inc.
目錄 尋找資訊 . . . . . . . . . . . . . . . . . . . . . . . . . . . . . . . . . . . . . 41 系統檢視 . . . . . . . . . . . . . . . . . . . . . . . . . . . . . . . . . . . . . 44 迷你直立型電腦 — 前視圖 . . . . . 迷你直立型電腦後視圖 . . . . . . . 迷你直立型電腦 — 背面板連接器 . 移除主機蓋 . . . . . . . . . . . . . . . . . . . 44 46 47 . . . . . . . . . . . . . . . . . . . . . . . . . . . . . . . . . . . 49 開始操作之前 . . 迷你直立型電腦 . 您的電腦內部 49 50 . . . . . . . . . . . . . . . . . . . . . . . . . . . . . . . . . . 51 . . . . . . . . . . . . . . . .
目錄
尋找資訊 註 : 有些功能或媒體可能是選購的,且可能不會隨您的電腦一起提供。有些功能或媒體可能在特定國家 或地區沒有。 註 : 其他資訊可能會隨您的電腦一併提供。 您在尋找什麼? • • • • • 我的電腦的診斷程式 我的電腦的驅動程式 我的電腦說明文件 我的裝置說明文件 桌面系統軟體 (DSS) 在此查找 Drivers and Utilities CD (ResourceCD) 註 : Drivers and Utilities CD 可能為選購,且可能不 會隨您的電腦一起提供。 說明文件與驅動程式已安裝於您的電腦上。您可 使用光碟來重新安裝驅動程式 ( 參閱第 68 頁的 「使用 Drivers and Utilities CD」 ), 執行 Dell 診斷 程式 ( 參閱第 56 頁的 「Dell 診斷程式」 ),或存 取您的說明文件。 讀我檔案可能包含 在您的光碟,提供 關於您的電腦的最 新技術變更,或供 技術人員或有經驗 的使用者參考的進 階技術參考資料。 註 : 驅動程式和說明文件更新可以在 support.dell.
您在尋找什麼? • • • • • • 保固資訊 條款與條件 ( 僅限美國 ) 安全說明 管制資訊 人體工學資訊 一般使用者授權合約 • 如何重新安裝我的作業系統 在此查找 Dell™ 產品資訊指南 作業系統光碟 註 : Operating System ( 作業系統 ) 光碟可能是選購 的,且並不與您的電腦一併提供。 作業系統已安裝於您的電腦中。欲重新安裝您的 作業系統,使用作業系統光碟 ( 參閱第 64 頁的 「重新安裝 Microsoft Windows XP」 )。 在您重新安裝您的 作業系統之後,使 用可選的 Drivers and Utilities CD (ResourceCD) 為隨 附您的電腦之裝置 來重新安裝驅動程 式。如需更多資 訊,請參閱第 41 頁的 「Drivers and Utilities CD (ResourceCD)」。 您的作業系統的產品號碼標簽可在您的電腦上找 到 ( 參閱第 64 頁的 「重新安裝 Microsoft Windows XP」 )。 註 : 您的作業系統光碟的顏色會視您訂購的作業 系統不同而改變。 • 如何使用 Windows XP • 如何使
您在尋找什麼? 在此查找 • 服務標籤與快速服務代碼 • Microsoft Windows 產品號碼標簽 服務標籤與 Microsoft® Windows® 產品號碼 這些標籤是在您的電腦上。 • 當您使用 support.dell.com 或聯絡支援時, 請使用服務標籤 來識別您的電 腦。 • 當聯絡支援時, 輸入快速服務代碼來轉接您的電話。 • 解決方案 — 疑難排除提示、技術人員的文章、線上 Dell 支援網站 — support.dell.com 課程以及常見問題集 註 : 選取您的地域或企業部分來檢視適宜的支援 • 社群 — 與其他 Dell 顧客進行線上討論 站台。 • 升級 — 元件升級資訊,例如記憶體、硬碟機與作業 系統 • 客戶關懷中心 — 聯絡資訊、服務呼叫與訂購狀態、 保固和維修資訊 • 服務與支援 — 服務呼叫狀態、支援歷史、服務合約、 與線上討論支援。 • 參考 — 電腦說明文件、電腦組態的詳細資料、產品 下載桌上型電腦系統軟體 : 規格和白皮書 1 跳至 support.dell.
系統檢視 迷你直立型電腦 — 前視圖 1 2 3 11 10 4 5 6 9 7 8 44 快速參考指南
1 5.25 吋磁碟機凹槽 可以容納一個光碟機。插入一個光碟或數位影碟 ( 如果支援 ) 至此磁碟機中。 2 5.25 吋磁碟機凹槽 可以容納一個光碟機。插入一個光碟或數位影碟 ( 如果支援 ) 至此磁碟機中。 3 3.5 吋磁碟機凹槽 可包含一個可選軟碟機或一個可選媒體插卡讀取機。 4 USB 2.
迷你直立型電腦後視圖 1 2 3 4 5 6 46 快速參考指南
1 機箱蓋釋放閂鎖 此閂鎖允許您打開主機蓋。 2 掛鎖扣環 將掛鎖插入以鎖定主機蓋。 3 電壓選擇開關 您的電腦是備有一個手動電壓選擇開關。 為避免損壞帶有手動電壓選擇開關的電腦,請將開關撥到與當地交流電供給電 壓最接近的位置。 注意 : 電壓選擇開關必須設定到 115-V 位置,即使日本當地的交流電供給 電壓為 100 V。 也請確認您的顯示器及其他連接裝置的額定電力允許使用當地可獲得的電源操 作。 4 電源連接器 插入電源線。 5 背面板連接器 插入序列、USB 與其它裝置到適宜的連接器中 ( 參閱第 47 頁的 「迷你直立型 電腦 — 背面板連接器」 )。 6 插槽 已安裝的 PCI 與 PCI Express ( 快速插 ) 卡的連接埠。 迷你直立型電腦 — 背面板連接器 1 2 3 4 5 6 9 8 7 快速參考指南 47
1 並列連接器 將並列裝置,例如印表機,連接到並列連接器。如果您擁有 USB 印表機,將 它的插頭插入 USB 連接器。 註 : 若電腦偵測到包含並列連接器的已安裝插卡設定到相同的位址,則整合並 列連接器將自動停用。如需更多資訊,請參閱您的線上使用者指南。 2 連結完整性指示燈 • • • • 3 網路配接器的連接器 若要連接您的電腦到網路或寬頻裝置,將網路纜線的一端連接到網路插孔或 您的網路或寬頻裝置。網路纜線的另一端則連接到您的電腦背面板上的網路 配接器。單按表示網路纜線已經穩固連接。 註 : 請勿將電話纜線插到網路連接器。 綠燈 — 10-Mbps 網路與電腦之間的連線狀況良好。 橘燈 — 100-Mbps 網路與電腦之間的連線狀況良好。 黃燈 — 1000-Mbps (1-Gbps) 網路與電腦之間的連線狀況良好。 熄滅 — 電腦未偵測到連接到網路的實體連線。 若電腦附有網路連接卡,則使用卡上的連接器。 在此建議您的網路使用類別 5 接線與連接器。若您必須使用類別 3 接線,請將 網路速度強迫設定為 10 Mbps 以確保可靠運作。 4 網路活動指示燈 指示燈閃爍黃燈表示電腦正
移除主機蓋 警告 : 在開始本章節中的任何程序之前,請按照產品資訊指南中的安全說明操作。 警告 : 為保護您避免觸電,在移除主機蓋之前,請務必將您電腦的電源插頭從電源插座拔掉。 開始操作之前 注意 : 為避免遺失資料,請儲存並關閉所有打開的檔案,然後在關閉電腦之前結束所有打開的程式。 1 2 關閉作業系統: a 儲存並關閉所有打開的檔案,結束所有打開的程式,單按開始按鈕,然後單按關閉電腦 。 b 在關閉電腦視窗中,單按關閉。 在作業系統關機處理結束之後,電腦將會關閉。 確定電腦及連接的所有設備均已關閉。如果在您關閉作業系統之後,電腦及連接的設備沒有自動 關閉,現在請將它們關閉。 拆裝電腦內部組件之前 請遵守下列安全指示,以避免您的電腦受到可能的損壞,並確保您自身的安全。 警告 : 在開始本章節中的任何程序之前,請按照產品資訊指南中的安全說明操作。 警告 : 請小心拿取元件與插卡。請勿碰觸元件或插卡上的觸點。持卡時請握住卡的邊緣或其金屬固定托 架。握持元件 〔如處理器〕的邊緣而非其插腳。 注意 : 僅允許合格之維修技術專員修理您的電腦。非 Dell 授權之維修所造成的損壞不在保固範圍之內。 注
迷你直立型電腦 警告 : 在開始本章節中的任何程序之前,請按照產品資訊指南中的安全說明操作。 警告 : 為保護您避免觸電,在移除電腦主機蓋之前,請務必將您電腦的電源插頭從電源插座拔掉。 1 請遵循第 49 頁的 「開始操作之前」中的程序。 2 依圖解所示將電腦側放。 3 找到圖解中顯示的蓋板釋放閂鎖。然後,在提起機箱蓋時,向後滑動釋放閂鎖。 4 緊緊夾住主機蓋的側面,以鉸鏈卡舌作為支點將主機蓋向上轉動。 5 將主機蓋自鉸鏈卡舌移除,然後側放在柔軟而無摩擦的表面上。 警告 : 圖形卡散熱器可能於正常作業中變得非常熱。碰觸之前,請確保圖形卡散熱器已有足夠的時間冷卻。 1 2 3 1 50 安全纜線插槽 快速參考指南 2 機箱蓋釋放閂鎖 3 掛鎖扣環
您的電腦內部 迷你直立型電腦 3 2 4 1 5 6 7 1 光碟機 2 軟碟機 3 電源供應器 4 底座防盜開關 5 主機板 6 散熱器組件 7 硬碟機 快速參考指南 51
主機板元件 21 2 1 3 20 4 19 18 5 6 17 7 16 MFG_MODE 15 8 14 9 13 52 快速參考指南 12 11 10
1 風扇連接器 (FAN) 12 內部 USB (INTERNAL_USB) 2 處理器連接器 (CPU) 13 電池槽 (BATT) 3 處理器電源連接器 (12VPOWER) 14 PCI Express x16 連接器 ( 插槽 1) 4 記憶體模組連接器 (DIMM_1, DIMM_2, DIMM_3, DIMM_4) 15 PCI Express x1 連接器 ( 插槽 4) 5 RTC 重設跳線 (RTCRST) 16 PCI 連接器 ( 插槽 2) 6 密碼跳線 (PSWD) 17 PCI 連接器 ( 插槽 3) 7 SATA 磁碟機連接器 (SATA0, SATA1, SATA4, SATA5) 18 序列連接器 (SER2) 8 製造模式跳線 (MFG_MODE) 19 軟碟機連接器 (DSKT) 9 前面板連接器 (FNT_PANEL) 20 主機板喇叭 (BEEP) 10 電源連接器 (POWER) 21 喇叭連接器 (INT_SPKR) 11 防盜切換連接器 (INTRUDER) 跳線設定 註 : 不
安裝電腦 警告 : 在開始本章節中的任何程序之前,請按照產品資訊指南中的安全說明操作。 注意 : 如果您的電腦已經安裝有擴充卡 ( 例如數據機卡 ),請將對應的纜線連接至此擴充卡,而不要連接 至電腦背面板中的連接器。 注意 : 為協助電腦維持適當的作業溫度,請您不要將電腦放置在太靠近牆的位置或可能妨礙底架附近空 氣流通的儲存隔間。參閱您的產品資訊指南以取得更多資訊。 註 : 在您安裝任何非電腦隨附裝置或軟體時,請閱讀裝置或軟體隨附的說明文件,或是與廠商聯絡以確 認裝置或軟體與您的電腦和作業系統相容。 您必須完成所有步驟,才能夠正確地設定電腦。請參考這些指示所對應的圖表。 注意 : 請勿嘗試同時操作 PS/2 滑鼠與 USB 滑鼠。 1 連接鍵盤與滑鼠。 注意 : 請勿將數據機纜線連接至網路配接器的連接器。電話通訊的電壓可能會對網路配接器造成損壞 2 連接數據機或網路纜線。 將網路纜線 ( 而不是電話線 ) 插入網路連接器。如果您有可選的數據機,請將電話線連接至數據 機。 3 連接顯示器。 對準後輕輕插入顯示器纜線,避免將連接器插腳弄彎。將纜線連接器上的指旋螺絲鎖緊。 註 : 有些顯示器在螢幕背面的底
安裝鍵盤與滑鼠 安裝顯示器 快速參考指南 55
電源連線 解決問題 Dell 提供了許多工具,可以在電腦工作未達到預期水準時提供協助。如果要取得您電腦的最新故障 排除資訊,請參閱 Dell 支援網站,網址是:support.dell.
從硬碟機啟動 Dell 診斷程式 1 開啟 ( 或重新啟動 ) 電腦。 2 當出現 DELL 徽標時,立即按下 。 註 : 如果您看到一個訊息陳述找不到診斷程式公用程式分割區,從可選 Drivers and Utilities CD ,執行 Dell 診斷程式 ( 參閱第 57 頁的 「從 Drivers and Utilities CD Drivers and Utilities CD」 )。 如果等待過長時間而 Windows 作業系統徽標出現,請繼續等待直到看見 Microsoft® Windows® 桌 面。然後關閉電腦並再試一次。 當啟動裝置清單出現時,請反白顯示 啟動公用程式分割區 然後按 。 3 當 Dell 診斷程式主選單出現時,請選取您想要執行的測試。 從 Drivers and Utilities CD Drivers and Utilities CD 1 插入 Drivers and Utilities CD 執行 Dell 診斷程式。 2 關閉並重新啟動電腦。 當出現 DELL 徽標時,立即按下 。 如果等待過長時間而出現 Windo
2 如果在測試期間發生問題,會出現一個包含錯誤代碼與問題說明的訊息。請記錄錯誤代碼與問題 說明,然後遵循螢幕的指示進行操作。 如果您無法解決錯誤的情況,請聯絡 Dell。如需 Dell 的聯絡資訊,請參閱您的線上使用者指南。 註 : 您電腦的服務標籤是位於每個測試螢幕的頂端。如果您與 Dell 聯絡,技術支援人員會詢問您的 服務標籤。 3 如果您是從自訂測試或徵兆樹選項執行測試,請單按下表中適用的標籤描述以獲得更多資訊。 標籤 功能 Results ( 結果 ) 顯示測試結果以及遇到的任何錯誤情況。 Errors ( 錯誤 ) 顯示遇到的錯誤情況、錯誤代碼和問題說明。 Help ( 說明 ) 說明測試並且可能會指出執行測試的要求。 Configuration ( 組態 ) 顯示選定裝置的硬體組態。 Dell 診斷程式自系統設定、記憶體和各種內部測試獲取所有裝置的組態資 訊,並將資訊顯示在螢幕左窗格的裝置清單中。裝置清單並不一定會顯示 安裝在您電腦中的所有元件名稱,或是與電腦連接的所有裝置的名稱。 Parameters ( 參數 ) 允許您通過變更測試設定來自訂測試。 4 當測試
電源指示燈 問題說明 建議的解決方法 閃爍的黃燈 電源供應器或主機板發生故障。 檢查診斷程式指示燈以查看是否出現特定問題 ( 請 參閱第 59 頁的 「診斷程式指示燈」 )。 請參閱您的線上使用者指南中的 「電源問題」。 如果電腦無法啟動,請聯絡 Dell 以尋求技術協助。 如需 Dell 的聯絡資訊,請參閱您的線上使用者指南。 在機器自我測試期 在執行 BIOS 時偵測到問題。 間持續綠燈亮起並 出現嗶聲代碼 如需有關診斷嗶聲代碼的說明,請參閱第 61 頁的 「嗶聲代碼」。同時檢查診斷程式指示燈以查看是 否可確定特定問題。 綠色電源指示燈持 監視器或是圖形卡可能故障或未正 續亮起,在機器自 確安裝。 我測試期間沒有嗶 聲代碼或影像 檢查診斷程式指示燈以查看是否出現特定問題。 綠色電源指示燈持 整合主機板裝置可能有問題。 續亮起而且沒有嗶 聲代碼,但是電腦 在自我測試期間被 鎖定 檢查診斷程式指示燈以查看是否出現特定問題。如 果未查出問題,請聯絡 Dell 以請求技術協助。如需 Dell 的聯絡資訊,請參閱您的線上使用者指南。 診斷程式指示燈 警告 : 在開始本章節中的任何程序之前,請
指示燈樣式 60 快速參考指南 問題說明 建議的解決方法 可能發生處理器故障。 重新安裝處理器,然後重新啟動電腦。 如需有關重新安裝處理器的資訊,請參閱 您的線上使用者指南。 已偵測到記憶體模組,但是發生記憶體故障。 • 如果您安裝了一個記憶體模組,請重新 安裝此模組,然後重新啟動電腦。如需 有關重新安裝記憶體模組的資訊,請 參閱您的線上使用者指南。 • 如果您安裝了兩個或兩個以上的記憶 體模組,請卸下所有模組,。重新安 裝一個模組,然後重新啟動電腦。 如 果電腦正常啟動,請重新安裝另外一 個模組。繼續此步驟直到您找出有問 題的模組,或是重新安裝所有模組而 沒有發現錯誤。 • 如果可用,請將工作正常的同類型記 憶體安裝到您的電腦中。 • 如果問題仍存在,聯絡 Dell。 如需 Dell 的聯絡資訊,請參閱您的線上使 用者指南。 可能發生圖形卡故障。 • 如果電腦有圖形卡,請先卸下圖形卡。 重新安裝圖形卡,然後重新啟動電腦。 • 如果問題仍然存在,請重新安裝一張 您確定可正常運作的圖形卡,然後重 新啟動電腦。 • 如果問題仍存在或電腦有整合視訊圖 形,請聯絡 Dell。如需 Dell 的聯絡
指示燈樣式 問題說明 建議的解決方法 未偵測到記憶體模組。 • 如果您安裝了一個記憶體模組,請重 新安裝此模組,然後重新啟動電腦。 如需有關重新安裝記憶體模組的資訊, 請參閱您的線上使用者指南。 • 如果您安裝了兩個或兩個以上的記憶 體模組,請卸下所有模組,重新安裝 一個模組,然後重新啟動電腦。如果 電腦正常啟動,請重新安裝另外一個 模組。繼續此步驟直到您找出有問題 的模組,或是重新安裝所有模組而沒 有發現錯誤。 • 如果可用,請將工作正常的同類型記 憶體安裝到您的電腦中。 • 如果問題仍存在,請聯絡 Dell。如需 Dell 的聯絡資訊,請參閱您的線上使 用者指南。 已偵測到記憶體模組,但是出現記憶體組態或 相容性錯誤。 • 確定沒有特殊的記憶體模組 / 記憶體連 接器置換要求。 • 確定您正安裝記憶體模組與您的電腦 相容。 • 如果問題仍存在,請聯絡 Dell。如需 Dell 的聯絡資訊,請參閱您的線上使 用者指南。 發生故障。 • 請確定纜線已適當地從硬碟機、光碟 機和 DVD 磁碟機連接至主機板。 • 檢查在監視器螢幕上出現的電腦訊息。 • 如果問題仍存在,聯絡 Dell。如需 Del
代碼 原因 代碼 原因 1-1-2 微處理器暫存器故障 3-1-4 從屬岔斷遮罩暫存器故障 1-1-3 NVRAM 讀取 / 寫入失敗 3-2-2 岔斷向量載入故障 1-1-4 ROM BIOS 檢查總和故障 3-2-4 鍵盤控制器測試失敗 1-2-1 可程式間隔計時器故障 3-3-1 NVRAM 電源損耗 1-2-2 DMA 起始作業故障 3-3-2 無效的 NVRAM 組態 1-2-3 DMA 頁面暫存器讀取 / 寫入失敗 3-3-4 影像記憶體測試失敗 1-3 影像記憶體測試失敗 3-4-1 螢幕起始作業故障 1-3-1 到 2-4-4 無法識別記憶體 或未 使用記憶體 3-4-2 螢幕馳返故障 3-1-1 從屬 DMA 暫存器故障 3-4-3 搜尋影像 ROM 故障 3-1-2 主控 DMA 暫存器故障 4-2-1 無計時器滴答聲 3-1-3 主控岔斷遮罩暫存器故障 4-2-2 關機故障 4-2-3 A20 閘故障 4-4-1 序列埠或並列埠測試失敗 4-2-4 保護模式中未預期的岔斷 4-4-
建立還原點 1 請單按開始按鈕,然後單按說明與支援。 2 單按系統還原。 3 根據螢幕上的說明操作。 將電腦回復至先前的運作狀態 注意 : 在您將電腦還原為較早的運作狀態之前,請儲存並關閉所有打開的檔案,並且結束任何打開的程 式。在系統還原作業完成前,請勿變更、開啟或刪除任何檔案或程式。 1 單按開始按鈕,指向所有程式 → 附屬應用程式 → 系統工具,然後單按系統還原。 2 請確定已經選取將我的電腦還原為先前的時間,然後單按下一步。 3 單按您想要恢復電腦的日期。 選取還原點螢幕可提供一個行事曆,允許您查看並選取還原點。所有包含可用還原點的日期會以 粗體的形式顯示。 4 選取某個還原點,然後單按下一步。 如果行事曆上只有一個還原點,則會自動選取該還原點。如果有兩個或更多還原點可以使用,單 按您喜好的還原點。 5 單按下一步。 還原完成螢幕會在系統還原完成收集資料後出現,接著會重新啟動電腦。 6 在電腦重新啟動之後,請單按確定。 若要變更還原點,您可以使用不同的還原點重複上述步驟,或者您可以取消還原。 取消上次的系統還原 注意 : 在您取消上次的系統還原之前,請儲存並關閉
啟用系統還原 如果您重新安裝 Windows XP 時可用的硬碟空間少於 200 MB,系統還原會自動關閉。若要查看系 統還原是否已啟用: 1 單按開始按鈕,然後單按控制台。 2 單按效能與維護。 3 單按系統。 4 單按系統還原標籤。 5 確定未勾選關閉系統還原。 重新安裝 Microsoft Windows XP 開始操作 註 : 本文件中的程序是依照 Windows XP Home Edition 中的 Windows 預設檢視編寫,因此如果您將 Dell 電腦 設定為 Windows Classic 檢視或者使用的是 Windows XP Professional 版本,則步驟會有所不同。 如果您考慮重新安裝 Windows XP 作業系統以更正新安裝的驅動程式的問題,請先嘗試使用 Windows XP 裝置驅動程式復原。 1 單按開始按鈕,然後單按控制台。 2 在選擇類別底下,單按效能與維護。 3 單按系統。 4 在系統內容視窗中,單按硬體標籤。 5 單按裝置管理員。 6 在安裝新驅動程式的裝置中單按滑鼠右鍵,然後單按內容。 7 單按驅動程式標籤。
若要重新安裝 Windows XP,請依照下列章節所列出的順序執行所有步驟。 重新安裝的程序可能需要花費 1 到 2 個小時來完成。在您重新安裝作業系統之後,您還必須重新安 裝裝置驅動程式、病毒保護程式以及其他軟體。 注意 : 作業系統光碟提供重新安裝 Windows XP 的選項。這些選項可以覆寫檔案並且可能會影響已安裝在 硬碟機中的程式。因此,除非 Dell 技術支援部門人員指示您重新安裝,否則請勿重新安裝 Windows XP。 注意 : 為了避免與 Windows XP 發生衝突,請先關閉電腦中安裝的任何病毒保護軟體,然後再重新安裝 Windows XP。請參閱軟體附贈的說明文件以獲取更多說明。 從作業系統光碟啟動 1 儲存並關閉所有開啟的檔案,然後結束所有開啟的程式。 2 插入作業系統光碟。如果出現安裝 Windows XP 訊息,請單按結束。 3 重新啟動電腦。 4 當 DELL 徽標出現後立刻按下 。 如果作業系統徽標出現,請等待直到您看見 Windows 桌面,然後關閉電腦並再試一次。 5 按下箭號鍵以選取 CD-ROM,然後按 。 6 當出現按
12 當您正在重新安裝 Windows XP Professional 時,如果系統提示您要提供有關您的網路組態的進一 步資訊,請輸入您的選擇。如果您不確定設定是否正確,請接受預設的選項。 Windows XP 會安裝作業系統元件並組態電腦。電腦會自動重新啟動。 注意 : 當出現下列訊息時,請勿按下任何按鍵:按任意鍵以便從光碟啟動。 13 當出現歡迎使用 Microsoft 螢幕時,請單按下一步。 14 當出現 “這台電腦要如何連線至網際網路?”訊息時,請單按略過。 15 當出現 “準備好要向 Microsoft 註冊?”螢幕時,選取否,現在不要,然後單按下一步。 16 當出現 “誰會使用這台電腦?”螢幕時,您可以輸入最多五位使用者。 17 單按下一步。 18 單按完成以完成安裝,然後取出光碟。 19 使用 Drivers and Utilities CD 重新安裝合適的驅動程式。 20 重新安裝您的病毒保護軟體。 21 重新安裝您的程式。 註 : 若要重新安裝並啟動您的 Microsoft Office 或 Microsoft Works Suite 程式,您需要產品號
執行 Windows Vista 升級時,您會: • 使用 Dell Windows Vista Upgrade Assistant DVD 來檢查您的系統是否相容,與執行任何 Dell 安裝 的應用程式與驅動程式所需要的升級。 • 使用 Windows Vista Install DVD 來升級 Windows Vista。 註 : 本冊子裏的升級步驟不適用在 Windows Vista 64 位元作業系統。如果您要升級到 Windows Vista 64- 位 元作業系統,您必須執行完整的安裝 程序。 開始操作之前 注意 : 在執行 Windows Vista 升級步驟前,請確定已背份重要資料。 在您的 Dell 電腦設定 Windows Vista 前,確定您有下列物件: • Dell Windows Vista Upgrade Assistant DVD • Microsoft Windows Vista Install DVD • Windows Vista 原版證書 (COA) • DVD 磁碟機 • 至少 512 MB 的 RAM ( 系統記憶體 ) • 15 GB
使用 Drivers and Utilities CD 若要在執行 Windows 作業系統時使用 Drivers and Utilities CD ( 也稱為 ResourceCD): 註 : 若要存取裝置驅動程式以及使用者說明文件,您必須在執行 Windows 時使用 Drivers and Utilities CD 。 1 開啟電腦並允許它啟動至 Windows 桌面。 2 將 Drivers and Utilities CD 插入光碟機。 如果您是第一次在此電腦中使用 Drivers and Utilities CD,ResourceCD 安裝視窗將會開啟並通知 您 Drivers and Utilities CD 即將要開始安裝。 3 單按確定以繼續。 若要完成安裝,請回應安裝程式所提供的提示。 4 單按歡迎 Dell 系統所有人螢幕中的下一步。 選取對應的系統型式、作業系統、裝置類型、和主題。 電腦的驅動程式 顯示電腦裝置驅動程式的清單 : 清單 1 單按主題下拉選單中的我的驅動程式。 Drivers and Utilities CD ( 可選 ) 會掃描您的電腦硬體與作業系統
索引 C 五劃 CDs 作業系統 , 42 主機板 , 52 D Dell 診斷程式 , 56 Drivers and Utilities CD, 41 主機板。 請參閱主機板 六劃 安全說明 , 42 安裝部件 , 49 開始操作之前 , 49 I IRQ 衝突 , 62 W Windows XP 安裝 , 65 系統還原 , 62 重新安裝 , 42, 64 硬體疑難排解 , 62 硬體疑難排解 , 62 說明與支援中心 , 42 故障排除 , 42 七劃 作業系統 重新安裝 , 42 重新安裝 Windows XP, 64 十一劃 問題。 請參閱故障排除 產品資訊指南 , 42 終端用戶軟體授權協議書 , 42 系統還原 , 62 八劃 十二劃 使用者指南 , 41 服務標籤 , 43 九劃 人體工學資訊 , 42 重新安裝 Windows XP, 64 軟體 衝突 , 62 作業系統光碟 , 42 說明檔 , 42 二劃 故障排除 Dell 診斷程式 , 56 系統指示燈 , 58 恢復電腦成先前的操作 , 62 硬體疑難排解 , 62 診斷程式指示燈 , 5
索引 十三劃 十六劃 電源指示燈 診斷問題 , 58 錯誤訊息 系統指示燈 , 58 診斷程式指示燈 , 59 嗶聲代碼 , 61 十四劃 嗶聲代碼 , 61 管制資訊 , 42 蓋板 , 49 移除 , 49 說明文件 人體工學 , 42 安全 , 42 使用者指南 , 41 保固 , 42 產品資訊指南 , 42 終端用戶軟體授權協議 , 42 管制 , 42 說明文件 , 43 線上 , 43 Dell 支援站台 , 43 支援網站 , 43 十五劃 標簽 , 43 服務標籤 , 43 衝突 軟體與硬體不相容的問 , 62 70 索引 二十一劃 驅動程式 , 68
Dell™ OptiPlex™ 745c DCSM www.dell.com | support.dell.
: ' ' ! " #$ %&' ( $ )$* # $ +" : '( , -' ,$' "+ , .
$% . . . . . . . . . . . . . . . . . . . . . . . . . . . . . . . . & . . . . . . . . . . . . . . . . . . . . . . . . . . . #$ /% + #0+" " ' 1, * #' " " . . . . #$ /% + #0+" " ' 1, * #' " . . . . #$ /% + #0+" " ' 1, /2 ( 3, ' " ' . . . . , " $ . . . . . . . . . . . . #$ %/ + #0+" " ' 1, . & ( . . . . . . . . . . #$ %/ + #0+" " ' 1, . ) . . . . .
: ! $ 0 0 ' (7" (, !% $ / , , / & &' ' &(# , #$ % ! $ 0 0 ' & " #$ % ! 0 " ( : #$ $ ' &(# , #$ % 0 1 % + ! " # (Desktop System Software $ DSS) %& ' ( (&*) + + , - .
0 1 % + - 4( - ( ( $) - ( 5 "+ / ) &*) ( 6 * - 4( &*) - 4( & 7 - ( + * "% %& / 8 + & / %& Windows XP %& ( !( + , %& / + .
0 1 % + Service Tag ( Express Service Code : * % *;( 6 < Microsoft Windows - ( - &*) $+ ( ) Service Tag Microsoft® Windows® )4 $ % + &%' # ( Service Tag - $) support.dell.com $ + 74 * " " 0 * (- Express Service Code $) + 74 * " " ! +/ Dell Support support.dell.
! " 1 2 3 11 10 9 4 5 6 7 8 78 0 " / 1
1 2 3 4 *6 5.25 *6 5.25 *6 3.5 ) 8 % USB 2.
! " 1 2 3 4 5 6 80 0 " / 1
1 2 3 ) < A $ 5 " **4 5 ) 8 * 1 ) 8 % $ 6 % 4 ) < "# )= A % $ 5 " # 5 A ( ) **4 "# )4 $ ' # + "# + " **4 $ ) )' # **4 ' # - * AC " ' #( : "( - ( <" $ %( ' / ' "&44: ' 115 6 % / ( - (" < , &4 AC
1 2 3 4 5 6 7 8 9 82 ) 8 % ( % ) ( % " # ( ) 8 % ( "# USB $ % ( ) 8 USB : ( ,3 " "/ , $,, "6' 6" $ #$ % # , $' + , %' ( 3, / " " , "'/ ' ' & / " ' , " #$ $ , ! ' 0 2 "& "% * " # % & -&* $ ) + + $ -+ * 10-Mbps = & $ ) + + $ -+ * 100-Mbps
' ( : 1 ) ( 5 ( ) ( ,4 1 * 1 ,% & : " ,6 +776 #! ( ,% 8 ,% 8 +7 ) ' & )*+, + : #0 (: , "& " ,/ (;'&4 % (;' / , ,6( /, 8 , " (;' #$ % 1 2 : a ! " # $ Start % " TurnOff Computer b & ' ( Turn o
3 4 / + - " ) * # . % ' ( + 2 % # $ / " 0 * - /( + / 3 ( &'(/ " ) * ( #. + + &'() ( +3 ' "4 3 ) : " ,6 +776 #! ( ,% 8 ,% 8 +7 ) ' 5 / 5 " " ) * #.
1 2 3 1 % 2 2 ) < A 3 $ 5 0 " / 1 85
. ! 3 2 4 1 5 6 7 1 4 7 86 ) *6 )4 (2 "# @ 0 " / 1 2 5 *6 3 6 $ % +% * )
$ / 21 2 1 3 20 4 19 18 5 6 17 7 16 MFG_MODE 15 8 14 9 13 12 11 10 0 " / 1 87
1 2 3 4 5 6 7 8 9 10 11 (FAN) (CPU) (12VPOWER) (DIMM_1, DIMM_2, DIMM_3, DIMM_4) RTC (RTCRST) ! "# (PSWD) SATA (SATA0, SATA1, SATA4, SATA5) ! " % (MFG_MODE) "& ' ! ' (FNT_PANEL) (POWER) ( ! #& (INTRUDER) 12 13 14 15 16 17 18 19 20 21 USB (INTERNAL_USB) (BATT) PCI Express x16 (SLOT1) PCI Express x1 (SLOT4) PCI (SLOT2) PCI (SLOT
: 1 ) ( 5 ( ) ( ,4 1 * 1 ,% & ( : #$ % ! $' + , %' (, !% #$ $ ( " , %'6 '1 ) $ , , %' , ( 3, /2 ' " : #0 ,A ! * $ " , #$ % /" & &' #$ % $', 2" 0 /2 , +" , ,$"&( 5 &((;', +", " 0 &' #$ $ , ! ' /" "B 2 $ * !C% : , "
* , 90 0 " / 1
& $ % 12 1 $3 Dell ) $ * + "# #$ $ $ + ), ' , "(+&( -. + ," $ $ , ' "# "# $ /' 0 Dell Support $ support.dell.com "# $ -. $ ' (+& * + ) Dell "# $ 1 ' +& $ 2 , ,,..
, + &'' ( "# $ " &''" , ' ( & ) ), ' + (+& ( ) " # $ , ' (, 6 &''(+& 5 ( Dell Diagnostics ) 7 , (+&) " # , (ResourceCD) + 5$ Dell Diagnostics , 6 1 2 3 + , ( '+ ') ) & + + , DELL #4 5!0 # ! : & # # % $ ", $ % $ $ "6( /
5$ Dell Diagnostics 1 , ( # # Dell Diagnostics ) ! ( Main Menu( #4 5!0 #' % ; ) # + & % ,# Express Test ( ) Extended Test ( '%$ (% ) Custom Test ( ) Symptom Tree (2- - ) 2 10 20 ! " # $ % & '# $ ! ( )*! + ,%$ ( " - ! .
4 5 Dell Diagnostics ( ) !" ! # $ # % & ' ! # ( %)#* ! Main Menu Dell Diagnostics %+ , ! ( & , ). ' Main Menu 12 */ ' / ' - $ 0- 12 ! 30.
/ / * 2 & && && " 0 ), ) " & POST " +.
' % 3 " " ) " 0 ,& # BIOS 5/ $ ) ) , " &': , && 8 &, .
" 0 5/ ,& 0 " 0 5/ ,& =) > " 0 5/ ,& USB " &( ' ) "# 3$ 0 %)$3 0 " ,/ %)$ ,/ %) ,/ $ # 3$ 61) , 5/ %)$ ,/ 0 3$ 61) , ' ) && && %)$ Dell # ) ,& $ '
" &( ' ) "# , 0 ,& # ) $ , $ ) "# 5/ 0 5/ ' &&" 5/ *2% ,/ && $ A5 " %+ &* 61) 5/ %)$ " &%)$ %" # ) ! ) ,; ) "!/( ' ) "# ?@ 9 " & ( ' ) "# *2 $ ,/ 3 $ , $ &, *2 3$ 6 ) , 5/ %)$ Dell # ) ,& $ ' ,& ,
1-3-1 *, 2-4-4 3-1-1 3-1-2 3-1-3 4-2-3 DMA Slave DMA Master Master A20 4-2-4 4-3-1 1 ' ') $ 4-4-2 ! ) ! # 1 + # 0FFFFh 4-4-3 2 % 2 4-4-4 3 ! 4-3-3 4-3-4 3-4-2 3-4-3 4-2-1 4-2-2 4-4-1 ' ' ROM -- .
& 1$ ' )- & : - . () $ +# %/ $ 0 , # ' 1" & ' -. 1" ' * -. 1",2 + '-+. , 1" ' & ' * ,"3 % % ) #& * %+ Start (! * All Programs→ Accessories→ System Tools & $#& System Restore 2 " $" ( & Restore my computer to an earlier time & $ & #& Next 3 #& $ *- # .
Microsoft Windows XP . & Getting Started : # ! , % -! " #" $ ! %$ # Windows default view , Windows XP Home Edition "# #! / () #! 0 Dell () 4 Windows Classic view ,2 Windows XP Professional # ! $% 0 / , ## 1 # Windows XP ! " ' %& )* + " .
: 7-"- - # ' 3 %$ # " # ! Windows XP , # ' ' -!% / -+ # & ' ' % 8' * -. " # ! # 5 "" % . 0 () " "# #! " #! Windows XP , . () " # $ $ -." , $ " #! #! : 0 . & # % " ' # -. " ! # Windows XP () + ' $ 7 & # #% #! " - . " #! + , 0 - .
10 11 12 9 + ", / '/ / ! % Date and Time Settings , / Next $% % Networking Settings 1 .
$: Microsoft Windows Vista : ( Microsoft Windows Vista - . " #! # 0 () / $ "*"+ #%8' #)> -. -.+ # #0 " #%8' #)> + -.
1 2 3 ! %& + " support.dell.com, / +=/ , + " , / Drivers and Downloads 9 % 2/ Service Tag (/ 8 B '/ / + " Go / ## 1 # '/ 8 A , / + " Find Downloads, ! % 0 0 * (keyword) " % % + " " % # % 2/+ " % : + % 7 % support.dell.com # - . () " ' .
4 * Symbols % / % + 7 ! % , 76 % ( / &5 , 95 &5 ##, 94 % 2 / % = , 76 % 2 / # , 76 % 2 / " # # , 76 # % '/ ' % ) - 3 ' , 99 C # $ , 83 # , 99 # % ) - &5 ##, 94 # % '/ ' % ) - / #& $ +0 % ,, 99 & /% , 99 &5 , 95 Help and Support Center, 76 # % '/
"#2 - D Dell Diagnostics , 91 diagnostics Dell Diagnostics, 91 H Help and Support Center, 76 I 3 Dell Diagnostics, 91 M motherboard.