
Quick Reference Guide


Installing Drives: Dell OptiPlex GX1 and GX1p Midsize Managed PC Systems
file:///C|/infodev/2013/eDoc/OpGX1/SIG/drives.htm[2/21/2013 12:07:25 PM]
If you purchased the drive from Dell, you can contact Dell for the necessary reconfiguration
information. (See the chapter titled "Getting Help" in the Diagnostics and Troubleshooting Guide
for instructions on obtaining technical assistance.)
If you did not purchase the drive from Dell, call the drive manufacturer.
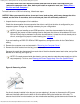
With the two EIDE interface connectors on the system board, your system can support up to four EIDE
devices. EIDE hard-disk drives should be connected to the EIDE interface connector labeled "IDE1." (EIDE
tape drives and CD-ROM drives should be connected to the EIDE interface connector labeled "IDE2.")
Installing an EIDE Hard-Disk Drive in the Hard-Disk Drive Bracket
CAUTION: To avoid the possibility of electric shock, turn off the computer and any peripherals,
disconnect them from their electrical outlets, and then wait at least 5 seconds before you
remove the computer cover. Also, before you install an expansion card, see "
Safety First —
For You and Your Computer."
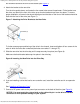
Install an EIDE hard-disk drive in the hard-disk drive bracket as follows:
1. If you are replacing a hard-disk drive that contains data you want to keep, be sure to make a backup of
your files before you begin this procedure.
NOTICE: When you unpack the drive, do not set it on a hard surface, which may damage the
drive. Instead, set the drive on a surface, such as a foam pad, that will sufficiently cushion it.
2. Unpack the drive and prepare it for installation.
Check the documentation that accompanied the drive to verify that the drive is configured for your
computer system. Change any settings necessary for your configuration.
NOTE: If you are installing a non-EIDE tape drive, check the documentation for the drive to
determine the jumper or switch settings used to designate the drive as drive address DS4 (not
DS2 or DS3 as may be indicated in the drive documentation). Unless the drive is already set to
drive 4, reconfigure its jumper or switch setting (see "
Jumpers.")
If you are installing an EIDE CD-ROM or EIDE tape drive, configure the drive for the Cable Select
setting.
3. Remove the computer cover as instructed in "
Removing the Computer Cover."
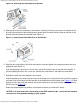
4. Remove the drive bracket from the chassis.
If a hard-disk drive is already installed in the drive bracket, disconnect the DC power cable and EIDE
cable from the drive.
Remove the screw securing the hard-disk drive bracket to the chassis wall. Grasp the front part of the
bracket that serves as a handle, and rotate the bracket up toward the back of the computer until it
disengages from the floor of the chassis (see Figure 10).