User's Guide www.dell.com/regulatory_compliance DellTM OptiPlexTM SFF 980 All In One (AIO) Stand The Dell OptiPlex SFF 980 All-in-One Stand is a unique design that can integrate monitor, system and cables management to adapt to your unique environment.
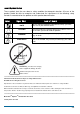
Hazard Symbols Review These symbols alert the user about a safety condition that demands attention. All users of the product should be able to recognize and understand the significance of the following safety hazards if encountered on the product or within product documentation. Symbol Signal Word NOTE Level of Hazard A NOTE indicates important information that helps you make better use of your Dell AIO Stand.
Contents 1 About your Dell OptiPlex SFF 980 AIO Stand ………………………………………………….. 4 2 Setting up the Dell OptiPlex SFF 980 AIO Stand ………………………………………………. 6 3 Specifications …………………………………………………………………………................... 15 4 Finding Information …………………………………………………………………….................
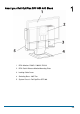
About your Dell OptiPlex SFF 980 AIO Stand 1 1 DELL Monitor: P190S / 1909W / P2210 2 DELL Quick Release Monitor Mounting Plate 3 Locking Cable Cover 4 Swiveling Base - 360o Pan 5 System Chassis: Dell OptiPlex SFF 980 4/15
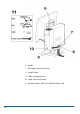
6 Handle 7 Kensington Security Lock Slot 8 Unlock Switch 9 Cable management clip 10 Cable Cover Lock Switch 11 Provided Cables: VGA, DVI, USB and Power Cord 5/15
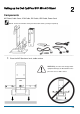
Setting up the Dell OptiPlex SFF 980 AIO Stand 2 Components AIO Stand, Cable Cover, VGA Cable, DVI Cable, USB Cable, Power Cord NOTE:Refer to the Monitor and System Instruction Guides, packaged separately. ______________________________________________________________________________________ 1 Place the AIO Stand on a level, stable surface. WARNING:To reduce risk of injury and/or equipment damage, the AIO Stand must be placed on a level, stable surface.
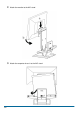
/15 2 Attach the monitor to the AIO stand. 3 Attach the computer chassis to the AIO stand.
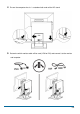
4 Ensure the computer chassis is seated on both ends of the AIO stand. 5 Determine which monitor cable will be used (VGA or DVI) and connect it to the monitor and computer.
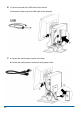
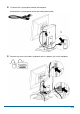
6 a Connect one end of the USB cable to the monitor. b Connect the other end of the USB cable to the computer. 7 a Connect the monitor power cord to the monitor. b Connect the monitor power cord to the facility power outlet.
8 a Connect the system power cord to the computer. b Connect the system power cord to the facility power outlet. 9 Connect any accessory cables (keyboard, mouse, speaker, etc.) to the computer.
/15 10 Route the cables and power cords through the clip at the back of the AIO stand. 11 Slide the cable cover over and down to attach it to the computer chassis.
a Slide the switch located on the cable cover to lock the system. b Slide the switch to lock the AIO stand. 13 Attach customer-supplied security accessory. NOTE: This security feature is only accessible when the AIO Stand lock is engaged as shown in Step 12.
To remove components: a Slide the switch at the back of the stand to release system. b Lift off the cable cover. c Lift off the system.
Range of Motion ______________________________________________________________________________________ Physical Dimensions 14/15
3 Specifications Physical Dimensions* Height 16.8 inches (429 mm) Depth 10.1 inches (255.6 mm) Width 16.9 inches (430.2 mm) Weight 11.5 lbs (5.2 kg) * not including monitor and system Monitor and System Weight Capacities Dell Monitor: P190S / 1909W / P2210 ≦ 10.1 lbs (4.6 kg) Dell System: OptiPlex SFF 980 ≦ 13 lbs (5.