Dell™ OptiPlex™ SX280 Quick Reference Guide Model DCTR w w w. d e l l . c o m | s u p p o r t . d e l l .
Notes, Notices, and Cautions NOTE: A NOTE indicates important information that helps you make better use of your computer. NOTICE: A NOTICE indicates either potential damage to hardware or loss of data and tells you how to avoid the problem. CAUTION: A CAUTION indicates a potential for property damage, personal injury, or death. If you purchased a Dell™ n Series computer, any references in this document to Microsoft® Windows® operating systems are not applicable.
Contents Finding Information . . . . . . . . . . . . . . . . . . . . . . . . . . . . About Your Computer . . . . . . . . . . . . . . . . . . . . . . . . . . . . . . . . . . . . . . . . . . . . . . . . . . . . . . . . . . . . . . . . . . . . . . . 10 . . . . . . . . . . . . . . . . . . . . . . . . . . . . . . . . . . . . . . . . . . . . . . . . . . . . . . . . . . . . . . . . . 10 11 12 15 16 . . . . . . . . . . . . . . . . . . . . . . . . . . .
Contents
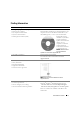
Finding Information What Are You Looking For? Find It Here • • • • • Drivers and Utilities CD (also known as the ResourceCD) A diagnostic program for my computer Drivers for my computer My computer documentation My device documentation Desktop System Software (DSS) • OS updates and patches Documentation and drivers are already installed on your computer. You can use the CD to reinstall drivers, run the Dell Diagnostics, or access your documentation.
www.dell.com | support.dell.com What Are You Looking For? Find It Here • Service Tag and Express Service Code • Microsoft Windows License Label Service Tag and Microsoft Windows License These labels are located on your computer. • Use the Service Tag to identify your computer when you use support.dell.com or contact technical support. • Enter the Express Service Code to direct your call when contacting technical support. The Express Service Code is not available in all countries.
What Are You Looking For? Find It Here • How to use Windows XP • Documentation for my computer • Documentation for devices (such as a modem) Windows Help and Support Center 1 Click the Start button and click Help and Support. 2 Type a word or phrase that describes your problem and click the arrow icon. 3 Click the topic that describes your problem. 4 Follow the instructions on the screen.
www.dell.com | support.dell.com About Your Computer NOTE: If you want to orient your computer under a desk top or on a wall surface, use the optional wallmount bracket. To order the bracket, contact Dell. For information on contacting Dell, see your online User’s Guide. NOTE: To ensure proper ventilation, do not block the cooling vents.
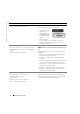
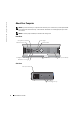
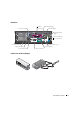
Back View cover release knob parallel connector link integrity light network adapter network activity light line-out connector line-in connector vents (do not block) diagnostic lights power connector USB connectors (5) serial connector video connector Cable Cover and Power Adapter Quick Reference Guide 9
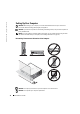
www.dell.com | support.dell.com Setting Up Your Computer NOTICE: When setting up your computer, secure all cables toward the back of your work area to prevent the cables from being pulled, tangled, or stepped on. NOTICE: To prevent the computer from overheating and shutting down, do not place the computer in a poorly ventilated area.
NOTICE: In a high-vibration environment or when installing the computer under a surface or on a wall, use the optional wall-mount bracket. To order the bracket, contact Dell. For information on contacting Dell, see your online User’s Guide. NOTE: To ensure proper ventilation, place the computer at least 5 cm (2 inches) from a vertical surface. Do not place the computer in an enclosed environment without ventilation.
www.dell.com | support.dell.com 1 device screw Connecting External Devices CAUTION: Before performing any of the procedures in this section, follow the safety instructions in the Product Information Guide. You must complete all steps to properly set up your computer. See the appropriate figures that follow the instructions. 1 Use the USB connectors on the back of your computer to connect the keyboard and mouse. 2 Connect the modem or network cable.
5 Connect power cables to the computer, monitor, and devices and insert the other ends of the power cables to electrical outlets. 6 Press the power buttons to turn on the computer and monitor. NOTE: Before you install any devices or software that did not ship with your computer, read the documentation that came with the software or device, or contact the vendor to verify that the software or device is compatible with your computer and operating system.
www.dell.com | support.dell.com Connecting a DVI Monitor If you have a DVI-compatible monitor, plug the cable from your monitor in to the white DVI display-connector on the computer back panel. Connecting a VGA Monitor If you have a VGA-compatible monitor, use the adapter cable to connect the cable from your monitor to the white DVI display-connector on the computer back panel.
Connecting Two Monitors Use the adapter cable to connect both a VGA monitor and a DVI monitor to the white DVI displayconnector on the computer back panel. Installing a Hard Drive CAUTION: Before you begin any of the procedures in this section, follow the safety instructions in the Product Information Guide. 1 If you are installing a new drive, attach the drive rails—located inside the cover—to the new drive.
www.dell.com | support.dell.com CAUTION: If your power cord or adapter provides a green ground wire for connection to an electrical outlet, do not permit contact between the green ground wire and power leads because electrical shock, fire, or damage to your computer can occur (see the following figure). 4 5 Connect the metal ground connector to the grounding source on the outlet (see the following figure): a Loosen the grounding source.
CAUTION: To prevent static damage to components inside your computer, discharge static electricity from your body before you touch any of your computer’s electronic components. You can do so by touching an unpainted metal surface on the computer chassis. 1 cover release knob Remove the computer cover. a Rotate the cover release knob in a clockwise direction, as shown in the figure. b Slide the computer cover forward 1 cm (0.5 inch), or until it stops, and then raise the cover.
www.dell.com | support.dell.com Replacing the Computer Cover CAUTION: Before you begin any of the procedures in this section, follow the safety instructions in the Product Information Guide. 1 2 Replace the cover: a Lower and align the cover with the metal computer frame. a Slide the cover until you hear or feel it click into place. Connect your computer to its power adapter and connect devices to electrical outlets, and turn them on.
Dell Diagnostics CAUTION: Before you begin any of the procedures in this section, follow the safety instructions located in the Product Information Guide. When to Use the Dell Diagnostics If you experience a problem with your computer, perform the checks in "Setting Up Your Computer" on page 10 and run the Dell Diagnostics before you contact Dell for technical assistance. NOTICE: The Dell Diagnostics works only on Dell™ computers.
www.dell.com | support.dell.com 3 When the boot device list appears, highlight Onboard or USB CD-ROM and press . 4 Select Onboard or USB CD-ROM Device from the CD boot menu. 5 Select the Boot from CD-ROM option from the menu that appears. 6 Type 1 to start the ResourceCD menu. 7 Type 2 to start the Dell Diagnostics. 8 Select Run the 32 Bit Dell Diagnostics from the numbered list. If multiple versions are listed, select the version appropriate for your computer.
Tab Function Help Describes the test and may indicate requirements for running the test. Configuration Displays your hardware configuration for the selected device. The Dell Diagnostics obtains configuration information for all devices from system setup, memory, and various internal tests, and it displays the information in the device list in the left pane of the screen. The device list may not display the names of all the components installed on your computer or all devices attached to your computer.
www.dell.com | support.dell.com Power Supply Light Light State PSU State Description Troubleshooting Off No AC, or a fault condition occurred Indicates that the power supply is not receiving power from an electrical outlet, OR that the power supply shut down due to a fault condition. Ensure that the electrical outlet is working by testing it with another device, such as a lamp. Verify that the AC power cable connection is properly seated in the power supply.
Power Light Problem Description Suggested Resolution Solid green power light and no beep code and no video during POST The monitor may be faulty or incorrectly installed. Check "Diagnostic Lights" on page 23 to see if the specific problem is identified. Solid green and a beep code during POST A problem was detected while the BIOS See "Running the Dell™ IDE Hard Drive was executing. Diagnostics" on page 27 for instructions on diagnosing the beep code.
www.dell.com | support.dell.com Light Pattern 24 Problem Description Suggested Resolution off off off off The computer is in a normal off Plug the computer into a working electrical condition or a possible pre-BIOS failure outlet and press the power button. has occurred. green yellow yellow yellow A possible BIOS failure has occurred; the Run the BIOS Recovery utility, wait for recovery computer is in the recovery mode. completion, and then restart the computer.
Light Pattern Problem Description Suggested Resolution green green green yellow A possible USB failure has occurred. Reinstall all USB devices, check cable connections, and then restart the computer. yellow yellow yellow green No memory modules are detected. • If you have one memory module installed, reinstall it and restart the computer. For information on reinstalling the memory module, see your online User’s Guide.
www.dell.com | support.dell.com Beep Codes Your computer might emit a series of beeps during start-up if the monitor cannot display errors or problems. This series of beeps, called a beep code, identifies a problem. One possible beep code (code 1-3-1) consists of one beep, a burst of three beeps, and then one beep. This beep code tells you that the computer encountered a memory problem. If your computer beeps during start-up: 1 Write down the beep code.
Running the Dell™ IDE Hard Drive Diagnostics The Dell IDE Hard Drive Diagnostics is a utility that tests the hard drive to troubleshoot or confirm a hard drive failure. 1 Turn on your computer (if your computer is already on, restart it). 2 When F2 = Setup appears in the upper-right corner of the screen, press . 3 Follow the instructions on the screen. If a failure is reported, see "Hard Drive Problems" in your User’s Guide.
www.dell.com | support.dell.com 8 Reconfigure the devices or remove the devices from the Device Manager. See the documentation that came with the device for information on configuring the device. To resolve incompatibilities using the Hardware Troubleshooter: 1 Click the Start button and click Help. 2 Click Troubleshooting and Maintenance on the Contents tab, click Windows 2000 troubleshooters, and then click Hardware.
5 Click Next. The Restoration Complete screen appears after System Restore finishes collecting data and then the computer restarts. 6 After the computer restarts, click OK. To change the restore point, you can either repeat the steps using a different restore point, or you can undo the restoration. Undoing the Last System Restore NOTICE: Before you undo the last system restore, save and close all open files and exit any open programs.
www.dell.com | support.dell.com • Dell™ Operating System CD • Dell Drivers and Utilities CD NOTE: The Drivers and Utilities CD contains drivers that were installed during assembly of the computer. Use the Drivers and Utilities CD to load any required drivers, including the drivers required if your computer has a RAID controller. Reinstalling Windows XP NOTICE: You must use Windows XP Service Pack 1 or later when you reinstall Windows XP.
5 Press to select the highlighted partition (recommended), and follow the instructions on the screen. The Windows XP Setup screen appears, and the operating system begins to copy files and install the devices. The computer automatically restarts multiple times. NOTE: The time required to complete the setup depends on the size of the hard drive and the speed of your computer. NOTICE: Do not press any key when the following message appears: Press any key to boot from the CD.
www.dell.com | support.dell.com 20 Reinstall your virus protection software. 21 Reinstall your programs. NOTE: To reinstall and activate your Microsoft Office or Microsoft Works Suite programs, you need the Product Key number located on the back of the Microsoft Office or Microsoft Works Suite CD sleeve. NOTE: If you installed a unique image on your computer or if you had to reinstall your operating system, run the DSS utility. DSS is available on your Drivers and Utilities CD and at support.dell.com.
Index B beep codes, 26 C CD operating system, 7 computer beep codes, 26 closing cover, 18 restore to previous state, 28 conflicts software and hardware incompatibilities, 27 cover closing, 18 diagnostics (continued) lights, 22-23 documentation device, 5 online, 6 ResourceCD, 5 System Information Guide, 5 User’s Guide, 5 drivers ResourceCD, 5 I IRQ conflicts, 27 L labels Microsoft Windows, 6 Service Tag, 6 E lights back of computer, 23 diagnostic, 22-23 front of computer, 22 power button, 22 system, 22
Index P T power button light, 22 problems beep codes, 26 conflicts, 27 Dell Diagnostics, 19 diagnostic lights, 22-23 restore to previous state, 28 troubleshooting conflicts, 27 Dell Diagnostics, 19 diagnostic lights, 22-23 Hardware Troubleshooter, 27 Help and Support Center, 7 restore to previous state, 28 R U reinstalling Drivers and Utilities CD, 5 ResourceCD, 5 Windows XP, 29 User’s Guide, 5 ResourceCD Dell Diagnostics, 19 warranty, 5 S safety instructions, 5 Service Tag, 6 software confli
Dell™ OptiPlex™ SX280 クイックリファレンスガイド モデル DCTR w w w. d e l l . c o m | s u p p o r t . d e l l .
メモ、注意、および警告 メモ:コンピュータを使いやすくするための重要な情報を説明しています。 注意:ハードウェアの損傷やデータの損失の可能性を示し、その危険を回避するための方法を説明していま す。 警告:物的損害、けが、または死亡の原因となる可能性があることを示します。 Dell™ n シリーズコンピュータをご購入いただいた場合、このマニュアルの Microsoft® Windows® オペレーティングシステムについての説明は適用されません。 ____________________ このマニュアルの内容は予告なく変更されることがあります。 © 2004 すべての著作権は Dell Inc. にあります。 Dell Inc. からの書面による許可なしには、いかなる方法においてもこのマニュアルの複写、転載を禁じます。 このマニュアルに使用されている商標: Dell、OptiPlex、および DELL のロゴは、Dell Inc.
目次 お使いのコンピュータに関する情報の検索. . . . . . . . . . . . . . . . . . . . . . . 39 コンピュータについて . . . . . . . . . . . . . . . . . . . . . . . . . . . . . . . . . . . . . . . 42 正面図 . . . . . . . . . . . . . . . . . . . . . . . . . . . . . . . . . . . . . . . . . . . . . . . . 42 側面図 . . . . . . . . . . . . . . . . . . . . . . . . . . . . . . . . . . . . . . . . . . . . . . . . 42 背面図 . . . . . . . . . . . . . . . . . . . . . . . . . . . . . . . . . . . . . . . . . . . . . . . . 43 ケーブルカバーと電源アダプタ . . . . . . . . . . . . .
目次
お使いのコンピュータに関する情報の検索 何をお探しですか ? • • • • • こちらをご覧ください (『ResourceCD』とも呼ば コンピュータの Diagnostics (診断)プログラム 『Drivers and Utilities CD』 れます ) コンピュータのドライバ コンピュータのマニュアル マニュアルおよびドライバは、お使いのコンピュータ にプリインストールされています。CD を使用して、 デバイスのマニュアル ドライバを再インストールしたり、Dell Diagnostics DSS (デスクトップシステムソフトウェア) (診断)プログラムやマニュアルにアクセスすること ができます。 CD に収録されている Readme ファイルには、 マニュアルの作成後に システムに追加された 変更や、技術者や専門 知識をお持ちのユー ザーを対象とするテク ニカルリファレンスな どが記載されています。 メモ:最新のドライバ と マ ニ ュ ア ル は、 support.jp.dell.
www.dell.com | support.dell.com 何をお探しですか ? • • • • 部品の取り外しおよび取り付け方法 仕様 システムの設定方法 トラブルシューティングおよび問題解決の方法 こちらをご覧ください Dell OptiPlex™『ユーザーズガイド』 Microsoft® Windows® XP ヘルプとサポートセンター 1 スタート ボタンをクリックして、 ヘルプとサポート をクリックします。 2 ユーザーズガイドおよびシステムガイド をク リックして、ユーザーズガイド をクリックしま す。 『ユーザーズガイド』は、 『Drivers and Utilities CD』 でもご利用できます。 • サービスタグおよびエクスプレスサービスコード サービスタグおよび Microsoft Windows ライセンス • Microsoft Windows ライセンスラベル ラベルはお使いのコンピュータに貼られています。 • support.jp.dell.
何をお探しですか ? こちらをご覧ください • Windows XP の使い方 • お使いのコンピュータのマニュアル • お使いのデバイス(モデムなど)のマニュアル Windows ヘルプとサポートセンター 1 スタート ボタンをクリックして、ヘルプとサポート をクリックします。 2 問題に関連する用語やフレーズを 検索 ボックスに 入力して、矢印アイコンをクリックします。 3 問題に関するトピックをクリックします。 4 画面の指示に従います。 • オペレーティングシステムの再インストール 『オペレーティングシステム CD』 オペレーティングシステムは、出荷時に、コンピュー タにプリインストールされています。『オペレーティ ングシステム CD』を使用して、オペレーティングシ ステムを再インストールすることができます。手順 については、OptiPlex 『ユーザーズガイド』を参照し てください。 オペレーティングシス テムを再インストール し た 後、『Drivers and Utilities CD』を使用し て、コンピュータに付 属しているデバイス用 のドライバを再インス トールします。 オペレー
www.dell.com | support.dell.
背面図 パラレル コネクタ カバーリリースノブ リンク保全ライト ネットワークアダプタ ネットワーク 動作ライト ライン出力 コネクタ ライン入力 コネクタ USB コネクタ(5) 通気孔 (塞がないでください) 診断ライト ビデオコネクタ シリアルコネクタ 電源コネクタ ケーブルカバーと電源アダプタ クイックリファレンスガイド 43
www.dell.com | support.dell.
注意:モニターをコンピュータの上に置かないでください。モニタースタンドを使用してくだ さい。 注意:コンピュータを上下逆に置かないでください。 注意:振動の大きい場所、水平な面の下、または壁にコンピュータを設置する場合、オプショ ンの壁用設置ブラケットを使用してください。このブラケットのご注文は、デルにお問い合わ せください。デルへのお問い合わせについては、オンラインの 『ユーザーズガイド』を参照し てください。 メモ:適切な換気のため、垂直面から 5 cm 以上離して、コンピュータを設置してください。 換気のできない密閉された環境にコンピュータを設置しないでください。 モジュールベイへのデバイスの取り付け フロッピードライブ、CD/DVD ドライブ、またはセカンドハードドライブなどの Dell™ ポータブルデバイスをモジュールベイに取り付けることができます。お使いの Dell コン ピュータは、モジュールベイに CD/DVD ドライブまたはエアベイ(フィラーブランク)が 取り付けられた状態で出荷されています。 お使いのコンピュータには、デバイスをモジュールベイに固定するためのモジュールロッ クスイッチがセ
www.dell.com | support.dell.
外付けデバイスの接続 警告:『製品情報ガイド』の安全にお使いいただくための注意事項に従い、この項の手順を始 めてください。 お使いのコンピュータを正しくセットアップするには、すべての手順を完了する必要があ ります。手順の後にある該当する図を参照してください。 1 コンピュータ背面の USB コネクタを使って、キーボードとマウスを接続します。 2 モデムとネットワークケーブルを接続します。 注意:ネットワークケーブルを接続するには、まずケーブルを壁のネットワークジャックに 差し込み、次にコンピュータに差し込みます。 (電話線でなく)ネットワークケーブルをネットワークコネクタに差し込みます。オ プションのモデムがある場合、電話線をモデムに差し込みます。 注意:モデムケーブルをネットワークアダプタに接続しないでください。電話線からの電圧で ネットワークアダプタが損傷を受ける可能性があります。 3 モニターを接続します。 コネクタピンを曲げないように、位置を合わせて慎重にモニターケーブルを挿入し ます。ケーブルコネクタのつまみネジを締めます。 メモ:モニターの中には画面裏の下部にビデオコネクタがあるものもありま
www.dell.com | support.dell.
VGA モニターの接続 VGA 互換モニターをお持ちの場合、アダプタケーブルを使って、モニターからのケーブ ルをコンピュータの背面パネルにある白色の DVI ディスプレイコネクタに接続します。 2 台のモニターの接続 アダプタケーブルを使って、VGA モニターと DVI モニターの両方をコンピュータの背面 パネルにある白色の DVI ディスプレイコネクタに接続します。 クイックリファレンスガイド 49
www.dell.com | support.dell.
5 AC電源ケーブルをコンセントに接続し ます。 オプションのケーブルカバーの 取り付け アース端子 金属製のアースコネクタ 1 すべての外付けデバイスケーブルが、ケーブルカバーの穴に通してあり、コンピュー タの背面パネルに接続されているか確認します。 2 ケーブルカバーの底部を持ち、コンピュータの背面パネルの 4 つのスロットと 4 つ のタブを揃えます。 3 タブをスロットに挿入し、ケーブルカ ケーブルカバー バーが確実に所定の位置に収まるまで、(オプション) 底部を診断ライトの方にスライドさせ ます (図を参照)。 4 セキュリティケーブルスロットに盗難 防止デバイスを取り付けます (オプ ション)。 セキュリティケーブル スロット クイックリファレンスガイド 51
www.dell.com | support.dell.
内部図 プロセッサヒートシンクファンカバー シャーシイントルージョン スイッチ スピーカー(オプション) メモリモジュール(2) セキュリティ ケーブルスロット ハードドライブ コンピュータカバーの取り付け 警告:『製品情報ガイド』の安全にお使いいただくための注意事項に従い、この項の手順を始 めてください。 1 カバーを取り付けます。 a 金属製のコンピュータフレームにカ バーを下ろして合わせます。 a カチッと所定の位置に収まるまで、 カバーをスライドします。 2 コンピュータを電源アダプタに接続し、 デバイスをコンセントに接続して、電源 を入れます。 クイックリファレンスガイド 53
www.dell.com | support.dell.com シャーシイントルージョンディテクタが On に設定されている場合、次回のコン ピュータ起動後に、以下のメッセージが画面に表示されます。 ALERT! Cover was previously removed. (警告 ! カバーが取り外されました。) 3 セットアップユーティリティを起動し、Intrusion Status オプションの下の Clear を 選んで、シャーシイントルージョンのステータスをクリアします。シャーシイント ルージョンディテクタについては、オンラインの『ユーザーズガイド』を参照してく ださい。 メモ:管理者パスワードが他の人によって設定されている場合、シャーシイントルージョン ディテクタのリセット方法はネットワーク管理者にお問い合わせください。 問題の解決 お使いのコンピュータが予想したとおりに機能しない場合、デルではお客様のお役に立つ 様々なツールを提供します。お使いのコンピュータ用の最新のトラブルシューティング 情報については、デルサポートウェブサイト support.jp.dell.
Dell Diagnostics (診断)プログラム 警告:『製品情報ガイド』の安全にお使いいただくための注意事項に従い、この項の手順を始 めてください。 Dell Diagnostics(診断)プログラムを使用するとき コンピュータに問題が発生した場合、デルテクニカルサポートにお問い合わせになる前 に、44 ページの 「コンピュータのセットアップ」 のチェック事項を実行してから、Dell Diagnostics (診断)プログラムを実行してください。 注意:Dell Diagnostics(診断)プログラムは、Dell™ コンピュータ専用です。 セットアップユーティリティを起動し、コンピュータの設定情報を閲覧して、テストする デバイスがセットアップユーティリティに表示され、アクティブであることを確認しま す。セットアップユーティリティについては、オンラインの『ユーザーズガイド』を参照 してください。 ハードドライブ(55 ページの 「ハードドライブからの Dell Diagnostics(診断)プログ ラムの起動」を参照)または 『Drivers and Utilities CD』(『Resource
www.dell.com | support.dell.
Dell Diagnostics(診断)プログラムのメインメニュー 1 Dell Diagnostics (診断)プログラムがロードされ、Main Menu 画面が表示された ら、希望のオプションのボタンをクリックします。 オプション 機能 Express Test デバイスのクイックテストを実行します。通常このテストは 10 ~ 20 分か かり、お客様の操作は必要ありません。最初に Express Test を実行すると、 問題をさらにすばやく特定することができます。 Extended Test デバイスの全体チェックを実行します。通常このテストは 1 時間以上かか り、質問に定期的に応答する必要があります。 Custom Test 特定のデバイスをテストします。実行するテストをカスタマイズできます。 Symptom Tree 検出した最も一般的な症状を一覧表示し、問題の症状に基づいたテストを 選択することができます。 2 テスト中に問題を検出すると、エラーコードと問題の説明を示すメッセージが表示 されます。エラーコードと問題の説明を記録し、画面の指示に従います。 エラーが解決できな
www.dell.com | support.dell.
システムライト 電源ボタンライトおよびハードドライブライトは、コンピュータの問題を示すことがあり ます。 電源ライト 問題の説明 推奨される処置 POST 中の緑色の点 内蔵システム基板デバイスに欠陥が 特定の問題が識別されているかを確認するため 灯、ビープコードは ある可能性があります。 に、60 ページの 「診断ライト」 を確認します。 ないがコンピュー 問題が識別されない場合、デルに連絡してテク タがロック ニカルサポートを受けてください。 POST 中の緑色の点 モニターが不良があるか、正しく取 特定の問題が識別されているかを確認するため 灯、ビープコードお り付けられていません。 に、60 ページの 「診断ライト」 を確認します。 よびビデオ表示なし POST 中に、緑色の BIOS 実行中に問題が検出されまし ビープコードによる診断については、64 ペー 点灯とビープコード た。 ジの 「Dell™ IDE Hard Drive Diagnostics(IDE HD 診断)プログラムの実行」 を参照してくだ さい。また、特定の問題が識別されているかを 確認するために、診断ライトを確認します。
www.dell.com | support.dell.
ライト パターン 問題の説明 推奨される処置 緑色 緑色 黄色 黄色 メモリモジュールが検出されました • 取り付けているメモリモジュールが 1 つ が、メモリ障害が発生しました。 の場合、そのモジュールを取り付けなおし てコンピュータを再起動します。メモリモ ジュールを取り付けなおす手順について は、オンラインの 『ユーザーズガイド』を 参照してください。 • 取り付けているメモリモジュールが 2 つ の場合、モジュールを取り外し、モジュー ルの 1 つを取り付けなおしてコンピュー タを再起動します。コンピュータが正常に 起動する場合、別のモジュールを追加しま す。 • 利用できる場合、正常に動作している同じ 種類のメモリをコンピュータに取り付け ます。 • 問題が解決しない場合、デルにお問い合わ せください。 黄色 緑色 緑色 黄色 フロッピードライブまたはハードド すべての電源ケーブルとデータケーブルを接 ライブの障害が発生した可能性があ 続しなおし、コンピュータを再起動します。 ります。 緑色 緑色 緑色 黄色 USB の障害が発生した可能性があり すべての USB デバイスを取り付け
www.dell.com | support.dell.
ビープコード お使いのコンピュータの起動時に、モニターにエラーメッセージまたは問題を表示できな い場合、ビープ音が連続して鳴ることがあります。この連続したビープ音はビープコード と呼ばれ、問題を特定します。連続したビープ音には、ビープ音がまず 1 回鳴り、次に連 続して 3 回鳴ってから、1 回鳴るものがあります (コード 1 3 1)。このビープコードは、 コンピュータがメモリの問題を検出したことを知らせます。 起動時にコンピュータがビープ音を発する場合、次の手順を実行します。 1 ビープコードを書き留めます。 2 より深刻な問題を識別するには、55 ページの 「Dell Diagnostics (診断)プログラ ム」を参照してください。 3 デルテクニカルサポートにお問い合わせください。 コード 原因 コード 原因 1 1 2 マイクロプロセッサレジスタ障害 3 3 4 Video Memory テスト障害 1 1 3 NVRAM 読み書き障害 3 4 1 画面初期化障害 1 1 4 ROM BIOS チェックサム障害 3 4 2 画面リトレース障害 1 2 1 プログラ
www.dell.com | support.dell.
7 感嘆符が付いているデバイスをダブルクリックして、プロパティ ウィンドウを開き ます。 プロパティ ウィンドウの デバイスの状態 領域に、再設定が必要なカード、またはデ バイスが表示されます。 8 デバイスを設定しなおすか、デバイスマネージャ から削除します。 デバイスの設定 については、デバイスに付属しているマニュアルを参照してください。 ハードウェアに関するトラブルシューティングを使って非互換性を解決するには、次の手 順を実行します。 1 スタート ボタンをクリックして、ヘルプ をクリックします 2 目次 タブで トラブルシューティングと保守 をクリックし、Windows 2000 に関す るトラブルシューティング をクリックして、ハードウェア をクリックします。 3 ハードウェアに関するトラブルシューティング 一覧で、コンピュータにあるハード ウェアの競合を解決する必要があります。をクリックして、次へ をクリックします。 Microsoft® Windows® XP システムの復元の使い方 ハードウェア、ソフトウェア、またはその他のシステム設定を変更したためにコンピュー タが正常に動作しなくなってし
www.dell.com | support.dell.
システムの復元の有効化 空き容量が 200 MB 以下のハードディスクに Windows XP を再インストールした場合、 システムの復元は自動的に無効に設定されます。システムの復元が有効になっているか 確認するには、次の手順を実行します。 1 スタート ボタンをクリックして、コントロールパネル をクリックします。 2 システムの復元 タブをクリックします。 3 すべてのドライブでシステムの復元を無効にする にチェックマークが付いていない ことを確認します。 Microsoft® Windows® XP の再インストール はじめに 新しくインストールしたドライバの問題を解消するために Windows XP オペレーティン グシステムを再インストールする場合、まず最初に Windows XP のデバイスドライバの ロールバックを使います。(デバイスドライバのロールバックについては、オンラインの 『ユーザーズガイド』を参照してください。)デバイスドライバのロールバックを実行して も問題が解決されない場合、システムの復元 (65 ページの 「Microsoft® Windows® XP システムの復元の使い方
www.dell.com | support.dell.
Windows XP のセットアップ 1 セットアップの開始 画面が表示されたら、 を押して続行します。 2 Microsoft Windows ライセンス契約 画面の内容を読み、 を押して、使用許諾 契約書に同意します。 3 お使いのコンピュータにすでに Windows XP がインストールされていて、現在の Windows XP データを復元したい場合、r と入力して修復オプションを選び、CD を 取り出します。 4 新たに Windows XP をインストールする場合、 を押してオプションを選択し ます。 5 を押してハイライト表示されたパーティションを選び (推奨)、画面の指示 に従います。 Windows XP セットアップ 画面が表示され、オペレーティングシステムは、ファイ ルのコピーおよびデバイスのインストールを開始します。コンピュータは自動的に 数回再起動します。 メモ:ハードドライブの容量やコンピュータの速度によって、セットアップに要する時間は異 なります。 注意:Press any key to boot from the CD.
www.dell.com | support.dell.com 12 Windows XP Professional を再インストールし、ネットワーク設定に関するネット ワーク情報を入力するよう求められた場合、ご自分の設定を入力します。設定がわか らない場合、デフォルトの選択肢を選びます。 Windows XP は、オペレーティングシステムのコンポーネントをインストールして、 コンピュータを設定します。コンピュータが自動的に再起動します。 注意:Press any key to boot from the CD.
Drivers and Utilities CD の使い方 Windows オ ペ レ ー テ ィ ン グ シ ス テ ム を 実 行 中 に『Drivers and Utilities CD』 (『ResourceCD』とも呼ばれます)を使用するには、次の手順を実行します。 メモ:デバイスドライバとユーザーマニュアルにアクセスするには、Windows を実行中に 『Drivers and Utilities CD』を使用する必要があります。 1 コンピュータを起動して、Windows のデスクトップが表示されるのを待ちます。 2 CD ドライブに 『Drivers and Utilities CD』を挿入します。 こ の コ ン ピ ュ ー タ で 初 め て『Drivers and Utilities CD』使 用 す る 場 合、Dell ResourceCD 用の InstallShield ウィザードへようこそ ウィンドウが開き、CD がイ ンストールを開始することを知らせます。 3 OK をクリックして、次に進みます。 インストールプログラムのプロンプトに従って、インストールを完了します。 4
クイックリファレンスガイド www.dell.com | support.dell.
索引 C W か CD Windows 2000 カバー オペレーティングシステム 41 デバイスマネージャ 64 ハードウェアトラブル シューティング 64 D Windows XP Dell Diagnostics (診断) プログラム 55 再インストール 67 システムの復元 65 Drivers and Utilities CD 39 ヘルプとサポートセンター 41 IRQ コンフリクト 64 エラーメッセージ ビープコード 診断ライト M Microsoft Windows ラベル 40 59 ResourceCD Dell Diagnostics (診断) プログラム 55 以前の状態の復元 65 カバーの取り付け 53 63 コンフリクト ソフトウェアおよび ハードウェアの非互換性 の解決 64 サービスタグ オペレーティングシステム CD 41 インストールガイド コンピュータ さ 63 Windows XP の再インス トール 67 R 53 ビープコード あ I 取り付け 41 オペレーティングシス
診断 Dell Diagnostics (診断) プログラム 55 Drivers and Utilities CD 39 ビープコード ライト 63 59 診断ライト 59 ソフトウェア コンフリクト 64 は や ハードウェア ユーザーズガイド Dell Diagnostics (診断) プログラム 55 コンフリクト 64 ら ビープコード 63 ライト ハードウェアトラブル シューター 64 コンピュータの正面 59 コンピュータの背面 60 ビープコード システム 63 ヘルプとサポートセンター 41 た 保証 デバイスマネージャ 39 サポートサイト 40 電源ボタンライト 59 マニュアル 39 ResourceCD 39 オンライン トラブルシューティング デバイス 以前の状態へ復元する コンフリクト 診断ライト 40 製品情報ガイド Dell Diagnostics (診断) プログラム 55 65 64 59 ユーザーズガイド 40 問題の解決 Dell Diagnostics (診断) プログラム 5