Dell™ PowerEdge™ Systems Oracle Database 10g – Linux for Intel® Extended Memory 64 Technology (EM64T) Deployment Guide Version 1.0 w w w. d e l l . c o m | s u p p o r t . d e l l .
LCE10et2.fm Page 2 Tuesday, April 12, 2005 3:43 PM Notes and Notices NOTE: A NOTE indicates important information that helps you make better use of your computer. NOTICE: A NOTICE indicates either potential damage to hardware or loss of data and tells you how to avoid the problem. ____________________ Information in this document is subject to change without notice. © 2005 Dell Inc. All rights reserved. Reproduction in any manner whatsoever without the written permission of Dell Inc.
Contents . . . . . . . . . . . . . . . . . . . 5 . . . . . . . . . . . . . . . . . . . . . . . 7 7 Software and Hardware Requirements License Agreements . . Important Documentation . . . . . . . . . . . . . . . . . . . . . . . Installing and Configuring Red Hat Enterprise Linux . . . . . . . . . . . . . Installing Red Hat Enterprise Linux Using the Deployment CDs . Configuring Red Hat Enterprise Linux . . . . . . . . . . . . . Updating Your System Packages Using Red Hat Network . . . 7 . . . . .
Adding a New Node to the Database Layer . . . . . Adding a New Node to the Database Instance Layer Removing a Node From the Cluster . . . . . . . . . . . . . . . . . . . 37 38 39 . . . . . . . . . . . . . . . . . . . . . . . . . 41 . . . . . . . . . . . . . . . . . . . . . . . . . . 42 Reinstalling the Software Additional Information . . . . . . . . . . . . . . . . . . . . . Supported Software Versions . . . . . . . . . . . . . . . Configuring Automatic Reboot for a Hung Operating System .
This document provides information for installing, configuring, reinstalling, and using your Oracle 10g software following Dell’s Supported Configurations for Oracle.
www.dell.com | support.dell.com Table 1-1. Software Requirements Software Component Configuration Red Hat Enterprise Linux AS (version 3) operating system for Intel® Extended Memory 64 Technology (EM64T) Quarterly update 4 Oracle 10g for Intel EM64T Version 10.1.0 • Enterprise Edition, including the RAC option for clusters • Enterprise Edition for single-node configuration EMC® PowerPath® (Fibre Channel clusters only) Version 4.
Table 1-3. Minimum Hardware Requirements—Single Node Hardware Component Configuration Dell PowerEdge 1850, 2800, or 2850 system 3-GHz Intel Xeon processor 1 GB of RAM Two 36-GB hard drives (RAID 1) connected to a PERC controller Two NIC ports Dell | EMC CX300, CX500, or CX700 See dell.
www.dell.com | support.dell.com 5 When prompted, insert each Red Hat Installation CD into the CD drive. A deployment partition is created and the contents of the CDs are copied to it. When the copy operation is complete, the system automatically ejects the last CD and boots to the deployment partition. When the installation is complete, the system automatically reboots and the Red Hat Setup Agent appears. 6 In the Red Hat Setup Agent Welcome window, click Next to configure your operating system settings.
7 Type ./275-rpms_dkms.py to install the Dynamic Kernel Module Support (DKMS) driver. 8 Type ./330-rpms_san_qlogic.py to replace the QLogic driver with the updated version. 9 Type ../custom/335-rpms_apps.py to install the PERC utility RPMs. 10 Type ./340-rpms_ocfs.py to install the OCFS RPMs (optional for a clustered node). 11 Connect the external storage.
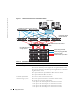
www.dell.com | support.dell.com Figure 1-1. Hardware Connections for a Fibre Channel Cluster public network Gb Ethernet switches (private network) LAN/WAN PowerEdge systems (Oracle database) Dell | EMC Fibre Channel switches (SAN) Dell | EMC Fibre Channel storage systems CAT 5e (integrated NIC) CAT 5e (copper gigabit NIC) fiber optic cables additional fiber optic cables Table 1-4.
Table 1-4.
www.dell.com | support.dell.
Configuring the Public Network If you have not already done so, configure the public network by performing the following steps on each node: 1 Log in as root. 2 Edit the network device file /etc/sysconfig/network-scripts/ifcfg-eth#, where # is the number of the network device, and configure the file as follows: DEVICE=eth0 ONBOOT=yes IPADDR= NETMASK= BOOTPROTO=static HWADDR= SLAVE=no 3 Edit the /etc/sysconfig/network file, and, if necessary, replace localhost.
www.dell.com | support.dell.com 3 For high availability, edit the /etc/modules.conf file and set the option for link monitoring. The default value for miimon is 0, which disables link monitoring. Change the value to 100 milliseconds initially, and adjust it as needed to improve performance. Type: options bonding miimon=100 mode=1 4 In the /etc/sysconfig/network-scripts/ directory, create or edit the ifcfg-bond0 configuration file.
8 Type ssh to connect to each node and verify that the private network and ssh are functioning correctly. 9 On each node, modify the /etc/hosts file by adding the following lines. NOTE: The examples in this and the following step are for a two-node configuration; add lines for each additional cluster node. 127.0.0.1 localhost.
www.dell.com | support.dell.com Verifying the Storage Configuration During the cluster configuration described in this document, you will create partitions on your Fibre Channel storage. In order to create the partitions, all cluster nodes must be able to detect the external storage devices.
2 Reload the HBA driver on all nodes to synchronize the kernel's partition tables on all nodes by typing: rmmod qla2300 modprobe qla2300 3 Restart the PowerPath service on all nodes by typing: service PowerPath start service naviagent start 4 Confirm that all nodes see the external storage devices by typing: more /proc/partitions Configuring Shared Storage for CRS This section provides instructions for configuring the shared storage for the Cluster Ready Services (CRS).
www.dell.com | support.dell.com c Edit the /etc/sysconfig/rawdevices file and add the following lines for a Fibre Channel cluster: /dev/raw/votingdisk /dev/raw/ocr.dbf /dev/raw/spfile+ASM.ora d /dev/emcpowera1 /dev/emcpowera2 /dev/emcpowera3 Type service rawdevices restart to restart the Raw Devices Service.
For a Fibre Channel cluster, format the PowerPath pseudo device partitions by typing: mkfs.ocfs -F -b 128 -L u01 -m /u01 -u 500 -g 500 -p 0775 /dev/emcpowerb1 mkfs.ocfs -F -b 128 -L u02 -m /u02 -u 500 -g 500 -p 0775 /dev/emcpowerc1 5 On each node, perform the following steps: a Create mount points for each OCFS partition. To perform this procedure, create the target partition directories and set the ownerships by typing: mkdir -p /u01 /u02 chown -R oracle.
www.dell.com | support.dell.com 4 For a Fibre Channel cluster, on the first node, create one partition on each of the other two external storage devices with fdisk: a Type fdisk /dev/emcpowerx and create a primary partition for the entire device. Type h for help within the fdisk utility. b Type cat /proc/partitions to verify that the new partition exists.
10 In the Cluster Configuration window, enter a global cluster name or accept the default name crs, enter the public and private node names for each node, and click Next. The cluster name must be unique throughout the enterprise. 11 In the Private Interconnect Enforcement window, click each interface type and select public, private, or Do not use, and then click Next. NOTE: The public and private NIC assignments that you select in this step must be identical and available on all nodes.
www.dell.com | support.dell.com Installing the Oracle Database 10g Software 1 As user root, mount the Oracle Database 10g CD1. 2 As user oracle, type: /mnt/cdrom/runInstaller The Oracle Universal Installer starts. 3 In the Welcome window, click Next. 4 In the Specify File Locations window, verify that the complete Oracle home path is /opt/oracle/product/10.1.0/db_1 and click Next. NOTE: The Oracle home in this step must be different from the Oracle home name that you identified during the CRS installation.
d In the Virtual IPs for Cluster Nodes window, enter an unused public virtual IP address and subnet mask for each node displayed and click Next. The virtual IP address must be the same as you entered in the /etc/hosts.equiv file, and the subnet mask must be the same as the public mask. e Click Finish in the summary window. A progress window appears. f When the configuration is complete, click OK and click Exit to exit the VIPCA. g Run root.sh on each of the other nodes in your cluster. Wait for root.
www.dell.com | support.dell.com Creating the Seed Database This section contains procedures for creating the seed database using either OCFS or ASM and for verifying the seed database. Creating the Seed Database Using OCFS 1 On node 1, as user oracle, type dbca -datafileDestination /u01 to start the Database Configuration Assistant (DBCA). 2 In the Welcome window, select Oracle Real Application Cluster Database and click Next. 3 In the Operations window, click Create a Database and click Next.
19 On each node, perform the following steps: a Determine which database instance exists on that node by typing: srvctl status database -d b Add the ORACLE_SID environment variable entry in the oracle user profile by typing: echo "export ORACLE_SID=racdbx" >> /home/oracle/.bash_profile source /home/oracle/.bash_profile where racdbx is the database instance identifier assigned to the node. This example assumes that racdb is the global database name that you defined in DBCA.
www.dell.com | support.dell.com 15 Enter the information in the Disk Group window for the flashback recovery files and click OK. Enter a name for the disk group to be created, such as flashbackDG, select External Redundancy, and select the disks to include in the disk group (for example, /dev/raw/ASM2). A window appears indicating that disk group creation is in progress.
On one node, type: srvctl status database -d dbname where dbname is the global identifier name that you defined for the database in DBCA. If the database instances are running, confirmation appears on the screen. If the database instances are not running, type: srvctl start database -d dbname where dbname is the global identifier name that you defined for the database in DBCA. RAC Post Deployment Fixes and Patches This section provides the required fixes and patch information for deploying 10g RAC.
www.dell.com | support.dell.com Before you install the patch on the nodes, use the following guidelines: • Do not run root.sh ($ORACLE_HOME/root.sh) on any node until you install the patch. • During the RAC installation procedure, install the patch on the first node and then run root.sh. on the node. To install the patch on all of the cluster nodes: 1 Log in as user oracle. 2 Create a folder for the patches and utilities at /opt/oracle/patches (if required). 3 Log in to your Oracle Metalink account.
Setting the oracle User Password Dell strongly recommends that you set a password for the user oracle to protect your system. Complete the following steps to create the oracle password: 1 Log in as root. 2 Type passwd oracle and follow the onscreen instructions to create the oracle password.
www.dell.com | support.dell.com 6 Type cat /proc/partitions to verify the new partition. If you do not observe the new partition, type: sfdisk -R /dev/sdb sfdisk -R /dev/sdc 7 Type: mke2fs -j /dev/sdb1 mke2fs -j /dev/sdc1 8 Modify the /etc/fstab file by adding an entry for the newly created file system. 9 Type: mount /dev/sdb1 /opt/oracle/oradata mount /dev/sdc1 /opt/oracle/recovery 10 Type: chown oracle.
Installing Oracle Database 10g Perform the following steps to install Oracle 10g: 1 Log in as root. 2 As user root, mount the Oracle Database 10g CD1 CD. 3 Log in as oracle. 4 As user oracle, type /mnt/cdrom/runInstaller to start the Oracle Universal Installer. 5 Type startx to start the X Window System. 6 Open a terminal window and type: xhost + 7 In the Welcome window, click Next. 8 In the Specify File Locations window, verify that the complete Oracle home path is /opt/oracle/product/10.1.
www.dell.com | support.dell.com Creating the Seed Database Creating the Seed Database Using ext3 File System Perform the following steps to create a seed database with the Oracle Database Creation Assistant (DBCA): 1 Log in as oracle. 2 Type dbca to start the Oracle DBCA 3 In the Welcome window, click Next. 4 In the Operations window, click Create a Database and click Next. 5 In the Database Templates window, click Custom Database and click Next.
Creating the Seed Database Using Oracle ASM If you configured your storage using Oracle ASM, perform the following steps to create a seed database with the Oracle Database Creation Assistant (DBCA): 1 As user oracle, type dbca & to start the DBCA. 2 In the Welcome window, click Next. 3 In the Operations window, click Create a Database and click Next. 4 In the Database Templates window, click Custom Database and click Next.
www.dell.com | support.dell.com 19 In the Initialization Parameters window, select Typical and click Next. 20 In the Database Storage window, click Next. 21 In the Creation Options window, select Create Database and click Finish. 22 In the Confirmation window click OK to create the database. NOTE: Creating the seed database may take more than an hour. When the database creation is complete, the Password Management window appears. 23 Click Exit.
Adding a New Node to the Network Layer To add a new node to the network layer: 1 Install the Red Hat Enterprise Linux operating system on the new node. See "Installing and Configuring Red Hat Enterprise Linux" on page 7. 2 Configure the public and private networks on the new node. See "Configuring the Public and Private Networks" on page 12. 3 Verify that each node can detect the storage LUNs or logical disks. See "Verifying the Storage Configuration" on page 16.
www.dell.com | support.dell.com 4 Type the following commands to set user oracle ownership of the Cluster Repository and voting disk: chown oracle.dba /dev/raw/ASM1 chown oracle.dba /dev/raw/ASM2 5 Copy the /etc/sysconfig/rawdevices file from one of the existing nodes to the same location on the new node. 6 Type: chown oracle.dba /dev/raw/ASM* 7 Type service rawdevices restart to restart the Raw Devices Service.
Adding a New Node to the Clusterware Layer 1 Log in as oracle. 2 From the /opt/oracle/product/10.1.0/crs_1/oui/bin directory on one of the existing nodes, type addNode.sh to start the Oracle Universal Installer. 3 In the Welcome window, click Next. 4 In the Specify Cluster Nodes for Node Addition window, enter the public and private node names for the new node and click Next. If all the network and storage verification checks pass, the Node Addition Summary window appears. 5 Click Next.
www.dell.com | support.dell.com 6 When prompted, run root.sh on the new node. When root.sh finishes running, click OK. 7 In the End of Cluster Node Addition window, click Exit. 8 From the /opt/oracle/product/10.1.0/db_1/oui/bin directory on one of the existing nodes, type (for example) the following line: vipca -nodelist node1-pub,node2-pub,node3-pub In this example, node3 is being added to an existing two-node cluster. The Virtual Internet Protocol Configuration Assistant (VIPCA) starts.
10 In the Services window, click Next. 11 In the Instance Storage window, click Finish. 12 In the Summary window click OK to add the database instance. A progress bar appears, followed by a message asking if you want to perform another operation. 13 Click No to exit DBCA. 14 On any node, type srvctl status database -d to determine if the instance has been successfully added. Removing a Node From the Cluster Deleting the Node From the Database Instance Layer 1 Log in as oracle.
www.dell.com | support.dell.com 10 Click No to exit. 11 Type srvctl config database -d to verify that the node was removed. Deleting the Node from the Database Layer 1 On the node being deleted, log in as oracle. 2 Type the following command, using the public name of the node you are deleting (node3-pub for example): srvctl stop nodeapps -n node3-pub 3 On the node being deleted, log in as root.
Reinstalling the Software NOTICE: Reinstalling the software erases all information on the hard drives. NOTICE: You must disconnect all external storage from the system before you reinstall the software. NOTICE: Dell recommends that you perform regular backups of your database and individual nodes so that you do not lose valuable data. Reinstall the node software only as a last resort.
www.dell.com | support.dell.com Additional Information Supported Software Versions NOTE: For this release of Dell Supported Configurations for Oracle, Emulex HBAs are not supported. Table 1-6 lists the supported software at the time of release. For the latest supported hardware and software, see the Dell and Oracle website at dell.com/oracle and download the Oracle Database 10g EM64T Version 1.0 Solution Deliverable List for the latest supported versions. Table 1-6.
5 Insert the Dell OpenManage Systems Management CD into the CD drive on the system. 6 Type mount /mnt/cdrom to mount the CD. 7 Click start.sh located in the root directory of the CD to start the setup program. 8 Click Next on the Welcome to Dell OpenManage Systems Management Installation screen. 9 Read and accept the software license agreement to continue. The setup program provides both an Express Setup option and a Custom Setup option.
www.dell.com | support.dell.com Determining the Private Network Interface To determine which interface device name is assigned to each network interface, perform the following steps: 1 Determine which types of NICs are in your system. Refer to table Table 1-7 to identify which integrated NICs are present in your system. For add-in NICs, you may have Intel PRO/100 family or PRO/1000 family cards or Broadcom NetXtreme Gigabit cards.
Troubleshooting Table 1-8 provides recommended actions for problems that you may encounter while deploying and using your Red Hat Enterprise Linux and Oracle software. Table 1-8. Troubleshooting Category Problem / Symptom Cause Performance and stability Red Hat Enterprise The Oracle System Global Linux exhibiting Area (SGA) exceeds the poor performance recommended size. and instability. Excessive use of swap space.
www.dell.com | support.dell.com Table 1-8. Troubleshooting (continued) Category Problem / Symptom Cause Recommended Corrective Action Performance and stability Unknown interface type warning appears in Oracle alert file. The public interface is configured as cluster communications (private interface). Force cluster communications to the private interface by performing the following steps on one node: 1 Log in as oracle. 2 Type sqlplus "/ as sysdba" at the command prompt. The SQL> prompt appears.
Table 1-8. Troubleshooting (continued) Category Problem / Symptom Cause OCFS The system hangs or The Red Hat Linux system displays a kernel by default has a daily cron panic message. job routine set up to perform updatedb on certain file systems in /etc/cron.daily and /etc/updatedb.conf. OCFS does not support updatedb on its file systems. Recommended Corrective Action 1 Edit the /etc/cron.d/slocate.conf file and add ocfs to the excluded file system list.
www.dell.com | support.dell.com Table 1-8. Troubleshooting (continued) 48 Category Problem / Symptom Cause Recommended Corrective Action NETCA NETCA cannot configure remote nodes or a raw device validation error occurs while running DBCA. The /etc/hosts.equiv file either does not exist or does not include the assigned public or virtual IP addresses. Verify that the /etc/hosts.equiv file on each node contains the correct public and virtual IP address.
Table 1-8. Troubleshooting (continued) Category Problem / Symptom Cause CRS When you run root.sh following reinstallation, CRS fails to start. The OCR file and voting disk have not been cleared and contain old information. Recommended Corrective Action 1 Clear the OCR and voting disks by typing the following lines: dd if=/dev/zero of= /dev/raw/ocr.
www.dell.com | support.dell.com Table 1-8. Troubleshooting (continued) Category Problem / Symptom Cause CRS Node continually reboots. The node does not have access to the quorum disk on the shared storage. 1 Start Linux in single user mode. The environment variable LD_ASSUME_KERNEL is missing. 1 Open a terminal window. Oracle Installation 50 The root.sh script fails. Recommended Corrective Action 2 Type: /etc/inet.d/init.
Table 1-8. Troubleshooting (continued) Category Problem / Symptom Cause Recommended Corrective Action Software installation When connecting Required permissions are On all remote nodes, as user root, type: to the database as a not set on the remote node. chmod 6751 $ORACLE_HOME user other than oracle, you receive the error messages ORA01034: ORACLE not available and Linux Error 13: Permission denied.
www.dell.com | support.dell.com Getting Help Dell Support For detailed information on the use of your system, see the documentation that came with your system components. For white papers, Dell Supported Configurations, and general information, visit the Dell and Oracle website at dell.com/oracle. For Dell technical support for your hardware and operating system software and to download the latest updates for your system, visit the Dell Support website at support.dell.com.
Index A adding and removing nodes, 34 additional configuration options adding and removing nodes, 34 additional information, 42 configuring automatic reboot, 42 determining the private network interface, 44 ASM configuring database storage, 30 ASM configuration, 19 B configuring (continued) database storage (single node) using ASM, 30 database storage (single node) using ex3, 29 OCFS, 18 Oracle Database 10g (single node), 29 Oracle RAC 10g, 12 Red Hat Enterprise Linux, 8 shared storage, 18 shared storage
Index G N R getting help, 52 node adding and removing, 34 removing, 39 Red Hat updating system packages, 9 O reinstalling software, 41 H hardware Fibre Channel cluster minimum requirements, 6 Fibre Channel interconnections, 10 single-node minimum requirements, 7 hardware and software configurations Fibre Channel, 11 I installing CRS, 20 Oracle Database 10g, 22 Oracle Database 10g (single node), 31 Oracle RAC 10g, 20 Red Hat Enterprise Linux, 7 using Dell Deployment CD, 7 OCFS configuring shar
Dell™ PowerEdge™ 系统 Oracle 数据库 10g — 适用于 Intel® 扩展内存 64 位技术 (EM64T) 的 Linux 部署指南 1.0 版 w w w. d e l l . c o m | s u p p o r t . d e l l .
注和注意 注:注表示可以帮助您更好地使用计算机的重要信息。 注意:注意表示可能会损坏硬件或导致数据丢失,并告诉您如何避免此类问题。 ____________________ 本文件中的信息如有更改,恕不另行通知。 © 2005 Dell Inc. 版权所有,翻印必究。 未经 Dell Inc. 书面许可,不得以任何方式进行复制。 本文中使用的商标:Dell、DELL 徽标、Dell OpenManage 和 PowerEdge 是 Dell Inc. 的商标; EMC、PowerPath 和 Navisphere 是 EMC Corporation 的注册商标; Intel 是 Intel Corporation 的注册商标,而 Xeon 是 Intel Corporation 的商标; Red Hat 是 Red Hat, Inc. 的注册商标。 本文件中述及的其它商标和产品名称是指拥有相应商标和名称的公司或其制造的产品。Dell Inc.
目录 软件和硬件要求 . . . . . . . . . . . . . . . . . . . . . . . . . . . . . 许可协议 . . . 重要说明文件 . . . . . . . . . . . . . . . . . . . . . . . . . . . . . . . . . . . . . . . . . . . . . . . . . . . . . . . . 安装和配置 Red Hat Enterprise Linux . . . . . . . . . . . . . . . . . . . 使用 Deployment CD 安装 Red Hat Enterprise Linux 配置 Red Hat Enterprise Linux . . . . . . . . . . . 使用 Red Hat 网络对系统软件包进行更新 . . . . . . . . . . . . . . . . . . . . . . . . . . . . 63 . . . . . . . . . . . . . . . . . . . . . . . . . 63 .
将新节点添加到群集件层 . . . 将新节点添加到数据库层 . . . 将新节点添加到数据库实例层 . 从群集中删除节点 . . . . . . . . . . . . . . . . . . . . . . . . . . 91 92 93 94 . . . . . . . . . . . . . . . . . . . . . . . . . . . . . . 96 . . . . . . . . . . . . . . . . . . . . . . . . . . . . . . . . . 97 重新安装软件 . 其它信息 . . . . . . . . . . . . . . . . . . . . . . . . . . . . . . . . . . . . . . . . . . . . . . . . . . . . . . . . . 支持的软件版本 . . . . . . . . . . . 为挂起的操作系统配置自动重新引导 确定专用网络接口 . . . . . . . . . . . . . . . . . . . . . . . . . . . . . . .
本说明文件提供按照 Dell 支持的 Oracle 配置来安装、配置、重新安装以及使用 Oracle 10g 软 件的相关信息。包括以下内容: • 软件和硬件要求 • 安装和配置 Red Hat® Enterprise Linux • 验证群集硬件与软件配置 • 为 Oracle Real Application Clusters (RAC) 10g 配置网络和存储 • 安装 Oracle RAC 10g • 配置和部署 Oracle 数据库 10g (单个节点) • 添加和删除节点 • 重新安装软件 • 附加信息 • 故障排除 • 获得帮助 • 获取和使用开放源代码文件 有关 Dell 支持的 Oracle 配置的详情,请访问 Dell 和 Oracle 网站 dell.com/oracle。 软件和硬件要求 在系统上安装 Oracle 软件之前: • 找到随 CD 套件附带的 Red Hat CD。 • 找到 Oracle CD 套件。 • 从 Dell 和 Oracle 网站 dell.
www.dell.com | support.dell.com 表 1-1. 软件要求 软件组件 配置 ® 适用于 Intel 扩展内存 64 位技术 季度更新 4 (EM64T) 的 Red Hat Enterprise Linux AS (第 3 版)操作系统 适用于 Intel EM64T 的 Oracle 10g 10.1.0 版 • 企业版,包括用于群集的 RAC 选件 • 用于单个节点配置的企业版 ® ® EMC PowerPath (仅限光纤信道群集) 4.3 版 注:视用户数量、使用的应用程序、批处理进程以及其它因素而定,您可能需要一个超出最低 硬件要求的系统才能获得所需的性能。 注:所有群集节点的硬件配置必须相同。 表 1-2.
表 1-3. 最低硬件要求 — 单个节点 硬件组件 配置 Dell PowerEdge 1850、2800 或 2850 系统 3-GHz Intel Xeon 处理器 1 GB 的 RAM 连接至一个 PERC 控制器的两个 36 GB 硬盘驱动器 (RAID 1) 两个 NIC 端口 Dell | EMC CX300、CX500 或 CX700 光纤信道存储系统(可选) 有关所支持的配置的信息,请访问 dell.
www.dell.com | support.dell.
使用 Red Hat 网络对系统软件包进行更新 Red Hat 会定期发布软件更新来修正错误、解决安全问题以及添加新功能。您可以通过 Red Hat 网络 (RHN) 服务下载这些更新。在使用 RHN 将系统软件更新为最新版本之前,请访问 Dell 和 Oracle 网站 dell.
www.dell.com | support.dell.com 图 1-1. 光纤信道群集的硬件连接 公用网络 千兆位以太网交换机(专用网络) LAN/WAN PowerEdge 系统 (Oracle 数据库) Dell | EMC 光纤信道交换机 (SAN) Dell | EMC 光纤信道存储系统 CAT 5e(集成 NIC) CAT 5e(铜质千兆位 NIC) 光纤电缆 附加光纤电缆 表 1-4.
表 1-4.
www.dell.com | support.dell.
配置公用网络 如果您尚未配置公用网络,请在每个节点上执行以下步骤进行配置: 1 作为 root 用户登录。 2 编辑网络设备文件 /etc/sysconfig/network-scripts/ifcfg-eth#,其中 # 是网络设备号, 并按以下方式配置文件: DEVICE=eth0 ONBOOT=yes IPADDR=< 公用 IP 地址 > NETMASK=< 子网掩码 > BOOTPROTO=static HWADDR= SLAVE=no 3 编辑 /etc/sysconfig/network 文件,如果需要,用完全限定的公用节点名称替换 localhost.localdomain。 例如,节点 1 对应的行应该如下所示: HOSTNAME=node1.domain.
www.dell.com | support.dell.com 3 为了获得高可用性,请编辑 /etc/modules.conf 文件并设置链接监测选项。 miimon 的默认值为 0,该值会禁用链接监测功能。开始时将该值更改为 100 毫秒, 然后根据需要进行调整,以便改善性能。键入: options bonding miimon=100 mode=1 4 在 /etc/sysconfig/network-scripts/ 目录中,创建或编辑 ifcfg-bond0 配置文件。 例如,使用样本网络参数时,该文件会显示如下: DEVICE=bond0 IPADDR=192.168.0.1 NETMASK=255.255.255.0 NETWORK=192.168.0.0 BROADCAST=192.168.0.
8 键入 ssh <专用 IP> 以连接到每个节点并验证专用网络和 ssh 是否正常工作。 9 在每个节点上,添加以下行来修改 /etc/hosts 文件。 注:本步骤和以下步骤中的示例针对的是双节点配置;其它每个群集节点都应该添加以 下行。 127.0.0.1 localhost.localdomain < 专用 IP node1> < 专用主机名 node1> < 专用 IP node2> < 专用主机名 node2> localhost < 公用 IP node1> < 公用主机名 node1> < 公用 IP node2> < 公用主机名 node2 > < 虚拟 IP node1> < 虚拟主机名 node1> < 虚拟 IP node2> < 虚拟主机名 node2> 10 在每个节点上,通过列出所有公用 IP 地址或主机名来创建或修改 /etc/hosts.
www.dell.com | support.dell.
2 键入以下命令,在所有节点上重新载入 HBA 驱动程序以使所有节点上的内核分区表保持 同步: rmmod qla2300 modprobe qla2300 3 键入以下命令,在所有节点上重新启动 PowerPath 服务: service PowerPath start service naviagent start 4 键入以下命令,确认所有节点都能看到外部存储设备: more /proc/partitions 为 CRS 配置共享存储 本节提供了为群集就绪服务 (CRS) 配置共享存储的有关说明。 1 在第一个节点上,使用 fdisk 在外部存储设备上创建三个分区: 键入 fdisk /dev/emcpowerx 并创建三个 150 MB 的分区,其中一个分区用于群集 库,一个用于投票磁盘,另外一个用于 Oracle 系统参数文件。 2 键入以下命令,验证这些新分区: more /proc/partitions 如果 /proc/partitions 文件中出现这些新分区,则键入: sfdisk -R /dev/< 设备名称 > 3 在每个节点上,执行以下步骤: a 键入以下命令以更改和识别原始字符
www.dell.com | support.dell.
5 在每个节点上,执行以下步骤: a 为每个 OCFS 分区创建安装点。 要执行此过程,请键入以下命令创建目标分区目录 和设置所有权: mkdir -p /u01 /u02 chown -R oracle.
www.dell.com | support.dell.com 安装 Oracle RAC 10g 本节将说明安装 Oracle RAC 10g 所需的步骤,其中包括安装 CRS 和安装 Oracle 数据库 10g 软 件。Dell 建议您创建基础 (seed) 数据库,以便在生产环境下部署群集之前先检查群集是否工作 正常。 安装 CRS 1 作为 root 用户登录。 2 键入 startx 以启动 X Window 系统。 3 打开终端窗口,然后键入: xhost + 4 装入 Oracle Cluster Ready Services CD。 5 键入: su - oracle 6 键入以下命令以启动 Oracle Universal Installer (Oracle 通用安装程序): unset ORACLE_HOME /mnt/cdrom/runInstaller 7 在 Welcome (欢迎)窗口中单击 Next (下一步)。 8 在 Specify File Locations (指定文件位置)窗口中,验证 Oracle 起始路径是否为 /opt/oracle/product/10.
15 出现提示后,打开新的终端窗口。 16 作为 root 用户,键入: export LD_ASSUME_KERNEL=2.4.19 17 从步骤 15 中的同一终端窗口,作为 root 用户在每个节点上运行 root.sh 脚本,并从本地 节点开始。 在下一个节点上运行 root.sh 之前,要等到 root.sh 在当前节点上完成运行。 18 在 Setup Privileges (设置权限)窗口中单击 OK (确定)。 19 在 End of Installation (安装结束)窗口中单击 Exit (退出),然后单击 Yes (是)进行 确认。 20 在所有节点上,执行以下步骤: a 从 /opt/oracle/product/10.1.0/crs_1/bin 目录中键入下列命令,验证 CRS 安装: olsnodes -n -v 此时将显示群集中所有节点的公用节点名称列表。 b 键入: crs_stat 屏幕将显示以下信息: No services are registered with the CRS daemon.
www.dell.com | support.dell.com 6 在 Select Installation Types (选择安装类型)窗口中,单击 Enterprise Edition (企业版), 然后单击 Next (下一步)。 屏幕将显示一个窗口,其中列出了正在执行的各种检查的状态。检查完成后,单击 Next (下一步)。 7 在 Select Database Configuration (选择数据库配置)窗口中,单击 Do not create a starter database (不创建启动程序数据库),然后单击 Next (下一步)。 8 在 Summary (摘要)窗口中单击 Install (安装)。 9 出现提示时,将 CD2 插入 CD 驱动器。 10 出现提示后,打开新的终端窗口。 11 作为 root 用户,键入: export LD_ASSUME_KERNEL=2.4.19 12 在节点 1 上运行 root.
配置监听程序 本节将介绍配置监听程序的步骤,与数据库建立远程客户机连接时需要使用此程序。 仅在一个节点上,执行以下步骤: 1 作为 root 用户登录。 2 键入 startx 以启动 X Window 系统。 3 打开终端窗口,然后键入: xhost + 4 作为 oracle 用户,键入 netca 以启动 Net Configuration Assistant (网络配置助手)。 5 选择 Cluster Configuration (群集配置),然后单击 Next (下一步)。 6 在 TOPSNodes 窗口中,单击 Select All Nodes (选择全部节点),然后单击 Next (下一步)。 7 在 Welcome (欢迎)窗口中,选择 Listener Configuration (监听程序配置),然后单击 Next (下一步)。 8 在 Listener Configuration, Listener (监听程序配置,监听程序)窗口中,选择 Add (添加),然后单击 Next (下一步)。 9 在 Listener Configuration, Listener Name (监听程序
www.dell.com | support.dell.
17 在 Confirmation (确认)窗口中单击 OK (确定)创建数据库。 注:基础 (seed) 数据库的创建过程可能需要一个多小时。 数据库创建完成后,屏幕上将显示 Password Management(密码管理)窗口。 18 单击 Exit (退出)。 屏幕上会显示一则消息,提示正在所有节点上启动群集数据库。 19 在每个节点上,执行以下步骤: a 键入以下命令,确定该节点上存在的数据库实例: srvctl status database -d < 数据库名称 > b 键入以下命令,在 oracle 用户配置文件中,添加 ORACLE_SID 环境变量条目: echo "export ORACLE_SID=racdbx" >> /home/oracle/.bash_profile source /home/oracle/.
www.dell.com | support.dell.com 10 在 ASM Credentials (ASM 证书)窗口中,输入 SYS 的密码,单击 Create server parameter file (创建服务器参数文件) ,将位置更改为 /dev/raw/spfile+ASM.
25 单击 Exit (退出)。 屏幕上会显示一则消息,提示正在所有节点上启动群集数据库。 26 在每个节点上执行以下步骤: a 键入 srvctl status database -d < 数据库名称 > 以确定该节点上存在的数据 库实例。 b 键入以下命令,在 oracle 用户配置文件中添加 ORACLE_SID 环境变量条目: echo "export ORACLE_SID=racdbx" >> /home/oracle/.bash_profile source /home/oracle/.
www.dell.com | support.dell.com 配置群集就绪服务 在 Red Hat Enterprise Linux (第 3 版)上针对适用于 EM64T 的 Oracle 10g 配置群集就绪服务 (CRS) 时,会间歇性地发生 CRS_STAT 命令挂起和不返回 CRS 后台程序状态的问题。 Oracle 已将此问题确定为 Oracle BUG 4039296。 要解决此问题,请从 Oracle Metalink 网站下载以下补丁程序: • 用于 Linux x86-64 (AMD) 的补丁程序号 4039296 • 以 Linux x86-64 作为平台的补丁程序号 2617419 使用 Oracle Opatch 公用程序,在所有群集节点上安装下载的补丁程序。 在节点上安装补丁程序之前,请遵循以下指南: • 在安装补丁程序之前,不要在任何节点上运行 root.sh ($ORACLE_HOME/root.sh)。 • 在安装 RAC 的过程中,在第一个节点上安装补丁程序,然后在该节点上运行 root.
11 作为用户 oracle 登录并键入: export OPATCH_PLATFORM_ID=226 cd 4039296 ../OPatch/opatch apply 完成后,屏幕上将显示以下信息: Patch succeeded.
www.dell.com | support.dell.com 3 键入: mkdir oradata recovery 4 使用 fdisk,创建一个需要在其中存储数据库文件的分区 (例如,如果存储设备为 sdb, 则该分区为 sdb1)。 5 使用 fdisk,创建一个需要在其中存储恢复文件的分区 (例如,如果存储设备为 sdc, 则该分区为 sdc1)。 6 键入 cat /proc/partitions,验证新分区。 如果没有看到新分区,则键入: sfdisk -R /dev/sdb sfdisk -R /dev/sdc 7 键入: mke2fs -j /dev/sdb1 mke2fs -j /dev/sdc1 8 为新创建的文件系统添加一个条目来修改 /etc/fstab 文件。 9 键入: mount /dev/sdb1 /opt/oracle/oradata mount /dev/sdc1 /opt/oracle/recovery 10 键入: chown oracle.
5 编辑 /etc/sysconfig/rawdevices 文件并添加以下行: /dev/raw/ASM1 /dev/sdb1 /dev/raw/ASM2 /dev/sdc1 6 键入 service rawdevices restart 以重新启动原始设备服务。 安装 Oracle 数据库 10g 要安装 Oracle 10g,请执行以下步骤: 1 作为 root 用户登录。 2 作为 root 用户,装入 Oracle Database 10g CD1 CD。 3 作为 oracle 登录。 4 作为 oracle 用户键入 /mnt/cdrom/runInstaller,以启动 Oracle Universal Installer。 5 键入 startx 以启动 X Window 系统。 6 打开终端窗口,然后键入: xhost + 7 在 Welcome (欢迎)窗口中单击 Next (下一步)。 8 在 Specify File Locations (指定文件位置)窗口中,验证完整的 Oracle 起始路径是否为 /opt/oracle/product/10.1.
www.dell.com | support.dell.
13 在 Initialization Parameters (初始化参数)窗口中,单击 Next (下一步)。 14 在 Database Storage (数据库存储)窗口中,单击 Next (下一步)。 15 在 Creation Options (创建选项)窗口中,单击 Create database (创建数据库), 然后单击 Finish (完成)。 16 在 Confirmation (确认)窗口中,单击 OK (确定)创建数据库。 注:基础 (seed) 数据库的创建过程可能需要一个多小时。 数据库创建完成后,屏幕上将显示 Password Management(密码管理)窗口。 17 单击 Exit (退出)。 18 键入 export ORACLE_SID=dbname,其中 dbname 是您在 DBCA 中为数据库定义的 全局标识名称。 19 要验证数据库是否可以正常操作,请执行以下步骤: a 键入 sqlplus "/ as sysdba" 以显示 SQL> 提示符。 b 在 SQL> 提示符下,键入以下查询: SELECT * FROM v$instance; c 如果数
www.dell.com | support.dell.
24 数据库创建完成后,键入以下命令,以便将 ORACLE_SID 环境变量条目添加到 oracle 用户配置文件中: echo "export ORACLE_SID=oradb" >> /home/oracle/.bash_profile source /home/oracle/.
www.dell.com | support.dell.com 在新节点上配置共享存储 要将现有 RAC 数据库扩展到新节点,请为新节点配置存储,使新节点的存储与现有节点上的 相同。本节提供了使用 ASM 或 OCFS 进行配置的相应步骤。 使用 ASM 配置共享存储 如果您使用的是 ASM,应确保新节点可以使用与现有节点相同的权限访问 ASM 磁盘。 要配置 ASM 磁盘,请执行以下操作: 1 作为 root 用户登录。 2 如果未使用原始设备配置现有节点,则转到步骤 3。 如果已使用用于 CRS 的原始设备配置现有节点,则执行以下操作: a 键入下列命令,更改原始字符设备的名称,使设备能够被识别: mv /dev/raw/raw1 mv /dev/raw/raw2 mv /dev/raw/raw3 b /dev/raw/votingdisk /dev/raw/ocr.dbf /dev/raw/spfile+ASM.ora 键入下列命令,设置群集库和投票磁盘的 oracle 用户所有权: chown oracle.dba /dev/raw/votingdisk chown oracle.
使用 OCFS 配置共享存储 如果要对 CRS、法定磁盘或数据库文件使用 Oracle 群集文件系统 (OCFS),请确保新节点可以 与现有节点采用相同的访问方法来访问群集文件系统。 1 编辑新节点上的 /etc/fstab 文件,并完全按照现有节点上所显示的内容添加 OCFS 卷信息: 例如: /dev/emcpowera1 /dev/emcpowerb1 /dev/emcpowerc1 /u01 /u02 /u03 ocfs ocfs ocfs _netdev 0 0 _netdev 0 0 _netdev 0 0 2 按照现有节点上存在的 OCFS 安装点 (例如, /u01、 /u02 和 /u03),在新节点上创建 OCFS 安装点。 3 执行以下步骤,运行 ocfstool 生成 OCFS 配置文件 /etc/ocfs.
www.dell.com | support.dell.com 6 出现提示时,在本地节点上运行 rootaddnode.sh。 rootaddnode.sh 完成运行后,单击 OK(确定)。 7 出现提示时,在新节点上运行 root.sh。 root.sh 完成运行后,单击 OK(确定)。 8 在 End of Cluster Node Addition (群集节点添加结束)窗口中,单击 Exit (退出)。 9 从某个现有节点上的 /opt/oracle/product/10.1.0/crs_1/oui/bin 目录中,键入以下文本行: racgons add_config node1-pub:4948 node2-pub:4948 node3-pub:4948 在该示例中,node3 将被添加到现有的两个节点的群集中。 将新节点添加到数据库层 1 作为 oracle 用户登录。 2 从某个现有节点上的 /opt/oracle/product/10.1.0/db_1/oui/bin 目录中,键入 addNode.
注:在该步骤中选择的公用和专用 NIC 分配对于所有节点均必须可用且完全相同。 c 在 IP Address (IP 地址)窗口中,为新节点输入未使用的公用虚拟 IP 地址和子网掩 码,然后单击 Next (下一步)。 d 在Summary (摘要)窗口中单击 Finish (完成)。 屏幕将显示进度窗口。 e 配置完成后,单击 OK (确定)然后单击 Exit (退出),退出 VIPCA。 将新节点添加到数据库实例层 1 在节点 1 上,作为 oracle 用户键入 dbca &,启动 DBCA。 2 在 Welcome (欢迎)窗口中单击 Next (下一步)。 3 在 Oracle Real Application Cluster Database (Oracle Real Application Cluster 数据库) 窗口中,单击 Next (下一步)。 4 在 Operations (操作)窗口中,单击 Instance Management (实例管理),然后单击 Next (下一步)。 5 在 Instance Management (实例管理)窗口中,单击 Add Instan
www.dell.com | support.dell.
从数据库层中删除节点 1 在要删除的节点上作为 oracle 用户登录。 2 使用要删除的节点的公用名称 (例如 node3-pub) 键入以下命令: srvctl stop nodeapps -n node3-pub 3 在将要删除的节点上,请作为 root 用户登录。 4 使用要删除的节点的公用名称 (例如 node3-pub) 键入以下命令: /opt/oracle/product/10.1.0/db_1/install/rootdeletenode.sh node3-pub 此时将删除 CRS 节点应用程序。忽略出现的任何警告。 5 如果要删除 Oracle 数据库软件,请键入下列命令: rm -rf /opt/oracle/product/10.1.0/db_1/* 从群集件层中删除节点 1 在要删除的节点上,作为 root 用户键入以下命令来禁用 CRS: /opt/oracle/product/10.1.0/crs_1/install/rootdelete.
www.dell.com | support.dell.
其它信息 支持的软件版本 注:Dell 支持的 Oracle 配置这一版本不支持 Emulex HBA。 表 1-6 列出了发行时支持的软件。要了解支持的最新硬件和软件,请访问 Dell 和 Oracle 网站 dell.com/oracle,下载 Oracle 数据库 10g EM64T 1.0 版的 Solution Deliverable List (可提供的 解决方案列表),以获得支持的最新版本。 表 1-6. 支持的软件版本 软件组件 支持的版本 适用于 Intel EM64T 的 Red Hat Enterprise Linux AS(第 3 版)季度 更新 4 操作系统 2.4.21-27.EL Oracle 补丁集 无 OCFS ocfs-1.0.14 PowerPath for Linux 4.3.2 DKMS 2.0.0.1 Qlogic HBA 2340 驱动程序 7.04.00 Qlogic HBA 2342 驱动程序 7.04.00 Qlogic HBA 2360 驱动程序 7.04.
www.dell.com | support.dell.com 为挂起的操作系统配置自动重新引导 通过执行以下步骤,安装 Red Hat Enterprise Linux 的管理型系统软件: 1 在您准备安装管理型系统组件的系统上,使用管理员权限登录。 2 退出已打开的所有应用程序,并且禁用所有病毒扫描软件。 3 键入 startx 以启动 X Window 系统。 4 打开终端窗口,然后键入: xhost + 5 将 Dell OpenManage Systems Management CD 插入系统的 CD 驱动器。 6 键入 mount /mnt/cdrom 装入 CD。 7 单击位于 CD 根目录下的 start.
确定专用网络接口 要确定为每个网络接口分配的接口设备名称,请执行以下步骤: 1 确定系统中的 NIC 类型。 参考表 1-7,识别系统中有哪些集成 NIC。您的附加 NIC 可能是 Intel PRO/100 系列或 PRO/1000 系列插卡,也可能是 Broadcom NetXtreme Gigabit 插卡。您可能需要打开系 统,然后查看以确定您配备的附加插卡。 表 1-7.
www.dell.com | support.dell.com 故障排除 表 1-8 提供了在部署或使用 Red Hat Enterprise Linux 和 Oracle 软件时可能遇到的问题的建议 操作。 表 1-8.
表 1-8. 故障排除(续) 类别 问题/症状 原因 OCFS 系统挂起或显示内 默认情况下,Red Hat 核严重错误消息。 Linux 系统设置了每天 的 cron 作业例行程序, 对 /etc/cron.daily 和 /etc/updatedb.conf 中的 某些文件系统执行 updatedb。OCFS 不支 持对其文件系统执行 updatedb。 建议的纠正措施 1 编辑 /etc/cron.d/slocate.conf 文件, 将 ocfs 添加到排除的文件系统列 表中。该文件应该类似如下所示: #!/bin/sh renice +19 -p $$ >/dev/null 2>&1 /usr/bin/updatedb -f "ocfsnfs,smbfs,ncpfs, proc,devpts" -e "/tmp,/var/tmp,/usr/ tmp,/afs,/net" 2 编辑 /etc/updatedb.
www.dell.com | support.dell.com 表 1-8. 故障排除(续) 类别 问题/症状 原因 建议的纠正措施 NETCA NETCA 无法配置 /etc/hosts.equiv 文件不存 远程节点,或者在 在或者不包含已分配的公 运行 DBCA 时出 用或虚拟 IP 地址。 现原始设备验证 错误。 验证各个节点上的 /etc/hosts.equiv 文件 是否均包含正确的公用和虚拟 IP 地址。 尝试作为 oracle 用户,向其它公用名 称和 VIP 地址发出 rsh 命令。 CRS 当您重新引导节点 群集就绪服务 CSS 后台 或键入 程序无法向法定磁盘写入 /etc/ini.d/ 数据。 init.crs start 时,CRS 无法 启动。 • 尝试重新引导节点或从 /opt/oracle/product/10.1.0/crs_1/ 中键 入 root.sh,再次启动服务。 • 验证每个节点是否具有访问法定磁 盘的权限,以及 root 用户能否写入 磁盘。 • 检查文件 $ORA_CRS_HOME/css/log/ocssd.
表 1-8. 故障排除(续) 类别 问题/症状 原因 CRS 在重新安装之后运 OCR 文件和投票磁盘尚未 行 root.sh 时,CRS 清除,仍包含旧信息。 无法启动。 建议的纠正措施 1 键入以下文本行,清除 OCR 和投票 磁盘: dd if=/dev/zero of=/dev/raw/ocr.dbf bs=8192 count=12800 dd if=/dev/zero of=/dev/raw/votingdisk bs=8192 count=2560 2 尝试重新引导节点或从 /opt/oracle/product/10.1.0/crs_1/ 中运 行 root.sh,再次启动服务。 CRS 在运行 root.sh 时, oracle 用户无权访 问 /var/tmp(特别是 CRS 无法启动。 /var/tmp/.oracle)。 1 键入 chown oracle.oinstall /var/tmp/.oracle,使 oracle 用户成为 /var/tmp/.oracle 的所有者。 2 尝试重新引导节点或从 /opt/oracle/product/10.1.
www.dell.com | support.dell.com 表 1-8. 故障排除(续) 类别 问题/症状 原因 CRS 节点频繁地重新 引导。 该节点无权访问共享存储 上的法定磁盘。 建议的纠正措施 1 在单用户模式中启动 Linux。 2 键入: /etc/inet.d/init.crs disable 3 验证法定磁盘是否可用于读写。如果 不可用,请检查硬件连接并确保已安 装 OCFS 卷。 4 重新引导并键入 /etc/inet.d/init.crs enable Oracle 安装 root.sh 脚本失败。 缺少环境变量 LD_ASSUME_KERNEL。 1 打开终端窗口。 2 作为 root 用户键入: LD_ASSUME_KERNEL-2.4.19 3 在与 root 相同的终端窗口中,运行 root.
表 1-8. 故障排除(续) 类别 问题/症状 原因 软件安装 当作为 oracle 以 所需的权限在远程节点上 外的其他用户连接 没有进行设置。 到数据库时,出现 错误信息 ORA01034: ORACLE not available (ORA01034: ORACLE 不可用) 和 Linux Error 13: Permission denied(Linux 错误 13:权限被拒 绝)。 建议的纠正措施 在所有远程节点上,作为 root 用户键 入 chmod 6751 $ORACLE_HOME 光纤信道存储 载入光纤信道 HBA 需要更新 HBA 驱动程序、 驱动程序模块时, BIOS 或固件。 出现 I/O 错误和 警告。 查看 dell.
www.dell.com | support.dell.com 获得帮助 Dell 支持 有关使用系统的详情,请参阅随系统组件附带的说明文件。 有关白皮书、 Dell 支持的配置和一般信息,请访问 Dell 和 Oracle 网站 dell.com/oracle。 要获得对硬件和操作系统软件的 Dell 技术支持并下载最新的系统更新,请访问 Dell 支持 Web 站点 support.dell.com。 Dell 联系信息包含在系统的 《安装与故障排除指南》中。 我们现在还提供 Dell 企业培训与认证服务,请访问 www.dell.com/training 了解详情。并非在所 有地区均提供此培训服务。 Oracle 支持 有关 Oracle 软件和应用程序群集件的培训信息,请访问 Oracle 网站 oracle.com 或参阅 Oracle 说明文件,了解 Oracle 联系信息。 技术支持、下载和其它技术信息可以在 Oracle MetaLink 网站 metalink.oracle.
索引 A F M ASM 配置数据库存储,84 附加配置选项 添加和删除节点,89 密码 设置,83,89 G O 公用网络 配置,66−67 OCFS 配置共享存储,91 故障排除,100 OCFS 配置,72 光纤信道群集设置,63 Oracle RAC 10g ASM 配置,73 安装,74 CRS 配置,71 共享存储配置,72 OCFS 配置,72 配置,66 ASM 配置,73 安全保护,69 安装 CRS,74 Oracle RAC 10g,74 Oracle 数据库 10g,75 Oracle 数据库 10g (单个节点),85 Red Hat Enterprise Linux,61 使用 Dell Deployment CD, 61 B 绑定,67 部署 Oracle RAC 10g ,66 C CRS 安装,74 CRS 配置,71 创建基础 (seed) 数据库,78,86 ASM,79 OCFS,78 H 获取帮助,106 J 集成 NIC ,99 基础 (seed) 数据库 创建,78,86 验证,81,87 Oracle 数据库 10g 安装,
索引 P Q W 配置 ASM,73 CRS 的共享存储,71 共享存储,72 OCFS,72 Oracle RAC 10g,66 其它信息,97 配置自动重新引导,98 确定专用网络接口,99 为 CRS 配置共享存储,71 Oracle 数据库 10g(单个节 点),83 Red Hat Enterprise Linux,62 使用 ASM 的共享存储,73 使用 OCFS 的共享存储,72 数据库存储 (单个节点),83 数据库存储(单个节点), 使用 ASM,84 数据库存储(单个节点), 使用 ex3,83 配置 Oracle 10g ,63 验证硬件与软件配置,63 配置 Oracle RAC 10g ,66 创建基础 (seed) 数据库,78 配置 Oracle 数据库 10g (单个节点),83,86 创建基础 (seed) 数据库,86 配置共享存储,72 ASM,73 OCFS,72 配置公用网络,67 配置专用和公用网络,66 确定专用网络接口,99 群集 光纤信道硬件连接, 示例,64 群集设置 光纤信道,63 R Red Hat 更新系统软件包,63 R
Systèmes Dell™ PowerEdge™ Oracle Database 10g – Guide de déploiement de Linux pour Intel® EM64T version 1.0 w w w. d e l l . c o m | s u p p o r t . d e l l .
LCE10ft2.fm Page 2 Tuesday, April 12, 2005 3:48 PM Remarques et avis REMARQUE : une REMARQUE indique des informations importantes qui peuvent vous aider à mieux utiliser votre ordinateur. AVIS : un AVIS vous avertit d'un risque de dommage matériel ou de perte de données et vous indique comment éviter le problème. ____________________ Les informations contenues dans ce document peuvent être modifiées sans préavis. © 2005 Dell Inc. Tous droits réservés.
Sommaire Configuration matérielle et logicielle requise . Contrats de licence . . . . Documentation importante . . . . . . . . . . . . . . 113 . . . . . . . . . . . . . . . . . . . . . . . . . . . . . . . . . . . . . . . . . . 115 115 . . . . . . . . . 115 Installation et configuration de Red Hat Enterprise Linux Installation de Red Hat Enterprise Linux à l'aide des CD de déploiement . . . . . . . . . . . . . . . . . . . . . . . Configuration de Red Hat Enterprise Linux . . . . . . . . . .
Ajout et suppression de noeuds . . . . . . . . . . . . . . . . . . . . . Ajout d'un noeud à la couche réseau . . . . . . . . . . . . . . . Configuration des périphériques de stockage partagés sur le nouveau noeud . . . . . . . . . . . . . . . . . . . . . . Ajout d'un nouveau noeud à la couche de configuration du cluster Ajout d'un noeud à la couche de la base de données . . . . . . . Ajout d'un noeud à la couche de l'instance de base de données . . Suppression d'un noeud du cluster. . . . . . . . . . . .
Ce document contient des informations concernant l'installation, la configuration, la réinstallation et l'utilisation du logiciel Oracle 10g. Il fait partie du support fourni par Dell pour les configurations Oracle.
www.dell.com | support.dell.com Tableau 1-1. Configuration logicielle requise Composant logiciel Configuration Système d'exploitation Red Hat Enterprise Linux AS (version 3) pour Intel® EM64T Mise à jour trimestrielle 4 Oracle 10g pour Intel EM64T Version 10.1.0 • Enterprise Edition, avec l'option RAC pour clusters • Enterprise Edition pour les configurations comprenant un seul noeud EMC® PowerPath® (clusters Fibre Channel uniquement) Version 4.
Tableau 1-3. Configuration matérielle requise - Noeud unique Composant matériel Configuration Système Dell™ PowerEdge 1850, 2800 ou 2850 Processeur Intel Xeon™ à 3 GHz 1 Go de RAM Deux disques durs de 36 Go (RAID 1) connectés à un contrôleur PERC Deux ports NIC Système de stockage Fibre Channel Dell | EMC CX300, CX500 ou CX700 (en option) Consultez le site dell.com/oracle pour plus d'informations sur les configurations prises en charge.
www.dell.com | support.dell.com 4 Lorsque vous y êtes invité, tapez 2 et appuyez sur pour sélectionner Red Hat Enterprise Linux 3 AS for Oracle Database. À l'invite, tapez yes pour créer une partition d'utilitaires vierge. 5 À l'invite, insérez chaque CD d'installation Red Hat dans le lecteur. Le contenu des CD est copié dans la partition de déploiement qui est créée. Une fois la copie terminée, le système éjecte automatiquement le dernier CD et redémarre sur la partition de déploiement.
6 Tapez ./010-hwCheck.py pour vérifier que le processeur, la RAM et la taille du disque répondent à la configuration minimale pour l'installation d'Oracle. Si un script indique que l'un des paramètres n'est pas valide, mettez à jour la configuration matérielle du système et ré-exécutez le script. 7 Tapez ./275-rpms_dkms.py pour installer le pilote du module DKMS (Dynamic Kernel Module Support). 8 Tapez ./330-rpms_san_qlogic.py pour remplacer le pilote QLogic par sa version à jour. 9 Tapez ..
www.dell.com | support.dell.com Vérification de la configuration matérielle et logicielle du cluster Avant de commencer la configuration du cluster, vérifiez l'installation matérielle, les interconnexions de communication et la configuration logicielle des noeuds sur tout le cluster. Les sections suivantes contiennent des informations sur la configuration des clusters Fibre Channel.
Tableau 1-4.
www.dell.com | support.dell.
Selon le nombre de ports NIC disponibles, configurez les interfaces comme décrit dans le tableau 1-5. Tableau 1-5.
www.dell.com | support.dell.com Configuration du réseau privé à l'aide de liens (bonding) Avant de déployer le cluster, vous devez configurer le réseau privé de manière à permettre aux noeuds de communiquer entre eux. Pour ce faire, il est nécessaire de configurer des liens réseau et d'attribuer une adresse IP privée et un nom d'hôte à chaque noeud du cluster.
5 Pour chaque périphérique faisant partie du lien, procédez comme suit : a Dans le répertoire /etc/sysconfig/network-scripts/, modifiez le fichier ifcfg-ethn, qui contient les lignes suivantes : DEVICE=ethn HWADDR= ONBOOT=yes TYPE=Ethernet USERCTL=no MASTER=bond0 SLAVE=yes BOOTPROTO=none b Tapez service network restart et ne tenez pas compte des avertissements. 6 Sur chaque noeud, tapez ifconfig pour vérifier le bon fonctionnement de l'interface privée.
www.dell.com | support.dell.com Sécurité du système Pour protéger le système contre toute tentative d'accès non autorisé, Dell vous conseille de désactiver rsh une fois l'installation du logiciel Oracle terminée. Pour ce faire, tapez chkconfig rsh off. Vérification de la configuration des systèmes de stockage Au cours des étapes de configuration décrites dans ce document, vous allez créer des partitions sur le système de stockage Fibre Channel.
Si les périphériques de stockage externes ne s'affichent pas dans le fichier /proc/partitions : 1 Arrêtez le service PowerPath sur tous les noeuds. Pour ce faire, tapez : service naviagent stop service PowerPath stop 2 Tapez la commande suivante pour recharger le pilote HBA sur tous les noeuds et synchroniser les tables de partition du noyau : rmmod qla2300 modprobe qla2300 3 Redémarrez le service PowerPath sur tous les noeuds.
www.dell.com | support.dell.com b Tapez les commandes suivantes pour définir l'utilisateur oracle comme propriétaire du référentiel du cluster et du disque de vote : chown oracle.dba /dev/raw/votingdisk chown oracle.dba /dev/raw/ocr.dbf chown oracle.dba /dev/raw/spfile+ASM.ora c Éditez le fichier /etc/sysconfig/rawdevices et ajoutez-y les lignes suivantes pour un cluster Fibre Channel : /dev/raw/votingdisk /dev/raw/ocr.dbf /dev/raw/spfile+ASM.
4 Sur un noeud (uniquement), formatez les périphériques de stockage externes pour OCFS en tapant : mkfs.ocfs -b 128 -F -u -g -L
www.dell.com | support.dell.com Configuration du stockage via ASM Pour configurer le cluster avec ASM, effectuez la procédure suivante sur tous les noeuds : 1 Connectez-vous en tant que root.
Installation d'Oracle RAC 10g Cette section indique comment installer Oracle RAC 10g. La procédure requise inclut l'installation des services CRS et du logiciel Oracle Database 10g. Dell conseille de créer une base de données initiale pour vérifier le fonctionnement du cluster avant de le déployer dans un environnement de production. Installation des services CRS 1 Connectez-vous en tant que root. 2 Tapez startx pour démarrer le système X Window.
www.dell.com | support.dell.com 14 Dans la fenêtre Summary (Résumé), cliquez sur Install (Installer). Lorsque l'installation est terminée, un message s'affiche, indiquant que vous devez exécuter le script root.sh sur tous les noeuds. Ce script configure le cluster automatiquement. 15 À l'invite, ouvrez une nouvelle fenêtre de terminal. 16 Connectez-vous en tant que root, puis tapez : export LD_ASSUME_KERNEL=2.4.
6 Dans la fenêtre Select Installation Type (Sélection du type d'installation), cliquez sur Enterprise Edition, puis cliquez sur Next. Une fenêtre affiche l'état des différentes vérifications en cours. Lorsque ces dernières sont terminées, cliquez sur Next. 7 Dans la fenêtre Select Database Configuration (Sélectionner la configuration de la base de données), cliquez sur Do not create a starter database (Ne pas créer de base de données initiale), puis cliquez sur Next.
www.dell.com | support.dell.com Configuration de l'écouteur Cette section décrit les étapes à suivre pour configurer l'écouteur, nécessaire pour la connexion client distante à une base de données. Sur un noeud (uniquement), effectuez les étapes suivantes : 1 Connectez-vous en tant que root. 2 Tapez startx pour démarrer le système X Window. 3 Ouvrez une fenêtre de terminal et tapez : xhost + 4 Pour démarrer l'assistant de configuration réseau, connectez-vous en tant qu'utilisateur oracle, et tapez netca.
Création de la base de données initiale Cette section indique comment créer et vérifier la base de données initiale à l'aide d'OCFS ou d'ASM. Création d'une base de données initiale à l'aide d'OCFS 1 Sur le noeud 1, connectez-vous en tant qu'utilisateur oracle et tapez dbca -datafileDestination /u01 pour démarrer l'assistant de configuration de base de données (DBCA).
www.dell.com | support.dell.com 16 Dans la fenêtre Creation Options (Options de création), cochez Create Database (Créer la base de données), puis cliquez sur Finish (Terminer). 17 Dans la fenêtre Confirmation, cliquez sur OK pour créer la base de données. REMARQUE : la création de la base de données initiale peut durer plus d'une heure. Une fois la création de la base de données terminée, la fenêtre Password Management (Gestion des mots de passe) s'affiche. 18 Cliquez sur Exit (Quitter).
7 Dans la fenêtre Management Options (Options de gestion), cliquez sur Next. 8 Dans la fenêtre Database Credentials (Autorisations de la base de données), cliquez sur Use Same Password for All Accounts (Utiliser le même mot de passe pour tous les comptes), entrez et validez le mot de passe, puis cliquez sur Next. 9 Dans la fenêtre Storage Options (Options de stockage), cliquez sur ASM, puis sur Next.
www.dell.com | support.dell.com 21 La fenêtre Initialization Parameters (Paramètres d'initialisation) s'affiche. Si votre cluster comporte huit noeuds, redéfinissez la valeur du paramètre Shared Pool (Pool partagé) à 500 Mo et cliquez sur Next. 22 Dans la fenêtre Database Storage (Stockage de la base de données), cliquez sur Next. 23 Dans la fenêtre Creation Options (Options de création), cliquez sur Create Database (Créer la base de données), puis sur Finish (Terminer).
Correctifs à appliquer pour le déploiement de cartes d'accès distant Cette section contient des informations concernant les correctifs à appliquer pour le déploiement des cartes d'accès distant 10g. Reconfiguration du délai d'attente CSS pour optimiser le basculement de EMC PowerPath Lorsqu'un commutateur, une carte HBA ou processeur de stockage EMC (SP) tombe en panne, le temps de basculement de PowerPath sur un autre périphérique est de 105 secondes.
www.dell.com | support.dell.com 5 Téléchargez le correctif dans le répertoire /opt/oracle/patches. 6 Recherchez le correctif numéro 2617419 avec Linux x86-64 comme plate-forme. 7 Téléchargez le correctif dans le répertoire /opt/oracle/patches. 8 Arrêtez tous les services Oracle (services CRS Oracle compris) sur tous les noeuds du cluster (le cas échéant). 9 Connectez-vous en tant qu'utilisateur oracle, puis tapez : cd /opt/oracle/patches unzip p4039296_10103_LinuxAMD64.zip unzip p2617419_10102_GENERIC.
Configuration et déploiement d'Oracle Database 10g (noeud unique) Cette section contient des informations sur la configuration initiale et les procédures de réinstallation décrites dans la section “Installation et configuration de Red Hat Enterprise Linux” à la page 115.
www.dell.com | support.dell.com 7 Tapez : mke2fs -j /dev/sdb1 mke2fs -j /dev/sdc1 8 Modifiez le fichier /etc/fstab en ajoutant une entrée pour le système de fichiers qui vient d'être créé. 9 Tapez : mount /dev/sdb1 /opt/oracle/oradata mount /dev/sdc1 /opt/oracle/recovery 10 Tapez : chown oracle.
Installation d'Oracle Database 10g Effectuez la procédure suivante pour installer Oracle 10g : 1 Connectez-vous en tant que root. 2 En tant qu'utilisateur root, montez le CD n°1 d'Oracle Database 10g. 3 Connectez-vous en tant qu'utilisateur oracle. 4 Tapez /mnt/cdrom/runInstaller pour démarrer Oracle Universal Installer. 5 Tapez startx pour démarrer le système X Window. 6 Ouvrez une fenêtre de terminal et tapez : xhost + 7 Dans la fenêtre de bienvenue, cliquez sur Next.
www.dell.com | support.dell.com Configuration de l'écouteur 1 Connectez-vous en tant que root. 2 Tapez startx pour démarrer le système X Window. 3 Ouvrez une fenêtre de terminal et tapez : xhost + 4 Connectez-vous en tant qu'utilisateur oracle. 5 Pour démarrer l'assistant de configuration réseau Oracle, tapez netca. 6 Acceptez les paramètres par défaut et cliquez sur Next dans chaque écran pour terminer la configuration de l'écouteur.
12 Dans la fenêtre Database Content (Contenu de la base de données), cliquez sur Next. 13 Dans la fenêtre Initialization Parameters (Paramètres d'initialisation), cliquez sur Next. 14 Dans la fenêtre Database Storage (Stockage de la base de données), cliquez sur Next. 15 Dans la fenêtre Creation Options (Options de création), cliquez sur Create a Database (Créer une base de données), puis sur Finish (Terminer). 16 Dans la fenêtre Confirmation, cliquez sur OK pour créer la base de données.
www.dell.com | support.dell.com 7 Dans la fenêtre Database Credentials (Autorisations de la base de données), cliquez sur Use Same Password for All Accounts (Utiliser le même mot de passe pour tous les comptes), entrez et validez le mot de passe, puis cliquez sur Next. 8 Dans la fenêtre Storage Options (Options de stockage), cliquez sur ASM, puis sur Next. 9 Dans la fenêtre Create ASM Instance (Créer une instance ASM), entrez le mot de passe de l'utilisateur SYS et cliquez sur Next.
21 Dans la fenêtre Creation Options (Options de création), cliquez sur Create Database (Créer la base de données), puis sur Finish (Terminer). 22 Dans la fenêtre Confirmation, cliquez sur OK pour créer la base de données. REMARQUE : la création de la base de données initiale peut durer plus d'une heure. Cette opération terminée, la fenêtre Password Management (Gestion des mots de passe) s'affiche. 23 Cliquez sur Exit (Quitter).
www.dell.com | support.dell.com Ajout d'un noeud à la couche réseau Pour ajouter un noeud à la couche réseau, procédez comme suit : 1 Installez Red Hat Enterprise Linux sur le nouveau noeud. Voir la section “Installation et configuration de Red Hat Enterprise Linux” à la page 115. 2 Configurez les réseaux public et privé sur le noeud. Voir la section “Configuration de réseaux publics et privés” à la page 120. 3 Vérifiez que chaque noeud parvient à détecter les unités LUN de stockage ou disques logiques.
4 Tapez les commandes suivantes pour définir l'utilisateur oracle comme propriétaire du référentiel du cluster et du disque de vote : chown oracle.dba /dev/raw/ASM1 chown oracle.dba /dev/raw/ASM2 5 Copiez le fichier /etc/sysconfig/rawdevices depuis l'un des noeuds du cluster vers le même emplacement sur le nouveau noeud. 6 Tapez : chown oracle.dba /dev/raw/ASM* 7 Tapez service rawdevices restart pour redémarrer RDS (service des périphériques bruts).
www.dell.com | support.dell.com Ajout d'un nouveau noeud à la couche de configuration du cluster 1 Connectez-vous en tant qu'utilisateur oracle. 2 À partir du répertoire /opt/oracle/product/10.1.0/crs_1/oui/bin de l'un des noeuds, tapez addNode.sh pour démarrer Oracle Universal Installer. 3 Dans la fenêtre de bienvenue, cliquez sur Next.
6 À l'invite, exécutez le script root.sh sur le nouveau noeud. Cette opération terminée, cliquez sur OK. 7 Dans la fenêtre End of Cluster Node Addition (Fin de l'ajout du noeud au cluster), cliquez sur Exit (Quitter). 8 À partir du répertoire /opt/oracle/product/10.1.0/db_1/oui/bin de l'un des noeuds, tapez (par exemple) la ligne suivante : vipca -nodelist node1-pub,node2-pub,node3-pub Dans cet exemple, node3 (le noeud 3) est ajouté à un cluster comprenant deux noeuds. L'assistant VIPCA démarre.
www.dell.com | support.dell.com 7 Entrez le nom d'utilisateur sys et le mot de passe, puis cliquez sur Next. La fenêtre List of Cluster Database Instances (Liste des instances de bases de données de cluster) s'affiche. Elle répertorie les instances associées à la base de données RAC sélectionnée et leur état. 8 Cliquez sur Next. 9 Dans la fenêtre Adding an Instance (Ajouter une instance), entrez le nom de l'instance en haut de la fenêtre, sélectionnez le nom du noeud, puis cliquez sur Next.
7 Entrez le nom d'utilisateur sys et le mot de passe, puis cliquez sur Next. La fenêtre List of Cluster Database Instances (Liste des instances de bases de données de cluster) s'affiche. Elle répertorie les instances associées à la base de données RAC sélectionnée et leur état. 8 Sélectionnez l'instance à supprimer et cliquez sur Finish (Terminer). Cette instance ne peut pas être l'instance locale depuis laquelle vous exécutez DBCA.
www.dell.com | support.dell.com Suppression du noeud de la couche de configuration du cluster 1 Connectez-vous comme utilisateur root sur le noeud à supprimer et désactivez les services CRS en tapant : /opt/oracle/product/10.1.0/crs_1/install/rootdelete.sh remote nosharedvar 2 Connectez-vous ensuite comme utilisateur root sur l'un des noeuds restants et tapez : /opt/oracle/product/10.1.0/crs_1/install/rootdeletenode.
7 Lorsqu'il vous est demandé d'indiquer un autre numéro de partition, tapez 3. 8 Lorsqu'il vous est demandé d'entrer une commande, tapez d. 9 Lorsqu'il vous est demandé d'indiquer un numéro de partition, tapez 4. 10 Lorsqu'il vous est de nouveau demandé d'entrer une commande, tapez d. 11 Lorsqu'il vous est demandé d'indiquer un numéro de partition, tapez 3. 12 Lorsqu'il vous est demandé d'entrer une commande, affichez les partitions en tapant p.
www.dell.com | support.dell.com Tableau 1-6. Versions de logiciels prises en charge (suite) Composant logiciel Versions prises en charge Pilote Qlogic HBA 2342 7.04.00 Pilote Qlogic HBA 2360 7.04.00 Pilote du contrôleur PERC 4/DC, PERC 4/Di, PERC 4e/Di, PERC 4e/Si ou PERC 4e/DC (megaraid2) 2.10.8.2-RH1 Pilotes de NIC Intel PRO/100 S (e100) 5.3.19-K2-NAPI Intel PRO/1000 XT/MT/MT DP Pilotes de NIC (e1000) 5.3.19-K2-NAPI Broadcom NetXtreme BCM5704 (tg3) 3.
11 Lisez les informations de l'écran Installation Summary (Résumé de l'installation), puis cliquez sur Next. Le programme de configuration installe automatiquement tous les logiciels de gestion de systèmes adaptés à votre configuration matérielle. 12 Une fois l'installation terminée, cliquez sur Finish (Terminer). Pour plus d'instructions sur la désinstallation du logiciel de système géré, reportez-vous au document Server Administrator User's Guide.
www.dell.com | support.dell.com 3 Déterminez le module de pilote utilisé par le NIC privé. La carte Broadcom NetXtreme Gigabit utilise tg3. Les cartes de la gamme Intel PRO/1000 utilisent e1000. 4 Ouvrez le fichier /etc/modules.conf en tapant : more /etc/modules.conf Plusieurs lignes s'affichent, avec le format alias ethX module-pilote, où X correspond au numéro d'interface Ethernet et module-pilote, au module défini à l'étape 3.
Dépannage Le tableau 1-8 indique les mesures recommandées en cas d'incident lié au déploiement et à l'utilisation de Red Hat Enterprise Linux et d'Oracle. Tableau 1-8. Dépannage Catégorie Problème / Symptôme Cause Action corrective recommandée Performances et stabilité Instabilité du système et performances amoindries sous Red Hat Enterprise Linux. Utilisation excessive de l'espace de pagination. La zone SGA (Oracle System Global Area) dépasse la taille recommandée.
www.dell.com | support.dell.com Tableau 1-8. Dépannage (suite) Catégorie Problème / Symptôme Cause Action corrective recommandée Performances et stabilité Un avertissement signalant un type d'interface inconnu est consigné dans le journal d'alertes Oracle. L'interface publique est configurée pour gérer les communications du cluster (interface privée).
Tableau 1-8. Dépannage (suite) Catégorie Problème / Symptôme Cause OCFS Le système se bloque ou affiche un message signalant une erreur grave du noyau. Le système Red Hat Linux définit par défaut une tâche Cron quotidienne, qui permet d'exécuter updatedb sur certains systèmes de fichiers dans /etc/cron.daily et /etc/updatedb.conf. Le système de fichiers OCFS ne prend pas updatedb en charge. Action corrective recommandée 1 Modifiez le fichier /etc/cron.d/slocate.
www.dell.com | support.dell.com Tableau 1-8. Dépannage (suite) 160 Catégorie Problème / Symptôme Cause OCFS Les opérations portant sur des fichiers OCFS (copie ou déplacement de gros fichiers, utilisation de “dd”, etc.) peuvent parfois bloquer le système. Le module fileutils par Accédez au service Oracle Technology défaut ne prend pas en Network et téléchargez le dernier module charge les opérations sur les fileutils pris en charge par OCFS.
Tableau 1-8. Dépannage (suite) Catégorie Problème / Symptôme CRS Les services CRS Le démon CSS des services • Essayez de relancer le service en échouent au redémarrant le noeud ou en tapant CRS ne parvient pas à écrire root.sh à partir du répertoire redémarrage des sur le disque quorum. /opt/oracle/product/10.1.0/crs_1/. noeuds ou lorsque vous tapez • Vérifiez que chaque noeud a accès au /etc/ini.d/ini disque quorum et que le disque est t.crs start. accessible en écriture pour l'utilisateur root.
www.dell.com | support.dell.com Tableau 1-8. Dépannage (suite) Catégorie Problème / Symptôme Cause CRS Les services CRS ne démarrent pas lorsque vous exécutez le script root.sh après une réinstallation. Le fichier OCR et le disque de vote n'ont pas été vidés et contiennent d'anciennes données. Les services CRS ne démarrent pas lors de l'exécution du script root.sh. L'utilisateur oracle ne dispose pas des autorisations adéquates sur /var/tmp (plus particulièrement, /var/tmp/.oracle).
Tableau 1-8. Dépannage (suite) Catégorie Problème / Symptôme CRS Les services CRS ne D'autres tentatives de démarrent pas lors dépannage des services CRS de l'exécution du ont échoué. script root.sh. Cause Action corrective recommandée 1 Ajoutez la ligne suivante au script root.sh pour activer le débogage : set -x 2 Essayez de redémarrer le service en exécutant le script root.sh à partir du répertoire suivant : /opt/oracle/product/10.1.
www.dell.com | support.dell.com Tableau 1-8. Dépannage (suite) 164 Catégorie Problème / Symptôme Cause Installation d'Oracle Le script root.sh a échoué. La variable d'environnement LD_ASSUME_KERNEL est manquante. Action corrective recommandée 1 Ouvrez une fenêtre de terminal. 2 Connectez-vous en tant que root, puis tapez : LD_ASSUME_KERNEL-2.4.19 3 Dans la même fenêtre de terminal root, exécutez le script root.sh.
Tableau 1-8. Dépannage (suite) Catégorie Problème / Symptôme Cause Action corrective recommandée Stockage Fibre Vous recevez des Le pilote HBA, le BIOS ou Channel erreurs d'E-S et le micro-code doivent être des avertissements mis à jour. lorsque vous chargez le module du pilote HBA Fibre Channel. Consultez le document Solution Deliverable List (Liste des éléments pris en charge) qui se trouve sur le site dell.com/oracle pour savoir quelles sont les versions prises en charge.
www.dell.com | support.dell.com Obtention d'aide Support technique de Dell Pour plus de précisions sur l'utilisation du système, reportez-vous à la documentation fournie avec ses composants. Vous trouverez des informations sur les configurations Dell prises en charge et les livres blancs sur le site dell.com/oracle. Pour obtenir une assistance technique sur votre matériel ou le système d'exploitation et télécharger les dernières mises à jour appropriées pour le système, visitez le site support.dell.com.
Index A Aide, 166 Ajout et suppression de noeuds, 145 ASM configuration du stockage de la base de données, 140 Autres options de configuration ajout et suppression de noeuds, 145 B Base de données initiale création, 133, 142 vérification, 136, 143 Bonding, 122 C Cluster Fibre Channel, exemple de connexion matérielle, 118 Configuration ASM, 128 OCFS, 126 Oracle Database 10g (noeud unique), 139 Oracle RAC 10g, 120 périphériques de stockage partagés, 126 Configuration (suite) périphériques de stockage parta
Index D L Définition de l'interface réseau privée, 155 Logiciels configuration requise, 114, 153 réinstallation, 152 Dépannage, 157 Déploiement d'Oracle RAC 10g, 120 Documentation, 115 E Exemples Fibre Channel, connexions matérielles, 118 I Informations supplémentaires, 153 configuration du redémarrage automatique, 154 définition de l'interface réseau privée, 155 Installation CRS, 129 Oracle Database 10g, 130 Oracle Database 10g (noeud unique), 141 Oracle RAC 10g, 129 Red Hat Enterprise Linux, 1
S Sécurité, 124 Shell distant (rsh) désactivation, 124 Suppression d'un noeud, 150 V Vérification base de données initiale, 136, 143 configuration des systèmes de stockage, 124 configuration logicielle, 118 configuration matérielle, 118 Index 169
Index 170 Index
Dell™ PowerEdge™-Systeme Oracle Database 10g – Linux für Intel® Extended Memory 64 Technology (EM64T) – Einrichtungsanleitung Version 1.0 w w w. d e l l . c o m | s u p p o r t . d e l l .
LCE10gt2.fm Page 2 Tuesday, April 12, 2005 3:52 PM Anmerkungen und Hinweise ANMERKUNG: Eine ANMERKUNG macht auf wichtige Informationen aufmerksam, die die Arbeit mit dem Computer erleichtern. HINWEIS: Ein HINWEIS warnt vor möglichen Beschädigungen der Hardware oder vor Datenverlust und zeigt auf, wie derartige Probleme vermieden werden können. ____________________ Irrtümer und technische Änderungen vorbehalten. © 2005 Dell Inc. Alle Rechte vorbehalten.
Inhalt Software- und Hardware-Anforderungen . Lizenzvereinbarungen . . Wichtige Dokumentation . . . . . . . . . . . . . . . . 175 . . . . . . . . . . . . . . . . . . . . . . 177 177 . . . . . . . . . . . . . . . . . . . . . . Red Hat Enterprise Linux installieren und konfigurieren . . . . . . . . . . Installation von Red Hat Enterprise Linux mit Hilfe der Deployment-CDs . . . . . . . . . . . . . . . . . . . . . Konfigurieren von Red Hat Enterprise Linux . . . . . . . . . . .
Hinzufügen eines neuen Knotens zur Clusterware-Schicht . . Hinzufügen eines neuen Knotens zur Datenbankschicht . . . . Hinzufügen eines neuen Knotens zur Datenbankinstanzschicht Entfernen eines Knotens aus dem Cluster . . . . . . . . . . . . . . 211 211 213 214 . . . . . . . . . . . . . . . . . . . . . . 216 . . . . . . . . . . . . . . . . . . . . . . . . 217 Neuinstallation der Software . Zusätzliche Informationen Unterstützte Softwareversionen . . . . . .
Dieses Dokument enthält Informationen zur Installation, Konfiguration, Neuinstallation und Verwendung der Software Oracle 10g, die auf den von Dell für Oracle unterstützten Konfigurationen beruhen.
www.dell.com | support.dell.com Tabelle 1-1. Software-Anforderungen Softwarekomponente Konfiguration Vierteljährliches Update 4 Betriebssystem Red Hat Enterprise Linux AS (Version 3) für Intel® Extended Memory 64 Technologie (EM64T) Oracle 10g für Intel EM64T EMC® PowerPath® (nur Fibre-Channel-Cluster) Version 10.1.0 • Enterprise Edition mit RAC-Option für Cluster • Enterprise Edition für Einzelknoten-Konfiguration Version 4.
Tabelle 1-3. Minimale Hardware-Anforderungen – Einzelknoten Hardwarekomponente Konfiguration Dell PowerEdge-System 1850, 2800 oder 2850 Intel Xeon-Prozessor mit 3 GHz 1 GB RAM Zwei 36-GB-Festplatten (RAID 1) mit Anschluss an PERC-Controller Zwei NIC-Ports Fibre-Channel-Speichersystem Dell | EMC CX300, CX500 oder CX700 (optional) Informationen über unterstützte Konfigurationen finden Sie unter dell.
www.dell.com | support.dell.com Installation von Red Hat Enterprise Linux mit Hilfe der Deployment-CDs 1 Trennen Sie alle externen Speichergeräte vom System. 2 Halten Sie die Dell Deployment-CD und die originalen CDs für Red Hat Enterprise Linux AS mit Update 4 bereit. 3 Legen Sie die Dell Deployment-CD 1 in das CD-Laufwerk ein, und starten Sie das System neu. Das System startet von der Dell Deployment-CD.
Konfigurieren von Red Hat Enterprise Linux ANMERKUNG: Das vierteljährliche Update 4 unterstützt nicht Dell OpenManage™ Storage Services (OMSS). 1 Melden Sie sich als root beim System an. 2 Legen Sie die Dell Deployment-CD 2 in das CD-Laufwerk ein, und geben Sie folgende Befehle ein: mount /dev/cdrom /mnt/cdrom/install.sh Der Inhalt der CD wird in das Verzeichnis /usr/lib/dell/dell-deploy-cd kopiert. Geben Sie nach Abschluss des Vorgangs umount /dev/cdrom ein und entfernen Sie die CD aus dem Laufwerk.
www.dell.com | support.dell.com Betriebssystem-Pakete über das Red Hat Network aktualisieren Red Hat veröffentlicht regelmäßig Software-Updates zum Beheben von Programmfehlern und Sicherheitslücken und zum Hinzufügen neuer Funktionen. Diese Aktualisierungen können Sie über den Red Hat Network (RHN)-Service herunterladen. Informieren Sie sich auf der Dell/ Oracle-Website dell.com/oracle über die derzeit unterstützten Konfigurationen, bevor Sie die Systemsoftware über den RHN-Dienst aktualisieren.
Abbildung 1-1. Hardware-Verbindungen für einen Fibre-Channel-Cluster Öffentliches Netzwerk Gb-Ethernet-Switches (privates Netzwerk) LAN/WAN PowerEdge-Systeme (Oracle-Datenbank) Dell | EMC Fibre-Channel-Switches (SAN) Dell | EMC Fibre-ChannelSpeichersysteme CAT 5e (integrierter NIC) CAT 5e (Kupfer-Gigabit-NIC) Faseroptische Kabel Zusätzliche faseroptische Kab Tabelle 1-4.
www.dell.com | support.dell.com Tabelle 1-4.
• Der Fibre-Channel-Speicher muss wie folgt konfiguriert sein: – Mindestens drei LUNs wurden erstellt und dem Cluster zugewiesen – Minimale LUN-Größe von 5 GB Netzwerk und Speicher für Oracle RAC 10g konfigurieren Dieser Abschnitt enthält Informationen über das Einrichten eines Fibre-Channel- oder SCSIClusters mit einer Startdatenbank und umfasst die folgenden Vorgänge: • Öffentliche und private Netzwerke konfigurieren • System sichern • Speicherkonfiguration überprüfen • Gemeinsamen Speicher fü
www.dell.com | support.dell.com Konfigurieren des öffentlichen Netzwerks Falls noch nicht erfolgt, müssen Sie nun für jeden Knoten im Cluster die folgenden Schritte zur Konfiguration des öffentlichen Netzwerks durchführen: 1 Melden Sie sich als root beim System an.
3 Bearbeiten Sie die Datei /etc/modules.conf, und passen Sie die Optionen für die Verbindungsüberwachung an, um die Verfügbarkeit zu verbessern. Der Standardwert für miimon ist 0, wodurch die Verbindungsüberwachung deaktiviert wird. Ändern Sie den Wert zunächst auf 100 Millisekunden. Passen Sie ihn danach entsprechend der benötigten Leistung an. Geben Sie ein: options bonding miimon=100 mode=1 4 Erstellen oder bearbeiten Sie im Verzeichnis /etc/sysconfig/network-scripts/ die Konfigurationsdatei ifcfg-bond0.
www.dell.com | support.dell.com 6 Führen Sie auf jedem Knoten den Befehl ifconfig aus, um sicherzustellen, dass das private Netzwerk funktioniert. Die private IP-Adresse für den Knoten sollte der privaten Schnittstelle bond0 zugewiesen werden. 7 Senden Sie nach dem Einrichten der privaten IP-Adressen Pings von einem der Knoten an alle eingerichteten Adressen, um das private Netzwerk zu testen.
System sichern Um unerlaubten Zugriff auf das System zu verhindern, wird empfohlen, rsh nach der Installation der Oracle-Software zu deaktivieren. Geben Sie chkconfig rsh off ein, um rsh zu deaktivieren. Speicherkonfiguration überprüfen Bei der in diesem Dokument beschriebenen Clusterkonfiguration werden Partitionen auf dem Fibre-Channel-Speichersystem erstellt. Um diese Partitionen erstellen zu können, müssen alle Clusterknoten die externen Speichergeräte erkennen können.
www.dell.com | support.dell.com 5 Stellen Sie in der Datei /proc/partitions Folgendes sicher: • Alle PowerPath-Pseudogeräte erscheinen in der Datei mit ähnlichen Gerätepfaden. Zum Beispiel /dev/emcpowera, dev/emcpowerb und /dev/emcpowerc. • Die Fibre-Channel-LUNs erscheinen als SCSI-Geräte, und jeder Clusterknoten ist mit der gleichen Anzahl LUNs konfiguriert.
3 Führen Sie auf jedem Knoten die folgenden Schritte aus: a Geben Sie die folgenden Befehle ein, um die Namen der Ursprungsgeräte zu ändern: mv /dev/raw/raw1 mv /dev/raw/raw2 mv /dev/raw/raw3 b /dev/raw/votingdisk /dev/raw/ocr.dbf /dev/raw/spfile+ASM.ora Um den Benutzer oracle als Besitzer des Cluster-Repository und des Voting-Laufwerks festzulegen, geben Sie folgende Befehle ein: chown oracle.dba /dev/raw/votingdisk chown oracle.dba /dev/raw/ocr.dbf chown oracle.dba /dev/raw/spfile+ASM.
www.dell.com | support.dell.com 3 Erstellen Sie bei einem Fibre-Channel-Cluster auf dem ersten Knoten mit fdisk eine Partition auf jedem der zwei anderen externen Speichergeräte: a Geben Sie fdisk /dev/emcpowerx ein, und erstellen Sie eine Primärpartition für das gesamte Gerät. Hilfe für das Dienstprogramm fdisk erhalten Sie, indem Sie h drücken. b Geben Sie cat /proc/partitions ein, um zu überprüfen, ob die neue Partition erstellt wurde.
c Geben Sie auf jedem Knoten die folgenden Befehle ein, um das OCFS-Modul zu laden und alle Datenträger, die in der Datei /etc/fstab aufgelistet sind, bereitzustellen: ANMERKUNG: Ingnorieren Sie eventuell angezeigte Warnungen bezüglich nicht übereinstimmender Versionen von OCFS-Modul und Kernel. /sbin/load_ocfs mount -a -t ocfs Speicher mit ASM konfigurieren Um den Cluster mit ASM zu konfigurieren, führen Sie auf allen Knoten folgende Schritte durch: 1 Melden Sie sich als root beim System an.
www.dell.com | support.dell.com Oracle RAC 10g installieren In diesem Abschnitt werden die erforderlichen Schritte zur Installation von Oracle RAC 10g beschrieben. Dabei werden CRS und die Oracle Database 10g-Software mit installiert. Dell empfiehlt, eine Startdatenbank einzurichten, um zu überprüfen, ob der Cluster korrekt funktioniert, bevor Sie ihn in einer Produktionsumgebung einsetzen. Installieren von CRS 1 Melden Sie sich als root beim System an.
14 Klicken Sie im Fenster Summary (Übersicht) auf Install (Installieren). Wenn die Installation abgeschlossen ist, wird der Hinweis angezeigt, dass Sie das Skript root.sh auf allen Knoten ausführen müssen. Das Skript root.sh konfiguriert den Cluster automatisch. 15 Öffnen Sie nach Aufforderung ein neues Terminalfenster. 16 Geben Sie als Benutzer root ein: export LD_ASSUME_KERNEL=2.4.19 17 Führen Sie vom gleichen Terminalfenster wie in Schritt 15 als Benutzer root auf jedem Knoten das Skript root.
www.dell.com | support.dell.com ANMERKUNG: Das Oracle-Heimverzeichnis muss bei diesem Schritt einen anderen Namen haben als der, den Sie während der Installation von CRS festgelegt haben. Sie können Oracle 10g Enterprise Edition mit RAC nicht in das gleiche Heimverzeichnis kopieren, dass Sie für CRS verwendet haben.
f Wenn die Konfiguration abgeschlossen ist, klicken Sie auf OK und anschließend auf Exit (Beenden), um den VIPCA zu beenden. g Führen Sie root.sh auf jedem der anderen Knoten im Cluster aus. Warten Sie, bis die Ausführung von root.sh auf einem Knoten beendet ist, bevor Sie es auf dem nächsten Knoten ausführen. 13 Klicken Sie im Fenster Setup Privileges (Setup-Rechte) auf OK. 14 Klicken Sie im Fenster End of Installation (Installation abgeschlossen) auf Exit (Beenden), und bestätigen Sie mit Yes (Ja).
www.dell.com | support.dell.com 12 Wählen Sie im Fenster Listener Configuration, More Listeners? (Konfiguration Listener, Weitere Listener?) die Option No (Nein) aus, und klicken Sie auf Next (Weiter). 13 Klicken Sie im Fenster Listener Configuration Done (Konfiguration Listener abgeschlossen) auf Next (Weiter). 14 Klicken Sie auf Finish (Fertig stellen).
13 Klicken Sie im Fenster Database Services (Datenbankdienste) auf Next (Weiter). 14 Wenn der Cluster mehr als vier Knoten umfasst, ändern Sie im Fenster Initialization Parameters (Initialisierungsparameter) den Wert für Shared Pool (Gemeinsam genutzter Speicher) auf 500 MB und klicken auf Next (Weiter). 15 Klicken Sie im Fenster Database Storage (Datenbankspeicher) auf Weiter.
www.dell.com | support.dell.com 5 Klicken Sie im Fenster Database Templates (Datenbankvorlagen) auf Custom Database (Benutzerdefinierte Datenbank) und anschließend auf Next (Weiter). 6 Geben Sie im Fenster Database Identification (Datenbankidentifikation) einen Global Database Name (Globalen Datenbanknamen) wie racdb ein, und klicken Sie auf Next (Weiter). 7 Klicken Sie im Fenster Management Options (Verwaltungsoptionen) auf Weiter.
17 Aktivieren Sie im Fenster Select File Locations (Dateispeicherorte wählen) das Kontrollkästchen Use Common Location for All Database Files (Gemeinsamen Speicherort für alle Datenbankdateien verwenden), und klicken Sie auf Next (Weiter). 18 Klicken Sie im Fenster Recovery Configuration (Wiederherstellungskonfiguration) auf Browse (Durchsuchen), und wählen Sie die Flashback-Gruppe aus, die Sie in Schritt 15 erstellt haben (z. B. flashbackDG). Klicken Sie anschließend auf Next (Weiter).
www.dell.com | support.dell.com Wenn die Datenbankinstanzen aktiv sind, wird auf dem Bildschirm eine Bestätigung angezeigt. Wenn die Datenbankinstanzen nicht aktiv sind, geben Sie Folgendes ein: srvctl start database -d dbname wobei dbname der globale Bezeichnername ist, den Sie im DatenbankKonfigurationsassistenten definiert haben. Fixes und Patches zur RAC-Einrichtung Dieser Abschnitt enthält Informationen zu Fixes und Patches für die Einrichtung von 10g RAC.
Beachten Sie vor der Installation des Patches auf den Knoten die folgenden Richtilinien: • Führen Sie auf keinem der Knoten root.sh ($ORACLE_HOME/root.sh) aus, bevor Sie den Patch installiert haben. • Installieren Sie beim RAC-Installationsvorgang den Patch auf dem ersten Knoten, führen Sie dann auf dem Knoten root.sh aus. So installieren Sie den Patch auf allen Clusterknoten: 1 Melden Sie sich als Benutzer oracle an.
www.dell.com | support.dell.com Festlegen des oracle-Benutzerkennworts Dell empfiehlt nachdrücklich, ein Kennwort für den Benutzer oracle einzurichten, um das System zu schützen. Gehen Sie wie folgt vor, um das oracle-Kennwort festzulegen: 1 Melden Sie sich als root beim System an. 2 Geben Sie passwd oracle ein. Befolgen Sie zum Erstellen des oracle-Kennworts die Anweisungen auf dem Bildschirm.
5 Erstellen Sie mit dem Dienstprogramm fdisk eine Partition, auf der Sie die Wiederherstellungsdateien speichern möchten (z. B. sdc1, wenn das Speichergerät sdc ist). 6 Geben Sie cat /proc/partitions ein, um zu überprüfen, ob die neue Partition erstellt wurde. Wenn die neue Partition nicht aufgeführt ist, geben Sie ein: sfdisk -R /dev/sdb sfdisk -R /dev/sdc 7 Geben Sie ein: mke2fs -j /dev/sdb1 mke2fs -j /dev/sdc1 8 Fügen Sie der Datei /etc/fstab einen Eintrag für das neue Dateisystem hinzu.
www.dell.com | support.dell.com 5 Öffnen Sie die Datei /etc/sysconfig/rawdevices, und fügen Sie folgende Zeilen ein: /dev/raw/ASM1 /dev/sdb1 /dev/raw/ASM2 /dev/sdc1 6 Geben Sie service rawdevices restart ein, um den Ursprungsgerätedienst (Raw Devices Service) neu zu starten. Installation von Oracle-Datenbank 10g So installieren Sie Oracle 10g: 1 Melden Sie sich als root beim System an. 2 Mounten Sie als Benutzer root die Oracle Database 10g CD1. 3 Melden Sie sich als Benutzer oracle an.
Listener konfigurieren 1 Melden Sie sich als root beim System an. 2 Geben Sie startx ein, um das X-Window-System zu starten. 3 Öffnen Sie ein Terminalfenster und geben Sie ein: xhost + 4 Melden Sie sich als Benutzer oracle an. 5 Geben Sie netca ein, um den Oracle Net Configuration Assistant (Netzkonfigurationsassistent) zu starten. 6 Behalten Sie in allen Fenstern die Standardeinstellungen bei, und klicken Sie jeweils auf Next (Weiter), um die Konfiguration des Listeners abzuschließen.
www.dell.com | support.dell.com 12 Klicken Sie im Fenster Database Content (Datenbankinhalt) auf Next (Weiter). 13 Klicken Sie im Fenster Initialization Parameters (Initialisierungsparameter) auf Weiter. 14 Klicken Sie im Fenster Database Storage (Datenbankspeicher) auf Weiter. 15 Aktivieren Sie im Fenster Creation Options (Erstellungsoptionen) das Kontrollkästchen Create Database (Datenbank erstellen), und klicken Sie anschließend auf Finish (Fertig stellen).
7 Klicken Sie im Fenster Database Credentials (Datenbank-Zugriffsrechte) auf Use the Same Password for All Accounts (Gleiches Kennwort für alle Benutzer verwenden), nehmen Sie die Kennworteingaben vor, und klicken Sie Sie dann auf Next (Weiter). 8 Wählen Sie im Fenster Storage Options (Speicheroptionen) die Option ASM aus, und klicken Sie auf Next (Weiter). 9 Geben Sie im Fenster Create ASM Instance (ASM-Instanz erstellen) das Kennwort für den Benutzer SYS ein, und klicken Sie auf Next (Weiter).
www.dell.com | support.dell.com 20 Klicken Sie im Fenster Database Storage (Datenbankspeicher) auf Weiter. 21 Klicken Sie im Fenster Creation Options (Erstellungsoptionen) auf Create Database (Datenbank erstellen) und anschließend auf Finish (Fertigstellen). 22 Klicken Sie im Fenster Confirmation (Bestätigung) auf OK, um die Datenbank zu erstellen. ANMERKUNG: Die Erstellung der Startdatenbank kann mehr als eine Stunde dauern.
Hinzufügen eines neuen Knotens zur Netzwerkschicht So fügen Sie der Netzwerkschicht einen neuen Knoten hinzu: 1 Installieren Sie auf dem neuen Knoten das Betriebssystem Red Hat Enterprise Linux. Siehe „Red Hat Enterprise Linux installieren und konfigurieren“ auf Seite 177. 2 Konfigurieren Sie das öffentliche und private Netzwerk auf dem neuen Knoten. Siehe „Öffentliche und private Netzwerke konfigurieren“ auf Seite 183. 3 Überprüfen Sie, ob jeder Knoten die Speicher-LUNs oder logischen Laufwerke erkennt.
www.dell.com | support.dell.com 4 Um den Benutzer oracle als Besitzer des Cluster-Repository and des Voting-Laufwerks festzulegen, geben Sie folgende Befehle ein: chown oracle.dba /dev/raw/ASM1 chown oracle.dba /dev/raw/ASM2 5 Kopieren Sie /etc/sysconfig/rawdevices von einem der vorhandenen Knoten im Cluster an die gleiche Stelle auf dem neuen Knoten. 6 Geben Sie ein: chown oracle.
Hinzufügen eines neuen Knotens zur Clusterware-Schicht 1 Melden Sie sich als Benutzer oracle an. 2 Geben Sie auf einem der bereits vorhandenen Knoten vom Verzeichnis /opt/oracle/product/10.1.0/crs_1/oui/bin aus den Befehl addNode.sh ein, um den Oracle Universal Installer zu starten. 3 Klicken Sie im Fenster Welcome (Willkommen) auf Weiter.
www.dell.com | support.dell.com 4 Wählen Sie im Fenster Specify Cluster Nodes for Node Addition (Hinzuzufügende Clusterknoten auswählen) den neuen Knoten aus, und klicken Sie danach auf Next (Weiter). Wenn alle Tests erfolgreich beendet wurden, wird das Fenster Node Addition Summary (Knoten hinzufügen: Zusammenfassung) angezeigt. 5 Klicken Sie auf Weiter. Im Fenster Cluster Node Addition Progress (Knoten hinzufügen: Status) wird der Fortschritt während des Hinzufügens des Knotens angezeigt.
Hinzufügen eines neuen Knotens zur Datenbankinstanzschicht 1 Geben Sie auf Knoten 1 als Benutzer oracle den Befehl dbca & ein, um den DBCA (Database Configuration Assistant) zu starten. 2 Klicken Sie im Fenster Welcome (Willkommen) auf Weiter. 3 Klicken Sie im Fenster Oracle Real Application Cluster Database auf Next (Weiter). 4 Klicken Sie im Fenster Operations (Operationen) auf Instance Management (Datenbankinstanzen verwalten) und anschließend auf Next (Weiter).
www.dell.com | support.dell.com Entfernen eines Knotens aus dem Cluster Entfernen eines Knotens aus der Datenbankinstanz-Layer 1 Melden Sie sich als Benutzer oracle an. 2 Geben Sie an Knoten 1 ein: dbca 3 Klicken Sie im Fenster Welcome (Willkommen) auf Weiter. 4 Klicken Sie im Fenster Operations (Operationen) auf Instance Management (Datenbankinstanzen verwalten) und anschließend auf Next (Weiter).
Entfernen eines Knotens aus der Datenbank-Layer 1 Melden Sie sich am zu löschenden Knoten als Benutzer oracle an. 2 Geben Sie den folgenden Befehl ein, und verwenden Sie dabei den öffentlichen Namen des zu löschenden Knotens (zum Beispiel node3-pub): srvctl stop nodeapps -n node3-pub 3 Melden Sie sich am zu löschenden Knoten als Benutzer root an. 4 Geben Sie den folgenden Befehl ein, und verwenden Sie dabei den öffentlichen Namen des zu löschenden Knotens (zum Beispiel node3-pub): /opt/oracle/product/10.1.
www.dell.com | support.dell.com Neuinstallation der Software HINWEIS: Bei der Neuinstallation der Software werden sämtliche Daten von den Festplatten gelöscht. HINWEIS: Sie müssen alle externen Speicher vom System trennen, bevor Sie die Software neu installieren. HINWEIS: Dell empfiehlt, regelmäßige Sicherungen der Datenbank und der einzelnen Knoten durchzuführen, damit Sie keine wertvollen Daten verlieren. Sie sollten die Software nur als letzten Ausweg neu installieren.
Zusätzliche Informationen Unterstützte Softwareversionen ANMERKUNG: Emulex-HBAs werden in dieser Version von „Dell Supported Configurations for Oracle“ nicht unterstützt. In Tabelle 1-6 ist die zum Zeitpunkt des Releases unterstützte Software aufgeführt. Welche Hardware und Software aktuell unterstützt wird, erfahren Sie auf der Dell/Oracle-Website unter dell.com/oracle; dort können Sie die Liste der aktuell unterstützten Versionen herunterladen (Oracle Database 10g EM64T Version 1.
www.dell.com | support.dell.com 3 Geben Sie startx ein, um das X-Window-System zu starten. 4 Öffnen Sie ein Terminalfenster und geben Sie ein: xhost + 5 Legen Sie die Dell OpenManage System Management-CD in das CD-Laufwerk ein. 6 Mounten Sie die CD durch Eingabe von mount /mnt/cdrom. 7 Klicken Sie im Root-Verzeichnis der CD auf start.sh, um das Setup-Programm zu starten. 8 Klicken Sie im Fenster Welcome to Dell OpenManage Systems Management Installation auf Next (Weiter).
Private Netzwerkschnittstelle feststellen Um festzustellen, welcher Schnittstellen-Gerätename den einzelnen Netzwerkschnittstellen zugeordnet ist, gehen Sie wie folgt vor: 1 Finden Sie heraus, welche NIC-Typen im System vorliegen. Anhand der Tabelle Tabelle 1-7 können Sie ermitteln, welche integrierten NICs im System installiert sind. Bei Add-In-NICs handelt es sich möglicherweise um Karten der Intel PRO/100-Serie oder der Intel PRO/1000-Serie oder um Broadcom NetXtreme Gigabit-Karten.
www.dell.com | support.dell.com Fehlerbehebung In Tabelle 1-8 sind empfohlene Maßnahmen für Probleme aufgeführt, die beim Einrichten und beim Einsatz von Red Hat Enterprise Linux und Oracle-Software auftreten können. Tabelle 1-8. Fehlerbehebung 220 Kategorie Problem/Anzeichen Ursache Empfohlene Korrekturmaßnahmen Leistung und Stabilität Unzureichende Das SGA (Oracle System Leistung und Global Area) übersteigt die instabiler Betrieb empfohlene Größe. von Red Hat Enterprise Linux.
Tabelle 1-8. Fehlerbehebung (Fortsetzung) Kategorie Problem/Anzeichen Ursache Empfohlene Korrekturmaßnahmen Leistung und Stabilität Die Warnung „Unknown interface type“ (Unbekannter Schnittstellentyp) wird im OracleAlarmprotokoll angezeigt. Leiten Sie den Netzwerkverkehr des Cluster auf die private Netzwerkschnittstelle um, indem Sie auf einem Knoten folgende Schritte ausführen: 1 Melden Sie sich als Benutzer oracle an. 2 Geben Sie an der Eingabeaufforderung sqlplus "/ as sysdba" ein.
www.dell.com | support.dell.com Tabelle 1-8. Fehlerbehebung (Fortsetzung) Kategorie Problem/Anzeichen Ursache OCFS Das System reagiert nicht mehr, oder es wird eine KernelPanic-Meldung angezeigt. In der Standardkonfiguration von Red Hat Linux ist in den Dateien /etc/cron.daily und /etc/updatedb.conf ein cron-Job festgelegt, der das Programm updatedb einmal täglich auf bestimmten Dateisystemen ausführt. updatedb wird auf OCFSDateisystemen nicht unterstützt.
Tabelle 1-8. Fehlerbehebung (Fortsetzung) Kategorie Problem/Anzeichen Ursache Empfohlene Korrekturmaßnahmen OCFS Bei den Befehlen copy, move, dd und anderen Vorgängen mit großen OCFSDateien reagiert das System unter Umständen vorübergehend nicht mehr. Das standardmäßig Laden Sie die das aktuelle fileutils-Paket installierte fileutils-Paket ist mit OCFS-Unterstützung vom Oracle nicht für die bei OCFSTechnology Network herunter. Dateien benötigten o_direct Datei-Operationen geeignet.
www.dell.com | support.dell.com Tabelle 1-8. Fehlerbehebung (Fortsetzung) 224 Kategorie Problem/Anzeichen Ursache Empfohlene Korrekturmaßnahmen CRS Fehler beim Start von CRS, wenn Sie die Knoten neu starten oder den Befehl /etc/ini.d/ini t.crs start ausführen. Der CSS-Daemon (Cluster Ready Services) kann nicht auf den QuorumDatenträger schreiben. • Versuchen Sie den Dienst neu zu starten, indem Sie den Knoten neu starten oder den Befehl root.sh im Verzeichnis /opt/oracle/product/10.1.
Tabelle 1-8. Fehlerbehebung (Fortsetzung) Kategorie Problem/Anzeichen Ursache CRS CRS startet nicht, wenn Sie root.sh nach einer Neuinstallation ausführen. Die OCR-Datei und der Speicher für Statusinformationen wurden nicht gelöscht und enthalten veraltete Informationen. Empfohlene Korrekturmaßnahmen 1 Löschen Sie die OCR-Datei und den Speicher für Statusinformationen, indem Sie folgende Befehle ausführen: dd if=/dev/zero of= /dev/raw/ocr.
www.dell.com | support.dell.com Tabelle 1-8. Fehlerbehebung (Fortsetzung) Kategorie Problem/Anzeichen Ursache CRS CRS startet beim Ausführen von root.sh nicht. Andere Schritte zur Fehlerbehebung bei CRS wurden ohne Erfolg durchgeführt. Empfohlene Korrekturmaßnahmen 1 Aktivieren Sie den Debug-Modus, indem Sie in der Datei root.sh folgende Zeile hinzufügen: set -x 2 Versuchen Sie den Dienst neu zu starten, indem Sie den Befehl root.sh im Verzeichnis /opt/oracle/product/10.1.0/crs_1/ ausführen.
Tabelle 1-8. Fehlerbehebung (Fortsetzung) Kategorie Problem/Anzeichen Ursache OracleInstallation Das Skript root.sh lässt sich nicht ausführen. Die Umgebungsvariable LD_ASSUME_KERNEL fehlt. Empfohlene Korrekturmaßnahmen 1 Öffnen Sie ein Terminalfenster. 2 Geben Sie als Benutzer root ein: LD_ASSUME_KERNEL-2.4.19 3 Führen Sie im gleichen Terminalfenster als root das Skript root.sh aus. DBCA Wenn Sie im Fenster DBCA Summary (DBCAÜbersicht) auf OK klicken, erfolgt keine Reaktion.
www.dell.com | support.dell.com Tabelle 1-8. Fehlerbehebung (Fortsetzung) Kategorie 228 Problem/Anzeichen Ursache Empfohlene Korrekturmaßnahmen Fibre-Channel- Sie erhalten E/AFür HBA-Treiber, BIOS oder Speicher Fehler und Firmware ist ein Update Warnmeldungen, erforderlich. wenn Sie das FibreChannel HBATreibermodul laden. Die unterstützten Versionen sind in der „Solution Deliverable List“ unter dell.com/oracle aufgeführt.
Hilfestellung Dell Support Weitere Informationen zum Betrieb des Systems finden Sie in der zusammen mit den Systemkomponenten gelieferten Dokumentation. Whitepaper, Informationen zu den von Dell unterstützten Oracle-Konfigurationen und allgemeine Informationen erhalten Sie auf der Dell/Oracle-Website unter dell.com/oracle. Technischen Support von Dell für die Hardware und die Betriebssystem-Software sowie aktuelle Updates für das System finden Sie auf der Dell Support-Webseite unter support.dell.com.
Einrichtungsanleitung www.dell.com | support.dell.
Index A F I ASM Konfiguration des Datenbankspeichers, 203 Fehlerbehebung, 220 Installation CRS, 192 mit Dell DeploymentCD, 178 Oracle Datenbank 10g, 193 Oracle Datenbank 10g (einzelner Knoten), 204 Oracle RAC 10g, 192 Red Hat Enterprise Linux, 177-178 Fibre-Channel-Cluster einrichten, 180 Automatischen Neustart konfigurieren, 217 G B Gemeinsamen Speicher für CRS konfigurieren, 188 Beispiele Fibre-Channel-Cluster, HardwareVerbindungen, 181 Gemeinsamen Speicher konfigurieren, 189 ASM, 191 OCFS, 189
Index Konfiguration (Fortsetzung) gemeinsamer Speicher für CRS, 188 gemeinsamer Speicher mit ASM, 191 gemeinsamer Speicher mit OCFS, 189 OCFS, 189 Oracle Datenbank 10g (einzelner Knoten), 202 Oracle RAC 10g, 183 Red Hat Enterprise Linux, 179 Konfiguration der öffentlichen und privaten Netzwerke, 183 Konfiguration von Oracle 10g, 180 Hardware- und Softwarekonfigurationen überprüfen, 180 Konfiguration von Oracle RAC 10g, 183 Startdatenbank erstellen, 196 Konfigurieren des privaten Netzwerks, 184 L List
U Überprüfen Hardware-Konfiguration, 180 Software-Konfiguration, 180 Speicherkonfiguration, 187 Startdatenbank, 199, 206 Unterstützte Speichergeräte, 217 Z Zusätzliche Informationen, 217 Automatischen Neustart konfigurieren, 217 Private Netzwerkschnittstelle feststellen, 219 Zusätzliche Konfigurationsoptionen Hinzufügen und Entfernen von Knoten, 208 Index 233
Index 234 Index
Dell™ PowerEdge™ システム Oracle Database 10g – Linux for Intel® EM64T (エクステンデッドメモリ 64 テクノロジ) 導入ガイド バージョン 1.0 w w w. d e l l . c o m | s u p p o r t . d e l l .
メモおよび注意 メモ:コンピュータを使いやすくするための重要な情報を説明しています。 注意:ハードウェアの損傷やデータの損失の可能性を示し、その危険を回避するための方法を説明してい ます。 ____________________ 本書の内容は予告なく変更されることがあります。 © 2005 すべての著作権は Dell Inc. にあります。 Dell Inc. の書面による許可のない複製は、いかなる形態においても厳重に禁じられています。 本書で使用されている商標について:Dell、DELL ロゴ、Dell OpenManage、および PowerEdge は Dell Inc. の商標です。 EMC、PowerPath、および Navisphere は EMC Corporation の登録商標です。Intel は Intel Corporation の登録商標です。 Xeon は Intel Corporation の商標です。Red Hat は Red Hat, Inc.
目次 ソフトウェアおよびハードウェアの要件 ライセンス契約 . . 重要なマニュアル . . . . . . . . . . . . . . . . 239 . . . . . . . . . . . . . . . . . . . . . . . . 241 241 . . . . . . . . . . . . . . . . . . . . . . . . Red Hat Enterprise Linux のインストールおよび設定 . . . . . . . . . . Deployment CD を使用した Red Hat Enterprise Linux の インストール . . . . . . . . . . . . . . . . . . . . . Red Hat Enterprise Linux の設定 . . . . . . . . . . . . . Red Hat Network を使用したシステムパッケージの アップデート . . . . . . . . . . . . . . . . . . . . . . . . . . . . . . . . .
新しいノードの共有ストレージの設定 . . . . . . . . . クラスタウェア層への新しいノードの追加 . . . . . . データベース層への新しいノードの追加. . . . . . . . データベースインスタンス層への新しいノードの追加 クラスタからのノードの削除 . . . . . . . . . . . . . . . . . . . 273 274 275 276 277 . . . . . . . . . . . . . . . . . . . 279 . . . . . . . . . . . . . . . . . . . . . . . . . . . . . . . . 280 ソフトウェアの再インストール . 追加情報 サポートされるソフトウェアのバージョン . . . . . . ハングしたオペレーティングシステムの自動再起動の ための設定 . . . . . . . . . . . . . . . . . . . . . . . プライベートネットワークインタフェースの確認 . . . 困ったときは . . . . . . . . . . . . .
本書では、Oracle をサポートするデルの構成に従って、Oracle 10g ソフトウェアをインス トール、設定、再インストール、および使用するのに必要な情報について説明します。 内容は次のとおりです。 • ソフトウェアおよびハードウェアの要件 • Red Hat® Enterprise Linux のインストールと設定 • クラスタのハードウェアおよびソフトウェアの構成の確認 • Oracle Real Application Clusters(RAC)10g のネットワークおよびストレージの設定 • Oracle RAC 10g のインストール • Oracle Database 10g の設定および導入(シングルノード) • ノードの追加と削除 • ソフトウェアの再インストール • 追加情報 • トラブルシューティング • 困ったときは • オープンソースファイルの入手方法および使用方法 デルがサポートする Oracle の構成の詳細については、デルと Oracle の Web サイト dell.
www.dell.com | support.dell.com 表 1-1 ソフトウェア要件 ソフトウェアコンポーネント 構成 Quarterly update 4 Red Hat Enterprise Linux AS (バージョン 3)for Intel® EM64T (Extended Memory 64 Technology) Oracle 10g for Intel EM64T バージョン 10.1.0 • Enterprise Edition、クラスタのための RAC オプショ ンを含む • シングルノード構成の Enterprise Edition EMC® PowerPath®(ファイバーチャ ネルクラスタの場合のみ) バージョン 4.
表 1-3 ハードウェアの最小要件 ― シングルノード ハードウェアコンポーネント 構成 Dell PowerEdge 1850、2800、 または 2850 システム 3 GHz Intel Xeon プロセッサ 1 GB RAM PERC コントローラに接続された 36 GB のハードドラ イブ(RAID 1)× 2 NIC ポート× 2 Dell | EMC CX300、CX500、または CX700 ファイバーチャネルストレー ジシステム(オプション) サポートされる構成については、dell.
www.dell.com | support.dell.
3 cd /dell-oracle-deployment/scripts/standard と入力して、 『Dell Deployment CD』のスクリプトを含むディレクトリへ移動します。 メモ:スクリプトによって、インストールされたコンポーネントのバージョン確認のた め検索が行われて、必要に応じてサポートされているバージョンレベルへのアップデー トが行われます。 4 5 6 ./005-oraclesetup.py と入力して、Red Hat Enterprise Linux を Oracle インス トール用に設定します。 source /root/.bash_profile と入力して、環境変数を起動します。 ./010-hwCheck.py と入力して、CPU、RAM、およびディスク容量が Oracle のイン ストールに必要な最小要件を満たしていることを確認します。 スクリプトがパラメータが正しくないことを報告した場合は、ハードウェア構成を更 新してから、再度スクリプトを実行します。 7 ./275-rpms_dkms.
www.dell.com | support.dell.
表 1-4 ファイバーチャネルハードウェアの相互接続 クラスタのコンポーネント 接続 各 PowerEdge システム ノード CAT 5e ケーブル 1 本をパブリック NIC から LAN に接続 CAT 5e ケーブル 1 本をプライベート Gigabit NIC から Gigabit Ethernet スイッチに接続 CAT 5e ケーブル 1 本を冗長プライベート Gigabit NIC から冗長 Gigabit Ethernet スイッチに接続 光ファイバーケーブル 1 本を 光学式 HBA 0 からファイバー チャネルスイッチ 0 に接続 光ケーブル 1 本を HBA 1 からスイッチ 1 に接続 各 Dell | EMC ファイバー チャネルストレージ システム CAT 5e ケーブル 2 本を LAN に接続 各 Dell | EMC ファイバー チャネルスイッチ 1 から 4 のオプティカルコネクタを Dell | EMC ファーバー チャネルストレージシステムに接続 1 から 4 のオプティカルコネクタを各ファイバーチャネルス イッチに接続。たとえば、4 ポート構成で
www.dell.com | support.dell.
利用可能な NIC ポートの数に応じて、表 1-5 に示すとおりにインタフェースを設定します。 表 1-5 NIC のポート割り当て NIC ポート 利用可能なポート 3 つ 利用可能なポート 4 つ 1 パブリック IP および仮想 IP パブリック IP 2 プライベート IP (ボンディング済み) プライベート IP (ボンディング済み) 3 プライベート IP (ボンディング済み) プライベート IP (ボンディング済み) なし 4 仮想 IP パブリックネットワークの設定 まだパブリックネットワークを設定していない場合は、各ノードで次の手順を実行して 設定します。 1 root としてログインします。 2 ネットワークデバイスファイル /etc/sysconfig/network-scripts/ifcfg-eth# を編集 します(# はネットワークデバイスの番号を表します)。ファイルの設定は次のとおり です。 DEVICE=eth0 ONBOOT=yes IPADDR= NETMASK= BOO
www.dell.com | support.dell.com ボンディングを使用したプライベートネットワークの設定 クラスタを配置する前に、プライベートクラスタネットワークを設定し、ノード間で通信 できるようにします。このためには、ネットワークボンディングを設定して、プライベー ト IP アドレスとホスト名をクラスタ内の各ノードに割り当てます。Broadcom または Intel の NIC でネットワークボンディングを設定し、プライベートネットワークを設定するには、 各ノードで次の手順を実行します。 1 root としてログインします。 2 /etc/modules.conf ファイルに、次の行を追加します。 alias bond0 bonding 3 可用性を高めるためには、/etc/modules.
5 6 ボンドの各メンバーデバイスについて、以下の手順を実行します。 a /etc/sysconfig/network-scripts/ ディレクトリで、ifcfg-ethn ファイルを次の ように編集します。 DEVICE=ethn HWADDR= ONBOOT=yes TYPE=Ethernet USERCTL=no MASTER=bond0 SLAVE=yes BOOTPROTO=none b service network restart と入力し、表示される警告はすべて無視します。 各ノードで ifconfig と入力して、プライベートインタフェースが機能していること を確認します。 ノードのプライベート IP アドレスはプライベートインタフェース bond0 に割り当て る必要があります。 7 各ノードにプライベート IP アドレスを設定したら、1 つのノードから各 IP アドレスを ping して、プライベートネットワークが機能していることを確認します。 8 ssh < プライベート IP> と入力して各ノードに接続し、プライベートネットワーク と
www.dell.com | support.dell.com 10 各ノードで、/etc/hosts.
メモ:一覧のデバイスはストレージの構成によって異なります。 ノードで検出された LUN または論理ディスクが、これらの外付けデバイスに作成され たパーティションとともに一覧表示されます。この一覧には、PowerPath 仮想デバイ スが /dev/emcpowera、/dev/emcpowerb、/dev/emcpowerc のように表示され ます。 5 /proc/partitions ファイル内で、以下のことを確認します。 • すべての PowerPath 擬似デバイスが類似するデバイスパスを持つファイル内に 表示されていること。たとえば、/dev/emcpowera、dev/emcpowerb、および /dev/emcpowerc です。 • ファイバーチャネル LUN が SCSI デバイスとして表示され、各クラスタノードが 同数の LUN で構成されていること。 たとえば、ノードが 3 つの論理ディスクを持つファイバーチャネルストレージデ バイスに取り付けられた SCSI ドライブまたは RAID コンテナで構成されている場 合、sda はノードの RAID コンテナまたは内蔵ドライブを識別
www.dell.com | support.dell.
データベース用の共有ストレージの設定 本項では OCFS(Oracle Cluster File System)または ASM(Automatic Storage Management)のどちらかを使用して共有ストレージを設定する方法について説明します。 OCFS を使用した共有ストレージの設定 1 root としてログインします。 2 各ノードで、以下の手順を実行します。 3 a startx と入力して X Window System を起動します。 b ocfstool と入力して、OCFS を使用してストレージをフォーマットします。 c メニューから Tasks をクリックして、次に Generate Config をクリックします。 d ノードのプライベート NIC デバイス名とプライベートホスト名を入力して、 OK をクリックします。 e Exit をクリックします。 ファイバーチャネルクラスタについては、最初のノードで、次のように fdisk を使用 して、別の 2 つの外付けストレージデバイスにそれぞれ 1 つずつパーティションを作 成します。 a fdisk
www.dell.com | support.dell.com ファイバーチャネルクラスタについては、次のように入力して、PowerPath 仮想デバ イスパーティションをフォーマットします。 mkfs.ocfs -F -b 128 -L u01 -m /u01 -u 500 -g 500 -p 0775 /dev/emcpowerb1 mkfs.ocfs -F -b 128 -L u02 -m /u02 -u 500 -g 500 -p 0775 /dev/emcpowerc1 5 各ノードで、以下の手順を実行します。 a 各 OCFS パーティション用にマウントポイントを作成します。この手順を実行す るには、次のように入力して、ターゲットパーティションのディレクトリを作成 し、オーナーシップを設定します。 mkdir -p /u01 /u02 chown -R oracle.
4 ファイバーチャネルクラスタについては、最初のノードで、次のように fdisk を使用 して、別の 2 つの外付けストレージデバイスにそれぞれ 1 つずつパーティションを作 成します。 a fdisk /dev/emcpowerx と入力して、デバイス全体に対するプライマリパー ティションを作成します。 fdisk ユーティリティのヘルプを表示するには、h と入力します。 b 新しいパーティションが存在することを確認するには、 cat /proc/partitions と入力します。 新しいパーティションが見つからない場合は、次のように入力します。 sfdisk -R /dev/< デバイス名 > 5 /etc/sysconfig/rawdevices ファイルを編集して、ファイバーチャネルクラスタ用に 以下の行を追加します。 /dev/raw/ASM1 /dev/emcpowerb1 /dev/raw/ASM2 /dev/emcpowerc1 6 service rawdevices restart と入力して Raw Devices Service を再起動します。 Oracle RA
www.dell.com | support.dell.com 8 Specify File Locations ウィンドウで Oracle ホームのパスが /opt/oracle/product/10.1.
20 すべてのノードで、以下の手順を実行します。 a /opt/oracle/product/10.1.0/crs_1/bin ディレクトリから次のコマンドを入力し て、CRS がインストールされたことを確認します。 olsnodes -n -v クラスタ内のすべてのノードのパブリックノード名が一覧表示されます。 b 次のように入力します。 crs_stat 次のメッセージが表示されます。 No services are registered with the CRS daemon.
www.dell.com | support.dell.com 11 root ユーザーとして、次のように入力します。 export LD_ASSUME_KERNEL=2.4.19 12 ノード 1 で root.
リスナーの設定 本項では、データベースへのリモートクライアントの接続に必要なリスナーの設定手順に ついて説明します。 1 つのノードのみで、以下の手順を実行します。 1 root としてログインします。 2 startx と入力して X Window System を起動します。 3 ターミナルウィンドウを開き、次のように入力します。 xhost + 4 oracle ユーザーとして、netca と入力して Net Configuration Assistant を起動し ます。 5 Cluster Configuration を選択してから、Next をクリックします。 6 TOPSNodes ウィンドウで Select All Nodes をクリックしてから、Next をクリック します。 7 Welcome ウィンドウで Listener Configuration を選択してから、Next をクリッ クします。 8 Listener Configuration, Listener ウィンドウで Add を選択してから、Next を クリックします。 9 Listene
www.dell.com | support.dell.
17 Confirmation ウィンドウで OK をクリックして、データベースを作成します。 メモ:シードデータベースの作成には 1 時間以上かかる場合があります。 データベースの作成が完了すると、Password Management ウィンドウが表示され ます。 18 Exit をクリックします。 クラスタデータベースがすべてのノードで起動中であることを示すメッセージが表示 されます。 19 各ノードで、以下の手順を実行します。 a 次のように入力して、そのノードにどのデータベースインスタンスが存在するか を判断します。 srvctl status database -d < データベース名 > b 次のように入力して、oracle ユーザープロファイルに ORACLE_SID 環境変数 エントリを追加します。 echo "export ORACLE_SID=racdbx" >> /home/oracle/.bash_profile source /home/oracle/.
www.dell.com | support.dell.com 9 Storage Options ウィンドウで ASM をクリックしてから、Next をクリックし ます。 10 ASM Credentials ウィンドウで、ユーザー SYS のパスワードを入力して、Create server parameter file をクリックし、作成先を /dev/raw/spfile+ASM.
24 Confirmation ウィンドウで OK をクリックして、データベースを作成します。 メモ:シードデータベースの作成には 1 時間以上かかる場合があります。 データベースの作成が完了すると、Password Management ウィンドウが表示され ます。 25 Exit をクリックします。 クラスタデータベースがすべてのノードで起動中であることを示すメッセージが表示 されます。 26 次の手順を各ノードで実行します。 a srvctl status database -d < データベース名 > と入力して、そのノードに どのデータベースインスタンスが存在するかを判断します。 b 以下のコマンドを入力して、oracle ユーザープロファイルに ORACLE_SID 環境 変数エントリを追加します。 echo "export ORACLE_SID=racdbx" >> /home/oracle/.bash_profile source /home/oracle/.
www.dell.com | support.dell.com RAC Post 導入のパッチと修正 本項では、10g RAC 導入のために必要なパッチと修正について説明します。 EMC PowerPath を正常にフェイルオーバーさせるための CSS Miscount の再設定 HBA、スイッチ、または EMC ストレージプロセッサ(SP)に障害が発生すると、 PowerPath の代替デバイスへのフェイルオーバー時間が合計で 105 秒を超える可能性が あります。10g R1 バージョン 10.1.0.3 のデフォルト CSS ディスクタイムアウトは、45 秒 です。PowerPath のフェイルオーバー手順が正常に機能するには、CSS タイムアウトを 120 秒に延長する必要があります。 CSS タイムアウトを延長するには、以下の手順を実行します。 1 1 つのノードを除く全ノードのデータベースと CRS をシャットダウンします。 2 実行中のノードで root ユーザーとしてログインし、次のように入力します。 /opt/oracle/product/10.1.
パッチを全クラスタノードにインストールするには、以下の手順を実行します。 1 oracle ユーザーとしてログインします。 2 必要に応じて、/opt/oracle/patches にパッチとユーティリティのためのフォルダを 作成します。 3 Oracle Metalink アカウントにログインします。 4 Linux x86-64(AMD)をプラットフォームとして、パッチ番号 4039296 を簡易検索 します。 5 パッチを /opt/oracle/patches ディレクトリにダウンロードします。 6 Linux x86-64(AMD)をプラットフォームとして、パッチ番号 2617419 を簡易検索 します。 7 パッチを /opt/oracle/patches ディレクトリにダウンロードします。 8 (必要な場合)全クラスタノードで、Oracle CRS を含むすべての Oracle サービスを シャットダウンします。 9 10 oracle ユーザーとしてログインし、次のように入力します。 cd /opt/oracle/patches unzip p4039296
www.dell.com | support.dell.
6 新しいパーティションを確認するには、cat /proc/partitions と入力します。 新しいパーティションが見つからない場合は、次のように入力します。 sfdisk -R /dev/sdb sfdisk -R /dev/sdc 7 次のように入力します。 mke2fs -j /dev/sdb1 mke2fs -j /dev/sdc1 8 新しく作成したファイルシステムの内容を /etc/fstab ファイルに追加入力します。 9 次のように入力します。 mount /dev/sdb1 /opt/oracle/oradata mount /dev/sdc1 /opt/oracle/recovery 10 次のように入力します。 chown oracle.
www.dell.com | support.dell.com Oracle Database 10g のインストール Oracle 10g をインストールするには、以下の手順を実行します。 1 root としてログインします。 2 root ユーザーとして、『Oracle Database 10g CD1』にマウントします。 3 oracle としてログインします。 4 oracle ユーザーとして、/mnt/cdrom/runInstaller と入力して、 Oracle Universal Installer を起動します。 5 startx と入力して X Window System を起動します。 6 ターミナルウィンドウを開き、次のように入力します。 xhost + 7 Welcome ウィンドウで Next をクリックします。 8 Specify File Locations ウィンドウで Oracle ホームのパスが /opt/oracle/product/10.1.
リスナーの設定 1 root としてログインします。 2 startx と入力して X Window System を起動します。 3 ターミナルウィンドウを開き、次のように入力します。 xhost + 4 oracle としてログインします。 5 netca と入力して、Oracle Net Configuration Assistant を起動します。 6 デフォルトの設定を受け入れて、すべての画面で Next をクリックし、リスナーの 設定を完了します。 シードデータベースの作成 ext3 ファイルシステムを使用したシードデータベースの作成 DBCA(Oracle Database Creation Assistant)で以下の手順を実行して、シードデータ ベースを作成します。 1 oracle としてログインします。 2 dbca と入力して、Oracle DBCA を起動します。 3 Welcome ウィンドウで Next をクリックします。 4 Operations ウィンドウで Create a Database をクリックしてから、Next をクリッ ク
www.dell.com | support.dell.
10 DBCA が ASM インスタンスを作成して起動する準備ができたことを示すメッセージが 表示されたら、OK をクリックします。 11 ASM Disk Groups ウィンドウで、Available Disk Groups の下にある Create New をクリックします。 12 Create Disk Group ウィンドウにデータベースファイルのストレージ情報を入力し、 OK をクリックします。 databaseDG など、作成するディスクグループの名前を入力し、External Redundancy を選択してから、ディスクグループに含めるディスク(たとえば、 /dev/raw/ASM1)を選択します。 ディスクグループの作成が進行中であることを示すウィンドウが表示されます。 13 Available Disk Groups で Create New をクリックします。 14 Disk Group ウィンドウに、フラッシュバックリカバリファイルの情報を入力して、 OK をクリックします。 flashbackDG など、作成するディスクグループの名前を入力し、External R
www.dell.com | support.dell.com 24 データベースの作成が完了したら、次のコマンドを入力して、Oracle のユーザー プロファイルに ORACLE_SID 環境変数エントリを追加します。 echo "export ORACLE_SID=oradb" >> /home/oracle/.bash_profile source /home/oracle/.
新しいノードの共有ストレージの設定 既存の RAC データベースを新しいノードに拡張するには、ストレージを既存のノードと同 様にするため、新しいノード用にストレージの設定を行います。本項では、ASM または OCFS を使用した場合の適切な手順を説明します。 ASM を使用した共有ストレージの設定 ASM を使用する場合は、新しいノードが既存のノードと同じ権限で ASM ディスクにアク セスできるようにする必要があります。 ASM ディスクを設定するには、以下の手順を実行します。 1 root としてログインします。 2 既存のノードが raw デバイスを使用して設定されていない場合は、手順 3 に進み ます。 既存のノードが CRS 用の raw デバイスを使用して設定されている場合は、次の手順 を実行します。 a 以下の各コマンドを入力して、raw キャラクタによるデバイス名を変更し、識別 可能にします。 mv /dev/raw/raw1 /dev/raw/votingdisk mv /dev/raw/raw2 /dev/raw/ocr.
www.dell.com | support.dell.com OCFS を使用した共有ストレージの設定 CRS、クォーラム、またはデータベースの各ファイルに OCFS(Oracle Cluster File System) を使用する場合は、新しいノードが既存のノードと同様にクラスタファイルシステムにア クセスできるようにします。 1 新しいノードで /etc/fstab ファイルを編集して、既存のノードに表示されるのとまっ たく同じように OCFS ボリューム情報を追加します。 たとえば、以下のように入力します。 /dev/emcpowera1 /dev/emcpowerb1 /dev/emcpowerc1 /u01 /u02 /u03 ocfs ocfs ocfs _netdev 0 0 _netdev 0 0 _netdev 0 0 2 既存のノードと同様に、新しいノードに OCFS マウントポイントを作成します(たと えば、/u01、/u02、および /u03)。 3 以下の手順で ocfstool を実行して、OCFS 設定ファイル /etc/ocfs.
5 Next をクリックします。 Cluster Node Addition Progress ウィンドウにクラスタノード追加処理のステータ スが表示されます。 6 確認のメッセージが表示されたら、ローカルノードで rootaddnode.sh を実行し ます。 rootaddnode.sh の実行が完了したら、OK をクリックします。 7 確認のメッセージが表示されたら、新しいノードで root.sh を実行します。 root.sh の実行が完了したら、OK をクリックします。 8 End of Cluster Node Addition ウィンドウで Exit をクリックします。 9 既存のノードの 1 つで、/opt/oracle/product/10.1.
www.dell.com | support.dell.com 8 既存のノードの 1 つで、/opt/oracle/product/10.1.
9 Adding an Instance ウィンドウで、ウィンドウ上部にインスタンス名を入力して、 新しいノード名を選択してから、Next をクリックします。 10 Services ウィンドウで Next をクリックします。 11 Instance Storage ウィンドウで Finish をクリックします。 12 Summary ウィンドウで OK をクリックして、データベースインスタンスを追加 します。 プログレスバーに続いて、別の操作を実行するかどうかを尋ねるメッセージが表示 されます。 13 No をクリックして、DBCA を終了します。 14 いずれかのノードで、 srvctl status database -d < データベース名 > を入力 すると、インスタンスが正常に追加されたかどうかが確認できます。 クラスタからのノードの削除 データベースインスタンス層からのノードの削除 1 oracle としてログインします。 2 ノード 1 から、次のように入力します。 dbca 3 Welcome ウィンドウで Next をクリックします。 4 Operat
www.dell.com | support.dell.
クラスタウェア層からのノードの削除 1 削除するノードで、root ユーザーとして、次のコマンドを入力し、CRS を無効にし ます。 /opt/oracle/product/10.1.0/crs_1/install/rootdelete.sh remote nosharedvar 2 残りのノードの 1 つで、root ユーザーとして、次のコマンドを入力します。 /opt/oracle/product/10.1.0/crs_1/install/rootdeletenode.sh < パブリック名 >, < ノード番号 > ノード番号を判定するには、次のコマンドを入力します。 /opt/oracle/product/10.1.0/crs_1/bin/olsnodes -n 3 Oracle CRS ソフトウェアを削除する場合は、削除するノードで、次のコマンドを入力 します。 rm -rf /opt/oracle/product/10.1.
www.dell.com | support.dell.
表 1-6 サポートされるソフトウェアのバージョン (続き) ソフトウェアコンポーネント 対応バージョン Qlogic HBA 2342 ドライバ 7.04.00 Qlogic HBA 2360 ドライバ 7.04.00 PERC 4/DC、PERC 4/Di、PERC 4e/Di、PERC 4e/Si、 2.10.8.2-RH1 または PERC 4e/DC Driver(megaraid2) Intel PRO/100 S NIC ドライバ(e100) 5.3.19-K2-NAPI Intel PRO/1000 XT/MT/MT DP NIC ドライバ(e1000) 5.3.19-K2-NAPI Broadcom NetXtreme BCM5704 (tg3) 3.
www.dell.com | support.dell.
プライベートネットワークインタフェースの確認 各ネットワークインタフェースに割り当てられているインタフェースデバイス名を確認す るには、次の手順を実行します。 1 システムの NIC の種類を確認します。 表 1-7 を参照して、システムに内蔵されている NIC を特定します。アドイン NIC に は、Intel PRO/100 ファミリー、PRO/1000 ファミリー、または Broadcom NetXtreme Gigabit のカードが使用されています。この場合、システムを開けて実際にアドイン カードを見て確認する必要があります。 表 1-7 内蔵 NIC システム 内蔵 NIC PowerEdge 1850 Intel PRO/1000(2) PowerEdge 2800 Intel PRO/1000(2) PowerEdge 2850 Intel PRO/1000(2) 2 Broadcom NetXtreme Gigabit または Intel PRO/1000 ファミリーの NIC が Cat 5e ケーブルで Gigabit Ethernet に接続されていることを確
www.dell.com | support.dell.
表 1-8 トラブルシューティング (続き) カテゴリ 問題 / 症状 パフォーマン Oracle アラート スと安定性 ファイル内に インタフェース タイプ不明の警告 がある。 システムパフォー マンスの低下。 原因 推奨する対応処置 パブリックインタフェー スがクラスタ通信に設定 されている(プライベー トインタフェース)。 1 つのノードで次の手順を実行して、 クラスタの通信にプライベートインタ フェースを強制します。 1 oracle としてログインします。 2 コマンドプロンプトから sqlplus "/ as sysdba" と入力します。 SQL> プロンプトが表示されます。 3 SQL> プロンプトで以下の各行を入 力します。 alter system set cluster_interconnects= '< プライベート IP アドレス node1>' scope=spfile sid= '' alter system set cluster_interconnects= '< プライベート IP アドレス node2>' scope=spfile sid= '
www.dell.com | support.dell.com 表 1-8 トラブルシューティング (続き) カテゴリ 問題 / 症状 原因 OCFS システムがハング する。カーネルパ ニックメッセージ が表示される。 Red Hat Linux システム は、/etc/cron.daily と /etc/updatedb.conf 内 のいくつかのファイルシ ステムで updatedb を実 行するために、デフォル トでは毎日 cron ジョブ ルーチンを実行するよう に設定されているが、 OCFS のファイルシステム では updatedb に対応し ていない。 推奨する対応処置 1 /etc/cron.d/slocate.
表 1-8 トラブルシューティング (続き) カテゴリ 問題 / 症状 原因 推奨する対応処置 NETCA NETCA が誤動作し パブリックネットワーク、 netca を起動する前に、ホスト名が て、データベース ホスト名、仮想 IP が パブリックネットワークに割り当てて 作成が失敗する。 /etc/hosts.equiv ファイ あること、/etc/hosts.equiv ファイ ル内のリストにない。 ル内のリストにパブリック IP アドレ スと仮想 IP アドレスが入っているこ とを確認します。 NETCA NETCA がリモート ノードを設定でき ない。または、 DBCA 実行中に raw デバイス検証 エラーが発生す る。 /etc/hosts.equiv ファイ ルがない。または、割り 当てられたパブリックま たは仮想 IP アドレスが含 まれていない。 各ノードで、/etc/hosts.
www.dell.com | support.dell.com 表 1-8 トラブルシューティング (続き) カテゴリ 問題 / 症状 原因 推奨する対応処置 CRS root.sh 実行時に OCR ファイルと Voting I/O の問題を解決して、該当ノードを CRS が起動でき Disk にアクセスできない。再起動するか、 /opt/oracle/product/10.1.0/crs_1/ ない。 から root.sh を実行して、もう一度 このサービスが起動できるかどうか試 してみます。 CRS 再インストール後 OCR ファイルと Voting の root.sh 実行時 Disk がクリアされず、古 に CRS が起動でき い情報が残っている。 ない。 1 以下の行を入力して、OCR と Voting Disk をクリアします。 dd if=/dev/zero of= /dev/raw/ocr.
表 1-8 トラブルシューティング (続き) カテゴリ 問題 / 症状 原因 CRS root.sh 実行時に その他の CRS トラブル CRS が起動でき シューティングの手順を ない。 試したが、失敗した。 推奨する対応処置 1 次の行を root.sh に追加して、 デバッグを可能にします。 set -x 2 /opt/oracle/product/10.1.0/crs_1/ から root.
www.dell.com | support.dell.
表 1-8 トラブルシューティング (続き) カテゴリ 問題 / 症状 原因 推奨する対応処置 DBCA による 8 ノード OCFS のセットアッ プ ORA-04031 unable to allocate 4180 bytes of shared memory というエラーメッ セージが表示され る。 8 ノードクラスタに対す るメモリ割り当てのデ フォルト設定が小さすぎ る。 Initialization Parameters ウィン ドウで、Shared Pool の値をデフォ ルトの 95 MB から 500 MB に変更し て、Next をクリックします。 PowerPath RHEL 3.0 EM64T PowerPath デバイスのス 無視してください。この問題は キャンの問題。 PowerPath バージョン 4.3.
www.dell.com | support.dell.com 困ったときは デルサポート システムの詳しい使い方については、システムコンポーネントに付属のマニュアルを参照 してください。 各種の白書、デルがサポートする設定、一般情報については、デルと Oracle の Web サイ ト dell.com/oracle を参照してください。 ハードウェアおよびオペレーティングシステムソフトウェアに対するデルのテクニカルサ ポート、アップデートのダウンロードについては、デルサポートサイト support.dell.com を参照してください。デルへの問い合わせ先については、システムに 付属の『インストール&トラブルシューティング』に記載されています。 デルでは、企業向けのトレーニングと資格認証を実施しております。詳細については、 dell.
索引 A ASM データベースストレー ジの設定 , 267 ASM の設定 , 254 C CRS インストール , 255 CRS の設定 , 252 CRS 用の共有ストレー ジの設定 , 252 O OCFS 共有ストレージの設定 , 274 OCFS の設定 , 253 Oracle 10g の設定 , 244 ハードウェアおよびソフト ウェアの構成の 確認 , 244 Oracle Database 10g, 266 インストール , 257 インストール (シングルノード), 268 Oracle Database 10g の設定 (シングルノード), 266, 269 Oracle RAC 10g ASM の設定 , 254 CRS の設定 , 252 OCFS の設定 , 253 インストール , 255 共有ストレージの 設定 , 253 構成 , 246 Oracle RAC 10g の 設定 , 246 シードデータベースの 作成 , 260 Oracle RAC 10g の 導入 , 246 R Red Hat システムパッケージの アップデート , 243 Red Hat
ç ௠く せ つ クラスタ ファイバーチャネルのハー ドウェア接続例 , 244 セキュリティ , 250 追加情報 , 280, 283 自動再起動の設定 , 281 クラスタのセットアップ ファイバーチャネル , 244 こ 困ったときは , 292 さ 再インストール ソフトウェア , 279 サポートされるストレージ デバイス , 280 し シードデータベース , 269 確認 , 263, 270 作成 , 260 シードデータベースの 作成 , 260, 269 ASM, 261 OCFS, 260 自動再起動の設定 , 281 設定 ASM, 254 ASM を使用した共有スト レージ , 254 ASM を使用したデー タベースストレージ (シングルノード), 267 CRS 用の共有ストレ ージ , 252 ex3 を使用したデー タベースストレージ (シングルノード), 266 OCFS, 253 OCFS を使用した共有スト レージ , 253 Oracle Database 10g (シングルノード), 266 Oracle RAC 10g, 24
ハードウェアおよびソフト ウェアの構成 ファイバーチャネル , 246 パスワード 設定 , 266, 272 パブリックおよびプライベー トネットワークの 設定 , 246 パブリックネットワーク 設定 , 246, 247 パブリックネットワークの 設定 , 247 ほ ボンディング , 248 ま マニュアル , 241 ら ライセンス契約 , 241 り ふ リスナーの設定 , 259, 269 ファイバーチャネルクラスタ のセットアップ , 244 リモートシェル(rsh) 無効化 , 250 プライベートネット ワーク , 283 設定 , 246, 248 れ プライベートネットワーク インタフェースの 確認 , 283 プライベートネットワーク の設定 , 248 例 ファイバーチャネルクラス タ用のハードウェア 接続 , 244 索引 295
ç ௠296 索引
Sistemas Dell™ PowerEdge™ Oracle Database 10g – Guía de implementación de Linux para Intel® Extended Memory 64 Technology (EM64T) versión 1.0 w w w. d e l l . c o m | s u p p o r t . d e l l .
LCE10st2.fm Page 2 Tuesday, April 12, 2005 3:55 PM Notas y avisos NOTA: una NOTA proporciona información importante que le ayudará a utilizar mejor el ordenador. AVISO: un AVISO indica la posibilidad de daños en el hardware o la pérdida de datos, e informa de cómo evitar el problema. ____________________ La información contenida en este documento puede modificarse sin previo aviso. © 2005 Dell Inc. Reservados todos los derechos.
Contenido Requisitos de software y hardware . Contratos de licencia . . . Documentación importante . . . . . . . . . . . . . . . . . . . 301 . . . . . . . . . . . . . . . . . . . . . . . . . . . . . . . . . . . . . . . . . . 303 303 . . . . . . . . . 303 Instalación y configuración de Red Hat Enterprise Linux Instalación de Red Hat Enterprise Linux con los CD de implantación . Configuración de Red Hat Enterprise Linux . . . . . . . . . . . . .
Adición de un nodo nuevo al nivel de software de clúster . . . . . . Adición de un nuevo nodo al nivel de base de datos . . . . . . . . Adición de un nodo nuevo al nivel de la instancia de la base de datos Eliminación de un nodo del clúster . . . . . . . . . . . . . . . . . . 337 338 339 340 . . . . . . . . . . . . . . . . . . . . . . . 342 . . . . . . . . . . . . . . . . . . . . . . . . . . 343 Reinstalación del software . Información adicional Versiones de software admitidas. . . . . . . . . . . .
En este documento se proporciona información para instalar, configurar, reinstalar y utilizar el software de Oracle 10g siguiendo las configuraciones admitidas de Dell para Oracle.
www.dell.com | support.dell.com Tabla 1-1. Requisitos de software Componente de software Configuración Sistema operativo Red Hat Enterprise Linux AS (versión 3) para Intel® Extended Memory 64 Technology (EM64T) Actualización trimestral 4 Oracle 10g para Intel EM64T Versión 10.1.0 • Enterprise Edition, incluida la opción RAC para clústeres • Enterprise Edition para la configuración de un solo nodo EMC® PowerPath® (sólo para clústeres Fibre Channel) Versión 4.
Tabla 1-3. Requisitos mínimos de hardware: un solo nodo Componente de hardware Configuración Sistema Dell™ PowerEdge™ 1850, 2800 o 2850 Procesador Intel Xeon a 3 GHz 1 GB de RAM Dos unidades de disco duro (RAID1) de 36 GB conectadas a una controladora PERC Dos puertos NIC Sistema de almacenamiento Dell | EMC Consulte dell.com/oracle para obtener información CX300, CX500 o CX700 Fibre Channel sobre las configuraciones admitidas.
www.dell.com | support.dell.com Instalación de Red Hat Enterprise Linux con los CD de implantación 1 Desconecte todos los dispositivos de almacenamiento externo del sistema. 2 Localice el CD de implantación de Dell y los CD originales de Red Hat Enterprise Linux AS con la actualización 4. 3 Inserte el CD 1 de implantación de Dell en la unidad de CD y reinicie el sistema. El sistema iniciará el CD de implantación de Dell.
Configuración de Red Hat Enterprise Linux NOTA: la actualización trimestral 4 no admite Dell OpenManage™ Storage Services (OMSS). 1 Inicie la sesión como root. 2 Inserte el CD 2 de implantación de Dell en la unidad de CD e introduzca los siguientes comandos: mount /dev/cdrom /mnt/cdrom/install.sh El contenido del CD se copia en el directorio /usr/lib/dell/dell-deploy-cd. Cuando haya finalizado el proceso de copia, escriba umount /dev/cdrom y extraiga el CD de la unidad de CD.
www.dell.com | support.dell.com Actualización de los paquetes de sistema mediante Red Hat Network Red Hat publica periódicamente actualizaciones de software para corregir errores, solucionar problemas de seguridad y añadir nuevas funciones. Puede descargar estas actualizaciones a través del servicio Red Hat Network (RHN). Consulte la página Web de Dell y Oracle (dell.
Figura 1-1. Conexiones de hardware para un clúster Fibre Channel Red pública Conmutadores Ethernet Gb (red privada) LAN/WAN Sistemas PowerEdge (base de datos Oracle) Conmutadores Dell | EMC Fibre Channel (SAN) Sistemas de almacenamiento Dell | EMC Fibre Channel CAT 5e (NIC integrada) CAT 5e (NIC gigabit de cobre) Cables de fibra óptica Cables de fibra óptica adiciona Tabla 1-4.
www.dell.com | support.dell.com Tabla 1-4. Interconexiones de hardware Fibre Channel (continuación) Componente del clúster Conexiones Cada sistema de almacenamiento Dell | EMC Fibre Channel Dos cables CAT 5e conectados a la LAN Cada conmutador Dell | EMC Fibre Channel De una a cuatro conexiones ópticas al sistema de almacenamiento Dell | EMC Fibre Channel Cada conmutador Fibre Channel permite de una a cuatro conexiones ópticas.
• El almacenamiento Fibre Channel debe configurarse con lo siguiente: – Un mínimo de tres LUN creados y asignados al clúster – Un tamaño mínimo de LUN de 5 GB Configuración de la conexión a redes y el almacenamiento de Oracle RAC 10g En esta sección se proporciona información sobre la forma de configurar un clúster Fibre Channel o SCSI que ejecute una base de datos semilla, y se incluyen los procedimientos siguientes: • Configuración de las redes pública y privada • Protección del sistema • Verifi
www.dell.com | support.dell.com Configuración de la red pública Si aún no lo ha hecho, lleve a cabo los siguientes pasos en cada nodo para configurar la red pública: 1 Inicie la sesión como root.
3 Para obtener una alta disponibilidad, edite el archivo /etc/modules.conf y configure la opción para supervisar enlaces. El valor predeterminado para miimon es 0, que desactiva la opción de supervisión de enlaces. Inicialmente, cambie el valor a 100 milisegundos, y ajústelo según sea necesario para mejorar el rendimiento. Escriba options bonding miimon=100 mode=1 4 En el directorio /etc/sysconfig/network-scripts/, cree o edite el archivo de configuración ifcfgbond0.
www.dell.com | support.dell.com 7 Una vez configuradas las direcciones IP privadas en cada nodo, ejecute un ping a cada dirección IP desde un nodo para asegurarse de que la red privada funciona. 8 Escriba ssh para conectarse a cada nodo y compruebe que la red privada y ssh funcionan correctamente. 9 En cada nodo, modifique el archivo /etc/hosts añadiendo las siguientes líneas. NOTA: los ejemplos de este paso y del siguiente corresponden a una configuración de dos nodos.
Verificación de la configuración de almacenamiento Durante la configuración de clúster que se describe en este documento, creará particiones en el almacenamiento Fibre Channel. Para crear las particiones, todos los nodos del clúster deben ser capaces de detectar los dispositivos de almacenamiento externo.
www.dell.com | support.dell.
b Escriba los siguientes comandos para establecer la propiedad de usuario oracle del repositorio de clúster y del disco de votación: chown oracle.dba /dev/raw/votingdisk chown oracle.dba /dev/raw/ocr.dbf chown oracle.dba /dev/raw/spfile+ASM.ora c Edite el archivo /etc/sysconfig/rawdevices y añada las líneas siguientes para un clúster Fibre Channel: /dev/raw/votingdisk /dev/raw/ocr.dbf /dev/raw/spfile+ASM.
www.dell.com | support.dell.com 4 En un solo nodo, formatee los dispositivos de almacenamiento externo para OCFS escribiendo: mkfs.
Configuración del almacenamiento mediante ASM Para configurar el clúster mediante ASM, realice los pasos siguientes en todos los nodos: 1 Inicie la sesión como root.
www.dell.com | support.dell.com Instalación de CRS 1 Inicie la sesión como root. 2 Escriba startx para iniciar el sistema X Window. 3 Abra una ventana de terminal y escriba lo siguiente: xhost + 4 Monte el CD Oracle Cluster Ready Services. 5 Escriba su - oracle 6 Escriba los siguientes comandos para iniciar Oracle Universal Installer: unset ORACLE_HOME /mnt/cdrom/runInstaller 7 En la ventana Welcome (Bienvenido), haga clic en Next (Siguiente).
16 Escriba lo siguiente como usuario root: export LD_ASSUME_KERNEL=2.4.19 17 Desde la misma ventana de terminal en el paso 15, como usuario root, ejecute el script root.sh en cada nodo, empezando por el local. Espere a que el script root.sh termine de ejecutarse en un nodo antes de ejecutarlo en el siguiente. 18 Haga clic en OK (Aceptar) en la pantalla Setup Privileges (Privilegios de configuración).
www.dell.com | support.dell.com 6 En la ventana Select Installation Type (Seleccionar tipo de instalación), haga clic en Enterprise Edition y, a continuación, en Next (Siguiente). Aparece una pantalla que muestra el estado de varias comprobaciones que se están realizando. Cuando finalicen las comprobaciones, haga clic en Next (Siguiente).
Configuración del proceso de escucha En esta sección se describen los pasos necesarios para configurar el proceso de escucha, que es necesario para la conexión remota de clientes a una base de datos. Siga estos pasos sólo en un nodo: 1 Inicie la sesión como root. 2 Escriba startx para iniciar el sistema X Window. 3 Abra una ventana de terminal y escriba lo siguiente: xhost + 4 Como usuario oracle, escriba netca para iniciar el asistente de configuración de red.
www.dell.com | support.dell.com Creación de la base de datos semilla Esta sección contiene los procedimientos necesarios para crear la base de datos semilla mediante OCFS o ASM, así como para verificarla. Creación de la base de datos semilla mediante OCFS 1 En el nodo 1, como usuario oracle, escriba dbca -datafileDestination /u01 para iniciar DBCA (Database Configuration Assistant).
15 En la ventana Database Storage (Almacenamiento de base de datos), haga clic en Next (Siguiente). 16 En la ventana Creation Options (Opciones de creación), seleccione Create Database (Crear una base de datos) y, a continuación, haga clic en Finish (Finalizar). 17 En la ventana Confirmation (Confirmación), haga clic en OK (Aceptar) para crear la base de datos. NOTA: la creación de la base de datos semilla puede tardar más de una hora.
www.dell.com | support.dell.com 6 En la ventana Database Identification (Identificación de la base de datos), especifique un Global Database Name (Nombre de base de datos global), como por ejemplo racdb y, a continuación, haga clic en Next (Siguiente). 7 En la ventana Management Options (Opciones de administración), haga clic en Next (Siguiente).
18 En la ventana Recovery Configuration (Configuración de la recuperación), haga clic en Browse (Examinar), seleccione el grupo flashback que ha creado en el paso 15 (por ejemplo, flashbackDG) y haga clic en Next (Siguiente). 19 En la ventana Database Content (Contenido de la base de datos), haga clic en Next (Siguiente). 20 En la ventana Database Services (Servicios de la base de datos), haga clic en Next (Siguiente).
www.dell.com | support.dell.com 27 Escriba lo siguiente en un nodo: srvctl status database -d nombre_de_la_base_de_datos donde nombre de la base de datos es el nombre del identificador global que ha definido para la base de datos en el DBCA. Si se están ejecutando las instancias de la base de datos, aparece una confirmación en pantalla.
Configuración de Cluster Ready Services En ocasiones, al configurar Cluster Ready Services (CRS) en Oracle 10g para EM64T en Red Hat Enterprise Linux (versión 3), el comando CRS_STAT se bloquea y no devuelve el estado del daemon CRS. Oracle ha identificado este problema como el error de Oracle 4039296.
www.dell.com | support.dell.com 11 Inicie la sesión como usuario oracle y escriba lo siguiente: export OPATCH_PLATFORM_ID=226 cd 4039296 ../OPatch/opatch apply Cuando haya terminado, aparecerá el mensaje siguiente: Patch succeeded (Parche instalado correctamente) Definición de la contraseña de usuario oracle Dell recomienda establecer una contraseña para el usuario oracle a fin de proteger el sistema. Complete los pasos siguientes para crear la contraseña oracle: 1 Inicie la sesión como root.
Configuración del almacenamiento de base de datos Configuración del almacenamiento de base de datos mediante el sistema de archivos ex3 Si dispone de almacenamiento adicional, realice los siguientes pasos: 1 Inicie la sesión como root. 2 Escriba cd /opt/oracle 3 Escriba mkdir oradata recovery 4 Mediante fdisk, cree una partición en la que se almacenarán los archivos de la base de datos (por ejemplo, sdb1 si el dispositivo de almacenamiento es sdb).
www.dell.com | support.dell.com Configuración del almacenamiento de base de datos mediante Oracle ASM Para configurar el sistema de almacenamiento mediante ASM, realice los siguientes pasos: En el ejemplo siguiente, se presupone que se dispone de dos dispositivos de almacenamiento (sdb y sdc) para crear un grupo de discos para los archivos de base de datos y otro para la recuperación flashback y los archivos de registro respectivamente. 1 Inicie la sesión como root.
9 En la ventana Select a Product to Install (Seleccionar el producto que va a instalarse), haga clic en Oracle Database 10g 10.1.0.3.0 y, a continuación, en Next (Siguiente). 10 En la ventana Select Installation Type (Seleccionar tipo de instalación), haga clic en Enterprise Edition y, a continuación, en Next (Siguiente).
www.dell.com | support.dell.com 5 En la ventana Database Templates (Plantillas de base de datos), haga clic en Custom Database (Base de datos personalizada) y, a continuación, en Next (Siguiente). 6 En la ventana Database Identification (Identificación de la base de datos), escriba el nombre de la base de datos que está creando en los campos Global Database Name (Nombre de la base de datos global) y SID Prefix (Prefijo SID), y haga clic en Next (Siguiente).
19 Para verificar que la base de datos esté operativa, realice los pasos siguientes: a Escriba sqlplus "/ as sysdba" para ver el indicador SQL>. b Escriba la consulta siguiente en el indicador SQL>: SELECT * FROM v$instance; c Si la base de datos no está en ejecución y recibe un mensaje de error, escriba startup en el indicador SQL> para iniciar la instancia de la base de datos en el nodo.
www.dell.com | support.dell.com Introduzca un nombre para el grupo de discos que debe crearse, como por ejemplo databaseDG, seleccione External Redundancy (Redundancia externa) y los discos que desea incluir en el grupo de discos (por ejemplo, /dev/raw/ASM1). Aparece una ventana indicando que la creación del grupo de discos está en curso. 13 En Available Disk Groups (Grupos de discos disponibles), haga clic en Create New (Crear Nuevo).
24 Una vez finalizada la creación de la base de datos, escriba los siguientes comandos para añadir la entrada de la variable de entorno ORACLE_SID al perfil de usuario oracle: echo "export ORACLE_SID=oradb" >> /home/oracle/.bash_profile source /home/oracle/.bash_profile En este ejemplo se presupone que oradb es el nombre global de la base de datos que ha definido en DBCA.
www.dell.com | support.dell.com Configuración del almacenamiento compartido en el nodo nuevo Para ampliar una base de datos RAC existente para los nodos nuevos, configure el almacenamiento de los nodos nuevos de forma que el almacenamiento sea el mismo que en los nodos existentes. En esta sección se indican los procedimientos apropiados para ASM u OCFS.
Configuración del almacenamiento compartido mediante OCFS Si utiliza Oracle Cluster File System (OCFS) para CRS, quórum o archivos de base de datos, asegúrese de que los nuevos nodos puedan acceder a los sistemas de archivos de clúster de la misma forma que los nodos existentes.
www.dell.com | support.dell.com 4 En la ventana Specify Cluster Nodes for Node Addition (Especificar nodos de clúster para adición de nodos), escriba los nombres de nodo público y privado del nuevo nodo y haga clic en Next (Siguiente). Si se consigue pasar todas las comprobaciones de verificación de redes y almacenamiento, se mostrará la ventana Node Addition Summary (Resumen de adición de nodo). 5 Haga clic en Next (Siguiente).
7 En la ventana End of Cluster Node Addition (Fin de la adición de nodos de clúster), haga clic en Exit (Salir). 8 Desde el directorio /opt/oracle/product/10.1.0/db_1/oui/bin en uno de los nodos existentes, escriba, por ejemplo, la siguiente línea: vipca -nodelist node1-pub,node2-pub,node3-pub En este ejemplo, se añade node3 a un clúster de dos nodos existente. Se inicia VIPCA (Virtual Internet Protocol Configuration Assistant). a En la primera ventana de VIPCA, haga clic en Next (Siguiente).
www.dell.com | support.dell.com 7 Introduzca el nombre de usuario sys y la contraseña y, a continuación, haga clic en Next (Siguiente). Aparece la ventana List of cluster database instances (Lista de instancias de base de datos del clúster), en la que se muestran las instancias asociadas a la base de datos RAC que ha seleccionado, así como el estado de cada instancia. 8 Haga clic en Next (Siguiente).
7 Introduzca el nombre de usuario sys y la contraseña y, a continuación, haga clic en Next (Siguiente). Aparece la ventana List of cluster database instances (Lista de instancias de base de datos del clúster), en la que se muestran las instancias asociadas a la base de datos RAC que ha seleccionado, así como el estado de cada instancia. 8 Seleccione la instancia que desee borrar y haga clic en Finish (Finalizar). Esta instancia no puede ser la instancia local desde la que está ejecutando DBCA.
www.dell.com | support.dell.com Eliminación del nodo del nivel del software de clúster 1 En el nodo que esté eliminando, como usuario root, desactive CRS escribiendo el comando siguiente: /opt/oracle/product/10.1.0/crs_1/install/rootdelete.sh remote nosharedvar 2 En uno de los nodos restantes, como usuario root, escriba el comando siguiente: /opt/oracle/product/10.1.0/crs_1/install/rootdeletenode.
7 Cuando se le solicite otro número de partición, escriba 3. 8 Cuando se le solicite un comando, escriba d. 9 Cuando se le solicite un número de partición, escriba 4. 10 Cuando se le solicite un comando, escriba de nuevo d. 11 Cuando se le solicite un número de partición, escriba 3. 12 Cuando se le solicite un comando, escriba p para obtener la lista de las particiones. Sólo existe la partición /dev/sda2; está precedida de un asterisco. 13 Cuando se le solicite un comando de nuevo, escriba w.
www.dell.com | support.dell.com Tabla 1-6. Versiones de software admitidas (continuación) Componente de software Versiones admitidas Controlador 2342 HBA Qlogic 7.04.00 Controlador 2360 HBA Qlogic 7.04.00 Controlador PERC 4/DC, PERC 4/Di, 2.10.8.2-RH1 PERC 4e/Di, PERC 4e/Si o PERC 4e/DC (megaraid2) Controladores NIC Intel PRO/100 S (e100) 5.3.19-K2-NAPI Controladores de NIC Intel PRO/1000 XT/MT/MT DP (e1000) 5.3.19-K2-NAPI Broadcom NetXtreme BCM5704 (tg3) 3.
9 Lea y acepte el contrato de licencia de software para continuar. El programa de instalación proporciona una opción de instalación rápida (Express Setup) y otra de instalación personalizada (Custom Setup). La opción Express Setup (Instalación rápida) es la recomendada, e instala automáticamente todos los componentes de software necesarios para administrar el sistema. La opción Custom Setup (Instalación personalizada) permite seleccionar los componentes de software que desee instalar.
www.dell.com | support.dell.com Determinación de la interfaz de red privada Para determinar el nombre de dispositivo de interfaz que se ha asignado a cada interfaz de red, realice los pasos siguientes: 1 Determine los tipos de NIC que existen en el sistema. Consulte la tabla 1-7 para identificar las NIC integradas que están presentes en el sistema. Para NIC adicionales, puede tener tarjetas de las series Intel PRO/100 o PRO/1000 o tarjetas Broadcom NetXtreme Gigabit.
Solución de problemas En la tabla 1-8 se indican las acciones recomendadas para los problemas que pueden surgir al implantar y utilizar el software Red Hat Enterprise Linux y Oracle. Tabla 1-8. Solución de problemas Categoría Problema/síntoma Causa Rendimiento y estabilidad Red Hat Enterprise El área global del sistema Linux tiene un bajo (SGA) de Oracle sobrepasa rendimiento e el tamaño recomendado. inestabilidad. Uso excesivo de espacio de intercambio.
www.dell.com | support.dell.com Tabla 1-8. Solución de problemas (continuación) Categoría Problema/síntoma Causa Acción correctiva recomendada Rendimiento y estabilidad Se muestra una advertencia de tipo de interfaz desconocida en el archivo de alertas de Oracle. La interfaz pública está configurada para las comunicaciones de clúster (interfaz privada). Fuerce las comunicaciones del clúster a la interfaz privada realizando los pasos siguientes en un nodo: 1 Inicie la sesión como oracle.
Tabla 1-8. Solución de problemas (continuación) Categoría Problema/síntoma Causa OCFS El sistema se bloquea o muestra un mensaje de error de kernel panic. De forma predeterminada, el sistema Red Hat Linux tiene una rutina de trabajos cron diaria configurada para ejecutar diariamente updatedb en determinados sistemas de archivos en /etc/cron.daily y /etc/updatedb.conf. OCFS no admite el comando updatedb en sus sistemas de archivos. Acción correctiva recomendada 1 Edite el archivo /etc/cron.
www.dell.com | support.dell.com Tabla 1-8. Solución de problemas (continuación) 350 Categoría Problema/síntoma Causa Acción correctiva recomendada NETCA NETCA falla, lo cual produce errores de creación de base de datos. La red pública, el nombre de host o la dirección IP virtual no aparecen en el archivo /etc/hosts.equiv. Antes de iniciar netca, asegúrese de que se ha asignado un nombre de host y de que las direcciones IP pública y virtual aparecen en el archivo /etc/hosts.equiv.
Tabla 1-8. Solución de problemas (continuación) Categoría Problema/síntoma Causa CRS Cuando ejecuta No se puede tener acceso al Corrija el problema de E/S e intente root.sh, no se puede archivo OCR ni al disco de volver a iniciar el servicio mediante el iniciar CRS. votación. reinicio del nodo o la ejecución de root.sh en /opt/oracle/product/10.1.0/crs_1/. CRS Cuando ejecuta root.sh tras efectuar la reinstalación, no se puede iniciar CRS.
www.dell.com | support.dell.com Tabla 1-8. Solución de problemas (continuación) Categoría Problema/síntoma CRS Cuando ejecuta Se han realizado otros root.sh, no se puede pasos para solucionar los iniciar CRS. problemas relacionados con el CRS, pero el problema persiste. 1 Active la depuración de errores El nodo se reinicia constantemente. El nodo no tiene acceso al disco de quórum en el almacenamiento compartido. 1 Inicie Linux en modo de un solo Falta la variable de entorno LD_ASSUME_KERNEL.
Tabla 1-8. Solución de problemas (continuación) Categoría Problema/síntoma Causa Acción correctiva recomendada DBCA No se obtiene ninguna respuesta al hacer clic en OK (Aceptar) en la ventana DBCA Summary (Resumen de DBCA). Problema de sincronización Vuelva a hacer clic. Si sigue sin haber de Java Runtime respuesta, reinicie DBCA. Environment. DBCA Al crear la base de datos semilla con volúmenes DBCA en OCFS, obtiene el error ORA-60, ORA-06512 o ORA-34740. Problema intermitente conocido.
www.dell.com | support.dell.com Tabla 1-8. Solución de problemas (continuación) 354 Categoría Problema/síntoma Causa Acción correctiva recomendada Configuración de OCFS de 8 nodos con DBCA Recibe el mensaje de error ORA04031 unable to allocate 4180 bytes of shared memory. La asignación de memoria predeterminada para un clúster de 8 nodos es demasiado pequeña.
Obtención de ayuda Asistencia de Dell Para obtener información detallada sobre el uso del sistema, consulte la documentación que se incluye con los componentes del sistema. Para obtener documentos técnicos, configuraciones admitidas e información general de Dell, visite la página Web de Dell y Oracle (dell.com/oracle).
Guía de implantación www.dell.com | support.dell.
Índice A añadir y eliminar nodos, 335 ASM configuración del almacenamiento de base de datos, 330 B base de datos Oracle 10g configuración de un solo nodo, 328 instalar, 319 instalar (un solo nodo), 330 base de datos semilla crear, 322, 331 verificar, 326, 333 bonding, 310 C clúster ejemplo de conexiones de hardware Fibre Channel, 307 configuración de ASM, 317 configuración de CRS, 314 configuración de OCFS, 315 configuración del clúster Fibre Channel, 306 configuración del proceso de escucha, 321, 331 co
Índice D determinar interfaz de red privada, 346 dispositivos de almacenamiento admitidos, 343 documentación, 303 instalar base de datos Oracle 10g, 319 base de datos Oracle 10g (un solo nodo), 330 CD de implantación de Dell, 304 CRS, 318 Oracle RAC 10g, 317 Red Hat Enterprise Linux, 303-304 E ejemplos conexiones de hardware para clúster Fibre Channel, 307 eliminar un nodo, 340 H hardware interconexiones Fibre Channel, 307 requisitos mínimos para clústeres Fibre Channel, 302 requisitos mínimos para