Dell™ PowerEdge™ Systems Oracle Database 10g Release 2 Enterprise Edition Real Application Cluster for Microsoft® Windows ServerTM 2003 SP1 Enterprise x64 Edition Deployment Guide Version 1.0 w w w. d e l l . c o m | s u p p o r t . d e l l .
Notes and Notices NOTE: A NOTE indicates important information that helps you make better use of your computer. NOTICE: A NOTICE indicates either potential damage to hardware or loss of data and tells you how to avoid the problem. ____________________ Information in this document is subject to change without notice. © 2006 Dell Inc. All rights reserved. Reproduction in any manner whatsoever without the written permission of Dell Inc. is strictly forbidden.
Contents Software and Hardware Requirements License Agreements . . Important Documentation . . . . . . . . . . . . . . . . . . . 6 . . . . . . . . . . . . . . . . . . . . . . . 7 7 . . . . . . . . . . . . . . . . . . . . . . . Installing and Configuring the Operating System . . . . . . . . . . . . . . Installing the Operating System Using the Deployment CDs Verifying Cluster Hardware and Software Configurations 7 . . . . . . . . . . 9 . . . . 9 11 . . . . . . . .
Additional Information . . . . . . . . . . . . . . . . . . . . . . . . . . . Troubleshooting 33 . . . . . . . . . . . . . . . . . . . . . . . . . . . . . . 34 . . . . . . . . . . . . 34 34 37 . . . . . . . . . . . . . . . . . . . . . . . . . . . . . . . 42 Working Around Clusterware Installation Failure Uninstalling Oracle Clusterware . . . . . . . . Additional Troubleshooting Issues . . . . . . . Getting Help . Dell Support . Oracle Support 4 Contents . . . . . . . . . . . . . . . . . . . . .
This document provides information for installing, configuring, reinstalling, and using your Oracle Database 10g R2 software following Dell’s Supported Configurations for Oracle. Use this document in conjunction with the Dell Deployment CD to install your software. If you install your operating system using only the operating system CDs, the steps in this document may not be applicable.
Software and Hardware Requirements Table 1-1 lists basic software requirements for Dell’s Supported Configurations for Oracle. Table 1-2 lists the hardware requirements. For detailed information on the minimum software versions for drivers and applications, see "Supported Software Versions". Table 1-1. Software Requirements Software Component ® Configuration ™ Microsoft Windows Server 2003 Enterprise x64 Edition with Service Pack 1 (SP1) Oracle10g R2 Version 10.2.0.
License Agreements NOTE: If you do not have an Oracle software license, contact your Dell sales representative. Important Documentation For more information on specific hardware components, see the documentation included with your system. Installing and Configuring the Operating System NOTICE: To ensure that the operating system is installed correctly, disconnect all external storage from the system before you install the operating system.
6 At the command prompt, type 6 to select Windows 2003 Server EE/SE SP1 for Oracle Database (x64) and press . 7 When prompted, remove the Deployment CD1 from the CD drive and insert the Deployment CD2 into the CD drive. 8 When prompted, insert the Microsoft Windows Server 2003 Enterprise x64 Edition SP1 CD into the CD drive. The Windows media is copied to the Deployment partition, the system is rebooted, and the installation continues.
Verifying Cluster Hardware and Software Configurations Before you begin cluster setup, ensure that the hardware installation, public and private interfaces, and node software are configured correctly. The following sections provide information about Fibre Channel cluster setup. Setting Up Your Fibre Channel Cluster Your Dell Professional Services representative completed the setup of your Fibre Channel cluster.
Table 1-4.
• • Each node must have the following software installed: – Windows Server 2003, Enterprise x64 Edition with SP1 (see Table 1-1) – HBA driver The Fibre Channel storage must be configured with the following: – A minimum of three LUNs created and assigned to the cluster – A minimum LUN size of 40 GB (for one LUN) and 1 GB (for two LUNs) Cabling Your Storage System for a SAN-Attached Configuration Use the following procedure to configure your Oracle Cluster storage system in a four port SAN-attached
Depending on the number of NIC ports available, configure the public and private interfaces as shown in Table 1-5. Table 1-5. NIC Port Assignments NIC Port Three Ports Available Four Ports Available 1 Public IP and virtual IP Public IP 2 Private IP (NIC team) Private IP (NIC team) 3 Private IP (NIC team) Private IP (NIC team) 4 NA Virtual IP Configuring and Teaming the Private Network Before you deploy the cluster, assign a private IP address and host name to each cluster node.
e In the Team Configuration box, ensure that you selected the correct network adapters and click Finish. f In the Message window, click OK. g In the File menu, select Exit. h Click Yes to save your settings. 4 On node 1, if you have Broadcom NICs, configure the NIC teaming by doing the following: a On the Windows desktop, click Start and select: Program→ Broadcom→ Broadcom Advanced Control Suite 2 The Broadcom Advanced Control Suite 2 window appears. b Click Tools and select Create a Team.
e Rename the Private NIC team to Private and press . f Repeat step a through step e on the remaining nodes. 2 Configure the IP addresses. NOTE: You must set a default gateway for your Public Interface, otherwise the Clusterware installation may fail. a On node 1, navigate to Start→ Settings→ Control Panel→ Network Connections→ Public→ Properties. b Double-click Internet Protocol (TCP/IP).
4 On both nodes, add the public, private, and virtual IP addresses and host name to the %SystemRoot%\system32\drivers\etc\hosts file. For example, the following entries use the adapter IP and host name as shown in Table 1-6: 172.16.170.1 rac1 172.16.170.2 rac2 10.10.10.1 rac1-priv 10.10.10.2 rac2-priv 172.16.170.201 rac1-vip 172.16.170.
5 Expand Storage and click Disk Management. If the Welcome to the Initialize and Convert Disk Wizard appears, perform steps a-d. Otherwise, go to step 6. a In the Welcome to the Initialize and Convert Disk Wizard window, click Next. b In the Select Disks to Initialize window, in the Disks window, select the disks that are associated with your storage LUNs and click Next. c In the Select Disks to Convert window, deselect the disk(s) that you selected in step b and click Next.
9 Close the PowerPathAdmin console. A message windows appears, prompting you to save the console settings. 10 Click No. 11 On the Windows desktop, right-click My Computer and select Manage. 12 Expand Storage and click Disk Management. One disk appears for each LUN assigned in the storage. 13 Ensure that each LUN is configured as a Basic disk. 14 Repeat step 1 through step 13 on the remaining nodes.
10 Create logical drives for the OCR disk. a On the disk partition area, right-click on the free space and select New Logical Drive. The Welcome to the New Partition Wizard appears. b Click Next. c In the Select Partition Type window, select Logical drive and click Next. d In the Specify Partition Size window, in the Partition size in MB field, type 100 and click Next. e In the Assign Drive Letter or Path window, select Do not assign a drive letter or drive path and click Next.
e In the Specify Partition Size window in the Partition size in MB field, type 10000 and click Next. f In the Assign Drive Letter or Path window, select Do not assign a drive letter or drive path and click Next. g In the Format Partition window, select Do not format this partition and click Next. h Click Finish. 2 On node 1, create one logical drive for the Recovery disk. a Locate the disk that is assigned for the Oracle Recovery.
Preparing the Database Disk and Recovery Disk for Database Storage with ASM This section provides information for creating logical drives that will be used to create Automatic Storage Management (ASM) disk storage. ASM disk storage consists of one or more disk groups that can span multiple disks.
Enabling the automount Option for the Shared Disks 1 On node 1, click Start and select Run. 2 In the Run field, type cmd and click OK. 3 At the command prompt, type diskpart and press . 4 At the DISKPART command prompt, type the following and press : automount enable The following message appears: Automatic mounting of new volumes enabled. 5 At the DISKPART command prompt, type exit and press . 6 Close the command prompt. 7 Repeat step 1 through step 6 on each of the remaining nodes.
4 In the Specify Home Details window, accept the default settings and click Next. NOTE: Record the OraCR10g_home (CRS Home) path because you will need this information later. 5 In the Product Specification Prerequisite Checks window, make sure all the checks are completed successfully and then click next. 6 In the Specify Cluster Configuration window, enter the following: • An alternate cluster name (if desired) • The public and private network host names for both cluster nodes.
e Use the pull-down menu of the Assign Drive Letter option to assign a drive letter to the partition. f Click OK. 13 In the Cluster Configuration Storage window, perform the following steps for recovery: a Locate the 20GB partition created in step 2 of the procedure "Preparing the Database Disk and Recovery Disk for Database Storage with OCFS." Select the partition and click Edit. b In the Specify Disk Configuration window select Format partition with CFS.
4 At the command prompt, type the following and press : crsctl set css misscount 120 5 Restart node 1 and login as administrator. 6 Start all other nodes. Installing Oracle Database 10g R2 with Real Application Clusters 10.1.0.2 1 On node 1, insert the "Oracle Database 10g Release 2 for Microsoft Windows" CD into the CD drive. The Oracle Database 10g - Autorun window displays. If the Oracle Database 10g - Autorun window does not appear: a Click Start and select Run.
11 In the End of Installation window, perform the procedure as listed in the window. NOTE: You must perform the procedures as listed in the window before proceeding to the next step. 12 After completing the required procedures in as listed in the End of Installation window, click Exit. 13 In the Exit Window, click Yes. Configuring the Listener This section describes the steps to configure the listener, which is required for a remote client connection to a database.
Creating the Seed Database This section contains procedures for creating the seed database using OCFS and verifying the seed database. Perform the following steps to create the seed database using Oracle Cluster File System (CFS): 1 On node 1, click Start and select Run. 2 In the Run field, type dbca and click OK. The Database Configuration Assistant starts. 3 In the Welcome window, select Oracle Real Application Clusters database and click Next.
16 In the Database Content window, accept the default values and click Next. 17 In the Database Services window, click Next. 18 In the Initialization Parameters window, click Next. 19 In the Database Storage window, click Next. 20 In the Creation Options window, accept the default values, and click Finish. 21 In the Summary window, click OK. The Database Configuration Assistant window appears, and the Oracle software creates the database. NOTE: This procedure may take several minutes to complete.
3 In the Welcome screen, click Next. 4 In the Specify Home Details window, accept the default settings and click Next. NOTE: Record the OraCR10g_home (CRS Home) path because you will need this information later. 5 In the Product-Specific Prerequisite Checks window, click Next. 6 In the Specify Cluster Configuration window, enter an alternate cluster name (if desired): a Verify the Public, Private, and Virtual Host names for the primary node.
14 In the Summary window, click Install to start the installation procedure. NOTE: If failures are seen during Configuration Assistant execution, see the Troubleshooting section of this document in the section titled "Working Around Clusterware Installation Failure". The Install window appears, displaying an installation progression bar. Next, the Configuration Assistant window appears and the Oracle Universal Installer (OUI) runs a series of configuration tools.
4 In the Select Installation Type window, click Standard Edition and click Next. 5 In the Specify Home Details window under Destination, verify the following: • In the Name field, the Oracle database home name is OraDb10g_home1. • In the Path field, the complete Oracle home path is %SystemDrive%\oracle\product\10.2.0\db_1 NOTE: Record the path because you will need this information later.
2 On node 1, click Start and select Run. 3 In the Run field, type the following and click OK: dbca The Database Configuration Assistant starts. 4 In the Welcome window, select Oracle Real Application Clusters database and click Next. 5 In the Operations window, click Create a Database and click Next. 6 In the Node Selection window, click Select All and click Next. 7 In the Database Templates window, click Custom Database and click Next.
f In the Generate stamps with this prefix field, keep the default settings and click Next. g In the Stamp disks window, click Next. h Click Finish to save your settings. i Select the check boxes next to the available disks and click OK. 16 In the ASM Disk Groups window, click Create New. 17 In the Create Disk Group window, enter the information for the recovery files. a In the Disk Group Name field, enter a name for the new disk group. For example, FLASH. b In the Redundancy box, select External.
26 In the Summary window, click OK. The Database Configuration Assistant window appears, and the Oracle software creates the database. NOTE: This procedure may take several minutes to complete. When completed, the Database Configuration Assistant window provides database configuration information. 27 Record the information in the Database Configuration Assistant window for future database administration. 28 Click Exit. The Start Cluster Database window appears and the cluster database starts.
Troubleshooting Working Around Clusterware Installation Failure Oracle Clusterware Configuration Assistant Fails In the Configuration Assistants window, if the installation fails using the Oracle Clusterware Configuration Assistant, then perform the following: 1 Open the file: %ORA_CLUSTERWARE_HOME%\cfgtoollogs\configToolFailedCommands where %ORA_CLUSTERWARE_HOME% is the CRS home directory that you created in "Installing Oracle Clusterware Version 10.2.0.1.".
Running OUI 1 On node 1, open an Explorer window and navigate to the following directory: %SystemDrive%\oracle\product\10.2.0\crs\oui\bin 2 Double-click setup.exe to launch the Oracle Universal Installer (OUI). 3 In the Welcome window, click Deinstall Products. 4 In the Inventory window, select OraCr10g_home and then click Remove. 5 In the Confirmation window, click Yes. If an error message appears, click Cancel. 6 In the Welcome window, click Cancel. 7 When prompted, click Cancel, and then click Yes.
Cleaning the Storage Devices 1 Clean the partitions that will be configured for the OCR registry (ocrcfg) and the voting disks. a Click Start and select Run. b In the Run field, type cmd and click OK. c At the command prompt, type the following and press : %SystemDRive%\oracle\product\10.2.0\crs\bin\ExportSYMLink The Oracle Symbolic Link Exporter (ExportSYMLink) imports the symbolic links to the SYMMAP.TBL file to your current directory.
6 Delete the symlinks for the OCR (OCRCFG) and Voting disks (VOTEDSK). a Select ocrcfg and votesdk. b Click Options and select Commit. If successful, the ocrcfg and votedsk entries disappear. c Click Options and select Exit to close the Oracle Object Manager. 7 Launch the Computer Management Console. a On the Windows desktop, click Start and select Run. b In the Run field, type the following and press : compmgmt.msc The Computer Management Console appears.
Table 1-8. Troubleshooting Category Problem / Symptom Cause Recommended Corrective Action NIC Teaming Broadcom NIC teaming fails The following steps may result in a NIC teaming failure: 1 One of the Broadcom NICs that was used in the NIC teaming fails or is disabled. Due to the availability of the second NIC, the private network is still active on this node through the second NIC. 2 When the first NIC is still down or disabled, the second NIC in the teaming also fails or is disabled.
Table 1-8. Category Troubleshooting (continued) Problem / Symptom Cause Recommended Corrective Action Oracle The cluster node The cluster node cannot Perform the following steps: Clusterwa restarts with a communicate with the storage disks. 1 Restart the cluster node. re blue screen. 2 During POST, press . 3 In the Windows Advanced Options Menu screen, select Safe Mode. 4 Select the appropriate operating system. 5 Logon to the system. 6 In the Desktop screen, click OK.
Table 1-8. Troubleshooting (continued) Category Problem / Symptom Cause System blue screen The cluster nodes The cluster nodes cannot access generate a blue the voting disk. screen. Recommended Corrective Action 1 Ensure that the HBA connection mode firmware settings are configured properly for your storage configuration. If your cluster nodes and storage system are configured in a direct-attached configuration, configure the Connection mode as: 0 - loop only.
Table 1-8. Troubleshooting (continued) Category Problem / Symptom Cause Recommended Corrective Action Storage Disks appear as unreachable. On the Windows desktop, when you right-click My Computer, select Computer Management, and then click Disk Management, the disks appear unreachable. Ensure that the storage LUNs are assigned to both cluster nodes. Causes: • The LUNs are not assigned to the cluster nodes. • Improper cabling. • The HBA drivers are not installed on the cluster node(s).
Getting Help Dell Support For detailed information on the use of your system, see the documentation that came with your system components. For white papers, Dell Supported Configurations, and general information, visit dell.com/10g. For Dell technical support for your hardware and operating system software and to download the latest updates for your system, visit the Dell Support website at support.dell.com. Information about contacting Dell is provided in your system Installation and Troubleshooting Guide.
Index A E L additional information, 33 examples Fibre Channel cluster hardware connections, 9 license agreements, 7 B bonding, 12 O F Fibre Channel cluster setup, 9 C cluster Fibre Channel hardware connections, example, 9 cluster setup Fibre Channel, 9 configuring Oracle 10g, 9 verifying hardware and software configurations, 9 configuring the private and public networks, 11 configuring the private network, 12 G getting help, 42 P private network configuring, 11-12 H hardware Fibre Channel cluster
Index T troubleshooting, 34 V verifying hardware configuration, 9 software configuration, 9 44 Index
Dell PowerEdge 系统 Oracle Database 10g R2 企业版 Real Application Cluster (适用于 Microsoft® Windows ServerTM 2003 SP1 企业版(64 位版本)) 部署指南 1.0 版 w w w. d e l l . c o m | s u p p o r t . d e l l .
注和注意 注:注表示可以帮助您更好地使用计算机的重要信息。 注意:注意表示可能会损坏硬件或导致数据丢失,并告诉您如何避免此类问题。 ____________________ 本说明文件中的信息如有更改,恕不另行通知。 © 2006 Dell Inc. 版权所有,翻印必究。 未经 Dell Inc. 书面许可,严禁以任何形式进行复制。 本文中使用的商标:Dell、DELL 徽标和 PowerEdge 是 Dell Inc. 的商标; Intel 和 Xeon 是 Intel Corporation 的注册商标; EMC、Navisphere 和 PowerPath 是 EMC Corporation 的注册商标; Microsoft 和 Windows 是 Microsoft Corporation 的注册商标, Windows Server 是 Microsoft Corporation 的商标。 本文件中述及的其它商标和产品名称是指拥有相应商标和名称的公司或其制造的产品。Dell Inc.
目录 软件和硬件要求 . . . . . . . . . . . . . . . . . . . . . . . . . . . . . 许可协议 . . . 重要说明文件 . . . . . . . . . . . . . . . . . . . . . . . . . . . . . . . . . . . . . . . . . . . . . . . . . . . . . . . . 安装和配置操作系统 . . . . . . . . . . . . . . . . . . . . . . . . . . . 使用 Deployment CD 安装操作系统 . 验证群集硬件与软件配置 50 51 51 51 . . . . . . . . . . . . . . . . . 51 . . . . . . . . . . . . . . . . . . . . . . . . 53 设置光纤信道群集 . . . . . . . . . . . 适用于 SAN 连接配置的存储系统布线 . 为 Oracle RAC 10g R2 配置网络和存储 . . . . . . . . .
附加信息 . . . . . . . . . . . . . . . . . . . . . . . . . . . . . . . . . 支持的软件版本 故障排除 . . . . . . . . . . . . . . . . . . . . . . . . . . . 78 . . . . . . . . . . . . . . . . . . . . . . . . . . . . . . . . . 79 解决群集件安装故障 卸载 Oracle 群集件 . . 其它故障排除问题 . . 获得帮助 . . . . . . . . . . . . . . . . . . . . . . . . . . . . . . . . . . . . . . . . . . . . . . . . 79 80 83 . . . . . . . . . . . . . . . . . . . . . . . . . . . . . . . . . 87 Dell 支持 . . Oracle 支持 . . . . . . . . . . . . . . . . . . . . . . . .
本说明文件提供按照 Dell 支持的 Oracle 配置来安装、配置、重新安装以及使用 Oracle Database 10g R2 软件的相关信息。 请将本说明文件与 Dell Deployment CD 配合使用来安装软件。如果您仅使用操作系统 CD 来安装操作 系统,则本说明文件中的步骤可能不适用。 包括以下内容: • 软件和硬件要求 • 安装和配置 Microsoft® Windows Server™ 2003 企业版(64 位版本,含 Service Pack 1,SP1) • 验证群集硬件与软件配置 • 为 Oracle Database Real Application Clusters (RAC) 10g R2 配置网络和存储 • 安装 Oracle Database RAC 10g R2 和软件更新 • 附加信息 • 故障排除 • 获得帮助 有关 Dell 支持的 Oracle 配置的详情,请访问 Dell 和 Oracle 网站 dell.
软件和硬件要求 表 1-1 列出了 Dell 支持的 Oracle 配置的基本软件要求。表 1-2 列出了硬件要求。 有关驱动程序和应用程序最低软件版本的详情,请参阅“支持的软件版本”。 表 1-1. 软件要求 软件组件 配置 Microsoft® Windows Server™ 2003 企业版 (64 位版本,含 Service Pack 1, SP1) Oracle10g R2 10.2.0.1 版 企业版,包括用于群集的 RAC 选件 EMC® PowerPath® (仅限光纤信道群集) 4.5 版 注:视用户数量、使用的应用程序、批处理进程以及其它因素而定,您可能需要一个超出最低硬件要求 的系统才能获得您所需的性能。 注:所有群集节点的硬件配置必须相同。 表 1-2.
许可协议 注:如果您没有 Oracle 软件许可,请与 Dell 销售代表联系。 重要说明文件 有关特定硬件组件的详情,请参阅随系统附带的说明文件。 安装和配置操作系统 注意:为确保正确地安装操作系统,在安装操作系统之前,应断开系统与所有外部存储设备的连接。 本节介绍有关安装和配置 Windows Server 2003 企业版(64 位版本,含 SP1)操作系统以实现 Oracle 部署的信息。 安装过程视随系统购买的安装 CD 不同而有所差异。有关适用于您的配置的安装过程,请参阅表 1-3。 表 1-3. 确定安装过程 所购 CD 安装过程 Windows Server 2003 企业版 (64 位版本,含 SP1) 请参阅 “使用 Deployment CD 安装操作系统”。 Dell Deployment CD 有关下载 Deployment CD 映像的信息,请参阅说明文 件 “为 Oracle Database 10g R2 - Microsoft Windows EE RAC 1.
8 出现提示时,将 Microsoft Windows Server 2003 Enterprise x64 Edition SP1 CD 插入 CD 驱动器。 Windows 介质将复制到部署分区,系统将重新引导,然后继续安装。 9 在 Personalize Your Software(自定义软件)窗口的 Name(名称)和 Organization(组织) 字段中,输入相应的信息,然后单击 Next(下一步)。 10 出现提示时,输入 Windows Server 2003 企业版(64 位版本,含 SP1)的产品密钥,然后单击 Next (下一步)。 11 在 Computer Name(计算机名称)和 Administrator password(管理员密码)字段中,输入相应的 信息,然后单击 Next(下一步)。 注:要正确配置网络,计算机名称和公共主机名必须完全相同。 12 按照窗口中的说明完成安装。 注:完成此过程可能需要几分钟。 完成安装过程后,屏幕将显示 Welcome to Windows(欢迎使用 Windows)窗口。 13 将所有外部存储设备重新连接至系统。
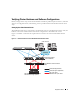
验证群集硬件与软件配置 在开始群集设置之前,请确保硬件安装、公共接口和专用接口及节点软件的配置正确无误。以下各节 提供了有关光纤信道群集设置的信息。 设置光纤信道群集 Dell 专业服务代表已为您完成了光纤信道群集的设置。请按照本节中的说明检查硬件连接、硬件及软件 配置。 图 1-1 和表 1-4 说明了 SAN 连接的光纤信道群集所需的群集连接。 图 1-1.
表 1-4.
适用于 SAN 连接配置的存储系统布线 请使用以下过程,在具有四个端口的 SAN 连接配置中配置 Oracle 群集存储系统。 1 从 SP-A 端口 0 至光纤信道交换机 0 连接一条光缆。 2 从 SP-A 端口 1 至光纤信道交换机 1 连接一条光缆。 3 从 SP-B 端口 0 至光纤信道交换机 1 连接一条光缆。 4 从 SP-B 端口 1 至光纤信道交换机 0 连接一条光缆。 5 从节点 1 上的 HBA0 至光纤信道交换机 0 连接一条光缆。 6 从节点 1 上的 HBA1 至光纤信道交换机 1 连接一条光缆。 7 从每个附加节点的 HBA0 至光纤信道交换机 0 连接一条光缆。 8 从每个附加节点的 HBA1 至光纤信道交换机 1 连接一条光缆。 为 Oracle RAC 10g R2 配置网络和存储 本节介绍设置光纤信道群集的信息,其中包括以下过程: • 配置公共和专用网络 • 验证存储配置 • 为 Oracle 群集件和 Oracle 数据库配置共享存储 注:Oracle RAC 10g R2 是一项复杂的数据库配置,要求按顺序执行以下一系列过程。
配置专用网络并组队 在部署群集之前,为每个群集节点分配一个专用 IP 地址和主机名。这一过程确保了节点之间可以通过 专用接口相互通信。 表 1-6 提供了两个节点群集的网络配置的示例。 表 1-6. 网络配置示例 主机名 类型 IP 地址 注册位置 rac1 公共 172.16.170.1 %SystemRoot%\system32\drivers\etc\hosts rac2 公共 172.16.170.2 %SystemRoot%\system32\drivers\etc\hosts rac1-vip 虚拟 172.16.170.201 %SystemRoot%\system32\drivers\etc\hosts rac2-vip 虚拟 172.16.170.202 %SystemRoot%\system32\drivers\etc\hosts rac1-priv 专用 10.10.10.1 %SystemRoot%\system32\drivers\etc\hosts rac2-priv 专用 10.10.10.
4 在节点 1 上,如果您具有 Broadcom NIC,请按以下步骤配置 NIC 组队: a 在 Windows 桌面上,单击 Start(开始),然后选择: Program(程序)→ Broadcom→ Broadcom Advanced Control Suite 2 (Broadcom 高级控制套件 2) 屏幕将显示 Broadcom Advanced Control Suite 2(Broadcom 高级控制套件 2) 窗口。 5 b 单击 Tools(工具),然后选择 Create a Team(创建组队)。 c 屏幕将显示 New Team Configuration(新组队配置) 窗口。 d 在 Enter a name you will use to identify this team(输入用于标识该组队的名称) 字段中, 键入 Private(专用)。 e 在 Team Type(组队类型)字段中,选择 Smart Load Balance and Fail Over(智能负载均衡和 故障转移)。 f 单击 Next(下一步)。 g 在 New Team C
2 配置 IP 地址。 注:必须为公共接口设置默认网关,否则群集件安装可能会失败。 a 在节点 1 上,浏览至 Start(开始)→ Settings(设置)→ Control Pane(控制面板)l→ Network Connections(网络连接)→ Public(公共)→ Properties(属性)。 b 双击 Internet Protocol (TCP/IP)(Internet 协议 [TCP/IP])。 c 单击 Use the following IP address(使用以下 IP 地址),输入所需的 IP 地址和 DNS 服务器 IP 地址,然后单击 OK(确定)。 d 在 Public Properties(公共属性)窗口中,选择 Show icon in notification area when connected (连接时,在通知区域显示图标)。 执行了本节中的步骤后,将在系统图标盒中显示网络适配器状态。 3 e 单击 OK(确定)。 f 在 Properties(属性)窗口中,单击 Close(关闭)。 g 在专用 NIC 组队中,重复步骤 a
4 在两个节点上,将公共、专用及虚拟 IP 地址和主机名添加到 %SystemRoot%\system32\drivers\etc\hosts 文件中。 例如,以下各项使用表 1-6 中所示的适配器 IP 和主机名: 172.16.170.1 rac1 172.16.170.2 rac2 10.10.10.1 rac1-priv 10.10.10.2 rac2-priv 172.16.170.201 rac1-vip 172.16.170.
5 展开 Storage(存储),然后单击 Disk Management(磁盘管理)。 如果屏幕上显示 Welcome to the Initialize and Convert Disk Wizard(欢迎使用初始化和转换磁盘 向导),请执行步骤 a 至 d。否则,请转至步骤 6。 a 在 Welcome to the Initialize and Convert Disk Wizard(欢迎使用初始化和转换磁盘向导) 窗口中,单击 Next(下一步)。 b 在 Disks(磁盘)窗口的 Select Disks to Initialize(选择要初始化的磁盘)窗口中,选择与存 储 LUN 关联的磁盘,然后单击 Next(下一步)。 c 在 Select Disks to Convert(选择要转换的磁盘)窗口中,取消选择在步骤 b 中选择的磁盘, 然后单击 Next(下一步)。 注:该过程可确保将磁盘配置为 Basic(基本)磁盘。 d 单击 Finish(完成)。 6 在 Disk Management(磁盘管理)窗口中,确保显示四个磁盘。磁盘的大小应彼此相同, 分配给存储系统中各
9 关闭 PowerPathAdmin 控制台。 将会显示一个信息窗口,提示您保存控制台设置。 10 单击 No(否)。 11 在 Windows 桌面上,右键单击 My Computer(我的电脑),然后选择 Manage(管理)。 12 展开 Storage(存储),然后单击 Disk Management(磁盘管理)。 对于存储中分配的每个 LUN,都将显示一个磁盘。 13 确保每个 LUN 配置为 Basic(基本)磁盘。 14 在其它节点上,重复执行步骤 1 至步骤 13。 为 Oracle 群集件准备磁盘 本节介绍有关为以下磁盘创建逻辑驱动器的信息: • Oracle 群集件注册表 (OCR) 磁盘 — 包含群集配置信息 • 投票磁盘 — 当专用网络或连接的存储无法用于一个或多个节点时,投票磁盘提供群集节点间的 仲裁 • 数据和备份磁盘 — 为创建数据库(数据磁盘)及保存备份和日志信息(备份磁盘)提供存储区域。 在本文中所述的群集配置过程中,您将会在光纤信道存储设备上创建分区。在创建分区时,确保群集 节点可以检测到分配给所连接存储系统的 LUN 或逻辑磁盘。 要
10 为 OCR 磁盘创建逻辑驱动器。 a 在磁盘分区区域中,右键单击可用空间,然后选择 New Logical Drive(新建逻辑驱动器)。 屏幕将显示 Welcome to the New Partition Wizard(欢迎使用新建分区向导)。 11 b 单击 Next(下一步)。 c 在 Select Partition Type(选择分区类型)窗口中,选择 Logical drive(逻辑驱动器),然后单 击 Next(下一步)。 d 在 Specify Partition Size(指定分区大小)窗口的 Partition size in MB(以 MB 为单位的分区 大小)字段中,键入 100,然后单击 Next(下一步)。 e 在 Assign Drive Letter or Path(指派驱动器号或路径)窗口中,选择 Do not assign a drive letter or drive path(不指派驱动器号或驱动器路径),然后单击 Next(下一步)。 f 在 Format Partition(格式化分区)窗口中,选择 Do not format th
使用 OCFS 为数据库存储准备数据库磁盘和恢复磁盘 本节介绍如何创建逻辑驱动器,以便用来创建 Oracle 的群集文件系统 (OCFS) 存储磁盘。 注:如果您创建逻辑驱动器是为了创建自动存储管理 (ASM) 存储磁盘,则忽略以下步骤并参阅“使用 ASM 为数据库存储准备数据库磁盘和恢复磁盘。” 1 在节点 1 上,为数据库磁盘创建一个逻辑驱动器。 a 找到分配用于 Oracle 数据库的磁盘。 b 在磁盘分区区域中,右键单击可用空间,然后选择 New Logical Drive(新建逻辑驱动器)。 屏幕将显示 Welcome to the New Partition Wizard(欢迎使用新建分区向导)。 2 c 单击 Next(下一步)。 d 在 Select Partition Type(选择分区类型)窗口中,选择 Logical drive(逻辑驱动器), 然后单击 Next(下一步)。 e 在 Specify Partition Size(指定分区大小)窗口的 Partition size in MB(以 MB 为单位的分区 大小)字段中,键入 10000,然后单击 Nex
5 在 Computer Management(计算机管理)窗口中,展开 Storage(存储),然后单击 Disk Management(磁盘管理)。 6 从在步骤 1 至步骤 2 及“为 Oracle 群集件准备磁盘”中创建的存储驱动器中删除分配的驱动器号。 a 右键单击逻辑驱动器,然后选择 Change Drive Letter and Paths(更改驱动器号和路径)。 b 在 Change Drive Letter and Paths(更改驱动器号和路径)窗口中,选择驱动器号, 然后单击 Remove(删除)。 c 在 Confirm(确认)窗口中,单击 Yes(是)。 d 对存储分区上的其它逻辑驱动器重复执行步骤 a 至步骤 c。 使用 ASM 为数据库存储准备数据库磁盘和恢复磁盘 本节介绍如何创建逻辑驱动器,以便用来创建自动存储管理 (ASM) 磁盘存储。ASM 磁盘存储由一个 或多个可以跨多个磁盘的磁盘组组成。 注:如果您创建逻辑驱动器是为了创建 Oracle 的群集文件系统 (OCFS) 存储磁盘,则忽略以下步骤并参阅 “使用 OCFS 为数据库存储准备数据库磁盘和恢
5 在 Computer Management(计算机管理)窗口中,展开 Storage(存储),然后单击 Disk Management(磁盘管理)。 6 从在步骤 1 至步骤 2 及“为 Oracle 群集件准备磁盘”中创建的存储驱动器中删除分配的驱动器号。 a 右键单击逻辑驱动器,然后选择 Change Drive Letter and Paths(更改驱动器号和路径)。 b 在 Change Drive Letter and Paths(更改驱动器号和路径)窗口中,选择驱动器号,然后单击 Remove(删除)。 c 在 Confirm(确认)窗口中,单击 Yes(是)。 d 对存储分区上的其它逻辑驱动器重复执行步骤 a 至步骤 c。 为共享磁盘启用 automount (自动安装)选项 1 在节点 1 上,单击 Start(开始),然后选择 Run(运行)。 2 在 Run(运行)字段中,键入 cmd,然后单击 OK(确定)。 3 在命令提示符下,键入 diskpart,然后按 键。 4 在 DISKPART 命令提示符下,键入以下命令并按
使用 OCFS 安装 Oracle RAC 10g R2 本节介绍有关安装 Oracle RAC 10g R2 软件的信息。包括以下内容: • 安装 Oracle 群集件 • 更改 css misscount 值 • 安装 Oracle Database 10g R2 软件和软件更新 • 配置监听程序 • 创建基础 (seed) 数据库 安装 Oracle 群集件 10.2.0.1 版 1 在节点 1 上,将“Oracle Clusterware 10g Release 2 for Microsoft Windows”CD 插入 CD 驱动器。 屏幕将显示 Oracle Clusterware - Autorun(Oracle 群集件 — 自动运行)窗口。如果屏幕未显示 Oracle Clusterware - Autorun(Oracle 群集件 — 自动运行)窗口: a 单击 Start(开始),然后选择 Run(运行)。 b 在 Run(运行)字段中,键入以下命令,然后单击 OK(确定): %CD-ROM drive%:\autorun\autorun.
8 如果需要,请通过选择 Interface Name(接口名称)并单击 Edit(编辑),将公共 Interface Type (接口类型)更改为 Public(公共)(如果显示为 Private(专用))。选择正确的接口,然后单 击 OK(确定)。 9 在 Specify Network Interface Usage(指定网络接口使用)窗口中,单击 Next(下一步)。 10 11 12 13 在 Cluster Configuration Storage(群集配置存储)窗口中,为每个 OCR 磁盘执行以下步骤: a 找到在过程“为群集件准备 OCR 磁盘和投票磁盘”中创建的 100MB 分区。 b 选择此分区,然后单击 Edit(编辑)。 c 在 Specify Disk Configuration(指定磁盘配置)窗口中,选择 Place OCR (Primary) on this partition(在此分区上放置 OCR(主分区)),然后单击 OK(确定)。 在 Cluster Configuration Storage(群集配置存储)窗口中,为每个投票磁盘执行以下步骤
16 在 Summary(摘要)窗口中,单击 Install(安装)以启动安装过程。 屏幕将显示 Install(安装)窗口,并显示安装进度栏。 接下来,屏幕将显示 Configuration Assistant(配置助手)窗口,且 OUI 将运行一系列配置工具。 接着,屏幕将显示 End of Installation(安装结束)窗口。 注:请勿右键单击磁盘分区区域。如果在 Configuration Assistant(配置助手)窗口中出现故障,请执 行以下步骤,并参阅本说明文件的故障排除部分和标题为“解决群集件安装故障”的部分。 a 在错误窗口中,单击 OK(确定)。 b 在 Configuration Assistant(配置助手)窗口中,单击 Next(下一步)。 c 忽略警告信息,然后单击 OK(确定)。 d 单击 Exit(退出)以完成 OUI 会话。 e 在 Exit(退出)窗口中,单击 Yes(是)。 更改 css misscount 值 1 关闭除节点 1 之外的其它所有节点。 2 在节点 1 上,打开命令提示窗口。 3 在命令提示符下,键入下列命令并按 <
2 在 Oracle Database 10g - Autorun(Oracle Database 10g — 自动运行)窗口中,单击 Install/Deinstall Products(安装/卸载产品)。此时将启动 Oracle 通用安装程序 (OUI),并显示 Welcome(欢迎)屏幕。 3 单击 Next(下一步)。 4 在 Select Installation Types(选择安装类型)窗口中,选择 Enterprise Edition(企业版), 然后单击 Next(下一步)。 5 在 Destination(目的地)下的 Specify Home Details(指定主目录详细信息)窗口中,验证以下 内容: • 在 Name(名称)字段中,Oracle 数据库主目录名称为 OraDb10g_home1。 • 在 Path(路径)字段中,完整的 Oracle 主目录路径为 %SystemDrive%\oracle\product\10.2.
配置监听程序 本节将介绍配置监听程序的步骤,与数据库建立远程客户机连接时需要使用此程序。 在节点 1 上,执行以下步骤: 1 单击 Start(开始),选择 Run(运行),然后键入: netca 2 单击 OK(确定)。 3 在 Real Application Clusters, Configuration(Real Application Clusters,配置)窗口中, 选择 Cluster Configuration(群集配置),然后单击 Next(下一步)。 4 在 Real Application Clusters, Active Nodes(Real Application Clusters,激活节点)窗口中, 选择 Select all nodes(选择所有节点),然后单击 Next(下一步)。 5 在 Welcome(欢迎)窗口中,选择 Listener configuration(监听程序配置),然后单击 Next (下一步)。 6 在 Listener Configuration, Listener(监听程序配置,监听程序)窗口中,选择 Add(添加), 然后单击
4 在 Operations(操作)窗口中,单击 Create a Database(创建数据库),然后单击 Next (下一步)。 5 在 Node Selection(节点选择)窗口中,单击 Select All(全选),然后单击 Next(下一步)。 6 在 Database Templates(数据库模板)窗口中,单击 Custom Database(自定义数据库), 然后单击 Next(下一步)。 7 在 Database Identification(数据库标识)窗口的 Global Database Name(全局数据库名称) 字段中,输入数据库名称(如 racdb),然后单击 Next(下一步)。 8 在 Management Options(管理选项)窗口中,接受默认选择,然后单击 Next(下一步)。 9 在 Database Credentials(数据库证书)窗口中,单击 Use the Same Password for All Accounts (对所有帐号使用相同密码),在相应的字段中键入并确认新密码,然后单击 Next(下一步)。 注:记住新密码,稍后您会
21 在 Summary(摘要)窗口中,单击 OK(确定)。 屏幕将显示 Database Configuration Assistant(数据库配置助手)窗口,Oracle 软件将创建数据库。 注:完成此过程可能需要几分钟。 22 在 Database Configuration Assistant(数据库配置助手)窗口中,单击 Yes(是)。 完成后,Database Configuration Assistant(数据库配置助手)窗口将提供数据库配置信息。 23 记下 Database Configuration Assistant(数据库配置助手)窗口中的信息,以便将来管理数据库。 24 单击 Exit(退出)。 25 屏幕将显示 Start Cluster Database(启动群集数据库)窗口,并启动群集数据库。 使用 ASM 安装 Oracle RAC 10g R2 本节介绍有关安装 Oracle RAC 10g R2 软件的信息。包括以下内容: • 安装 Oracle 群集件 • 更改 css misscount 值 • 安装 Oracle Database 10
6 在 Specify Cluster Configuration(指定群集配置)窗口中,输入备用群集名称(如果需要): a 验证主节点的公共、专用和虚拟主机名。 b 如果您想更改这些值,请单击 Edit(编辑),输入所需的值,然后单击 OK(确定)。 c 单击 Add(添加)。 d 输入第二个节点的公共、专用和虚拟主机名,然后单击 OK(确定)。 注:确保网络主机名不包括域名扩展。 7 单击 Next(下一步)。 屏幕将显示 Specify Network Interface Usage(指定网络接口使用)窗口,并显示群集范围的网络 接口列表。 8 在 Interface Type(接口类型)下拉式菜单中,通过选择 Interface Name(接口名称)并单击 Edit (编辑),将公共 Interface Type(接口类型)配置为 Public(公共),然后将专用 Interface Type (接口类型)配置为 Private(专用)(如果需要)。选择正确的 Interface Type(接口类型), 然后单击 OK(确定)。 9 单击 Next(下一步)。 10 1
更改 css misscount 值 1 关闭除节点 1 之外的其它所有节点。 2 在节点 1 上,打开命令提示窗口。 3 在命令提示符下,键入下列命令并按 键: cd %ORA_CLUSTERWARE_HOME%\bin\ 其中,%ORA_CLUSTERWARE_HOME% 为您在“安装 Oracle 群集件 10.2.0.1 版。” 的步骤 4 中创建的主目录。 4 在命令提示符下,键入下列命令并按 键: crsctl set css misscount 120 5 重新启动节点 1,并以管理员身份登录。 6 启动所有其它节点。 安装 Oracle10g 数据库以及 Real Application Clusters 10.2.0.
6 单击 Next(下一步)。 7 在 Specify Hardware Cluster Installation Mode(指定硬件群集安装模式)窗口中,单击 Select All (全选),然后单击 Next(下一步)。 8 在 Product-Specific Prerequisite Checks(产品特定先决条件检查)窗口中,单击 Next(下一步)。 9 在 Select Configuration Option(选择配置选项)窗口中,选择 Install database Software only (仅安装数据库软件),然后单击 Next(下一步)。 10 在 Summary(摘要)窗口中,单击 Install(安装)。 11 在 End of Installation(安装完成)窗口中,单击 Exit(退出)。 12 在 Exit(退出)窗口中,单击 Yes(是)。 安装最新的 Oracle 补丁 1 打开 Web 浏览器。 2 浏览至 Oracle Metalink 网站 metalink.oracle.
6 在 Node Selection(节点选择)窗口中,单击 Select All(全选),然后单击 Next(下一步)。 7 在 Database Templates(数据库模板)窗口中,单击 Custom Database(自定义数据库), 然后单击 Next(下一步)。 8 在 Database Identification(数据库标识)窗口的 Global Database Name(全局数据库名称) 字段中,输入数据库名称(如 racdb),然后单击 Next(下一步)。 9 在 Management Options(管理选项)窗口中,选择 Enable Daily Backup(启用每日备份), 输入执行每日备份所需的操作系统用户名和密码,然后单击 Next(下一步)。 10 在 Database Credentials(数据库证书)窗口中,单击 Use Same Password for All Accounts (对所有帐号使用相同密码),在相应的字段中键入并确认新密码,然后单击 Next(下一步)。 注:记住新密码,稍后您会需要这些信息来进行数据库管理。 11 在 St
16 在 ASM Disk Groups(ASM 磁盘组)窗口中,单击 Create New(新建)。 17 在 Create Disk Group(创建磁盘组)窗口中,输入恢复文件的信息。 a 在 Disk Group Name(磁盘组名称)字段中,输入新磁盘组的名称。 例如,FLASH。 b 在 Redundancy(冗余)框中,选择 External(外部)。 c 单击 Stamp Disks(标记磁盘)。 d 选择 Add or change label(添加或更改标签),然后单击 Next(下一步)。 e 在 Select disks(选择磁盘)屏幕中,按 键,然后选择在 Status(状态)列中分配了 Candidate device(候选设备)的其它磁盘。 f 在 Generate stamps with this prefix(使用此前缀生成标记)字段中,键入 FLASH, 然后单击 Next(下一步)。 g 在 Stamp disks(标记磁盘)窗口中,单击 Next(下一步)。 h 单击 Finish(完成)以保存您的设置。 i 选择可
26 在 Summary(摘要)窗口中,单击 OK(确定)。 屏幕将显示 Database Configuration Assistant(数据库配置助手)窗口,Oracle 软件将创建数据库。 注:完成此过程可能需要几分钟。 完成后,Database Configuration Assistant(数据库配置助手)窗口将提供数据库配置信息。 27 记下 Database Configuration Assistant(数据库配置助手)窗口中的信息,以便将来管理数据库。 28 单击 Exit(退出)。 屏幕将显示 Start Cluster Database(启动群集数据库)窗口,并启动群集数据库。 附加信息 支持的软件版本 注:Dell 支持的 Oracle 配置这一版本不支持 PCI Express 控制器。 表 1-7 列出了发行时支持的软件。要获取支持的最新硬件和软件,请访问 dell.com/10g,下载 1.1 版的 Solution Deliverable List(可提供的解决方案列表)。 表 1-7.
故障排除 解决群集件安装故障 Oracle 群集件配置助手失败 如果使用 Oracle Clusterware Configuration Assistant(Oracle 群集件配置助手)时安装失败, 则在 Configuration Assistants(配置助手)窗口中,执行以下步骤: 1 打开文件: %ORA_CLUSTERWARE_HOME%\cfgtoollogs\configToolFailedCommands,其中, %ORA_CLUSTERWARE_HOME% 为您在 “安装 Oracle 群集件 10.2.0.
卸载 Oracle 群集件 要排除下列问题,可能需要卸载 Oracle 群集件: • Oracle 群集件安装过程失败。 • 配置助手无法成功安装。 要卸载 Oracle 群集件,请在群集节点上运行 OUI,删除任何其它的 Oracle 服务,然后清除存储设备。 运行 OUI 1 在节点 1 上,打开资源管理器窗口,并浏览至以下目录: %SystemDrive%\oracle\product\10.2.0\crs\oui\bin 2 双击 setup.
清除存储设备 1 清除要配置用于 OCR 注册表 (ocrcfg) 磁盘和投票磁盘的分区。 a 单击 Start(开始),然后选择 Run(运行)。 b 在 Run(运行)字段中,键入 cmd,然后单击 OK(确定)。 c 在命令提示符下,键入下列命令并按 键: %SystemDRive%\oracle\product\10.2.0\crs\bin\ExportSYMLink Oracle 符号链接导出程序 (ExportSYMLink) 将指向 SYMMAP.TBL 文件的符号链接导入当前 目录下。 d 2 在命令提示符下,键入下列命令并按 键: notepad SYMMAP.
6 删除用于 OCR 磁盘 (OCRCFG) 和投票磁盘 (VOTEDSK) 的符号链接。 a 选择 ocrcfg 和 votesdk。 b 单击 Options(选项),然后选择 Commit(提交)。 如果成功,ocrcfg 和 votedsk 项将消失。 c 7 单击 Options(选项),然后单击 Exit(退出),以关闭 Oracle 对象管理器。 启动计算机管理控制台。 a 在 Windows 桌面上,单击 Start(开始),然后选择 Run(运行)。 b 在 Run(运行)字段中,键入下列命令,然后按 键: compmgmt.
其它故障排除问题 表 1-8 针对在部署或使用 Windows Server 2003 操作系统和 Oracle Database 10g R2 软件时可能遇到的问 题提供了建议的纠正措施。 表 1-8.
表 1-8.
表 1-8. 故障排除 (续) 类别 问题/症状 原因 系统蓝屏 群集节点生成 蓝屏。 群集节点不能访问投票磁盘。 建议的纠正措施 1 确保对存储配置正确地配置了 HBA 连 接方式固件设置。 如果群集节点和存储系统采用直接连接 配置进行配置,则将 Connection (连接)模式配置为:0 - loop only (0 - 仅回路)。 如果群集节点和存储系统是通过光纤信 道交换机连接的,则将 Connection (连接)模式配置为 2 - loop preferred, otherwise point-to-point (2 - 首选回 路,否则为点到点)。 2 如果问题仍然存在,则将 CSS 计数误 差增加为高于 120 的值。 3 请执行以下步骤: a 关闭除节点 1 之外的其它所有节点。 b 在节点 1 上,打开命令提示窗口。 c 键入下列命令并按 键: %ORA_CLUSTERWARE_HOME%\ bin 其中, %ORA_CLUSTERWARE_HOME% 为您在 “安装 Oracle 群集件 10.2.0.
表 1-8.
获得帮助 Dell 支持 有关系统使用方面的详情,请参阅随系统组件附带的说明文件。有关白皮书、Dell 支持的配置和一般 信息,请访问 dell.com/10g。要获得硬件和操作系统软件的 Dell 技术支持并下载最新的系统更新, 请访问 Dell 支持 Web 站点 support.dell.com。与 Dell 联系的有关信息包含在系统《安装与故障排除指 南》中。 我们现在还提供 Dell 企业培训与认证服务,请访问 www.dell.com/training 了解详情。此培训服务可能 不在所有地区提供。 Oracle 支持 有关 Oracle 软件和应用程序群集件的培训信息,请访问 Oracle 网站 oracle.com 或参阅 Oracle 说明文 件,了解 Oracle 联系信息。 技术支持、下载和其它技术信息可以在 Oracle MetaLink 网站 metalink.oracle.
部署指南
索引 A P X 安装 Oracle RAC 10g, 72 Red Hat Enterprise Linux, 51 配置 Oracle 10g , 53 验证硬件与软件配置 , 53 许可协议 , 51 配置专用和公共网络 , 55 配置专用网络 , 56 Q 验证 软件配置 , 53 硬件配置 , 53 群集 光纤信道硬件连接, 示例 , 53 硬件 光纤信道互连 , 54 光纤信道群集最低要求 , 50 群集设置 光纤信道 , 53 硬件和软件配置 光纤信道 , 54 R Z Red Hat Enterprise Linux 安装 , 51 支持的存储设备 , 78 B 绑定 , 56 F 附加信息 , 78 G 公共网络 配置 , 55 故障排除 , 79 光纤信道群集设置 , 53 H 获得帮助 , 87 O Oracle RAC 10g 安装 , 72 配置网络和存储 , 55 Y 软件 要求 , 50, 78 专用网络 配置 , 55-56 软件和硬件要求 , 50 S 示例 光纤信道群集硬件连接 , 53 说明文件 , 51 索引 89
À˜“″ 90 索引
Systèmes Dell™ PowerEdge™ Oracle Database 10g Release 2, Enterprise Edition Real Application Cluster pour Microsoft® Windows ServerTM 2003 SP1 Guide de déploiement pour Enterprise x64 Edition Version 1.0 w w w. d e l l . c o m | s u p p o r t . d e l l .
Remarques et avis REMARQUE : une REMARQUE indique des informations importantes qui peuvent vous aider à mieux utiliser votre ordinateur. AVIS: un AVIS vous avertit d'un risque de dommage matériel ou de perte de données et vous indique comment éviter le problème. ____________________ Les informations contenues dans ce document peuvent être modifiées sans préavis. © 2006 Dell Inc. Tous droits réservés. La reproduction de ce document de quelque manière que ce soit sans l'autorisation écrite de Dell Inc.
Sommaire Configuration matérielle et logicielle requise . Contrats de licence . . . . Documentation importante . . . . . . . . . . . . . . . 96 . . . . . . . . . . . . . . . . . . . . . . 97 97 . . . . . . . . . . . . . . . . . . . . . . Installation et configuration du système d'exploitation . . . . . . . . . . . Installation du système d'exploitation à l'aide des CD de déploiement 97 . . . . . 99 . . . . . . . 99 Vérification de la configuration matérielle et logicielle du cluster .
Informations supplémentaires . . . . . . . . . . . . . . . . . . . . . . Dépannage 127 . . . . . . . . . . . . . . . . . . . . . . . . . . . . . . . 127 . . . . . . 127 128 132 . . . . . . . . . . . . . . . . . . . . . . . . . . . . 136 Solutions en cas d'échec de l'installation de Clusterware . Désinstallation d'Oracle Clusterware . . . . . . . . . . . Procédures de dépannage supplémentaires . . . . . . . Obtention d'aide . Support Dell . Support Oracle 94 Sommaire . . . . . . . . . . . . .
Ce document contient des informations concernant l'installation, la configuration, la réinstallation et l'utilisation du logiciel Oracle Database 10g R2. Il fait partie du support fourni par Dell pour les configurations Oracle. Pour installer le logiciel, utilisez ce document ainsi que le CD Dell Deployment. Si vous utilisez uniquement les CD du système d'exploitation pour installer ce dernier, les instructions fournies dans ce document peuvent ne pas s'appliquer.
Configuration matérielle et logicielle requise Le tableau 1-1 présente la configuration de base requise au niveau logiciel pour la prise en charge des configurations Oracle par Dell. Le tableau 1-2 présente la configuration matérielle requise. Pour obtenir des informations détaillées sur les versions minimales des pilotes et applications à installer, voir “Versions de logiciels prises en charge”. Tableau 1-1.
Contrats de licence REMARQUE : si vous ne possédez pas de licence Oracle, contactez votre représentant commercial Dell. Documentation importante Pour plus d'informations sur certains composants matériels spécifiques, consultez la documentation fournie avec le système. Installation et configuration du système d'exploitation AVIS: déconnectez tous les périphériques de stockage externes avant d'installer le système d'exploitation, pour vous assurer que ce dernier sera correctement installé.
6 À l'invite de commande, tapez 6 pour sélectionner Windows 2003 Server EE/SE SP1 for Oracle Database (x64) et appuyez sur . 7 Lorsque vous y êtes invité, retirez le premier disque du lecteur et remplacez-le par le disque intitulé Dell Deployment CD2. 8 Lorsque vous y êtes invité, insérez le CD Microsoft Windows Server 2003 Enterprise x64 Edition SP1 dans le lecteur. Le média Windows est copié sur la partition de déploiement, puis le système redémarre et l'installation se poursuit.
Vérification de la configuration matérielle et logicielle du cluster Avant de commencer la configuration du cluster, vérifiez que l'installation matérielle, les interfaces publique et privée et le logiciel sont correctement configurés. Les sections suivantes fournissent des informations sur la configuration du cluster Fibre Channel. Configuration du cluster Fibre Channel La configuration du cluster Fiber Channel a été effectuée par votre prestataire de services Dell.
Tableau 1-4.
• • Les logiciels suivants doivent être installés sur chacun des noeuds : – Windows Server 2003, Enterprise x64 Edition avec SP1 (voir le tableau 1-1) – Pilote de carte HBA Le système de stockage Fibre Channel doit posséder la configuration suivante : – Au minimum trois unités logiques créées et attribuées au cluster – Unités logiques d'une taille minimale de 40 Go (une unité logique) et 1 Go (deux unités logiques) Câblage d'un système de stockage dans une configuration avec connexion à un SAN Pou
Configuration des réseaux publics et privés REMARQUE : chaque noeud doit être associé à une adresse IP publique et privée unique. Une adresse IP publique supplémentaire doit être utilisée comme adresse IP virtuelle pour les connexions des clients et le basculement en cas de panne. L'adresse IP virtuelle doit appartenir au même sous-réseau que l'adresse IP publique. Toutes les adresses IP publiques, y compris l'adresse virtuelle, doivent être enregistrées sur le DNS (système de noms de domaine).
Configuration du teaming des NIC pour le réseau privé 1 Sur le nœud 1, identifiez deux cartes réseau devant être utilisées pour le teaming. 2 Installez un câble Ethernet entre chaque carte réseau sélectionnée et le commutateur du réseau privé.
i Dans la fenêtre Broadcom Advanced Control Suite 2, cliquez sur Yes. j Dans la zone de message IP Address Setting Reminder (Rappel des paramètres d'adresses IP), cliquez sur OK. k Dans la fenêtre Broadcom Advanced Control Suite 2 principale, vérifiez que vous avez sélectionné les cartes réseau appropriées et cliquez sur OK. 5 Recommencez la procédure, de l'étape 1 à l'étape 4, sur les autres nœuds.
3 Vérifiez que les cartes des réseaux public et privé apparaissent dans l'ordre approprié pour l'accès des services réseau. a Sur le bureau Windows, cliquez sur Démarrer et pointez sur Paramètres→ Panneau de configuration→ Connexions réseau. b Dans la fenêtre Connexions réseau, cliquez sur Avancé et sélectionnez Paramètres avancés. c Sélectionnez l'onglet Cartes et liaisons.
Si les cartes réseau de ce nœud ne répondent pas aux commandes ping, vérifiez la configuration du réseau et recommencez cette étape. REMARQUE : les adresses IP virtuelles sont configurées ultérieurement et ne peuvent pas encore faire l'objet d'une commande ping. 6 Répétez la procédure de l'étape 1 à l'étape 5 pour les noeuds restants. Installation du logiciel basé sur l'hôte requis pour Dell | EMC Cette solution requiert l'installation du logiciel Naviagent.
Installation de PowerPath 1 Installez EMC PowerPath sur le noeud 1. REMARQUE : pour plus d'informations, consultez la documentation Dell | EMC PowerPath fournie avec le système de stockage Dell | EMC. 2 Une fois l'installation terminée, redémarrez l'ordinateur. 3 Recommencez l'étape 1 et l'étape 2 sur les autres noeuds. Vérification du fonctionnement de PowerPath 1 Sur le bureau Windows, cliquez avec le bouton droit sur l'icône triangulaire de PowerPath affichée dans la zone de notification.
Préparation des disques pour Oracle Clusterware Cette section contient des informations sur la création de lecteurs logiques pour les disques suivants : • Disque OCR (registre du cluster Oracle) : contient les informations de configuration du cluster. • Disque de vote : assure l'arbitrage entre les nœuds du cluster lorsque le réseau privé ou le stockage connecté n'est pas disponible pour un ou plusieurs nœuds.
c Dans la fenêtre Sélection du type de partition, sélectionnez Lecteur logique et cliquez sur Suivant. d Dans la fenêtre Spécifier la taille de la partition, tapez 100 dans le champ Taille de la partition en Mo et cliquez sur Suivant. e Dans la fenêtre Attribuer une lettre de lecteur ou de chemin d'accès, sélectionnez Ne pas attribuer une lettre ou un chemin d'accès de lecteur et cliquez sur Suivant.
d Dans la fenêtre Type de partition, sélectionnez Lecteur logique et cliquez sur Suivant. e Dans la fenêtre Spécifier la taille de la partition, tapez 10000 dans le champ Taille de la partition en Mo et cliquez sur Suivant. f Dans la fenêtre Attribuer une lettre de lecteur ou de chemin d'accès, sélectionnez Ne pas attribuer une lettre ou un chemin d'accès de lecteur et cliquez sur Suivant. g Dans la fenêtre Formater une partition, sélectionnez Ne pas formater cette partition et cliquez sur Suivant.
Préparation du disque de base de données et du disque de récupération pour le stockage de la base de données avec ASM Cette section contient des informations sur la création des lecteurs logiques devant être utilisés pour créer une configuration de stockage ASM (Automatic Storage Management). Cette configuration comprend un ou plusieurs groupes de disques pouvant être répartis sur plusieurs disques.
6 Supprimez les lettres affectées aux lecteurs de stockage créés aux étapes 1 et 2 et à la section “Préparation des disques pour Oracle Clusterware”. a Cliquez avec le bouton droit sur le lecteur logique et sélectionnez Modifier la lettre de lecteur et les chemins d'accès. b Dans la fenêtre Modifier la lettre de lecteur et les chemins d'accès, sélectionnez la lettre appropriée et cliquez sur Supprimer. c Dans la fenêtre de confirmation, cliquez sur Oui.
Installation d'Oracle Clusterware version 10.2.0.1 1 Sur le noeud 1, insérez le CD Oracle Clusterware 10g Release 2 for Microsoft Windows dans le lecteur. La fenêtre Oracle Clusterware - Autorun (Oracle Clusterware - Exécution automatique) s'affiche. Si cette fenêtre ne s'affiche pas, procédez comme suit : a Cliquez sur Démarrer et sélectionnez Exécuter. b Dans le champ Exécuter, tapez la commande suivante et cliquez sur OK : %Lettre_lecteur_CD%:\autorun\autorun.
10 Dans la fenêtre Cluster Configuration Storage (Stockage de la configuration du cluster), effectuez les procédures suivantes pour chaque disque OCR : a Identifiez la partition de 100 Mo créée à la section “Préparation du disque OCR et du disque de vote pour Clusterware”. b Sélectionnez-la et cliquez sur Edit (Modifier).
c Vérifiez que l'option Use partition for data storage (Utiliser la partition pour le stockage des données) est sélectionnée. d Utilisez le menu déroulant de l'option Assign Drive Letter (Attribuer une lettre de lecteur) pour associer une lettre de lecteur à la partition. e Cliquez sur OK. 14 Dans la fenêtre Cluster Configuration Storage (Stockage de la configuration du cluster), cliquez sur Next. 15 Ne tenez pas compte des messages d'avertissement et cliquez sur OK.
Installation d'Oracle Database 10g R2 avec Real Application Clusters 10.1.0.2 1 Sur le noeud 1, insérez le CD Oracle Database 10g Release 2 for Microsoft Windows dans le lecteur. La fenêtre Oracle Database 10g - Autorun (Oracle Database 10g - Exécution automatique) s'affiche. Si cette fenêtre ne s'affiche pas, procédez comme suit : a Cliquez sur Démarrer et sélectionnez Exécuter. b Dans le champ Exécuter, tapez la commande suivante et cliquez sur OK : %Lettre_lecteur_CD%:\autorun\autorun.
11 Dans la fenêtre de fin d'installation, suivez la procédure affichée. REMARQUE : vous devez suivre ces procédures avant de passer à l'étape suivante. 12 Après avoir effectué toutes les procédures indiquées, cliquez sur Exit (Quitter). 13 Dans la fenêtre de fermeture, cliquez sur Yes. Configuration de l'écouteur Cette section indique comment configurer l'écouteur, qui est requis pour la connexion des clients distants à la base de données.
Création de la base de données initiale Cette section indique comment créer et vérifier la base de données initiale à l'aide d'OCFS. Pour créer une base de données initiale à l'aide d'OCFS (Oracle Cluster File System ), procédez comme suit : 1 Sur le noeud 1, cliquez sur Démarrer puis sur Exécuter. 2 Dans le champ Exécuter, tapez dbca et cliquez sur OK : L'assistant de configuration de la base de données démarre.
13 Dans la fenêtre Recovery Configuration (Configuration de la récupération), effectuez les opérations suivantes : a Sélectionnez la zone Specify Flash Recovery Area (Définir la zone de récupération flash). b Cliquez sur Browse (Parcourir). c Dans la fenêtre qui s'affiche, utilisez le menu déroulant pour sélectionner le lecteur CFS créé à l'étape 13d de la section “Installation d'Oracle Clusterware version 10.2.0.1”. d Cliquez sur OK. 14 Cliquez sur Enable Archiving (Activer l'archivage).
Installation d'Oracle RAC 10g R2 avec ASM Cette section fournit des informations sur l'installation du logiciel Oracle RAC 10g R2. Les thèmes abordés sont les suivants : • Installation d'Oracle Clusterware • Modification de la valeur css misscount • Installation du logiciel Oracle Database 10g R2 et des mises à jour • Création de la base de données initiale Installation d'Oracle Clusterware version 10.2.0.1 1 Sur le nœud 1, insérez le CD Oracle Clusterware dans le lecteur.
7 Cliquez sur Next. La fenêtre Specify Network Interface Usage (Définir l'utilisation des interfaces réseau) affiche la liste des interfaces réseau du cluster. 8 Dans le menu déroulant Interface Type (Type d'interface), sélectionnez Public pour le type d'interface publique et Private pour le type d'interface privée (si nécessaire). Pour ce faire, sélectionnez Interface Name (Nom d'interface) et cliquez sur Edit (Modifier). Sélectionnez le type d'interface approprié et cliquez sur OK. 9 Cliquez sur Next.
Modification de la valeur css misscount 1 Arrêtez tous les nœuds, à l'exception du nœud 1. 2 Sur le noeud 1, ouvrez une fenêtre d'invite de commande. 3 Tapez la commande suivante et appuyez sur : cd %RACINE_ORA_CLUSTERWARE%\bin\ où %RACINE_ORA_CLUSTERWARE% correspond au répertoire racine créé à l'étape 4 de la section “Installation d'Oracle Clusterware version 10.2.0.1”.
REMARQUE : le répertoire racine d'Oracle doit être différent de celui sélectionné lors de l'installation d'Oracle Clusterware. Vous ne pouvez pas installer Oracle Database 10g R2 Enterprise x64 Edition avec RAC dans le même répertoire home que celui utilisé pour les services CRS. 6 Cliquez sur Next. 7 Dans la fenêtre Specify Hardware Cluster Installation Mode (Définition du mode d'installation du cluster), cliquez sur Select All (Sélectionner tout), puis sur Next.
3 Dans le champ Exécuter, tapez la commande suivante et cliquez sur OK : dbca L'assistant de configuration de base de données démarre. 4 Dans la fenêtre de bienvenue, sélectionnez Oracle Real Application Cluster Database (Base de données Oracle RAC), puis cliquez sur Next. 5 Dans la fenêtre Operations (Opérations), cliquez sur Create a Database (Créer une base de données), puis cliquez sur Next.
15 Dans la fenêtre Create Disk Group (Création d'un groupe de disques), entrez les informations relatives aux fichiers de la base de données. a Entrez un nom dans le champ Disk Group Name (Nom du groupe de disques). Exemple : DATABASE. b Dans la zone Redundancy (Redondance), sélectionnez External (Externe). c Cliquez sur Stamp Disks (Marquage des disques). d Sélectionnez Add or change label (Ajouter ou modifier un label) et cliquez sur Next.
18 Sélectionnez uniquement le nom du groupe de disques que vous avez affecté à DATABASE à l'étape 15, puis cliquez sur Next. 19 Dans la fenêtre Database File Locations (Emplacement des fichiers de base de données), sélectionnez Use Oracle-Managed Files (Utiliser des fichiers gérés par Oracle), puis cliquez sur Next.
Informations supplémentaires Versions de logiciels prises en charge REMARQUE : les contrôleurs PCI Express ne sont pas pris en charge par cette configuration Dell pour Oracle. Le tableau 1-7 répertorie les logiciels pris en charge au moment de la publication du présent document. Pour obtenir la liste la plus récente des éléments matériels et logiciels pris en charge, rendez-vous à l'adresse dell.com/10g et téléchargez le document “Solution Deliverable List” (Liste des éléments pris en charge), version 1.1.
3 Suivez les instructions de la section “Échec de l'assistant de configuration des adresses IP virtuelles” (ci-dessous) pour exécuter l'assistant VIPCA ayant échoué.
Suppression des services Oracle 1 Sur le noeud 1, démarrez la console Services. a Cliquez sur Démarrer et sélectionnez Exécuter. b Dans le champ Exécuter, tapez la commande suivante et cliquez sur OK : services.msc La fenêtre Services s'affiche. 2 Identifiez et supprimez tous les services Oracles restants. Pour ce faire : a Cliquez sur Démarrer et sélectionnez Exécuter. b Dans le champ Exécuter, tapez cmd et cliquez sur OK.
À l'invite, tapez la commande suivante et appuyez sur : %LecteurSystème%\oracle\product\10.2.0\crs\bin\ImportSYMLinks 3 À l'aide de l'utilitaire de formatage de partitions logiques d'Oracle (LogPartFormat), formatez les partitions OCRCFG et VOTEDSK sur les deux noeuds. À l'invite, tapez les commandes suivantes et appuyez sur après chaque commande : %LecteurSystème%\oracle\product\10.2.0\crs\bin\LogPartFormat \\.\OCRCFG %LecteurSystème%\oracle\product\10.2.0\crs\bin\LogPartFormat \\.
8 Supprimez les partitions ASM ou OCFS. a Dans la fenêtre Console de gestion de l'ordinateur, développez l'élément Stockage et cliquez sur Gestion des disques. b Cliquez avec le bouton droit sur la première partition et sélectionnez Supprimer un lecteur logique. c À l'invite, cliquez sur Oui. d Recommencez la procédure (étapes b et c) de manière à supprimer toutes les partitions, y compris la partition étendue d'origine. 9 Redémarrez le noeud 1 et connectez-vous en tant qu'administrateur.
Procédures de dépannage supplémentaires Le tableau 1-8 indique les mesures recommandées en cas d'incident lié au déploiement et à l'utilisation de Windows Server 2003 et du logiciel Oracle Database 10g R2. Tableau 1-8. Dépannage Catégorie Problème/ Symptôme Cause Mesure recommandée Teaming de Échec du L'association de NIC peut échouer cartes réseau teaming de NIC dans les cas de figure suivants : Broadcom 1 Un des NIC Broadcom utilisé dans le team est en panne ou désactivé.
Tableau 1-8. Dépannage (suite) Catégorie Problème/ Symptôme Cause Mesure recommandée Oracle Clusterware Le noeud redémarre en affichant un écran bleu. Le noeud ne peut pas communiquer avec les disques de stockage. Procédez comme suit : 1 Redémarrez le noeud. 2 Pendant l'auto-test de démarrage, appuyez sur . 3 Dans l'écran Menu d'options avancées de Windows, sélectionnez Mode sans échec. 4 Sélectionnez le système d'exploitation approprié. 5 Connectez-vous au système.
Tableau 1-8. Catégorie Dépannage (suite) Problème/ Symptôme Écran Les noeuds système bleu affichent un écran bleu. Cause Les noeuds ne peuvent pas accéder au disque de vote. Mesure recommandée 1 Vérifiez que les paramètres définissant le mode de connexion des cartes HBA dans le micrologiciel sont corrects par rapport à la configuration du stockage.
Tableau 1-8. Dépannage (suite) Catégorie Problème/ Symptôme Cause Mesure recommandée Stockage Lecteurs indisponibles. Les disques sont marqués comme étant indisponibles lorsque vous cliquez avec le bouton droit sur Poste de travail, Gestion de l'ordinateur, puis Gestion des disques. Vérifiez que les unités logiques sont affectées aux deux noeuds. Vérifiez que les câbles à fibres optiques sont correctement connectés aux noeuds et aux systèmes de stockage.
Tableau 1-8. Dépannage (suite) Catégorie Problème/ Symptôme Cause Mesure recommandée VIPCA La configuration de VIPCA a échoué. Le nom d'interface de la carte du réseau public (ou, si la configuration comprend 4 interfaces réseau, l'interface réseau affectée à l'adresse IP virtuelle) est différent sur les deux noeuds. Assurez-vous que le nom d'interface de la carte du réseau public est identique sur les deux noeuds.
Obtention et utilisation de fichiers Open Source Le CD Dell Deployment comprend à la fois des programmes tiers et des programmes Dell. L'utilisation de ces logiciels est soumise aux conditions des contrats de licence des logiciels respectifs. Tous les logiciels désignés comme étant soumis aux conditions de la licence GPL GNU (GNU General Public License) peuvent être copiés, distribués et/ou modifiés en accord avec les termes et conditions de la licence GPL GNU, version 2 de juin 1991.
Guide de déploiement
Index C I P Cluster Fibre Channel, exemple de connexion matérielle, 99 Informations supplémentaires, 127 Périphériques de stockage pris en charge, 127 Installation Oracle RAC 10g, 120 Red Hat Enterprise Linux, 97 R Configuration d'Oracle 10g, 99 vérification des configurations matérielle et logicielle, 99 Configuration des réseaux publics et privés, 102 L Red Hat Enterprise Linux Installation, 97 Liens réseau, 102 Réseau privé configuration, 102 Logiciels configuration requise, 96, 127 Réseau
Index 140 Index
Dell™ PowerEdge™-Systeme Oracle Database 10g Version 2 Enterprise Edition Real Application Cluster für Microsoft® Windows ServerTM 2003 SP1 Enterprise x64 Edition Einrichtungsanleitung Version 1.0 w w w. d e l l . c o m | s u p p o r t . d e l l .
Anmerkungen und Hinweise ANMERKUNG: Eine ANMERKUNG macht auf wichtige Informationen aufmerksam, die die Arbeit mit dem Computer erleichtern. HINWEIS: Ein HINWEIS warnt vor möglichen Beschädigungen der Hardware oder vor Datenverlust und zeigt auf, wie derartige Probleme vermieden werden können. ____________________ Irrtümer und technische Änderungen vorbehalten. © 2006 Dell Inc. Alle Rechte vorbehalten. Die Reproduktion dieses Dokuments in jeglicher Form ohne schriftliche Genehmigung von Dell Inc.
Inhalt Software- und Hardwareanforderungen Lizenzvereinbarungen . . Wichtige Dokumentation . . . . . . . . . . . . . . . . . 146 . . . . . . . . . . . . . . . . . . . . . . 147 147 . . . . . . . . . . . . . . . . . . . . . . Installation und Konfiguration des Betriebssystems . . . . . . . . . . . . Installation des Betriebssystems mit den Deployment-CDs . . . . . . 149 . . . . . . 149 . . . . . .
Zusätzliche Informationen . . . . . . . . . . . . . . . . . . . . . . . . Fehlerbehebung 178 . . . . . . . . . . . . . . . . . . . . . . . . . . . . . 179 . . . . . . . . 179 180 184 . . . . . . . . . . . . . . . . . . . . . . . . 188 . . . . . . . . . . . . . . . . . . . . . . . . . . . 188 188 Umgehen von Fehlern bei der Clusterware-Installation Deinstallation von Oracle Clusterware . . . . . . . . Weitere Maßnahmen zur Fehlerbehebung . . . . . . Wie Sie Hilfe bekommen . Dell Support .
Dieses Dokument enthält Informationen zur Installation, Konfiguration, Neuinstallation und Verwendung der Software Oracle Database 10g R2 gemäß den von Dell für Oracle unterstützten Konfigurationen. Verwenden Sie dieses Dokument zusammen mit der Dell Deployment-CD, um die Software zu installieren. Wenn Sie das Betriebssystem nur mit den Betriebssystem-CDs installieren, treffen die Vorgehensweisen in diesem Dokument möglicherweise nicht auf Sie zu.
Software- und Hardwareanforderungen Tabelle 1-1 enthält die grundlegenden Software-Anforderungen für die von Dell für Oracle unterstützten Konfigurationen. In Tabelle 1-2 sind die Hardware-Anforderungen aufgeführt. Informationen über die erforderlichen Versionsnummern für Treiber und Anwendungen erhalten Sie unter „Unterstützte Softwareversionen“. Tabelle 1-1.
Lizenzvereinbarungen ANMERKUNG: Wenn Sie über keine Oracle-Softwarelizenz verfügen, wenden Sie sich an den Dell Vertragshändler. Wichtige Dokumentation Weitere Informationen zu spezifischen Hardware-Komponenten finden Sie in der Dokumentation zum System. Installation und Konfiguration des Betriebssystems HINWEIS: Um die korrekte Installation des Betriebssystems zu gewährleisten, trennen Sie vor der Installation alle externen Speichergeräte vom System.
5 Legen Sie die CD Dell Deployment CD1 in das CD-Laufwerk ein. Das System startet von der Deployment CD1. Nach dem Start erscheint ein Textbildschirm mit der Aufforderung, eine Option zu wählen. Falls Ihr System nicht von der Deployment CD1 gestartet ist, starten Sie es neu. Drücken Sie beim Startvorgang auf F2 und stellen Sie sicher, dass das CD-Laufwerk in der Startreihenfolge an erster Stelle steht.
Aktualisieren der Pfade für temporäre Verzeichnisse 1 Stellen Sie sicher, dass die temporären Verzeichnisse Temp und Tmp korrekt gesetzt wurden. a Klicken Sie auf Start und wählen Sie Ausführen. b Geben Sie im Feld Öffnen den Befehl cmd ein, und klicken Sie auf OK. c Geben Sie an der Eingabeaufforderung echo %Temp% ein, und drücken Sie die . Der folgende Pfad wird angezeigt: %SystemDrive%\Temp d Geben Sie an der Eingabeaufforderung echo %Tmp% ein, und drücken Sie die .
Abbildung 1-1. Hardwareverbindungen für einen SAN-verbundenen Fibre-Channel-Cluster Öffentliches Netzwerk Gb-Ethernet-Switches (privates Netzwerk) LAN/WAN PowerEdge-Systeme (Oracle-Datenbank) Dell | EMC Fibre-Channel-Switches (SAN) CAT 5e/6 (integrierter NIC) CAT 5e/6 (Kupfer-Gigabit-NIC) Glasfaserkabel Fibre-Channel-Speichersysteme Dell | EMC CX300, CX500 oder CX700 Tabelle 1-4.
Tabelle 1-4.
Verkabeln des Speichersystems für eine SAN-verbundene Konfiguration Konfigurieren Sie das Oracle Cluster-Speichersystem für eine SAN-Anbindung mit vier Ports wie folgt. 1 Installieren Sie ein Glasfaserkabel zwischen SP-A-Port 0 und Fibre-Channel-Switch 0. 2 Installieren Sie ein Glasfaserkabel zwischen SP-A-Port 1 und Fibre-Channel-Switch 1. 3 Installieren Sie ein Glaserfaserkabel zwischen SP-B-Port 0 und Fibre-Channel-Switch 1.
Konfiguration und Teaming des privaten Netzwerks Bevor Sie den Cluster einrichten, weisen Sie jedem Clusterknoten eine private IP-Adresse und einen Hostnamen zu. So ist gewährleistet, dass die Knoten über die private Schnittstelle miteinander kommunizieren können. Tabelle 1-6 enthält ein Beispiel für eine Netzwerkkonfiguration mit einem Zwei-Knoten-Cluster. Tabelle 1-6. Beispiel für eine Netzwerkkonfiguration Host-Name Type (Typ) IP-Adresse Registriert in rac1 Öffentlich 172.16.170.
4 Falls es sich um Broadcom-NICs handelt, konfigurieren Sie das NIC-Teaming auf Knoten 1 wie folgt: a Klicken Sie auf dem Windows-Desktop auf Start, und wählen Sie: Programme→ Broadcom→ Broadcom Advanced Control Suite 2 Das Fenster Broadcom Advanced Control Suite 2 wird angezeigt. b Klicken Sie auf Tools (Extras) und wählen Sie Create a Team (Team erstellen). c Das Fenster New Team Configuration (Neue Team-Konfiguration) wird angezeigt.
e Benennen Sie das Privat-NIC-Team in Private um, und drücken Sie die . f Wiederholen Sie Schritt a bis Schritt e für die anderen Knoten. 2 Konfigurieren Sie die IP-Adressen. ANMERKUNG: Sie müssen für die öffentliche Schnittstelle ein Standard-Gateway festlegen, andernfalls schlägt die Clusterware-Installation möglicherweise fehl. a Navigieren Sie auf Knoten 1 zu Start→ Einstellungen→ Systemsteuerung→ Netzwerkverbindungen→ Öffentlich→ Eigenschaften.
4 Tragen Sie auf beiden Knoten in der Datei %SystemRoot%\system32\drivers\etc\hosts die öffentlichen, privaten und virtuellen IP-Adressen und den Host-Namen ein. So nutzen beispielsweise die folgenden Einträge die Netzwerkadapter-IP und den Hostnamen in Tabelle 1-6: 172.16.170.1 rac1 172.16.170.2 rac2 10.10.10.1 rac1-priv 10.10.10.2 rac2-priv 172.16.170.201 rac1-vip 172.16.170.
4 Vergewissern Sie sich, dass unter Laufwerke für jede LUN im Speichersystem vier SCSI-Laufwerke aufgeführt sind. 5 Blenden Sie Storage (Speicher) ein, und klicken Sie anschließend auf Disk Management (Datenträgerverwaltung). Wenn das Fenster Welcome to the Initialize and Convert Disk Wizard (Assistent zum Initialisieren und Konvertieren von Datenträgern) angezeigt wird, führen Sie die Schritte a bis d durch. Fahren Sie andernfalls mit Schritt 6 fort.
6 Klicken Sie auf den ersten SP. 7 Vergewissern Sie sich, dass im Fenster SP Configuration (SP-Konfiguration) alle Pfade wie folgt konfiguriert sind: • In der Spalte State (Status) wird Alive (Aktiv) angezeigt. • In der Spalte Mode (Betriebsart) wird Active (Aktiv) angezeigt. 8 Wiederholen Sie Schritt 6 und Schritt 7 für den verbleibenden SP. 9 Schließen Sie die PowerPathAdmin-Konsole. Daraufhin erscheint ein Hinweisfenster mit der Aufforderung, die Einstellungen für die Konsole zu speichern.
Vorbereiten des OCR- und Voting-Datenträgers für Clusterware 1 Klicken Sie auf dem Windows-Desktop mit der rechten Maustaste auf Arbeitsplatz, und wählen Sie Verwalten. 2 Blenden Sie Storage (Speicher) ein, und klicken Sie dann auf Disk Management (Datenträgerverwaltung). 3 Das Speicherlaufwerk, das Sie in „Überprüfen der Funktionsfähigkeit von PowerPath“ initialisiert haben, wird als Unallocated (Nicht zugeordnet) angezeigt.
11 Erstellen Sie ein logisches Laufwerk für den Voting-Datenträger. a Klicken Sie mit der rechten Maustaste in den Laufwerkpartitionsbereich und wählen Sie New Logical Drive (Neues logisches Laufwerk). Das Fenster Welcome to the New Partition Wizard (Assistent zum Erstellen von Partitionen) wird angezeigt. b Klicken Sie auf Weiter. c Wählen Sie im Fenster Select Partition Type (Partitionstyp festlegen) die Option Logical drive (Logisches Laufwerk), und klicken Sie auf Weiter.
g Wählen Sie im Fenster Format Partition (Partition formatieren) die Option Do not format this partition, (Diese Partition nicht formatieren), und klicken Sie auf Weiter. h Klicken Sie auf Finish (Fertig stellen). 2 Erstellen Sie auf Knoten 1 ein logisches Laufwerk für den Wiederherstellungsdatenträger. a Identifizieren Sie den für die Oracle-Wiederherstellung zugewiesenen Datenträger.
Vorbereiten der Datenbank- und Wiederherstellungsdatenträger für ASM-Datenspeicher Dieser Abschnitt enthält Informationen zum Erstellen logischer Laufwerke zum Einrichten eines ASMSpeichersystems (Automatic Storage Management). Ein ASM-Speichersystem besteht aus einer oder mehreren Laufwerkgruppen, die jeweils mehrere Laufwerke umfassen können.
6 Löschen Sie Laufwerkbuchstaben der Speicherlaufwerke, die Sie in Schritt 1 bis Schritt 2 und in „Vorbereiten der Datenträger für Oracle Clusterware“ erstellt haben. a Klicken Sie mit der rechten Maustaste auf das logische Laufwerk, und wählen Sie die Option Change Drive Letter and Path (Laufwerkbuchstaben und Pfad ändern). b Wählen Sie im Fenster Change Drive Letter and Paths (Laufwerkbuchstaben und Pfade ändern) den Laufwerkbuchstaben aus, und klicken Sie auf Remove (Entfernen).
Installation von Oracle Clusterware Version 10.2.0.1 1 Legen Sie auf Knoten 1 die CD Oracle Clusterware 10g Release 2 for Microsoft Windows ein. Das Fenster Oracle Clusterware - Autorun wird angezeigt. Falls das Fenster Oracle Clusterware Autorun nicht erscheint: a Klicken Sie auf Start und wählen Sie Ausführen. b Geben Sie im Feld Ausführen den folgenden Befehl ein, und klicken Sie auf OK: %CD-ROM drive%:\autorun\autorun.exe wobei %CD-ROM drive% der Laufwerkbuchstabe des CD-Laufwerks ist.
9 Klicken Sie im Fenster Specify Network Interface Usage (Nutzung der Netzwerkschnittstelle festlegen) auf Weiter. 10 Führen Sie im Fenster Cluster Configuration Storage (Clusterkonfigurationsspeicher) für jeden OCR-Datenträger die folgenden Schritte durch: a Identifizieren Sie die 100-MB-Partition, die im Vorgang „Vorbereiten des OCR- und VotingDatenträgers für Clusterware“ erstellt wurde. b Wählen Sie die Partition aus, und klicken Sie auf Edit (Bearbeiten).
d Wählen Sie im Pulldown-Menü der Option Assign Drive Letter (Laufwerkbuchstaben zuweisen) einen Laufwerkbuchstaben für die Partition aus. e Klicken Sie auf OK. 14 Klicken Sie im Fenster Cluster Configuration Storage (Clusterkonfigurationsspeicher) auf Weiter. 15 Ignorieren Sie die Warnmeldungen und klicken Sie auf OK. 16 Klicken Sie im Fenster Summary (Übersicht) auf Install (Installieren), um den Installationsvorgang zu starten.
Installation von Oracle Database 10g R2 mit Real Application Clusters 10.1.0.2 1 Legen Sie auf Knoten 1 die CD Oracle Database 10g Release 2 for Microsoft Windows ein. Das Fenster Oracle Database 10g - Autorun wird angezeigt. Falls das Fenster Oracle Database 10g Autorun nicht erscheint: a Klicken Sie auf Start und wählen Sie Ausführen. b Geben Sie im Feld Ausführen den folgenden Befehl ein, und klicken Sie auf OK: %CD-ROM drive%:\autorun\autorun.
11 Führen Sie im Fenster End of Installation (Installation abgeschlossen) die dort aufgeführten Maßnahmen durch. ANMERKUNG: Diese Maßnahmen müssen entsprechend den Angaben im Fenster erfolgt sein, bevor Sie mit dem nächsten Schritt fortfahren können. 12 Nachdem Sie die erforderlichen Maßnahmen aus dem Fenster End of Installation (Installation abgeschlossen) durchgeführt haben, klicken Sie auf Exit (Beenden). 13 Klicken Sie im Fenster Exit auf Ja.
Erstellen der Startdatenbank In diesem Abschnitt ist die Vorgehensweise zum Erstellen einer Startdatenbank mit OCFS sowie zum Überprüfen der Startdatenbank beschrieben. Führen Sie die folgende Schritte aus, um die Startdatenbank mit Oracle Cluster File System (CFS) zu erstellen: 1 Klicken Sie auf Knoten 1 auf Start, und wählen Sie Ausführen. 2 Geben Sie im Feld Ausführen den Befehl dbca ein, und klicken Sie auf OK: Der Database Configuration Assistant (Datenbankkonfigurationsassistent) wird gestartet.
c Wählen Sie im Fenster Directory Browse (Verzeichnis suchen) aus dem Pulldown-Menü das CFSLaufwerk aus, dass in Schritt 12 d des Vorgangs „Installation von Oracle Clusterware Version 10.2.0.1“ erstellt wurde. d Klicken Sie auf OK. 12 Klicken Sie auf Weiter. 13 Führen Sie im Fenster Recovery Configuration (Konfiguration für Wiederherstellung) folgende Schritte durch: a Wählen Sie Specify Flash Recovery Area (Flash-Wiederherstellungsbereich festlegen). b Klicken Sie auf Browse (Durchsuchen).
Installation von Oracle RAC 10g R2 mit ASM In diesem Abschnitt ist die Installation der Software Oracle RAC 10g R2 beschrieben. Folgende Themen werden behandelt: • Installation von Oracle Clusterware • Ändern des Werts css misscount • Installation von Oracle Database 10g R2 und der Software-Updates • Erstellen der Startdatenbank Installation von Oracle Clusterware Version 10.2.0.1 1 Legen Sie auf Knoten 1 die CD Oracle Clusterware ein.
ANMERKUNG: Achten Sie darauf, dass die Netzwerk-Hostnamen keine Domänennamenerweiterung aufweisen. 7 Klicken Sie auf Weiter. Das Fenster Specify Network Interface Usage (Nutzung der Netzwerkschnittstelle festlegen) wird angezeigt. Es enthält eine Liste clusterweiter Netzwerkschnittstellen.
Danach wird das Fenster End of Installation (Installation abgeschlossen) angezeigt. 15 Klicken Sie auf Exit (Beenden), um die OUI-Sitzung zu beenden. 16 Klicken Sie im Fenster Exit auf Ja. Ändern des Werts css misscount 1 Fahren Sie alle Knoten außer Knoten 1 herunter. 2 Öffnen Sie ein Befehlszeilenfenster auf Knoten 1.
5 Überprüfen Sie im Fenster Specify Home Details (Stamm-Details festlegen) unter Destination (Ziel), dass die folgenden Einstellungen vorhanden sind: • Im Feld Name ist als Stammname der Oracle-Datenbank die Bezeichnung OraDb10g_home1 eingetragen. • Im Feld Pfad ist der folgende vollständige Oracle-Stammpfad eingetragen: %SystemDrive%\oracle\product\10.2.0\db_1 ANMERKUNG: Notieren Sie sich den Pfad, da Sie diese Information später benötigen.
c Die Antwort sollte lauten: CSS appears healthy CRS appears healthy EVM appears healthy d Falls dies nicht angezeigt wird, geben Sie „crsctl start crs“ ein. e Schließen Sie das Fenster cmd, indem Sie eingeben: „exit“. 2 Klicken Sie auf Knoten 1 auf Start und wählen Sie Ausführen. 3 Geben Sie im Feld Ausführen den nachstehenden Befehl ein, und klicken Sie auf OK: dbca Der Datenbankkonfigurationsassistent wird gestartet.
b Wählen Sie Create initialization parameter file (IFILE) (Parameterdatei für Initialisierung erstellen [IFILE]). c Klicken Sie auf Weiter. 13 Klicken Sie im Fenster Database Configuration Assistant (Datenbank-Konfigurationsassistent) auf OK. Das Fenster ASM Creation (ASM-Erstellung) wird angezeigt, und die ASM-Instanz wird erstellt.
d Wählen Sie Add or change label (Kennzeichnung hinzufügen/ändern), und klicken Sie auf Weiter. e Drücken Sie im Fenster Select disks (Datenträger auswählen) die Taste und wählen Sie die verbleibenden Datenträger aus, denen in der Spalte Status der Status Candidate device (Mögliches Gerät) zugewiesen ist. f Geben Sie im Feld Generate stamps with this prefix (Kennzeichnungen mit diesem Präfix erzeugen) den Namen FLASH ein, und klicken Sie auf Weiter.
Der Datenbank-Konfigurationsassistent zeigt nach Abschluss des Vorgangs die Konfigurationsinformationen für die Datenbank an. 27 Notieren Sie sich die im Datenbank-Konfigurationsassistenten angezeigten Informationen. Sie benötigen sie für die Administration der neu erstellten Datenbank. 28 Klicken Sie auf Exit (Beenden). Das Fenster Start Cluster Database (Clusterdatenbank starten) wird angezeigt, und die Clusterdatenbank startet.
Fehlerbehebung Umgehen von Fehlern bei der Clusterware-Installation Fehler mit Oracle Clusterware-Konfigurationsassistent Wenn die Installation mit dem Oracle Clusterware Configuration Assistant (Oracle ClusterwareKonfigurationsassistenten) fehlschlägt, führen Sie im Fenster Configuration Assistants (Konfigurationsassistenten) Folgendes durch: 1 Öffnen Sie die Datei: %ORA_CLUSTERWARE_HOME%\cfgtoollogs\configToolFailedCommands wobei %ORA_CLUSTERWARE_HOME% das CRS-Stammverzeichnis ist, das Sie in „Installati
Deinstallation von Oracle Clusterware Zum Beheben der nachstehenden Probleme müssen Sie Oracle Clusterware möglicherweise deinstallieren: • Die Installation von Oracle Clusterware ist fehlgeschlagen. • Der Konfigurationsassistent wurde nicht erfolgreich installiert. Um Oracle Clusterware zu deinstallieren, führen Sie das Installationsprogramm OUI auf dem betreffenden Clusterknoten aus, und löschen Sie alle gegebenenfalls vorhandenen Oracle-Dienste sowie alle Daten auf den Speichergeräten.
2 Identifizieren und löschen Sie alle ggf. noch vorhandenen Oracle-Dienste. So löschen Sie einen Dienst: a Klicken Sie auf Start und wählen Sie Ausführen. b Geben Sie im Feld Ausführen den Befehl cmd ein, und klicken Sie auf OK. c Geben Sie an der Eingabeaufforderung die folgende Zeile ein, und drücken Sie die : sc delete d Wiederholen Sie Schritt c für jeden weiteren Dienst, den Sie löschen müssen.
3 Formatieren Sie mit dem Oracle Logical Partition Formatter (LogPartFormat), die Partitionen OCRCFG und VOTEDSK auf beiden Knoten. Geben Sie an der Eingabeaufforderung die folgenden Befehle ein, und drücken Sie nach jedem Befehl die : %SystemDrive%\oracle\product\10.2.0\crs\bin\LogPartFormat \\.\OCRCFG %SystemDrive%\oracle\product\10.2.0\crs\bin\LogPartFormat \\.\VOTEDSK Die folgende Meldung wird angezeigt: Are you sure you want to continue...
8 Löschen Sie die ASM- oder OCFS-Partitionen. a Klicken Sie im Fenster Computerverwaltung auf Storage (Datenspeicher), und klicken Sie auf Disk Management (Datenträgerverwaltung). b Klicken Sie mit der rechten Maustaste auf die erste Partition und wählen Sie Delete Logical Drive (Logisches Laufwerk löschen). c Klicken Sie nach entsprechender Aufforderung auf Ja.
Weitere Maßnahmen zur Fehlerbehebung Tabelle 1-8 enthält empfohlene Maßnahmen für Probleme, die beim Einrichten und beim Einsatz von Windows Server 2003 und Oracle Database 10g R2 auftreten können. Tabelle 1-8. Fehlerbehebung Kategorie NICTeaming Problem/Anzeichen Ursache Empfohlene Korrekturmaßnahmen Broadcom NICFolgende Schritte können zu einem Die wahrscheinlichste Ursache für dieses Teaming schlägt fehl Fehler beim NIC-Teaming führen: Problem ist ein Spanning-Tree-Protokoll auf dem Switch.
Tabelle 1-8. Fehlerbehebung (Fortsetzung) Kategorie Problem/Anzeichen Ursache Oracle Beim Neustart des Der Clusterknoten kann nicht mit den Clusterware Clusterknotens wird Speicherlaufwerken kommunizieren. ein blauer Bildschirm angezeigt. Empfohlene Korrekturmaßnahmen Gehen Sie wie folgt vor: 1 Starten Sie den Clusterknoten neu. 2 Drücken Sie während des Einschaltselbsttests (POST) die Taste . 3 Wählen Sie im Menü für erweiterte Windows-Optionen den Abgesicherten Modus.
Tabelle 1-8. Fehlerbehebung (Fortsetzung) Kategorie Blauer SystemBildschirm Problem/Anzeichen Die Clusterknoten zeigen einen blauen Bildschirm an. Ursache Die Clusterknoten können nicht auf den Voting-Datenträger zugreifen. Empfohlene Korrekturmaßnahmen 1 Stellen Sie sicher, dass die Firmwareeinstellungen für den HBA-Verbindungsmodus für die Speicherkonfiguration korrekt konfiguriert sind.
Tabelle 1-8. Fehlerbehebung (Fortsetzung) Kategorie Datenspeicher Problem/Anzeichen Datenträger erscheinen als nicht zugänglich. Datenspeicher SCSILaufwerkdienste werden nicht angezeigt. Ursache Wenn Sie auf dem Windows-Desktop mit der rechten Maustaste auf Arbeitsplatz klicken, Computerverwaltung wählen und dann auf Datenträgerverwaltung klicken, werden die Datenträger als nicht zugänglich angezeigt. Ursachen: • Die LUNS sind den Clusterknoten nicht zugeordnet. • Die Kabelverbindung ist fehlerhaft.
Tabelle 1-8. Fehlerbehebung (Fortsetzung) Kategorie VIPCA Problem/Anzeichen Die VIPCAKonfiguration schlägt fehl. Ursache Der Name des öffentlichen Netzwerkadapters (bzw. – bei 4 Netzwerkschnittstellen – der Name der Netzwerkschnittstelle für die virtuelle IP-Adresse) ist nicht auf beiden Clusterknoten identisch. Empfohlene Korrekturmaßnahmen Stellen Sie sicher, dass der Name des öffentlichen Netzwerkadapters auf beiden Clusterknoten identisch ist.
Erwerb und Einsatz von Open-Source-Dateien Die auf der Deployment-CD enthaltene Software umfasst sowohl Programme von Fremdanbietern als auch Programme von Dell. Die Verwendung der Software unterliegt den jeweils angegebenen Lizenzbestimmungen. Alle mit „Under the terms of the GNU GPL“ (gemäß den Bedingungen der GNU GPL) gekennzeichneten Softwarekomponenten dürfen gemäß den Bedingungen der GNU General Public License in der Version 2 vom Juni 1991 kopiert, verteilt und/oder modifiziert werden.
Einrichtungsanleitung
Index B H L Beispiele Fibre-Channel-Cluster, Hardwareverbindungen, 150 Hardware Fibre-Channel-Cluster, minimale Anforderungen, 146 Fibre-ChannelVerbindungen, 150 Lizenzvereinbarungen, 147 Bonding (Bündelung), 153 C Cluster Fibre-Channel-HardwareVerbindungen, Beispiel, 150 Cluster einrichten Fibre-Channel, 149 D Dokumentation, 147 F Fehlerbehebung, 179 Fibre-Channel-Cluster einrichten, 149 Hardware- und SoftwareKonfigurationen Fibre-Channel, 151 O Öffentliches Netzwerk Konfiguration, 152 Oracle RA
Index U Überprüfen Hardwarekonfiguration, 149 Softwarekonfiguration, 149 Unterstützte Speichergeräte, 178 W Wie Sie Hilfe bekommen, 188 Z Zusätzliche Informationen, 178 192 Index
Dell™ PowerEdge™ システム Oracle Database 10g Release 2 Enterprise Edition Real Application Cluster for Microsoft® Windows ServerTM 2003 SP1 Enterprise x64 Edition 導入ガイドバージョン 1.0 w w w. d e l l . c o m | s u p p o r t . d e l l .
メモおよび注意 メモ:コンピュータを使いやすくするための重要な情報を説明しています。 注意:ハードウェアの損傷やデータの損失の可能性を示し、その危険を回避するための方法を説明してい ます。 ____________________ 本書の内容は予告なく変更されることがあります。 © 2006 すべての著作権は Dell Inc. にあります。 Dell Inc. の書面による許可のない複製は、いかなる形態においても厳重に禁じられています。 本書で使用されている商標について:Dell、DELL ロゴ、および PowerEdge は Dell Inc.
目次 ソフトウェアおよびハードウェアの要件 ライセンス契約 . . 重要なマニュアル . . . . . . . . . . . . . . . . 198 . . . . . . . . . . . . . . . . . . . . . . . . 199 199 . . . . . . . . . . . . . . . . . . . . . . . . オペレーティングシステムのインストールと設定 . . . . . . . . . . 『Deployment CD』を使用したオペレーティングシステム のインストール . . . . . . . . . . . . . . . . . . . . . . クラスタのハードウェアおよびソフトウェアの構成の確認 . . . . 199 . . . . . 201 ファイバーチャネルクラスタのセットアップ . . . . . . . . SAN 接続構成に用いるストレージシステムのケーブル接続 . Oracle RAC 10g R2 用のネットワークおよびストレージの構成 201 204 . . . . 204 205 .
追加情報 . . . . . . . . . . . . . . . . . . . . . . . . . . . . . . . . . . . . . . . . . . . 231 . . . . . . . . . . . . . . . . . . . . . . . 232 サポートされるソフトウェアのバージョン トラブルシューティング . . . . . . 232 232 236 . . . . . . . . . . . . . . . . . . . . . . . . . . . . . 241 Clusterware のインストールに失敗した場合の対処法 Oracle Clusterware のアンインストール . . . . . . . . トラブルシューティングのその他の問題. . . . . . . 困ったときは . デルサポート . . . Oracle のサポート . 196 目次 . . . . . . . . . . . . . . . . . . . . . . . . . . . . . . . . . . . . . . . . .
本書では、Oracle をサポートするデルの構成に従って、Oracle 10g R2 ソフトウェアをインストー ル、設定、再インストール、および使用するのに必要な情報について説明します。 本書と『Dell Deployment CD』を併用して、使用するソフトウェアをインストールしてください。 オペレーティングシステムの CD のみを使用してオペレーティングシステムをインストールする場 合、本書の手順は該当しないことがあります。 内容は次のとおりです。 • ソフトウェアおよびハードウェアの要件 • Microsoft® Windows Server™ 2003, Enterprise x64 Edition with Service Pack 1(SP1) のインストールと設定 • クラスタのハードウェアおよびソフトウェアの構成の確認 • Oracle Database Real Application Clusters(RAC)10g R2 のネットワークおよびストレージ の設定 • Oracle Database RAC 10g R2 およびソフトウェアアップデートのインストール •
ソフトウェアおよびハードウェアの要件 デルがサポートする Oracle の設定の基本的なソフトウェア要件の一覧を 表 1-1 に示します。 表 1-2 は、ハードウェアの要件の一覧です。 最低限必要なドライバとアプリケーションのバージョンの詳細については、「サポートされるソフト ウェアのバージョン」を参照してください。 表 1-1 ソフトウェア要件 ソフトウェアコンポーネント 構成 Microsoft® Windows Server™ 2003 Enterprise x64 Edition with Service Pack 1(SP1) Oracle10g R2 バージョン 10.2.0.1 Enterprise Edition、クラスタのための RAC オプション を含む EMC® PowerPath®(ファイバー チャネルクラスタの場合のみ) バージョン 4.
ライセンス契約 メモ:Oracle のソフトウェアライセンスをお持ちでない場合は、デルの営業担当にお問い合わせくだ さい。 重要なマニュアル 特定のハードウェアコンポーネントの詳細については、システムに付属のマニュアルを参照してく ださい。 オペレーティングシステムのインストールと設定 注意:オペレーティングシステムを正常にインストールするには、インストールを開始する前に外付 けストレージシステムをすべてシステムから取り外してください。 本項では、Oracle の導入に必要な Windows Server 2003, Enterprise x64 Edition with SP1 オペ レーティングシステムのインストールと設定について説明します。 インストール手順は、システムと共に購入されたインストール CD によって異なる場合があります。 お使いのシステムの構成に該当するインストール手順については、表 1-3 を参照してください。 表 1-3 インストール手順の判断 購入した CD Windows Server 2003, Enterprise x64 Edition with SP1 インスト
5 CD ドライブに『Deployment CD1』をセットします。 システムが『Deployment CD1』から起動します。起動後に、オプションの選択を求めるテキ スト画面が表示されます。 システムが『Deployment CD1』から起動しなかった場合は、システムを再起動します。 再起動時に F2 を押して、CD ドライブが起動順序の最初に表示されることを確認します。 6 コマンドプロンプトで 6 と入力して Windows 2003 Server EE/SE SP1 for Oracle Database(x64)を選択し、 を押します。 7 確認のメッセージが表示されたら、『Deployment CD1』を CD ドライブから取り出し、 CD ドライブに『Deployment CD2』をセットします。 8 確認のメッセージが表示されたら、『Microsoft Windows Server 2003 Enterprise x64 Edition SP1 CD』を CD ドライブにセットします。 Windows メディアが導入パーティションにコピーされ、システムが再起動し、インストール が
一時ディレクトリパスのアップデート 1 ディレクトリ Temp と Tmp へのパスが正しく設定されていることを確認します。 a スタート をクリックし、ファイル名を指定して実行 を選択します。 b 名前 フィールドに cmd と入力し、OK をクリックします。 c コマンドプロンプトで、echo %Temp% と入力し、 を押します。 次のパスが表示されます。 %SystemDrive%\Temp d コマンドプロンプトで、echo %Tmp% と入力し、 を押します。 次のパスが表示されます。 %SystemDrive%\Tmp クラスタのハードウェアおよびソフトウェアの構成の確認 クラスタのセットアップを開始する前に、ハードウェアの取り付け、パブリックとプライベートの インタフェース、ノードソフトウェアが正しく設定されていることを確認します。以下の項では、 ファイバーチャネルクラスタのセットアップについて説明します。 ファイバーチャネルクラスタのセットアップ お使いのファイバーチャネルクラスタは、デルの公認技術者によってセットアップが完了していま す。本項
図 1-1 SAN 接続のファイバーチャネルクラスタのハードウェア接続 パブリックネットワーク Gb Ethernet スイッチ(プライベートネットワーク) LAN/WAN PowerEdge システム (Oracle データベース) Dell | EMC ファイバーチャネルスイッチ (SAN) CAT 5e/6(内蔵 NIC) CAT 5e/6(銅線 Gigabit NIC) 光ファイバーケーブル Dell | EMC CX300、CX500、または CX700 ファイバーチャネルストレージシステム 表 1-4 追加の光ファイバーケーブル ファイバーチャネルハードウェアの相互接続 クラスタのコンポーネント 接続 各 PowerEdge システムノード CAT 5e/6 ケーブル 1 本をパブリック NIC から LAN に接続 CAT 5e/6 ケーブル 1 本をプライベート Gigabit NIC から Gigabit Ethernet スイッチに接続 CAT 5e/6 ケーブル 1 本を冗長プライベート Gigabit NIC から冗長 Gigabit Ethernet スイッチ
表 1-4 ファイバーチャネルハードウェアの相互接続 (続き) クラスタのコンポーネント 接続 各 Dell | EMC ファイバー チャネルスイッチ 1 から 4 のオプティカルコネクタを Dell | EMC ファーバーチャネル ストレージシステムに接続 1 つのオプティカルコネクタを各 PowerEdge システムの HBA に接 続 各 Gigabit Ethernet スイッチ CAT 5e/6 ケーブル 1 本を各 PowerEdge システムのプライベート Gigabit NIC に接続 CAT 5e/6 ケーブル 1 本を別の Gigabit Ethernet スイッチに接続 クラスタについて、以下の各タスクが完了していることを確認します。 • すべてのハードウェアがラックに取り付けてある。 • すべてのハードウェアの相互接続が 図 1-1 と 表 1-4 に示すとおりに設定されている。 • Dell | EMC ファイバーチャネルストレージシステム上で、すべての LUN(論理ユニット番号)、 RAID グループ、ストレージグループが作成されている。 • 各クラス
SAN 接続構成に用いるストレージシステムのケーブル接続 Oracle Cluster ストレージシステムを 4 ポートの SAN 接続で構成するには、以下の手順を実行 します。 1 1 本の光ファイバーケーブルを SP-A ポート 0 からファイバーチャネルスイッチ 0 に接続 します。 2 1 本の光ファイバーケーブルを SP-A ポート 1 からファイバーチャネルスイッチ 1 に接続 します。 3 1 本の光ファイバーケーブルを SP-B ポート 0 からファイバーチャネルスイッチ 1 に接続 します。 4 1 本の光ファイバーケーブルを SP-B ポート 1 からファイバーチャネルスイッチ 0 に接続 します。 5 1 本の光ファイバーケーブルをノード 1 の HBA0 からファイバーチャネルスイッチ 0 に接続し ます。 6 1 本の光ファイバーケーブルをノード 1 の HBA1 からファイバーチャネルスイッチ 1 に接続し ます。 7 1 本の光ファイバーケーブルを各追加ノードの HBA0 からファイバーチャネルスイッチ 0 に接 続します。 8 1 本の光ファイバーケーブルを各追加ノードの HB
パブリックおよびプライベートネットワークの設定 メモ:クライアント接続および接続のフェイルオーバーのために、固有のパブリックおよびプライベー ト IP アドレスを 1 つと、仮想 IP アドレスとしての機能を果たす追加のパブリック IP アドレスを 1 つ、 各ノードに設定する必要があります。仮想 IP アドレスはパブリック IP アドレスと同じサブネットに属し ていなければなりません。仮想 IP アドレスを含むすべてのパブリック IP アドレスは DNS に登録する必要 があります。 利用可能な NIC ポートの数に応じて、表 1-5 に示すとおりにパブリックおよびプライベートインタ フェースを設定します。 表 1-5 NIC のポート割り当て NIC ポート 利用可能なポート 3 つ 利用可能なポート 4 つ 1 パブリック IP および仮想 IP パブリック IP 2 プライベート IP (NIC チーム) プライベート IP(NIC チーム) 3 プライベート IP (NIC チーム) プライベート IP(NIC チーム) なし 4 仮想 IP プライベートネットワークの
プライベートネットワークアダプタ用の NIC チーミングの設定 1 ノード 1 で、NIC チーミングに使用される 2 つのネットワークアダプタを確認します。 2 選択した各ネットワークアダプタとプライベートネットワークスイッチを Ethernet ケーブル で接続します。 3 ノード 1 で、Intel NIC を使用している場合は、以下の手順を実行して NIC チーミングを設定 します。 a Windows デスクトップで スタート をクリックし、次の順に選択します。 プログラム → Intel Network Adapters→ 有線用 Intel(R) PROSet 有線用 Intel(R) PROSet ウィンドウが表示されます。 b Action(操作)をクリックし、チームに追加 を選択し、新規チームを作成 をクリックし ます。 c チーム化ウィザード ウィンドウで、アダプティブロードバランシング を選択し、次へ を クリックします。 d このチームのアダプタを選択してください のボックスで、NIC チーミング用に特定した ネットワークアダプタを選択し、次へ をクリックします。
i Broadcom Advanced Control Suite 2 メッセージウィンドウで、Yes(はい) をクリックします。 j IP Address Setting Reminder(IP アドレス設定のリマインダー)メッセージボックス で OK をクリックします。 k Broadcom Advanced Control Suite 2 メインウィンドウで、正しいネットワークアダ プタが選択されていることを確認し、OK をクリックします。 5 残りのノードで 手順 1 ~ 手順 4 を繰り返します。 パブリックおよびプライベートネットワークアダプタ用の IP アドレスの設定 1 必要に応じて、アダプタのネットワークインタフェース名をアップデートします。必要がない 場合は、手順 3 に進みます。 a ノード 1 で スタート をクリックし、設定 → コントロールパネル → ネットワーク接続 の順 に選択します。 b ネットワーク接続 ウィンドウで、名前を変更するパブリックネットワークアダプタを右ク リックし、名前の変更 を選択します。 メモ:クラスタノードでネットワークアダプタの接続
e OK をクリックします。 f プロパティ ウィンドウで、閉じる をクリックします。 g プライベート NIC チームで 手順 a ~手順 f を繰り返します。 h 残りのノードで 手順 a ~手順 g を繰り返します。 3 パブリックおよびプライベートネットワークアダプタが、ネットワークサービスによってアク セスできる適切な順序で表示されていることを確認します。 a Windows デスクトップで、スタート をクリックし、設定 → コントロールパネル → ネット ワーク接続 の順に選択します。 b ネットワーク接続 ウィンドウで 詳細 をクリックし、詳細設定 を選択します。 c アダプタとバインド タブを選択します。 d ネットワークアダプタが次の順序で表示されていることを確認します。 メモ:アダプタの順序を変更するには、上下の矢印をクリックしてください。 パブリック プライベート < その他のネットワークアダプタ > e OK をクリックします。 f ネットワーク接続 ウィンドウを閉じます。 4 両方のノードで、%SystemRoot%\system32\driv
5 クラスタノードがパブリックおよびプライベートネットワークと通信できることを確認 します。 a ノード 1 で、コマンドプロンプトウィンドウを開きます。 b コマンドプロンプトで、次のコマンドを入力します。 ping ping と は、もう 1 つのノードにおけるパブリック およびプライベートネットワークアダプタのホスト名です。 ノードのネットワークアダプタが ping コマンドに反応しない場合は、ネットワーク設定 を確認し、この手順を繰り返します。 メモ:VIP の設定は後で行われます。この時点では ping コマンドによる確認ができ ません。 6 手順 1 ~手順 5 を残りのクラスタノードで繰り返します。 Dell | EMC に必要なホストベースソフトウェアのインストール Naviagent ソフトウェアのインストールは、Dell|EMC ストレージのマニュアルと CD メディアに 従って実行してください。Naviagent ソフトウェ
6 ディスクの管理 ウィンドウで、4 台のディスクが表示されていることを確認します。ディスク のサイズは互いに、また、ストレージシステム内のノードに割り当てられている LUN ともほ ぼ同一であるはずです。 7 手順 1 ~手順 6 を残りのクラスタノードで繰り返します。 PowerPath のインストール 1 ノード 1 で、EMC PowerPath をインストールします。 メモ:詳細については、Dell|EMC ストレージシステムに同梱の Dell|EMC PowerPath マニュアルを参照してください。 2 インストール手順が完了したら、システムを再起動します。 3 残りのノードで 手順 1 と 手順 2 を繰り返します。 PowerPath の機能の確認 1 Windows デスクトップでシステムトレイを探し、PowerPath の三角形のアイコンを右クリッ クし、PowerPath Administrator を選択します。 2 PowerPathAdmin コンソールで、EMC PowerPathAdmin を展開します。 3 左ウィンドウペインで、パス管理 を展開します。 4 左ウィンド
Oracle Clusterware 用のディスクの準備 本項では、以下のディスク用に論理ドライブを作成するための情報を提供します。 • Oracle Clusterware Registry(OCR)ディスク ― クラスタ設定情報が格納されています。 • 投票ディスク(Voting Disk)― 1 つまたは複数のノードでプライベートネットワークまたは 接続ストレージが使用できない場合に、クラスタノード間にアービトレーションを提供 します。 • データディスクとバックアップディスク ― データベースを作成し(データディスク)、バック アップとログデータを保存する(バックアップディスク)ためのストレージ領域を提供 します。 本書で説明されているクラスタ設定を行う際に、ファイバーチャネルストレージ上にパーティショ ンを作成します。パーティションの作成時には、接続されているストレージシステムに割り当てら れた LUN または論理ディスクをクラスタノードが検出できることを確認します。 Oracle Clusterware 用のディスクを準備するには、OCR ディスク、投票ディスク、およびデータ ディスク
10 OCR ディスク用に論理ドライブを作成します。 a ディスクパーティション領域で空き領域を右クリックし、新しい論理ドライブ を選択 します。 新しいパーティションウィザードへようこそ が表示されます。 b 次へ をクリックします。 c パーティションの種類を選択 ウィンドウで 論理ドライブ を選択し、次へ をクリック します。 d パーティションサイズの指定 ウィンドウの パーティションサイズ(MB) フィールドに 100 と入力し、次へ をクリックします。 e ドライブ文字またはパスの割り当て ウィンドウで、ドライブ文字またはドライブパスを割 り当てない を選択し、次へ をクリックします。 f パーティションのフォーマット ウィンドウで、このパーティションをフォーマットしない を選択し、次へ をクリックします。 g 完了 をクリックします。 11 投票ディスク用に論理ドライブを作成します。 a ディスクパーティション領域で空き領域を右クリックし、新しい論理ドライブ を選択 します。 新しいパーティションウィザードへようこそ が表示されます。 212 b 次へ をクリ
OCFS を使用したデータベースストレージ用のデータベースディスクとリカバリディスクの準備 本項では、OCFS(Oracle Clustered File System)ストレージディスクの作成に使用する論理ドライ ブの作成方法について説明します。 メモ:自動ストレージ管理(ASM)ストレージディスクの作成に使用する論理ドライブを作成する場 合は、次の手順を省略して、「ASM を使用したデータベースストレージ用のデータベースディスクと リカバリディスクの準備」を参照してください。 1 ノード 1 で、データベースディスク用に 1 つの論理ドライブを作成します。 a Oracle データベースに割り当てられたディスクを確認します。 b ディスクパーティション領域で空き領域を右クリックし、新しい論理ドライブ を選択 します。 新しいパーティションウィザードへようこそ が表示されます。 c 次へ をクリックします。 d パーティションの種類を選択 ウィンドウで 論理ドライブ を選択し、次へ をクリック します。 e パーティションサイズの指定 ウィンドウの パーティションサイズ(MB) フィール
3 他のすべてのノードを再起動します。 4 他の各ノードの Windows デスクトップで、マイコンピュータ アイコンを右クリックし、 管理 を選択します。 5 コンピュータの管理 ウィンドウで、記憶域 を展開し、ディスクの管理 をクリックします。 6 手順 1 ~ 2 と「Oracle Clusterware 用のディスクの準備」で作成したストレージドライブから、 割り当てられたドライブ文字を削除します。 a 論理ドライブを右クリックし、ドライブ文字とパスの変更 を選択します。 b ドライブ文字とパスの変更 ウィンドウで、ドライブ文字を選択し、削除 をクリック します。 c 確認 ウィンドウで、はい をクリックします。 d ストレージパーティション上の残りの論理ドライブに対して、手順 a ~ c を繰り返します。 ASM を使用したデータベースストレージ用のデータベースディスクとリカバリディスクの準備 本項では、自動ストレージ管理(ASM)によるディスクストレージの作成に使用する論理ドライブ の作成方法について説明します。ASM によるディスクストレージは、複数のディスクへのスパニン グが
2 フラッシュバックリカバリディスク用に 4 つの論理ドライブを作成します。 a 手順 1 の 手順 a ~手順 h を実行します。 b 手順 1 の手順 a ~ c をさらに 3 回繰り返して、フラッシュバックリカバリディスク用の残 りの論理ドライブを作成します。 3 他のすべてのノードを再起動します。 4 他の各ノードの Windows デスクトップで、マイコンピュータ アイコンを右クリックし、 管理 を選択します。 5 コンピュータの管理 ウィンドウで、記憶域 を展開し、ディスクの管理 をクリックします。 6 手順 1 ~ 2 と「Oracle Clusterware 用のディスクの準備」で作成したストレージドライブから、 割り当てられたドライブ文字を削除します。 a 論理ドライブを右クリックし、ドライブ文字とパスの変更 を選択します。 b ドライブ文字とパスの変更 ウィンドウで、ドライブ文字を選択し、削除 をクリック します。 c 確認 ウィンドウで、はい をクリックします。 d ストレージパーティション上の残りの論理ドライブに対して、手順 a ~ c を繰り返します。 共有デ
OCFS を使用した Oracle RAC 10g R2 のインストール 本項では、Oracle RAC 10g R2 ソフトウェアのインストール手順について説明します。内容は次の とおりです。 • Oracle Clusterware のインストール • css misscount 値の変更 • Oracle Database 10g R2 ソフトウェアとソフトウェアアップデートのインストール • リスナーの設定 • シードデータベースの作成 Oracle Clusterware バージョン 10.2.0.
6 Specify Cluster Configuration(クラスタ構成の指定)ウィンドウで、以下の情報を入力し ます。 • 代替クラスタ名(必要に応じて)。 • 両方のクラスタノード用のパブリックおよびプライベートネットワークのホスト名。 追加ノードを指定するには、追加 をクリックします。 • Add a new node to the existing cluster(既存のクラスタに新しいノードを追加する) ウィンドウで、パブリック、プライベート、および仮想ホスト名を入力し、OK をクリッ クします。 メモ:ネットワークホスト名にドメイン名の拡張子が含まれていないことを確認してくだ さい。 7 次へ をクリックします。 Specify Network Interface Usage(ネットワークインタフェースの用途を指定する)ウィ ンドウが表示され、クラスタ全体のネットワークインタフェースの一覧が表示されます。 8 必要に応じて、Interface Name(インタフェース名)を選択し、編集 をクリックすること で、パブリック インタフェースタイプ を Public に(Private
12 Cluster Configuration Storage(クラスタ構成ストレージ)ウィンドウで、データベース について以下の手順を実行します。 a 「OCFS を使用したデータベースストレージ用のデータベースディスクとリカバリディスク の準備」の 手順 1 で作成した 10GB パーティションの位置を確認します。 b パーティションを選択し、編集 をクリックします。 c Specify Disk Configuration(ディスク構成の指定)ウィンドウで、Format partition with CFS(パーティションを CFS でフォーマット)を選択します。 d Use partition for data storage(パーティションをデータストレージに使用する)が選 択されていることを確認します。 e Assign Drive Letter(ドライブ文字の割り当て)オプションのプルダウンメニューを使 用して、ドライブ文字をパーティションに割り当てます。 f OK をクリックします。 13 Cluster Configuration Storage(クラスタ構成ストレ
16 サマリー ウィンドウで インストール をクリックしてインストール手順を開始します。 インストール ウィンドウにインストールの進行状況が表示されます。 次に、Configuration Assistant ウィンドウが表示され、OUI が一連の設定ツールを実行し ます。 次に、インストールの終了 ウィンドウが表示されます。 メモ:ディスクパーティション領域を右クリックしないでください。Configuration Assistant ウィンドウでエラーが発生した場合は、以下の手順を実行して、本書の トラブルシューティング と「Clusterware のインストールに失敗した場合の対処法」 を参照してください。 a エラーウィンドウで、OK をクリックします。 b Configuration Assistant ウィンドウで、次へ をクリックします。 c 警告メッセージを無視して OK をクリックします。 d 終了 をクリックして OUI セッションを終了します。 e 終了 ウィンドウで、はい をクリックします。 css misscount 値の変更 1 ノード 1 以外のすべてのノードを
Oracle Database 10g R2 with Real Application Clusters 10.1.0.2 のインストール 1 ノード 1 で CD ドライブに『Oracle Database 10g Release 2 for Microsoft Windows CD』 をセットします。 Oracle Database 10g - Autorun(Oracle Database 10g ― 自動実行)ウィンドウが表示さ れます。Oracle Database 10g - Autorun(Oracle Database 10g― 自動実行)ウィンドウ が表示されない場合は、以下の手順を実行します。 a スタート をクリックし、ファイル名を指定して実行 を選択します。 b ファイル名を指定して実行 フィールドに次のテキストを入力し、OK をクリックします。 %CD-ROM drive%:\autorun\autorun.
10 サマリー ウィンドウで インストール をクリックします。 11 インストールの終了 ウィンドウで、ウィンドウに表示されている手順を実行します。 メモ:次の手順に進む前に、このウィンドウに表示されている手順を実行する必要があり ます。 12 インストールの終了 ウィンドウの表示に従って必要な手順を実行したら、終了 をクリックし ます。 13 終了 ウィンドウで、はい をクリックします。 リスナーの設定 本項では、リモートクライアントからデータベースに接続するために必要なリスナーの設定手順に ついて説明します。 ノード 1 で、以下の手順を実行します。 1 スタート をクリックし、ファイル名を指定して実行 を選択して、次のテキストを入力します。 netca 2 OK をクリックします。 3 Real Application Clusters, Configuration(Real Application Clusters、構成)ウィン ドウで、クラスタ構成 を選択し、次へ をクリックします。 4 Real Application Clusters, Active Nodes(Real Applicatio
シードデータベースの作成 本項では、OCFS を使用してシードデータベースを作成する手順とシードデータベースを確認する 手順について説明します。 Oracle CFS(Cluster File System)を使用してシードデータベースを作成するには、次の手順を実行 します。 1 ノード 1 で スタート をクリックし、ファイル名を指定して実行 を選択します。 2 ファイル名を指定して実行 フィールドに dbca と入力し、OK をクリックします。 Database Configuration Assistant が起動します。 3 ようこそ ウィンドウで Oracle Real Application Cluster データベース を選択し、 次へ をクリックします。 4 操作 ウィンドウで、データベースの作成 をクリックし、次へ をクリックします。 5 ノードの選択 ウィンドウで すべて選択 をクリックし、次へ をクリックします。 6 データベーステンプレート ウィンドウで、カスタムデータベース をクリックし、 次へ をクリックします。 7 データベース識別情報 ウィンドウの グローバルデータベース名 フ
13 Recovery Configuration(リカバリ設定)ウィンドウで、以下の手順を実行します。 a フラッシュリカバリ領域の指定 を選択します。 b 参照 をクリックします。 c ディレクトリの参照 ウィンドウで、プルダウンメニューを使用して、「Oracle Clusterware バージョン 10.2.0.
ASM を使用した Oracle RAC 10g R2 のインストール 本項では、Oracle RAC 10g R2 ソフトウェアのインストール手順について説明します。内容は次の とおりです。 • Oracle Clusterware のインストール • css misscount 値の変更 • Oracle Database 10g R2 ソフトウェアとソフトウェアアップデートのインストール • シードデータベースの作成 Oracle Clusterware バージョン 10.2.0.1 のインストール 1 ノード 1 で、CD ドライブに『Oracle Clusterware CD』をセットします。 Oracle Universal Installer(OUI)が起動し、ようこそ 画面が表示されます。 ようこそ画面が表示されない場合は、以下の手順を実行します。 a スタート をクリックし、ファイル名を指定して実行 を選択します。 b ファイル名を指定して実行 フィールドに次のテキストを入力し、OK をクリックします。 %CD drive%\autorun\autorun.
7 次へ をクリックします。 Specify Network Interface Usage(ネットワークインタフェースの用途を指定する)ウィ ンドウが表示され、クラスタ全体のネットワークインタフェースの一覧が表示されます。 8 インタフェースタイプ ドロップダウンメニューで、(必要に応じて)Interface Name(イン タフェース名)を選択し、編集 をクリックすることで、パブリックの インタフェースタイプ を Public、プライベートの インタフェースタイプ を Private に設定します。正しいインタ フェースタイプ を選択し、OK をクリックします。 9 次へ をクリックします。 10 Cluster Configuration Storage(クラスタ構成ストレージ)画面で、OCR ディスクについ て以下の手順を実行します。 a 「Clusterware 用の OCR と投票ディスクの準備」で作成した 100 MB パーティションの位 置を確認します。 b パーティションを選択し、編集 をクリックします。 c Specify Disk Configuration(ディスク構成の指定
css misscount 値の変更 1 ノード 1 以外のすべてのノードをシャットダウンします。 2 ノード 1 で、コマンドプロンプトウィンドウを開きます。 3 コマンドプロンプトで次のテキストを入力し、 を押します。 cd %ORA_CLUSTERWARE_HOME%\bin\ %ORA_CLUSTERWARE_HOME% は、「Oracle Clusterware バージョン 10.2.0.1 のインストール」 の 手順 4 で作成したホームディレクトリです。 4 コマンドプロンプトで次のテキストを入力し、 を押します。 crsctl set css misscount 120 5 ノード 1 を再起動し、管理者としてログインします。 6 他のすべてのノードを起動します。 Oracle10g Database with Real Application Clusters 10.2.0.
5 Specify Home Details(ホームの詳細を指定)ウィンドウの インストール先 で、以下のこ とを確認します。 • 名前 フィールドで、Oracle データベースのホーム名が OraDb10g_home1 であること。 • パス フィールドで、Oracle ホームの完全なパスが次のようになっていること。 %SystemDrive%\oracle\product\10.2.
シードデータベースの作成 本項では、ASM を使用してシードデータベースを作成する手順とシードデータベースを確認する手 順について説明します。 Oracle ASM を使用してシードデータベースを作成するには、次の手順を実行します。 1 Oracle Clusterware が実行中であることを確認します。 a コマンドプロンプトウィンドウを開きます。スタート をクリックし、 ファイル名を指定して実行 を選択して、cmd と入力し、 を押します。 b 「crsctl check crs」と入力します。 c 画面に次の情報が出力されます。 CSS appears healthy CRS appears healthy EVM appears healthy(CSS は正常です。…) d 上記のメッセージが表示されない場合は、「crsctl start crs」と入力します。 e 「exit」と入力することで、cmd ウィンドウを閉じます。 2 ノード 1 で スタート をクリックし、ファイル名を指定して実行 を選択します。 3 ファイル名を指定して実行 フィールドに次のテキストを入力
11 記憶域オプション ウィンドウで、Automatic Storage Management(ASM)を選択し、 次へ をクリックします。 12 Create ASM Instance(ASM インスタンスの作成)ウィンドウで、以下の手順を実行 します。 a SYS パスワード フィールドで、新しいそれぞれ適切なフィールドに新しいパスワードの入 力と確認の入力を行います。 b 初期化パラメータファイル(IFILE)の作成 を選択します。 c 次へ をクリックします。 13 Database Configuration Assistant ウィンドウで、OK をクリックします。 ASM Creation(ASM の作成)ウィンドウが表示され、ASM インスタンスが作成されます。 メモ:Failed to retrieve network listener resources(ネットワークリス ナーリソースの読み出しに失敗しました)という警告メッセージが表示された場合は、 はい をクリックして DBCA に適切なリスナーリソースの作成を許可します。 14 ASM ディスクグループ ウィンドウで、新規
e Select disks(ディスクの選択)画面で を押し、Status(ステータス)行で Candidate device(候補デバイス)を割り当てた残りのディスクを選択します。 f Generate stamps with this prefix(この接頭辞を持つスタンプを生成する)フィール ドで、FLASH と入力し、次へ をクリックします。 g Stamp disks(ディスクにスタンプする)ウィンドウで、次へ をクリックします。 h 完了 をクリックして設定を保存します。 i 利用可能なディスクの隣にあるチェックボックスを選択し、OK をクリックします。 ASM ディスクグループ ウィンドウが表示され、ソフトウェアがディスクグループを作成中で あることが示されます。 作成が完了したら、FLASH ディスクグループが ディスクグループ名 行に表示されます。 18 手順 15 で DATABASE に割り当てたディスクグループ名のみを選択し、次へ をクリック します。 19 データベースファイルの場所 ウィンドウで、Use Oracle-Managed Files(O
追加情報 サポートされるソフトウェアのバージョン メモ:今回のリリースに含まれる Oracle をサポートするデルの設定では、PCI Express コントローラは サポートされていません。 リリース時点でサポートされているソフトウェアの一覧を 表 1-7 に示します。サポートされている 最新のハードウェアとソフトウェアについては、dell.com/10g からバージョン 1.1 の Solution Deliverable List をダウンロードして参照してください。 表 1-7 サポートされるソフトウェアのバージョン ソフトウェアコンポーネント 対応バージョン Windows Server 2003 Enterprise x64 Edition SP1 PowerPath for Windows 4.5 QLogic HBA Storport ドライバ 9.1.0.15 Emulex HBA Storport ドライバ 7-1.11a0-1e PERC 4e/Di および PERC4e/Si 6.46.3.64 Intel 1000 MT/XT(ベースドライバ) 8.4.
トラブルシューティング Clusterware のインストールに失敗した場合の対処法 Oracle Clusterware Configuration Assistant のエラー Oracle Clusterware Configuration Assistant を使用したインストールが失敗した場合は、 Configuration Assistant ウィンドウで以下の手順を実行します。 1 ファイル %ORA_CLUSTERWARE_HOME%\cfgtoollogs\configToolFailedCommands を開きます。%ORA_CLUSTERWARE_HOME% は、「Oracle Clusterware バージョン 10.2.0.
OUI の実行 1 ノード 1 で Explorer のウィンドウを開き、次のディレクトリに移動します。 %SystemDrive%\oracle\product\10.2.0\crs\oui\bin 2 setup.exe をダブルクリックして Oracle Universal Installer(OUI)を起動します。 3 ようこそ ウィンドウで 製品の削除 をクリックします。 4 インベントリ ウィンドウで OraCr10g_home を選択し、削除 をクリックします。 5 確認 ウィンドウで、はい をクリックします。 エラーメッセージが表示されたら、キャンセル をクリックします。 6 ようこそ ウィンドウで キャンセル をクリックします。 7 確認のメッセージが表示されたら、キャンセル をクリックし、はい をクリックします。 Oracle サービスの削除 1 ノード 1 で サービス コンソールを起動します。 a スタート をクリックし、ファイル名を指定して実行 を選択します。 b ファイル名を指定して実行 フィールドに次のテキストを入力し、OK をクリックします。 services.
ストレージデバイスをクリーンにする方法 1 OCR レジストリ(ocrcfg)と投票ディスク用に設定するパーティションをクリーンにします。 a スタート をクリックし、ファイル名を指定して実行 を選択します。 b ファイル名を指定して実行 フィールドに cmd と入力し、OK をクリックします。 c コマンドプロンプトで次のテキストを入力し、 を押します。 %SystemDRive%\oracle\product\10.2.0\crs\bin\ExportSYMLink Oracle Symbolic Link Exporter(ExportSYMLink)によって、シンボリックリンクが SYMMAP.TBL ファイルから現在のディレクトリにインポートされます。 d コマンドプロンプトで次のテキストを入力し、 を押します。 notepad SYMMAP.
6 OCR(OCRCFG)および投票ディスク(VOTEDSK)用のシムリンクを削除します。 a ocrcfg および votesdk を選択します。 b オプション をクリックし、Commit(反映する)を選択します。 成功すると、ocrcfg および votedsk のエントリが消えます。 c オプション をクリックし、終了 を選択して Oracle Object Manager を閉じます。 7 コンピュータの管理コンソールを起動します。 a Windows デスクトップで スタート をクリックし、ファイル名を指定して実行 を選択 します。 b ファイル名を指定して実行 フィールドに次のテキストを入力し、 をクリック します。 compmgmt.
トラブルシューティングのその他の問題 Windows Server 2003 オペレーティングシステムと Oracle 10g R2 ソフトウェアを導入して使用す る際に発生する可能性のある問題について、推奨する対処方法を 表 1-8 に示します。 表 1-8 トラブルシューティング カテゴリ 問題 / 症状 原因 NIC のチー ミング Broadcom NIC のチーミング にエラーが発 生する NIC のチーミングにエラーが発生 この問題の原因である可能性が最も高 すると、以下の事象が順に起こる いのは、お使いのスイッチのスパニン 場合がある。 グツリープロトコルです。スパニング 1 NIC のチーミングで使用された ツリープロトコルが原因である場合、 Broadcom NIC の 1 つにエラー この問題の対処法は 3 つあります。 が発生するか、または無効にな • スイッチの スパニングツリー をオフ にする。 る。2 番目の NIC が利用できる ため、プライベートネットワー • チーム化された NIC が取り付けられ クは 2 番目の NIC の働きにより、 ているスイッチのポートで
表 1-8 トラブルシューティング (続き) カテゴリ 問題 / 症状 Oracle Clusterware のインス トール Oracle Clusterware の インストールが 失敗する。 原因 推奨する対応処置 ocrcfg や votedsk のシムリンク 以下の手順を実行します。 が使用できない。 1 OUI を使用して Oracle Clusterware をアンインストールします。 1 つまたは複数のストレージデバ 2 残りの Oracle サービスをすべてアン イスを再フォーマットする必要が インストールします。 ある。 Configuration 3 ストレージデバイスをクリーンに Assistant が正常 します。 にインストール 詳細については、「Oracle Clusterware できない。 のアンインストール」を参照してくだ さい。 導入ガイド 237
表 1-8 トラブルシューティング (続き) カテゴリ 問題 / 症状 原因 Oracle クラスタノード クラスタノードがストレージディ Clusterware が再起動し スクと通信できない。 て画面が青色 (ブルースクリー ン)になる。 238 導入ガイド 推奨する対応処置 以下の手順を実行します。 1 クラスタノードを再起動します。 2 POST 中に を押します。 3 Windows 詳細オプションメニュー 画面で セーフモード を選択します。 4 適切なオペレーティングシステムを選 択します。 5 システムにログオンします。 6 デスクトップ 画面で OK をクリック します。 7 Windows デスクトップで、マイコン ピュータ を右クリックし、管理 を選 択します。 8 コンピュータの管理 ウィンドウで、 サービスとアプリケーション を展開 します。 9 サービス をクリックします。 10 最初の Oracle サービスを右クリック し、プロパティ を選択します。 11 スタートアップ ドロップダウンメ ニューをクリックし、このサービスの デフォルトのスタートアップの種
表 1-8 トラブルシューティング (続き) カテゴリ 問題 / 症状 システムの クラスタノード 青色の画面 で画面が青色に なる。 原因 クラスタノードが投票ディスクに アクセスできない。 推奨する対応処置 1 HBA 接続モードのファームウェアが ストレージ構成に対して適切に設定さ れていることを確認します。 クラスタノードとストレージシステム が直接接続構成になっている場合は、 接続 モードを 0 - loop only (0 - ループのみ)に設定します。 クラスタノードとストレージシステム がファイバーチャネルスイッチを介し て相互に接続されている場合は、接続 モードを 2 - loop preferred, otherwise point-to-point (2 - ループ優先、ループが不可の場合 はポイントツーポイント)に設定 します。 2 問題が解決しない場合は、CSS misscount を 120 よりも大きな値にし ます。 3 以下の手順を実行します。 a ノード 1 以外のすべてのノードを シャットダウンします。 b ノード 1 で、コマンドプロンプトを 開きます。 c
表 1-8 トラブルシューティング (続き) カテゴリ 問題 / 症状 原因 推奨する対応処置 ストレージ ディスクがアク セスできないも のとして表示さ れる。 Windows デスクトップで マイコ ンピュータ を右クリックし、コン ピュータの管理 を選択し、ディス クの管理 をクリックすると、ディ スクがアクセスできないものとし て表示される。 両方のクラスタノードにストレージ LUN が割り当てられていることを確認 します。 クラスタノードとストレージシステム を接続する光ファイバーケーブルが正 しく取り付けられていることを確認し ます。 考えられる原因 • LUN がクラスタノードに割り当 詳細については、 「SAN 接続構成に用い てられていない。 るストレージシステムのケーブル接続」 • ケーブル接続が正しくない。 を参照してください。 • クラスタノードに HBA ドライバ がインストールされていない。 ストレージ SCSI ディスクデ Windows デスクトップで マイコ 両方のクラスタノードにストレージ バイスが表示さ ンピュータ を右クリックし、コン LUN が割り当
表 1-8 トラブルシューティング (続き) カテゴリ 問題 / 症状 原因 推奨する対応処置 VIPCA VIPCA の設定が パブリックネットワークのアダプ パブリックネットワークのアダプタイ 失敗する。 タインタフェース(または 4 ネッ ンタフェース名が両方のクラスタノー トワークインタフェースの場合は、ドで同一であることを確認します。 VIP 用に割り当てられたネット パブリックネットワークのアダプタイ ワークインタフェース)の名前が、ンタフェース名を確認するには、以下 両方のクラスタノードで同一 の手順を実行します。 でない。 1 ノード 1 で スタート をクリックし、 設定 → コントロールパネル → ネット ワーク接続 の順に選択します。 2 ネットワーク接続 ウィンドウで、名 前を変更するパブリックネットワーク アダプタを右クリックし、名前の変更 を選択します。 3 残りの各ノードで 手順 1 および 手順 2 を繰り返します。 困ったときは デルサポート システムの詳しい使い方については、システムコンポーネントに付属のマニュアルを参照してくだ さい。各種の白書、デルがサポ
オープンソースファイルの入手および使用 『Deployment CD』に格納されているソフトウェアには、デルのプログラムのほかに、サードパー ティ製のプログラムもあります。ソフトウェアの使用に際しては、そのソフトウェアを対象とした 使用許諾条件が適用されます。"under the terms of the GNU GPL" と表記されているすべてのソフ トウェアは、GNU General Public License、バージョン 2(1991 年 6 月)の条項および条件に従っ てコピー、配布、およびまたは修正を行うことが認められています。"under the terms of the GNU LGPL"(または "Lesser GPL")と表記されているすべてのソフトウェアは、GNU Lesser General Public License、バージョン 2.
索引 O く と Oracle 10g の設定 ハードウェアおよびソフト ウェアの構成の確 認, 201 クラスタ ファイバーチャネルのハー ドウェア接続例, 202 トラブルシューティン グ, 232 Oracle RAC 10g インストール, 224 ネットワークおよびスト レージの構成, 204 クラスタのセットアップ ファイバーチャネル, 201 は こ ハードウェア ファイバーチャネルクラス タの最小要件, 198 ファイバーチャネルの相互 接続, 202 困ったときは, 241 R Red Hat Enterprise Linux インストール, 199 さ サポートされるストレージデ バイス, 231 い インストール Oracle RAC 10g, 224 Red Hat Enterprise Linux, 199 そ ソフトウェア 要件, 198, 231 パブリックおよびプライベー トネットワークの設 定, 205 パブリックネットワーク 設定, 205 ソフトウェアおよびハード ウェアの要件, 198 ふ つ プライベートネットワーク 設定, 2
索引 ほ ボンディング, 205 ま マニュアル, 199 ら ライセンス契約, 199 れ 例 ファイバーチャネルクラス タ用のハードウェア接 続, 202 244 索引
Sistemas Dell™ PowerEdge™ Guía de implantación de la base de datos Oracle 10g versión 2 Enterprise Edition Real Application Cluster para Microsoft® Windows ServerTM 2003 SP1 Enterprise x64 Edition versión 1.0 w w w. d e l l . c o m | s u p p o r t . d e l l .
Notas y avisos NOTA: una NOTA proporciona información importante que le ayudará a utilizar mejor el ordenador. AVISO: un AVISO indica la posibilidad de daños en el hardware o la pérdida de datos, e informa de cómo evitar el problema. ____________________ La información contenida en este documento puede modificarse sin previo aviso. © 2006 Dell Inc. Reservados todos los derechos. Queda estrictamente prohibida la reproducción de este documento en cualquier forma sin la autorización por escrito de Dell Inc.
Contenido Requisitos de software y hardware . Contratos de licencia . . . Documentación importante . . . . . . . . . . . . . . . . . . . 250 . . . . . . . . . . . . . . . . . . . . . 251 251 . . . . . . . . . . . . . . . . . . . . . Instalación y configuración del sistema operativo . . . . . . . . . . . . Instalación del sistema operativo mediante los CD de implantación Verificación de las configuraciones de hardware y software del clúster . . . . . . . . . . . . . . 251 . . . . . . . . . . . .
Información adicional . . . . . . . . . . . . . . . . . . . . . . . . . . Solución de problemas. 281 . . . . . . . . . . . . . . . . . . . . . . . . . 281 . . . . . . 281 282 285 . . . . . . . . . . . . . . . . . . . . . . . . . . . 289 Solución de errores de instalación del software de clúster Desinstalación del software de clúster Oracle . . . . . . Solución de problemas adicionales . . . . . . . . . . . Obtención de ayuda Asistencia de Dell . . Asistencia de Oracle 248 Contenido . . . . . .
En este documento se proporciona información para instalar, configurar, reinstalar y utilizar el software de base de datos Oracle 10g R2 de acuerdo con las configuraciones de Oracle admitidas por Dell. Utilice este documento junto con el CD de implantación de Dell para instalar el software. Si instala el sistema operativo utilizando únicamente los CD del sistema operativo, los pasos descritos en este documento pueden no ser aplicables.
Requisitos de software y hardware En la tabla 1-1 se enumeran los requisitos básicos de software para las configuraciones de Oracle admitidas por Dell, y en la tabla 1-2 se enumeran los requisitos de hardware. Para obtener información detallada sobre las versiones mínimas de software que pueden utilizarse con los controladores y las aplicaciones, consulte “Versiones de software admitidas”. Tabla 1-1.
Contratos de licencia NOTA: si no dispone de licencia para el software Oracle, póngase en contacto con un representante de ventas de Dell. Documentación importante Para obtener más información sobre componentes de hardware específicos, consulte la documentación incluida con el sistema.
6 En el indicador de comandos, escriba 6 para seleccionar Windows 2003 Server EE/SE SP1 for Oracle Database (x64) y pulse . 7 Cuando se le solicite, extraiga el primer CD de implantación de la unidad de CD e inserte el segundo CD de implantación. 8 Cuando se le solicite, inserte el CD Microsoft Windows Server 2003 Enterprise x64 Edition SP1 en la unidad de CD. Los medios de Windows se copian en la partición de implantación, el sistema se reinicia y la instalación continúa.
Verificación de las configuraciones de hardware y software del clúster Antes de comenzar la configuración del clúster, asegúrese de que la instalación del hardware, las interfaces públicas y privadas, y el software de nodos están configurados correctamente. En las secciones siguientes se proporciona información sobre la configuración del clúster Fibre Channel.
Tabla 1-4. Interconexiones de hardware Fibre Channel Componente del clúster Conexiones Cada nodo del sistema PowerEdge Un cable CAT 5e/6 de una NIC pública a una LAN Un cable CAT 5e/6 de una NIC Gigabit privada a un conmutador Ethernet Gigabit Un cable CAT 5e/6 de una NIC Gigabit privada redundante a un conmutador Ethernet Gigabit redundante Un cable óptico del HBA 0 óptico al conmutador 0 Fibre Channel, y un cable óptico del HBA 1 al conmutador 1.
• • Cada nodo debe tener instalado el software siguiente: – Windows Server 2003, Enterprise x64 Edition con SP1 (vea la tabla 1-1) – Controlador HBA El almacenamiento Fibre Channel debe estar configurado con lo siguiente: – Un mínimo de tres LUN creados y asignados al clúster – Un tamaño mínimo de 40 GB para un LUN y de 1 GB para dos LUN Cableado del sistema de almacenamiento para una configuración de conexión mediante SAN Utilice el procedimiento siguiente para configurar el sistema de almacenami
Configuración de las redes pública y privada NOTA: cada nodo requiere una dirección IP pública y una dirección IP privada exclusivas y otra dirección IP pública que se utilizará como dirección IP virtual en las conexiones de cliente y en la sustitución tras error de las conexiones. La dirección IP virtual debe pertenecer a la misma subred que la dirección IP pública. Todas las direcciones IP públicas, incluida la dirección IP virtual, deben estar registradas con DNS.
Configuración de la agrupación de NIC para los adaptadores de red privada 1 Identifique en el nodo 1 los dos adaptadores de red que se utilizarán para la agrupación de NIC. 2 Conecte un cable Ethernet de cada adaptador de red seleccionado al conmutador de la red privada.
g En la casilla Available Adapters (Adaptadores disponibles) de la ventana New Team Configuration (Nueva configuración de grupo), seleccione los adaptadores de red que ha identificado para la agrupación de NIC y añádalos a la casilla Load Balance Members (Miembros del equilibrio de carga). h Haga clic en Apply (Aplicar). i En la ventana de mensaje Broadcom Advanced Control Suite 2, haga clic en Yes (Sí).
d En la ventana de propiedades de Público, seleccione Mostrar icono en el área de notificación al conectar. Una vez realizados los procedimientos descritos en esta sección, se mostrará el estado del adaptador de red en la bandeja del sistema. e Haga clic en Aceptar. f En la ventana Propiedades, haga clic en Cerrar. g Repita del paso a al paso f en el grupo de NIC privado. h Repita del paso a al paso g en los nodos restantes.
5 Asegúrese de que los nodos del clúster pueden comunicarse con las redes pública y privada. a En el nodo 1, abra una ventana de indicador de comandos. b En el indicador de comandos, escriba lo siguiente: ping ping donde y son los nombres de host de los adaptadores de red pública y privada del nodo restante.
6 En la ventana Administración de discos, compruebe que aparezcan cuatro discos. Los discos deben ser de tamaño similar entre ellos y respecto a los LUN que están asignados a los nodos en el sistema de almacenamiento. 7 Repita del paso 1 al paso 6 en los nodos restantes. Instalación de PowerPath 1 Instale EMC PowerPath en el nodo 1. NOTA: para obtener más información, consulte la documentación de Dell|EMC PowerPath incluida con el sistema de almacenamiento Dell|EMC.
Preparación de los discos para el software de clúster Oracle En esta sección se proporciona información para crear unidades lógicas para los discos siguientes: • Disco de registro del software de clúster Oracle (OCR): contiene información de configuración del clúster. • Disco de votación: ofrece arbitraje entre los nodos del clúster cuando la red privada o el almacenamiento conectado no están disponibles para uno o más nodos.
c En la ventana Seleccionar el tipo de partición, seleccione Unidad lógica y haga clic en Siguiente. d En el campo Tamaño de partición en MB de la ventana Especificar el tamaño de la partición, escriba 100 y haga clic en Siguiente. e En la ventana Asignar letra de unidad o ruta de acceso, seleccione No asignar una letra o ruta de acceso de unidad y haga clic en Siguiente. f En la ventana Formatear la partición, seleccione No formatear esta partición y haga clic en Siguiente.
e En el campo Tamaño de partición en MB de la ventana Especificar el tamaño de la partición, escriba 10000 y haga clic en Siguiente. f En la ventana Asignar letra de unidad o ruta de acceso, seleccione No asignar una letra o ruta de acceso de unidad y haga clic en Siguiente. g En la ventana Formatear la partición, seleccione No formatear esta partición y haga clic en Siguiente. h Haga clic en Finalizar. 2 En el nodo 1, cree una unidad lógica para el disco de recuperación.
Preparación de los discos de base de datos y de recuperación para el almacenamiento de base de datos con ASM En esta sección se proporciona información para crear las unidades lógicas que se utilizarán para la creación del almacenamiento en disco ASM (administración automática del almacenamiento). El almacenamiento en disco ASM se compone de uno o más grupos de discos que pueden abarcar varios discos.
6 Elimine las letras de unidad asignadas de las unidades de almacenamiento que ha creado en los pasos 1 y 2 y en “Preparación de los discos para el software de clúster Oracle”. a Haga clic con el botón derecho del ratón en la unidad lógica y seleccione Cambiar la letra y rutas de acceso de unidad. b En la ventana Cambiar la letra y rutas de acceso de unidad, seleccione la letra de la unidad y haga clic en Quitar. c En la ventana Confirmar, haga clic en Sí.
Instalación del software de clúster Oracle versión 10.2.0.1 1 En el nodo 1, inserte el CD Oracle Clusterware 10g Release 2 for Microsoft Windows (Software de clúster Oracle 10g versión 2 para Microsoft Windows) en la unidad de CD. Aparece la ventana Oracle Clusterware – Autorun (Software de clúster Oracle – Ejecución automática). Si esta ventana no aparece: a Haga clic en Inicio y seleccione Ejecutar. b En el campo Ejecutar, escriba lo siguiente y haga clic en Aceptar: %Unidad_CD-ROM%:\autorun\autorun.
10 En la ventana Cluster Configuration Storage (Almacenamiento de configuración de clúster), realice los pasos siguientes para cada disco OCR: a Localice la partición de 100 MB creada en el procedimiento “Preparación de los discos OCR y de votación para el software de clúster”. b Seleccione la partición y haga clic en Edit (Editar).
c Asegúrese de que Use partition for data storage (Utilizar partición para almacenamiento de datos) está seleccionado. d Utilice el menú desplegable Assign Drive Letter (Asignar letra de unidad) para asignar una letra de unidad a la partición. e Haga clic en Aceptar. 14 En la ventana Cluster Configuration Storage (Almacenamiento de configuración de clúster), haga clic en Next (Siguiente). 15 Ignore el mensaje de advertencia y haga clic en OK (Aceptar).
Instalación de la base de datos Oracle 10g R2 con Real Application Clusters 10.1.0.2 1 En el nodo 1, inserte el CD Oracle Database 10g Release 2 for Microsoft Windows (Base de datos Oracle 10g versión 2 para Microsoft Windows) en la unidad de CD. Aparece la ventana Oracle Database 10g – Autorun (Base de datos Oracle 10g – Ejecución automática). Si esta ventana no aparece: a Haga clic en Inicio y seleccione Ejecutar.
10 En la ventana Summary (Resumen), haga clic en Install (Instalar). 11 En la ventana End of Installation (Fin de la instalación), realice el procedimiento tal como se indica en la ventana. NOTA: antes de ir al paso siguiente, debe realizar los procedimientos tal como se enumeran en la ventana. 12 Cuando haya completado los procedimientos necesarios que se indican en la ventana End of Installation (Fin de la instalación), haga clic en Exit (Salir). 13 En la ventana Exit (Salir), haga clic en Yes (Sí).
Creación de la base de datos semilla En esta sección se describen los procedimientos necesarios para crear la base de datos semilla mediante OCSF y verificarla. Para crear la base de datos semilla mediante Oracle Cluster File System (OCFS), realice los pasos siguientes: 1 En el nodo 1, haga clic en Inicio y seleccione Ejecutar. 2 En el campo Ejecutar, escriba dbca y haga clic en Aceptar. Se inicia el asistente para la configuración de bases de datos.
12 Haga clic en Next (Siguiente). 13 En la ventana Recovery Configuration (Configuración de recuperación), realice los pasos siguientes: a Seleccione Specify Flash Recovery Area (Especificar área de recuperación flash). b Haga clic en Browse (Examinar). c En la ventana Directory Browse (Mostrar directorios), utilice el menú desplegable y seleccione la unidad CFS que ha creado en el paso 13d de “Instalación del software de clúster Oracle versión 10.2.0.1”. d Haga clic en OK (Aceptar).
Instalación de Oracle RAC 10g R2 mediante ASM En esta sección se proporciona información sobre cómo instalar el software Oracle RAC 10g R2. Se tratan los temas siguientes: • Instalación del software de clúster Oracle • Cambio del valor misscount de css • Instalación del software de base de datos Oracle 10g R2 y actualizaciones de software • Creación de la base de datos semilla Instalación del software de clúster Oracle versión 10.2.0.
7 Haga clic en Next (Siguiente). Aparece la ventana Specify Network Interface Usage (Especificar uso de interfaz de red) con una lista de las interfaces de red de todo el clúster. 8 En los menús desplegables de Interface Type (Tipo de interfaz), configure el tipo de interfaz público como Público y el tipo de interfaz privado como Privado, si es necesario. Para ello, seleccione Interface Name (Nombre de interfaz) y haga clic en Edit (Editar).
Cambio del valor misscount de css 1 Apague todos los nodos excepto el nodo 1. 2 En el nodo 1, abra una ventana de indicador de comandos. 3 En el indicador de comandos, escriba lo siguiente y pulse : cd %ORA_CLUSTERWARE_HOME%\bin\ donde %ORA_CLUSTERWARE_HOME% es el directorio principal que ha creado en el paso 4 de “Instalación del software de clúster Oracle versión 10.2.0.1”.
6 Haga clic en Next (Siguiente). 7 En la ventana Specify Hardware Cluster Installation Mode (Especificar el modo de instalación del clúster de hardware), haga clic en Select All (Seleccionar todos) y, a continuación, en Next (Siguiente). 8 En la ventana Product-Specific Prerequisite Checks (Comprobaciones de requisitos previos específicos del producto), haga clic en Next (Siguiente).
4 En la ventana de bienvenida, seleccione Oracle Real Application Cluster database (Base de datos Oracle Real Application Cluster) y haga clic en Next (Siguiente). 5 En la ventana Operations (Operaciones), haga clic en Create a Database (Crear una base de datos) y, a continuación, en Next (Siguiente). 6 En la ventana Node Selection (Selección de nodos), haga clic en Select All (Seleccionar todos) y, a continuación, en Next (Siguiente).
15 En la ventana Create Disk Group (Crear grupo de discos), introduzca la información para los archivos de base de datos. a En el campo Disk Group Name (Nombre de grupo de discos), introduzca un nombre para el grupo de discos nuevo. Por ejemplo, BASEDEDATOS. b En la casilla Redundancy (Redundancia), seleccione External (Externa). c Haga clic en Stamp Disks (Marcar discos). d Seleccione Add or change label (Agregar o cambiar etiqueta) y haga clic en Next (Siguiente).
h Haga clic en Finish (Finalizar) para guardar la configuración. i Seleccione las casillas de verificación que aparecen junto a los discos disponibles y haga clic en OK (Aceptar). Aparece la ventana ASM Disk Group (Grupo de discos ASM), donde se indica que el software está creando el grupo de discos. Una vez finalizado el proceso, el grupo de discos FLASH aparecerá en la columna Disk Group Name (Nombre de grupo de discos).
Información adicional Versiones de software admitidas NOTA: en esta versión de las configuraciones de Oracle admitidas por Dell, no se admiten las controladoras PCI Express. En la tabla 1-7 se indica el software admitido en el momento de la publicación. Para obtener el hardware y el software más recientes disponibles, vaya a dell.com/10g y descargue la versión 1.1 de Solution Deliverable List (Lista de soluciones disponibles). Tabla 1-7.
El asistente para la configuración de IP privada virtual falla Si el asistente para la configuración de IP privada virtual (VIPCA) falla durante la instalación del software de clúster Oracle, puede aparecer el mensaje siguiente: Virtual Private IP Configuration Assistant failed (El asistente para la configuración de IP privada virtual ha fallado) En este caso, realice los pasos que se describen a continuación para solucionar el error. Estos pasos se detallan en la nota 338924.1 de Metalink.
Eliminación de los servicios de Oracle 1 En el nodo 1, inicie la consola de servicios. a Haga clic en Inicio y seleccione Ejecutar. b En el campo Ejecutar, escriba lo siguiente y haga clic en Aceptar: services.msc Aparece la ventana Services (Servicios). 2 Identifique y elimine todos los servicios de Oracle que queden. Para eliminar un servicio: a Haga clic en Inicio y seleccione Ejecutar. b En el campo Ejecutar, escriba cmd y haga clic en Aceptar.
3 Utilice el formateador de particiones lógicas de Oracle (LogPartFormat) para formatear las particiones de OCRCFG y VOTEDSK en los dos nodos. En el indicador de comandos, escriba los comandos siguientes y pulse después de cada uno: %SystemDrive%\oracle\product\10.2.0\crs\bin\LogPartFormat \\.\OCRCFG %SystemDrive%\oracle\product\10.2.0\crs\bin\LogPartFormat \\.\VOTEDSK Aparece el mensaje siguiente: Are you sure you want to continue...
11 Repita los procedimientos “Preparación de los discos para el software de clúster Oracle” y “Activación de la opción automount para los discos compartidos” para volver a crear las particiones lógicas, y repita el procedimiento “Instalación de Oracle RAC 10g R2 mediante OCFS” para reinstalar Oracle RAC para OCFS o “Instalación de Oracle RAC 10g R2 mediante ASM” para reinstalar Oracle RAC para ASM.
Tabla 1-8. Solución de problemas (continuación) Categoría Problema/ síntoma Instalación del software de clúster Oracle La instalación Los enlaces simbólicos de ocrcfg del software de clúster o votedsk no están disponibles. Oracle falla. Es necesario reformatear uno El asistente de o más dispositivos de configuración no se almacenamiento. instala correctamente. Software de clúster Oracle 286 El nodo del clúster se reinicia con una pantalla azul.
Tabla 1-8. Solución de problemas (continuación) Categoría Problema/ síntoma Causa Pantalla azul del sistema Los nodos del clúster generan una pantalla azul. Los nodos del clúster no pueden acceder al disco de votación. Acción correctiva recomendada 1 Asegúrese de que los valores del firmware para el modo de conexión de HBA estén configurados correctamente para su configuración de almacenamiento.
Tabla 1-8. Solución de problemas (continuación) Categoría Problema/ síntoma Causa Acción correctiva recomendada Almacenamiento No se puede acceder a los discos. En el escritorio de Windows, cuando hace clic con el botón derecho del ratón en Mi PC, selecciona Administración de equipos y hace clic en Administración de discos, los discos aparecen como inaccesibles. Compruebe que se hayan asignado LUN de almacenamiento a los dos nodos del clúster.
Tabla 1-8. Solución de problemas (continuación) Categoría Problema/ síntoma Causa Acción correctiva recomendada VIPCA La configuración de VIPCA falla. El nombre de la interfaz de adaptador de red pública (o la interfaz de red asignada para VIP, en el caso de cuatro interfaces de red) no es el mismo en los dos nodos del clúster. Asegúrese de que el nombre de la interfaz de adaptador de red pública es el mismo en los dos nodos del clúster.
Obtención y uso de archivos de código abierto El software que se incluye en el CD de implantación es un complemento de programas de terceros, así como programas de Dell. El uso del software está sujeto a las condiciones definidas en la licencia. Todo el software designado como “bajo las condiciones de la GPL de GNU” se puede copiar, distribuir y/o modificar según las condiciones de la Licencia pública general GNU, versión 2 de junio de 1991.
Índice B E bonding, 256 ejemplos conexiones de hardware para un clúster Fibre Channel, 253 C clúster ejemplo de conexiones de hardware Fibre Channel, 253 configuración del clúster Fibre Channel, 253 configuraciones de hardware y software Fibre Channel, 254 configurar la red privada, 256 configurar las redes pública y privada, 256 configurar Oracle 10g, 253 verificar las configuraciones de hardware y software, 253 contratos de licencia, 251 Oracle RAC 10g configurar redes y almacenamiento, 255 instalar,
Índice 292 Índice