Dell™ PowerEdge™ Systems Oracle Database 10g Release 2 Standard Edition Real Application Cluster for Microsoft® Windows Server® 2003 Standard x64 R2 Edition Deployment Guide Version 1.1 w w w. d e l l . c o m | s u p p o r t . d e l l .
Notes and Notices NOTE: A NOTE indicates important information that helps you make better use of your computer. NOTICE: A NOTICE indicates either potential damage to hardware or loss of data and tells you how to avoid the problem. ____________________ Information in this document is subject to change without notice. © 2006 Dell Inc. All rights reserved. Reproduction in any manner whatsoever without the written permission of Dell Inc. is strictly forbidden.
Contents Software and Hardware Requirements License Agreements . . . Important Documentation. . . . . . . . . . . . . . . . . . . . . . . 5 . . . . . . . . . . . . . . . . . . . . . . . . . . 7 7 . . . . . . . . . . . . . . . . . . . . . . . . . . Installing and Configuring the Operating System . . . . . . . . . . . . . . . . . Installing the Operating System Using the Deployment CDs . 7 . . . . . . . . . . . . 9 . . . . . . . . . . . . . . . . . . . .
Getting Help . . . . . . . . . . . . . . . . . . . . . . . . . . . . . . . . . . . Dell Support . . Oracle Support . . . . . . . . . . . . . . . . . . . . . . . . . . . . . . . . . . . . . . . . . . . . . . . . . . . . . . . . . . . . . . Obtaining and Using Open Source Files . Index . 4 Contents 43 43 43 . . . . . . . . . . . . . . . . . . . . 44 . . . . . . . . . . . . . . . . . . . . . . . . . . . . . . . . . . . . . . . .
This document provides information for installing, configuring, reinstalling, and using your Oracle Database 10g R2 software following Dell’s supported configurations for Oracle. Use this document in conjunction with the Dell™ Deployment CD to install your software. If you install your operating system using only the operating system CDs, the steps in this document may not be applicable.
Table 1-1. Software Requirements Software Component Configuration Windows Server 2003 Standard x64 R2 Edition Oracle Database 10g R2 Version 10.2.0.1 Standard Edition, including the RAC option for clusters Oracle Patchset Version 10.2.0.2 EMC® PowerPath® (Fibre Channel clusters only) Version 4.
License Agreements NOTE: If you do not have an Oracle software license, contact your Dell sales representative. Important Documentation For more information on specific hardware components, see the documentation that came with your system. Installing and Configuring the Operating System NOTICE: To ensure that the operating system is installed correctly, disconnect all the external storage from the system before you install the operating system.
7 When prompted for the choice of deployment, type 1 and press . 8 When prompted, remove Dell Deployment CD1 from the CD drive and insert the Dell Deployment CD2 into the CD drive. 9 When prompted, insert Microsoft Windows Server 2003 Standard x64 R2 Edition CD1 into the CD drive. The Windows® media is copied to the Deployment partition, the system is rebooted, and the installation continues.
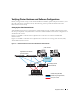
Verifying Cluster Hardware and Software Configurations Before you begin cluster setup, ensure that the hardware installation, public and private interfaces, and the node software are configured correctly. The following sections provide information about the Fibre Channel cluster setup. Setting Up Your Fibre Channel Cluster Your Dell Professional Services representative completed the setup of your Fibre Channel cluster.
Table 1-4.
Table 1-5.
System Hardware and Software Configurations • • • Each node must include the following minimum hardware peripheral components: – Two hard drives (73 GB minimum) in the internal hard-drive bay – Three Gigabit NIC ports – Two HBAs (one dual-port HBA for use with PowerEdge 1850/1950 system) Each node must have the following software installed: – Windows Server 2003, Standard x64 R2 Edition (see Table 1-1) – HBA driver The Fibre Channel storage must be configured with a minimum of three LUNs creat
Direct-Attached Configuration To configure your nodes in a direct-attached configuration (see Figure 1-3), perform the following steps: 1 Connect one optical cable from HBA0 on node 1 to port 0 of SP-A. 2 Connect one optical cable from HBA1 on node 1 to port 0 of SP-B. 3 Connect one optical cable from HBA0 on node 2 to port 1 of SP-A. 4 Connect one optical cable from HBA1 on node 2 to port 1 of SP-B. Figure 1-4.
SAN-Attached Configuration To configure your nodes in a four-port SAN-attached configuration (see Figure 1-4), perform the following steps: 1 Connect one optical cable from SP-A port 0 to Fibre Channel switch 0. 2 Connect one optical cable from SP-A port 1 to Fibre Channel switch 1. 3 Connect one optical cable from SP-B port 0 to Fibre Channel switch 1. 4 Connect one optical cable from SP-B port 1 to Fibre Channel switch 0. 5 Connect one optical cable from HBA0 on node 1 to Fibre Channel switch 0.
Configuring and Teaming the Private Network Before you deploy the cluster, assign a private IP address and a private host name to each node. This procedure ensures that the nodes can communicate with each other through the private interface. Table 1-8 provides an example of a network configuration for a two-node cluster. NOTE: This example assumes that all the IP addresses are registered in the hosts file of all the nodes. Table 1-8.
k In the Team: Properties window, click OK. l In the Intel NIC’s properties window, click OK. m Close the Computer Management window. 4 If you have Broadcom NICs on node 1, configure NIC teaming by performing the following steps. If not, go to step 5: a On the Windows desktop, click Start and select: Program→ Broadcom→ Broadcom Advanced Control Suite 2 The Broadcom Advanced Control Suite 2 window appears. b Click Tools and select Create a Team.
Configuring the IP Addresses for Your Public and Private Network Adapters 1 Update the adapter’s network interface name, if required. Otherwise, go to step 3. a On node 1, click Start and navigate to Settings→ Control Panel→ Network Connections. b In the Network Connections window, right-click the public network adapter you want to rename, and select Rename. NOTE: When you configure your network adapters on the nodes, use identical names for the public adapters and the private adapters on all the nodes.
3 Ensure that the public and private network adapters appear in the appropriate order for access by network services. a On the Windows desktop, click Start and navigate to Settings→ Control Panel→ Network Connections. b In the Network Connections window, click Advanced and select Advanced Settings. c Select the Adapter and Bindings tab.
5 Ensure that the nodes can communicate with the public and the private networks. a On node 1, open a command prompt window. b At the command prompt, type the following and press : ping ping where and are the host names for the public and private network adapters in the remaining nodes. If the node’s network adapters do not respond to ping commands, check your network configuration and then repeat this step.
6 In the Disk Management window, ensure that two disks (for a direct-attached configuration) or four disks (for a switched connection) appear. The disks should be similar in size to each other and to the LUNs that are assigned to the nodes in the storage. 7 Repeat step 1 through step 6 on the remaining nodes. Installing PowerPath 1 On node 1, install EMC PowerPath. NOTE: For more information, see the EMC PowerPath documentation that came with your Dell|EMC storage system.
Preparing the Disks for Oracle Clusterware This section provides information for creating the logical drives for the following disks: • Oracle Clusterware Registry (OCR) disk — Contains the cluster configuration information • Voting disk — Provides arbitration between the nodes when the private network or attached storage is unavailable to one or more nodes • Disks for database and flash recovery area — Provide storage area for creating the database (data disk) and the flash recovery area During the c
e In the Assign Drive Letter or Path window, select Do not assign a drive letter or drive path and click Next. f In the Format Partition window, select Do not format this partition and click Next. g Click Finish. 10 Create a logical drive for the Voting disk. a On the partition area of the disk identified for OCR and Voting disk (1 GB LUN), right-click on the free space and select New Logical Drive. The Welcome to the New Partition Wizard appears. b Click Next.
3 Restart node 2 and log in as administrator. 4 On the node 2 Windows desktop, right-click My Computer and select Manage. 5 In the Computer Management window, expand Storage and click Disk Management. 6 Remove the assigned drive letters from the storage drives that you created in step 1, step 2, and in "Preparing the OCR and Voting Disks for Clusterware." a Right-click on the logical drive and select Change Drive Letter and Paths.
Installing Oracle Clusterware Version 10.2.0.1 1 On node 1, insert the Oracle Clusterware CD into the CD drive. The Oracle Universal Installer (OUI) starts and the Welcome window appears. If the Welcome window does not appear: a Click Start and select Run. b In the Run field, type the following and click OK: %CD drive%\autorun\autorun.exe where %CD drive% is the drive letter of your CD drive. 2 In the Oracle Clusterware window, click Install/Deinstall Products. 3 In the Welcome window, click Next.
10 In the Cluster Configuration Storage window, perform the following steps for the OCR disk: a Locate the 100 MB partition that you created in the subsection, "Preparing the OCR and Voting Disks for Clusterware." b Select the partition and click Edit. c In the Specify Disk Configuration window, select Place OCR (Primary) on this partition and click OK.
Installing Oracle Database 10g R2 with Real Application Clusters 10.2.0.1 1 Insert the Oracle Database 10g Release 2 CD into the CD drive. The OUI starts and the Welcome window appears. If the Welcome window appears, skip to step 2. If not, perform the following steps: a Click Start and select Run. b In the Run field, type: %CD drive%\autorun\autorun.exe where %CD drive% is the drive letter of your CD drive. c Click OK. The OUI starts and the Welcome window appears. 2 Click Next.
Installing Oracle 10g R2 Patchset 10.2.0.2 1 Ensure that only 10.2.0.1 Clusterware and 10.2.0.1 Database binaries are installed on your system and the seed database is not created yet. 2 Download the Patchset 10.2.0.2 from the Oracle Metalink website at metalink.oracle.com. 3 Unzip the patchset to %SystemDrive%. Installing Patchset 10.2.0.2 for Oracle 10g Clusterware Before You Begin Before you install Patchset 10.2.0.
Installing PatchSet 10.2.0.2 for Oracle 10g Database NOTE: Before you install the Patchset, ensure that all the Oracle services are running. Complete the following procedures before creating a listener and a seed database. Installing the Patchset NOTE: You must install the patchset software from the node where the RAC 10g R2 software was installed. If this is not the node where you are running the OUI, exit and install the patchset from that node.
3 At the command prompt, type the following and press : %SystemDrive%\%CRS_HOME%\bin> opmd.exe -install 4 Repeat step 3 on all the nodes. Creating the Seed Database Perform the following steps to create the seed database using Oracle ASM: 1 On node 1, verify that the Oracle Clusterware is running. a Click Start and select Run. b In the Run field, type cmd and press .
11 In the Storage Options window, select Automatic Storage Management (ASM) and click Next. 12 In the Create ASM Instance window, perform the following steps: a In the SYS password field, type and confirm a new password in the appropriate fields. b Select Create initialization parameter file (IFILE). c Click Next. 13 In the Database Configuration Assistant window, click OK. The ASM Creation window appears, and the ASM Instance is created.
g Click Next. h In the Stamp disks window, click Next. i Click Finish to save your settings. j Select the check boxes next to the available disks and click OK. The ASM Disk Group window appears indicating that the software is creating the disk group. When completed, the FLASH disk group appears in the Disk Group Name column. 18 Select only the Disk Group Name that you assigned to DATABASE in step 15 and click Next.
Additional Information Supported Software Versions NOTE: For this release of Dell Supported Configurations for Oracle, PCI Express controllers are not supported. Table 1-9 lists the supported software at the time of this release. For the latest supported hardware and software, see the Dell|Oracle Tested and Validated Configurations website at www.dell.com/10g and download the version 1.1 Solution Deliverable List. Table 1-9.
Troubleshooting Working Around Clusterware Installation Failure Oracle Clusterware Configuration Assistant Fails In the Configuration Assistants window, if the installation fails using the Oracle Clusterware Configuration Assistant, then perform the following: 1 Open the file: %ORA_CLUSTERWARE_HOME%\cfgtoollogs\configToolFailedCommands where %ORA_CLUSTERWARE_HOME% is the CRS home directory that you created in "Installing Oracle Clusterware Version 10.2.0.1.
Running the OUI 1 On node 1, open an Explorer window and navigate to the following directory: %SystemDrive%\oracle\product\10.2.0\crs\oui\bin 2 Double-click setup.exe to launch the OUI. 3 In the Welcome window, click Deinstall Products. 4 In the Inventory window, select OraCr10g_home and then click Remove. 5 In the Confirmation window, click Yes. If an error message appears, click Cancel. 6 In the Welcome window, click Cancel. 7 When prompted, click Cancel, and then click Yes.
Cleaning the Storage Devices 1 Clean the partitions that will be configured for the OCR registry (OCRCFG) and the Voting disks. a Click Start and select Run. b In the Run field, type cmd and click OK. c At the command prompt, type the following and press : %SystemDrive%\oracle\product\10.2.0\crs\bin\ExportSYMLink The Oracle Symbolic Link Exporter (ExportSYMLink) imports the symbolic links to the SYMMAP.TBL file to your current directory.
6 Delete the symlinks for the OCR (OCRCFG) and Voting disks (VOTEDSK). a Select ocrcfg and votesdk. b Click Options and select Commit. If successful, the ocrcfg and votedsk entries disappear. c Click Options and select Exit to close the Oracle Object Manager. 7 Launch the Computer Management Console. a On the Windows desktop, click Start and select Run. b In the Run field, type the following and press : compmgmt.msc The Computer Management Console appears. 8 Delete the ASM partitions.
12 In the Computer Management Console window, use step 11 c through step 11 h as a reference to create the following partitions: • Cluster registry (CRSCFG) • Voting disk (VOTEDSK) • Data disk (two partitions) • Backup disk (two partitions) • Any additional partitions as required When you create the new partitions, the New Partition Wizard launches for each instance. To create the new partitions: a Select New Logical Drive. The New Partition Wizard appears. b Click Next to continue.
15 On node 2, launch the Computer Management Console and remove the drive letters from the new partitions. NOTE: Typically, node 2 assigns drive letters to the new partitions after you restart both nodes. If the new partition drive letters do not appear when you perform the following steps, perform the following steps on node 1. a Click Start and select Run. b In the Run field, type the following and press : compmgmt.msc The Computer Management Console window appears.
Additional Troubleshooting Issues Table 1-10 provides recommended actions for problems that you may encounter while deploying and using your Windows Server 2003 operating system and the Oracle Database 10g R2 software. Table 1-10. Troubleshooting Category Problem / Symptom Cause Recommended Corrective Action NIC Teaming Broadcom NIC teaming fails The following steps may result in a NIC teaming failure: 1 One of the Broadcom NICs that was used in the NIC teaming fails or is disabled.
Table 1-10. Category Troubleshooting (continued) Problem / Symptom The node Oracle Clusterware restarts with a blue screen. 40 Deployment Guide Cause Recommended Corrective Action The node cannot communicate with Perform the following steps: the storage disks. 1 Restart the node. 2 During POST, press . 3 In the Windows Advanced Options Menu screen, select Safe Mode. 4 Select the appropriate operating system. 5 Log on to the system. 6 In the Desktop screen, click OK.
Table 1-10. Category Troubleshooting (continued) Problem / Symptom System blue The nodes screen generate a blue screen. Cause The nodes cannot access the Voting disk. Recommended Corrective Action 1 Ensure that the HBA connection mode firmware settings are configured properly for your storage configuration. If your nodes and storage system are configured in a direct-attached configuration, configure the Connection mode as: 0 - loop only.
Table 1-10. Category Problem / Symptom Cause Recommended Corrective Action Navisphere® When you run Improper cabling to the HBAs in the server utility the Navisphere nodes. Server Utility for the AX Series application, the AX100 storage systems are not displayed in the Connected Storage Systems window. Ensure that the fiber optic cables attached to the nodes and storage systems are connected properly.
Table 1-10. Troubleshooting (continued) Category Problem / Symptom Cause Recommended Corrective Action Storage SCSI disk devices do not appear. On the Windows desktop, when you Ensure that the storage LUNs are assigned to both the nodes. right-click My Computer, select Computer Management, and then Perform the following steps. click Disk drivers, the SCSI disk 1 On the Windows desktop, right-click devices do not appear. My Computer and select Manage.
Obtaining and Using Open Source Files The software contained on the Dell Deployment CD is an aggregate of third-party programs as well as Dell programs. Use of the software is subject to designated license terms. All software that is designated as "under the terms of the GNU GPL" may be copied, distributed, and/or modified in accordance with the terms and conditions of the GNU's Not Unix (GNU) General Public License, Version 2, June 1991.
Index A E L additional information, 32 examples Fibre Channel cluster hardware connections, 10 license agreements, 7 B bonding, 15 O F Fibre Channel cluster setup, 9 C cluster Fibre Channel hardware connections, example, 10 cluster setup Fibre Channel, 9 configuring Oracle 10g, 9 verifying hardware and software configurations, 9 configuring the private and public networks, 14 configuring the private network, 15 G getting help, 43 documentation, 7 P private network configuring, 14-15 H hardware F
Index V verifying hardware configuration, 9 software configuration, 9 W Windows Server 2003, Standard x64 R2 Edition installing, 7 46 Index
Dell™ PowerEdge™ 系统 Oracle Database 10g R2 标准版适用于 Microsoft® Windows Server® 2003 的 Real Application Cluster x64 R2 标准版 部署指南 1.1 版 w w w. d e l l . c o m | s u p p o r t . d e l l .
注和注意 注:注表示可以帮助您更好地使用计算机的重要信息。 注意:注意表示可能会损坏硬件或导致数据丢失,并告诉您如何避免此类问题。 ____________________ 本说明文件中的信息如有更改,恕不另行通知。 © 2006 Dell Inc. 版权所有,翻印必究。 未经 Dell Inc. 书面许可,严禁以任何形式进行复制。 本文中使用的商标:Dell、DELL 徽标和 PowerEdge 是 Dell Inc. 的商标; Intel 和 Xeon 是 Intel Corporation 的注册商标; EMC、 Navisphere 和 PowerPath 是 EMC Corporation 的注册商标; Microsoft、Windows 和 Windows Server 是 Microsoft Corporation 的注册 商标。 本文件中述及的其它商标和产品名称是指拥有相应商标和名称的公司或其制造的产品。Dell Inc.
目录 软件和硬件要求 . . . . . . . . . . . . . . . . . . . . . . . . . . . . . . . . . 许可协议 . . . 重要说明文件 . . . . . . . . . . . . . . . . . . . . . . . . . . . . . . . . . . . . . . . . . . . . . . . . . . . . . . . . . . . . . . 安装和配置操作系统 . . . . . . . . . . . . . . . . . . . . . . . . . . . . . . 使用 Deployment CD 安装操作系统. 验证群集硬件与软件配置 设置光纤信道群集. 存储系统布线 . . . . . . . . . . . . . . . . . . . . . . . . . . . . . . . . . . . . . . . . . . . . . . . . . . . . . . . . . . . . . . . . . . . . . . . . . . . . . . . .
获得帮助 . . . . . . . . . . . . . . . . . . . . . . . . . . . . . . . . . . . . . Dell 支持 . . Oracle 支持 . . . . . . . . . . . . . . . . . . . . . . . . . . . . . . . . . . . . . . . . . . . . . . . . . . . . . . . . . . . . . . . . . 获取和使用开放源代码文件 . 索引 50 目录 90 90 90 . . . . . . . . . . . . . . . . . . . . . . . . . 90 . . . . . . . . . . . . . . . . . . . . . . . . . . . . . . . . . . . . . . . . .
本说明文件提供按照 Dell 支持的 Oracle 配置来安装、配置、重新安装以及使用 Oracle Database 10g R2 软件的相关信息。 请将本说明文件与 Dell™ Deployment CD 配合使用来安装软件。如果您仅使用操作系统 CD 来安装操作 系统,则本说明文件中的步骤可能不适用。 包括以下内容: • 软件和硬件要求 • 安装和配置 Microsoft® Windows Server® 2003 x64 R2 标准版 • 验证群集硬件与软件配置 • 为 Oracle Real Application Clusters (RAC) 10g R2 配置网络和存储 • 安装 Oracle Database RAC 10g R2 增补软件集 10.2.0.2 和软件更新 • 附加信息 • 故障排除 • 获得帮助 有关 Dell 支持的 Oracle 配置的详情,请参阅“经 Dell|Oracle 测试和验证的配置”网站 www.dell.
软件和硬件要求 表 1-1 列出了 Dell 支持的 Oracle 配置的基本软件要求。表 1-2 列出了硬件要求。 有关驱动程序和应用程序最低软件版本的详情,请参阅“支持的软件版本”。 表 1-1. 软件要求 软件组件 配置 Windows Server 2003 x64 R2 标准版 Oracle Database 10g R2 10.2.0.1 版 标准版,包括用于群集的 RAC 选件 Oracle 增补软件集 10.2.0.2 版 EMC® PowerPath®(仅限光纤信道群集) 4.5 版 注:视用户数量、使用的应用程序、批处理进程以及其它因素而定,您可能需要一个超出最低硬件要求 的系统才能获得您所需的性能。 注:所有节点的硬件配置必须完全相同。 表 1-2.
许可协议 注:如果您没有 Oracle 软件许可,请与 Dell 销售代表联系。 重要说明文件 有关特定硬件组件的详情,请参阅随系统附带的说明文件。 安装和配置操作系统 注意:为确保正确地安装操作系统,在安装操作系统之前,应断开系统与所有外部存储设备的连接。 本节介绍有关安装和配置 Windows Server 2003 x64 R2 标准版操作系统以实现 Oracle 部署的信息。 安装过程视随系统购买的安装 CD 不同而有所差异。有关适用于您的配置的安装过程,请参阅表 1-3。 表 1-3. 确定安装过程 CD 安装过程 Windows Server 2003 x64 R2 标准版 CD 请参阅“使用 Deployment CD 安装操作系统”。 Dell Deployment CD 请参阅随系统提供的说明文件《部署经 Dell 测试和验证的 Oracle Database 10g 配置》。 Oracle Database 10g R2 CD Oracle Database 10g 增补软件集 10.2.0.
9 出现提示时,将 Microsoft Windows Server 2003 Standard x64 R2 Edition CD1 插入 CD 驱动器。 Windows® 介质将复制到 Deployment(部署)分区,系统将重新引导,然后继续安装。 10 在 Personalize Your Software(自定义软件)窗口的 Name(名称)和 Organization(组织)字段 中,输入相应的信息,然后单击 Next(下一步)。 11 出现提示时,输入 Windows Server 2003 x64 R2 标准版的产品密钥,然后单击 Next(下一步)。 12 在 Computer Name(计算机名称)和 Administrator password(管理员密码)字段中,输入相应 的信息,然后单击 Next(下一步)。 注:要正确地配置公共网络,计算机名称和公共主机名必须完全相同。 注:记下该密码,稍后登录到计算机时需要该密码。 13 按照屏幕上显示的说明完成安装。 注:完成此过程可能需要几分钟。 完成安装过程后,屏幕将显示 Welcome to Windows(欢迎使用 W
验证群集硬件与软件配置 在开始群集设置之前,请确保硬件安装、公共接口和专用接口及节点软件的配置正确无误。以下各节 提供了有关光纤信道群集设置的信息。 设置光纤信道群集 Dell 专业服务代表已为您完成了光纤信道群集的设置。设置完成后,请按照本节中的说明检查硬件连 接、硬件及软件配置。 图 1-1 和表 1-4 说明了直接连接的光纤信道群集所需的群集连接。 图 1-2 和表 1-5 说明了存储区域网络 (SAN) 连接的光纤信道群集所需的群集连接。 图 1-1.
表 1-4. 直接连接光纤信道群集的硬件互连 群集组件 连接 每个 PowerEdge 系统节点 从公共 NIC 连接至局域网 (LAN) 的一根 Cat5e/6 电缆 从专用千兆位 NIC 连接至千兆位以太网交换机的一根 Cat5e/6 电缆 从冗余专用千兆位 NIC 连接至冗余千兆位以太网交换机的一根 Cat5e/6 电缆 从光学 HBA 0 连接至第一个存储系统存储处理器 (SP) 的一根光缆和从 HBA 1 连接至另一个存储 SP 的一根光缆 每个 Dell|EMC 光纤信道存储 系统 连接至 LAN 的两根 Cat5e/6 电缆 从每个 SP 连接至每个 PowerEdge 节点上一个 HBA 的一条光学连接 有关详情,请参阅 “存储系统布线”。 每个千兆位以太网交换机 连接至每个 PowerEdge 系统上的专用千兆位 NIC 的一条 CAT 5e/6 连接 连接至另一个千兆位以太网交换机的一条 Cat5e/6 连接 图 1-2.
表 1-5.
系统硬件和软件配置 • • • 每个节点均必须包含以下最低要求的硬件外围组件: – 内部硬盘驱动器托架中的两个硬盘驱动器(最少 73 GB) – 三个千兆位 NIC 端口 – 两个 HBA(一个用于 PowerEdge 1850/1950 系统的双端口 HBA) 每个节点均必须安装以下软件: – Windows Server 2003 x64 R2 标准版(请参阅表 1-1) – HBA 驱动程序 光纤信道存储设备必须配置至少三个已创建并分配给群集的 LUN(请参阅表 1-6) 表 1-6. 用于群集存储分组的 LUN LUN 最小容量 分区数 用途 第一个 LUN 1 GB 两个 (120 MB 和 50 MB) 投票磁盘和 OCR 第二个 LUN 大于数据库的大小 1个 数据库 第三个 LUN 至少为第二个 LUN 的两倍 1个 快闪恢复区域 存储系统布线 您可以在直接连接配置或具有四个端口的 SAN 连接配置中配置 Oracle 群集存储系统,具体取决于您的 需要。有关这两种配置,请参阅下列步骤。 图 1-3.
直接连接配置 要在直接连接配置中配置节点(请参阅图 1-3),请执行以下步骤: 1 从节点 1 上的 HBA0 至 SP-A 的端口 0 连接一条光缆。 2 从节点 1 上的 HBA1 至 SP-B 的端口 0 连接一条光缆。 3 从节点 2 上的 HBA0 至 SP-A 的端口 1 连接一条光缆。 4 从节点 2 上的 HBA1 至 SP-B 的端口 1 连接一条光缆。 图 1-4.
SAN 连接配置 要在具有四个端口的 SAN 连接配置中配置节点(请参阅图 1-4),请执行以下步骤: 1 从 SP-A 端口 0 至光纤信道交换机 0 连接一条光缆。 2 从 SP-A 端口 1 至光纤信道交换机 1 连接一条光缆。 3 从 SP-B 端口 0 至光纤信道交换机 1 连接一条光缆。 4 从 SP-B 端口 1 至光纤信道交换机 0 连接一条光缆。 5 从节点 1 上的 HBA0 至光纤信道交换机 0 连接一条光缆。 6 从节点 1 上的 HBA1 至光纤信道交换机 1 连接一条光缆。 7 从节点 2 上的 HBA0 至光纤信道交换机 0 连接一条光缆。 8 从节点 2 上的 HBA1 至光纤信道交换机 1 连接一条光缆。 为 Oracle RAC 10g R2 配置网络和存储 本节介绍了设置光纤信道群集的信息,其中包括以下过程: • 配置公共和专用网络 • 验证存储配置 • 为 Oracle 群集件和 Oracle 数据库配置共享存储 注:Oracle RAC 10g R2 是一项复杂的数据库配置,要求按顺序执行以下一系列过程。要想用最少的时间 配
配置专用网络并组队 在部署群集之前,为每个节点分配一个专用 IP 地址和专用主机名。这一过程确保了节点之间可以通过 专用接口相互通信。 表 1-8 提供了两个节点群集的网络配置的示例。 注:本示例假设所有 IP 地址均已在所有节点的 hosts(主机)文件中注册。 表 1-8. 网络配置示例 主机名 类型 IP 地址 注册位置 rac1 公共 155.16.170.1 %SystemRoot%\system32\drivers\etc\hosts rac2 公共 155.16.170.2 %SystemRoot%\system32\drivers\etc\hosts rac1-vip 虚拟 155.16.170.201 %SystemRoot%\system32\drivers\etc\hosts rac2-vip 虚拟 155.16.170.202 %SystemRoot%\system32\drivers\etc\hosts rac1-priv 专用 10.10.10.
4 l 在 Intel NIC 的属性窗口中,单击 OK(确定)。 m 关闭 Computer Management(计算机管理)窗口。 如果节点 1 配置了 Broadcom NIC,请执行以下步骤配置 NIC 组队。否则,请转至步骤 5: a 在 Windows 桌面上,单击 Start(开始),然后选择: Program(程序)→ Broadcom→ Broadcom Advanced Control Suite 2(Broadcom 高级控制套 件 2) 屏幕将显示 Broadcom Advanced Control Suite 2(Broadcom 高级控制套件 2) 窗口。 b 单击 Tools(工具),然后选择 Create a Team(创建组队)。 系统将显示 Broadcom Teaming Wizard(Broadcom 组队向导)窗口。 c 单击 Next(下一步)。 d 在 Enter the Name for the Team(输入组队的名称)字段中,键入 Private(专用),然后 单击 Next(下一步)。 e 在 Team Type(组队类型)字
为公共网络适配器和专用网络适配器配置 IP 地址 1 更新适配器的网络接口名称(如果需要)。否则,请转至步骤 3。 a 在节点 1 上,单击 Start(开始),然后浏览至 Settings(设置)→ Control Panel(控制面板)→ Network Connections(网络连接)。 b 在 Network Connections(网络连接)窗口中,右键单击要重命名的公共网络适配器,然后选 择 Rename(重命名)。 注:在节点上配置网络适配器时,请在所有节点上为公共适配器和专用适配器使用完全相同的 名称。否则,Oracle 数据库安装程序将生成错误,而无法完成安装过程。 2 c 将公共适配器名称重命名为 Public(公共),然后按 键。 d 右键单击要重命名的专用 NIC 组队,然后选择 Rename(重命名)。 e 将专用 NIC 组队重命名为 Private(专用),然后按 键。 f 在其它节点上,重复步骤 a 至步骤 e。 配置 IP 地址。 注:必须为公共接口设置默认网关;否则群集件安装可能会失败。 a 在节点 1 上,浏
3 确保公共和专用网络适配器以适当的顺序显示,以便通过网络服务访问。 a 在 Windows 桌面上,单击 Start(开始),然后浏览至 Settings(设置)→ Control Panel (控制面板)→ Network Connections(网络连接)。 b 在 Network Connections(网络连接)窗口中,单击 Advanced(高级),然后选择 Advanced Settings(高级设置)。 c 选择 Adapter and Bindings(适配器和绑定)选项卡。 d 确保网络适配器以下列所列顺序显示: 公共 专用 < 任何其它网络适配器 > 注:单击上下箭头键以更改适配器顺序。 4 e 单击 OK(确定)。 f 关闭 Network Connections(网络连接)窗口。 在这两个节点上,将公共、专用及虚拟 IP 地址和主机名添加到 %SystemRoot%\system32\drivers\etc\hosts 文件中。 注:仅当公共和虚拟 IP 地址未向 DNS 注册时,才将它们添加到 hosts(主机)文件中。 例如,以下各项使用表 1-8 中
5 确保节点可以与公共网络和专用网络进行通信。 a 在节点 1 上,打开命令提示符窗口。 b 在命令提示符下,键入下列命令并按 键: ping ping 其中, 和 是其它节点上的公共和专用网络适配器 的主机名。 如果该节点的网络适配器未回应 ping 命令,请检查网络配置,然后重复该步骤。 注:稍后配置虚拟 IP 地址,但此时不能使用 ping 命令。 6 在节点 2 上,重复步骤 1 至步骤 5。 安装 Dell|EMC 所需的基于主机的软件 按照 Dell|EMC 说明文件中的过程,使用 Dell|EMC 系统附带的 EMC 软件安装 EMC Naviagent 软件。 验证节点的存储分配 1 在 Windows 桌面上,右键单击 My Computer(我的电脑),然后选择 Manage(管理)。 2 在 Computer Management(计算机管理)窗口中,单击 Device Manager(设备管理器)
6 在 Disk Management(磁盘管理)窗口中,确保显示两个磁盘(用于直接连接配置)或四个磁盘 (用于交换连接)。磁盘的大小应彼此相同,分配给存储中各个节点的 LUN 的大小也应相同。 7 在其它节点上,重复步骤 1 至步骤 6。 安装 PowerPath 1 在节点 1 上,安装 EMC PowerPath。 注:有关详情,请参阅 Dell|EMC 存储系统附带的 EMC PowerPath 说明文件。 2 安装过程完成后,请重新启动系统。 3 在其它节点上,重复步骤 1 和 步骤 2。 验证 PowerPath 功能 1 在 Windows 桌面上,找到系统图标盒,右键单击三角形 PowerPath 图标,然后选择 PowerPath Administrator(PowerPath 管理员)。 2 在 PowerPathAdmin 控制台中,展开 EMC PowerPathAdmin。 3 在窗口的左窗格中,展开 Path Management(路径管理)。 4 在窗口的左窗格中,展开 Storage Arrays(存储阵列)。 5 单击存储系统标识符。 在
为 Oracle 群集件准备磁盘 本节介绍有关为以下磁盘创建逻辑驱动器的信息: • Oracle 群集件注册表 (OCR) 磁盘 — 包含群集配置信息 • 投票磁盘 — 当专用网络或连接的存储无法用于一个或多个节点时,投票磁盘提供节点间的仲裁 • 用于数据库和快闪恢复区域的磁盘 — 为创建数据库(数据磁盘)和快闪恢复区域提供存储区域 在本文中所述的群集配置过程中,您将会在光纤信道存储设备上创建分区。在创建分区时,确保节点 可以检测到在所连接存储系统中创建的 LUN 或逻辑磁盘。 要为 Oracle 群集件准备磁盘,应确定 OCR 磁盘、投票磁盘、数据磁盘和快闪恢复磁盘。在识别适当 的磁盘后,在一个节点上执行以下步骤。 为群集件准备 OCR 磁盘和投票磁盘 1 在 Windows 桌面上,右键单击 My Computer(我的电脑),然后选择 Manage(管理)。 2 展开 Storage(存储),然后单击 Disk Management(磁盘管理)。 在“验证 PowerPath 功能”中初始化的存储磁盘将显示为 Unallocated(未分配)。 3 右键单击分配给节点的第一个共享磁
10 f 在 Format Partition(格式化分区)窗口中,选择 Do not format this partition(不格式化该分 区),然后单击 Next(下一步)。 g 单击 Finish(完成)。 为投票磁盘创建逻辑驱动器。 a 在确定用于 OCR 和投票磁盘 (1 GB LUN) 的磁盘分区区域中,右键单击可用空间,然后选择 New Logical Drive(新建逻辑驱动器)。 屏幕将显示 Welcome to the New Partition Wizard(欢迎使用新建分区向导)。 b 单击 Next(下一步)。 c 在 Select Partition Type(选择分区类型)窗口中,选择 Logical drive(逻辑驱动器),然后 单击 Next(下一步)。 d 在 Specify Partition Size(指定分区大小)窗口的 Partition size in MB(以 MB 为单位的分区 大小)字段中,键入 50,然后单击 Next(下一步)。 e 在 Assign Drive Letter or Path(指派驱动器号或路径)窗口中,
2 为快闪恢复区域创建一个逻辑驱动器。 a 找到分配用于快闪恢复区域的磁盘。 b 执行步骤 1 的步骤 b 至步骤 h。 3 重新启动节点 2,并以管理员身份登录。 4 在节点 2 的 Windows 桌面上,右键单击 My Computer(我的电脑),然后选择 Manage(管理)。 5 在 Computer Management(计算机管理)窗口中,展开 Storage(存储),然后单击 Disk Management (磁盘管理)。 6 从在步骤 1、步骤 2 及“为群集件准备 OCR 磁盘和投票磁盘”中创建的存储驱动器中删除分配的 驱动器号。 a 右键单击逻辑驱动器,然后选择 Change Drive Letter and Paths(更改驱动器号和路径)。 b 在 Change Drive Letter and Paths(更改驱动器号和路径)窗口中,选择驱动器号,然后单击 Remove(删除)。 c 在 Confirm(确认)窗口中,单击 Yes(是)。 d 对存储分区上的其它逻辑驱动器重复执行步骤 a 至步骤 c。 为共享磁盘启用 automount(自
使用 ASM 安装 Oracle RAC 10g R2 本节介绍有关安装 Oracle RAC 10g R2 软件的信息。包括以下内容: • 安装 Oracle 群集件 • 更改 css misscount 值 • 安装 Oracle Database 10g R2 软件 • 安装增补软件集 10.2.0.2 和软件更新 • 创建基础数据库 安装 Oracle 群集件 10.2.0.1 版 1 在节点 1 上,将 Oracle Clusterware CD 插入 CD 驱动器。 Oracle 通用安装程序 (OUI) 启动,且显示 Welcome(欢迎)窗口。 如果未显示 Welcome(欢迎)窗口: a 单击 Start(开始),然后选择 Run(运行)。 b 在 Run(运行)字段中,键入下列命令,然后单击 OK(确定): %CD 驱动器 %\autorun\autorun.
7 单击 Next(下一步)。 屏幕将显示 Specify Network Interface Usage(指定网络接口使用)窗口,并显示群集范围的网络 接口列表。 8 9 10 11 在 Interface Type(接口类型)下拉式菜单中,将公共 Interface Type(接口类型)配置为 Public (公共),然后将专用 Interface Type(接口类型)配置为 Private(专用)(如果需要)。要进 行此操作: a 选择 Interface Name(接口名称)。 b 单击 Edit(编辑)。 c 选择正确的 Interface Type(接口类型)。 d 单击 OK(确定)。 单击 Next(下一步)。 在 Cluster Configuration Storage(群集配置存储)窗口中,为 OCR 磁盘执行以下步骤: a 找到在小节“为群集件准备 OCR 磁盘和投票磁盘”中创建的 100 MB 分区。 b 选择此分区,然后单击 Edit(编辑)。 c 在 Specify Disk Configuration(指定磁盘配置)窗口中,选择 Place
更改 css misscount 值 1 关闭节点 2。 2 在节点 1 上,打开命令提示符窗口。 3 在命令提示符下,键入下列命令并按 键: cd %ORA_CLUSTERWARE_HOME%\bin\ 其中,%ORA_CLUSTERWARE_HOME% 为您在“安装 Oracle 群集件 10.2.0.1 版”的步骤 4 中创建 的主目录。 4 在命令提示符下,键入下列命令并按 键: crsctl set css misscount 120 5 重新启动节点 1,并以管理员身份登录。 6 启动节点 2。 安装 Oracle Database 10g R2 及 Real Application Clusters 10.2.0.
注:该 Oracle 主目录路径不得与在 Oracle 群集件安装过程中选择的 Oracle 主目录路径相同。 不能将带有 RAC 的 Oracle10g R2 标准版与群集件安装到相同的主目录中。 5 单击 Next(下一步)。 6 在 Specify Hardware Cluster Installation Mode(指定硬件群集安装模式)窗口中,单击 Select All (全选),然后单击 Next(下一步)。 7 在 Product-Specific Prerequisite Checks(产品特定先决条件检查)窗口中,单击 Next (下一步)。 8 在 Select Configuration Option(选择配置选项)窗口中,选择 Install database Software only (仅安装数据库软件),然后单击 Next(下一步)。 9 在 Summary(摘要)窗口中,单击 Install(安装)。 10 在 End of Installation(安装完成)窗口中,执行窗口中列出的步骤。 注:必须先执行窗口中列出的过程,然后才能执行后续过程。 11
安装增补软件集 注:必须从安装了 RAC 10g R2 软件的节点上安装增补软件集软件。如果该节点不是运行 OUI 的节点, 请退出并在运行 OUI 的节点上安装增补软件集。 1 启动增补软件集文件夹中的 OUI。例如: %SystemDrive%\Oracle_patch\setup.
5 在 Summary(摘要)窗口中,单击 Install(安装)。 在安装过程中,可能会收到错误信息 Error in writing to file oci.dll…(写入文件 oci.dll… 时出现错误),请执行以下步骤解决此问题: a 取消增补软件集的安装。 b 将 %Oracle_home%\BIN 目录重命名为 \bin_save。 其中,%Oracle_home% 为安装 Oracle 数据库的完整路径。 c 重新引导系统。 d 重新引导后,将 \bin_save 目录重命名为 \bin。 e 从解压的增补软件集文件夹中运行 setup.exe。请勿停止默认的 Oracle 服务。 6 在 End of Installation(安装完成)窗口中,单击 Exit(退出)。 7 单击 Yes(是)以退出 OUI。 下载最新的 Oracle 增补软件 1 打开 Web 浏览器。 2 浏览至 Oracle Metalink 网站 metalink.oracle.
c 键入下列命令并按 键: crsctl check crs 屏幕将显示以下输出: CSS appears healthy(CSS 运行正常) CRS appears healthy(CRS 运行正常) EVM appears healthy(EVM 运行正常) d 如果未显示上述输出,则键入: crsctl start crs e 关闭命令提示符。 2 单击 Start(开始),然后选择 Run(运行)。 3 在 Run(运行)字段中,键入下列命令,然后单击 OK(确定): dbca 启动 Database Configuration Assistant(数据库配置助手)。 4 在 Welcome(欢迎)窗口中,选择 Oracle Real Application Clusters database(Oracle Real Application Cluster 数据库),然后单击 Next(下一步)。 5 在 Operations(操作)窗口中,单击 Create a Database(创建数据库),然后单击 Next (下一步)。 6 在 Node Sele
13 在 Database Configuration Assistant(数据库配置助手)窗口中,单击 OK(确定)。 屏幕将显示 ASM Creation(ASM 创建)窗口 ,并创建 ASM 实例。 注:如果显示警告消息 Failed to retrieve network listener resources(无法检索网 络监听程序资源),则单击 Yes(是),以允许数据库配置助手 (DBCA) 创建相应的监听程序资源。 14 在 ASM Disk Groups(ASM 磁盘组)窗口中,单击 Create New(新建)。 15 在 Create Disk Group(创建磁盘组)窗口中,输入数据库文件的信息。 a 在 Disk Group Name(磁盘组名称)字段中,输入新磁盘组的名称。 例如,DATABASE。 b 在 Redundancy(冗余)框中,选择 External(外部)。 c 单击 Stamp Disks(标记磁盘)。 d 选择 Add or change label(添加或更改标签),然后单击 Next(下一步)。 e 在 Select disks(选
18 仅选择在步骤 15 中分配给 DATABASE 的磁盘组名称,然后单击 Next(下一步)。 19 在 Database File Locations(数据库文件位置)窗口中,选择 Use Oracle-Managed Files (使用 Oracle 管理文件),然后单击 Next(下一步)。 20 在 Recovery Configuration(恢复配置)窗口中,执行以下步骤: a 选择 Specify Flash Recovery Area(指定快闪恢复区域)。 b 单击 Browse(浏览)。 c 选择您在步骤 17 中创建的 FLASH 磁盘组,然后单击 OK(确定)。 d 在 Flash Recovery Area Size(快闪恢复区域大小)字段中,键入在步骤 17 中创建的快闪磁盘 组的总大小。 e 选择 Enable Archiving(启用存档)。 f 单击 Edit Archive Mode Parameters(编辑存档模式参数)。 • 在 Edit Archive Mode Parameters(编辑存档模式参数)窗口中,将 Archive
附加信息 支持的软件版本 注:Dell 支持的 Oracle 配置这一版本不支持 PCI Express 控制器。 表 1-9 列出了发行此版本时支持的软件。要获取支持的最新硬件和软件,请访问“经 Dell|Oracle 测试 和验证的配置”网站 www.dell.com/10g,下载 1.1 版的 Solution Deliverable List(可提供的解决方案列 表)。 表 1-9. 支持的软件版本 软件组件 支持的版本 Windows Server 2003 x64 R2 标准版 PowerPath for Windows 4.5 QLogic HBA Storport 驱动程序 9.1.2.15 Emulex HBA Storport 驱动程序 7.1.11.3 PERC 4e/Di 和 PERC 4e/Si 6.46.3.64 PERC 5/i 集成 RAID 控制器 1.18.0.64 Intel PRO 千兆位适配器 8.4.21.0 Intel PRO PCIe 千兆位适配器系列 (基本驱动程序) 9.2.24.
故障排除 解决群集件安装故障 Oracle 群集件配置助手失败 如果使用 Oracle Clusterware Configuration Assistant(Oracle 群集件配置助手)时安装失败,则在 Configuration Assistants(配置助手)窗口中,执行以下步骤: 1 打开文件:%ORA_CLUSTERWARE_HOME%\cfgtoollogs\configToolFailedCommands 其中,%ORA_CLUSTERWARE_HOME% 为您在“安装 Oracle 群集件 10.2.0.
运行 OUI 1 在节点 1 上,打开资源管理器窗口,并浏览至以下目录: %SystemDrive%\oracle\product\10.2.0\crs\oui\bin 2 双击 setup.exe 以启动 OUI。 3 在 Welcome(欢迎)窗口中,单击 Deinstall Products(卸载产品)。 4 在 Inventory(产品清单)窗口中,选择 OraCr10g_home,然后单击 Remove(删除)。 5 在 Confirmation(确认)窗口中,单击 Yes(是)。 如果显示错误信息,单击 Cancel(取消)。 6 在 Welcome(欢迎)窗口中,单击 Cancel(取消)。 7 出现提示后,单击 Cancel(取消),然后单击 Yes(是)。 删除 Oracle 服务 1 在节点 1 上,启动 Services(服务)控制台。 a 单击 Start(开始),然后选择 Run(运行)。 b 在 Run(运行)字段中,键入以下命令,然后单击 OK(确定): services.
清除存储设备 1 清除要配置用于 OCR 注册表 (OCRCFG) 磁盘和投票磁盘的分区。 a 单击 Start(开始),然后选择 Run(运行)。 b 在 Run(运行)字段中,键入 cmd,然后单击 OK(确定)。 c 在命令提示符下,键入下列命令并按 键: %SystemDrive%\oracle\product\10.2.0\crs\bin\ExportSYMLink Oracle 符号链接导出程序 (ExportSYMLink) 将指向 SYMMAP.TBL 文件的符号链接导入当前 目录下。 d 2 在命令提示符下,键入下列命令并按 键: notepad SYMMAP.
6 删除用于 OCR 磁盘 (OCRCFG) 和投票磁盘 (VOTEDSK) 的符号链接。 a 选择 ocrcfg 和 votesdk。 b 单击 Options(选项),然后选择 Commit(提交)。 如果成功,ocrcfg 和 votedsk 项将消失。 c 7 单击 Options(选项),然后单击 Exit(退出),以关闭 Oracle 对象管理器。 启动计算机管理控制台。 a 在 Windows 桌面上,单击 Start(开始),然后选择 Run(运行)。 b 在 Run(运行)字段中,键入下列命令,然后按 键: compmgmt.
12 在 Computer Management Console(计算机管理控制台)窗口中,使用步骤 11 c 至步骤步骤 11 h 作为参考来创建下列分区: • 群集注册表 (CRSCFG) • 投票磁盘 (VOTEDSK) • 数据磁盘(两个分区) • 备份磁盘(两个分区) • 任何需要的其它分区 在创建新分区时,将对每个实例启动“新建分区向导”。 要创建新分区: a 选择 New Logical Drive(新建逻辑驱动器)。 屏幕将显示 New Partition Wizard(新建分区向导)。 b 单击 Next(下一步)继续。 c 在 Partition Type(分区类型)窗口中,单击 Next(下一步)。 注:要确保存储设备不对现有分区进行重新配置,请更改 CRCFG 和 VOTEDSK 分区的磁盘位置和 大小。在磁盘的前面创建数据分区、备份分区和任何其它分区,而在磁盘的末端创建 OCRCFG 和 VOTEDSK 分区。 84 d 在 Partition Size(分区大小)窗口中,执行下列步骤,然后单击 Next(下一步)。 e 在 Assign D
15 在节点 2 上,启动计算机管理控制台,然后从新分区中删除驱动器号。 注:通常,节点 2 会在重新启动两个节点后,为新分区分配驱动器号。如果在执行了下列步骤后, 仍不显示新分区的驱动器号,则在节点 1 上执行下列步骤。 a 单击 Start(开始),然后选择 Run(运行)。 b 在 Run(运行)字段中,键入下列命令,然后按 键: compmgmt.
其它故障排除问题 表 1-10 针对在部署或使用 Windows Server 2003 操作系统和 Oracle Database 10g R2 软件时可能遇到的 问题提供了建议的纠正措施。 表 1-10.
表 1-10.
表 1-10. 故障排除 (续) 类别 问题/症状 原因 系统蓝屏 节点生成蓝屏。 节点不能访问投票磁盘。 建议的纠正措施 1 确保对存储配置正确地配置了 HBA 连 接模式固件设置。 如果节点和存储系统采用直接连接配置 进行配置,则将 Connection(连接) 模式配置为:0 - loop only(0 - 仅回 路)。 如果节点和存储系统是通过光纤信道交 换机连接的,则将 Connection(连接) 模式配置为 2 - loop preferred, otherwise point-to-point(2 - 首选回路,否则为 点到点)。 2 如果问题仍然存在,则将 CSS 计数误差 增加为高于 120 的值。 3 请执行以下步骤: a 关闭节点 2。 b 在节点 1 上,打开命令提示窗口。 c 键入下列命令并按 键: %ORA_CLUSTERWARE_HOME%\ bin 其中, %ORA_CLUSTERWARE_HOME% 为您在“安装 Oracle 群集件 10.2.0.
表 1-10.
获得帮助 Dell 支持 有关系统的详情,请参阅随系统组件附带的说明文件。有关白皮书、Dell 支持的配置和一般信息,请 参阅“经 Dell|Oracle 测试和验证的配置”网站 www.dell.com/10g。要获得硬件和操作系统软件的 Dell 技术支持以及下载最新的系统更新,请访问 Dell 支持 Web 站点 support.dell.com。与 Dell 联系的有关 信息包含在系统《安装与故障排除指南》中。 我们现在还提供 Dell 企业培训与认证服务;请访问培训和认证网站 www.dell.com/training 了解有关详 情。此培训服务可能不在所有地区提供。 Oracle 支持 有关 Oracle 软件和应用程序群集件的培训信息,请访问 Oracle 网站 www.oracle.com 或参阅 Oracle 说 明文件,了解 Oracle 联系信息。 技术支持、下载和其它技术信息可以在 Oracle MetaLink 网站 metalink.oracle.
索引 A P X 安装 Oracle RAC 10g, 70 Windows Server 2003 x64 R2 标准版 , 53 配置 Oracle 10g , 55 验证硬件与软件配置 , 55 许可协议 , 53 B 绑定 , 61 F 附加信息 , 79 G 公共网络 配置 , 60 故障排除 , 80 配置专用和公共网络 , 60 配置专用网络 , 61 Q 群集 光纤信道硬件连接,示例 , 56 群集设置 光纤信道 , 55 Y 验证 软件配置 , 55 硬件配置 , 55 硬件 光纤信道互连 , 57 光纤信道群集最低要求 , 52 Z R 支持的存储设备 , 79 软件 要求 , 52, 79 专用网络 配置 , 60-61 软件和硬件要求 , 52 光纤信道群集设置 , 55 S H 获得帮助 , 90 O Oracle RAC 10g 安装 , 70 配置网络和存储 , 60 示例 光纤信道群集硬件连接 , 56 说明文件 , 53 W Windows Server 2003 x64 R2 标准版 安装 , 53 索引 91
À˜“″ 92 索引
Systèmes Dell™ PowerEdge™ Oracle Database 10g Release 2 Standard Edition Real Application Cluster pour Microsoft® Windows Server® 2003 R2 Standard Edition 64 bits Guide de déploiement Version 1.1 w w w. d e l l . c o m | s u p p o r t . d e l l .
Remarques et avis REMARQUE : une REMARQUE indique des informations importantes qui peuvent vous aider à mieux utiliser votre ordinateur. AVIS : un AVIS vous avertit d'un dommage ou d'une perte de données potentiels et vous indique comment éviter ce problème. ____________________ Les informations contenues dans ce document peuvent être modifiées sans préavis. © 2006 Dell Inc. Tous droits réservés. La reproduction de ce document de quelque manière que ce soit sans l'autorisation écrite de Dell Inc.
Sommaire Configuration matérielle et logicielle requise Contrats de licence . . . . . Documentation importante . . . . . . . . . . . . . . . . . . 97 . . . . . . . . . . . . . . . . . . . . . . . . 99 99 . . . . . . . . . . . . . . . . . . . . . . . . Installation et configuration du système d'exploitation . . . . . . . . . . . . Installation du système d'exploitation à l'aide des CD de déploiement . . . . . . . . . . . . . . . . . 101 105 . . . . . . . . . . . . . . . . . . . . . . .
Obtention d'aide . . . . . . . . . . . . . . . . . . . . . . . . . . . . . . . . Support Dell . . Support Oracle . . . . . . . . . . . . . . . . . . . . . . . . . . . . . . . . . . . . . . . . . . . . . . . . . . . . . . . . . . . . Obtention et utilisation de fichiers Open Source . Index . 96 Sommaire 138 138 138 . . . . . . . . . . . . . . 139 . . . . . . . . . . . . . . . . . . . . . . . . . . . . . . . . . . . . . . .
Ce document contient des informations concernant l'installation, la configuration, la réinstallation et l'utilisation du logiciel Oracle Database 10g R2. Il fait partie du support fourni par Dell pour les configurations Oracle. Pour installer les logiciels, utilisez ce document ainsi que le CD Dell™ Deployment. Si vous utilisez uniquement les CD du système d'exploitation pour installer ce dernier, les instructions fournies dans ce document peuvent ne pas s'appliquer.
Tableau 1-1. Configuration logicielle requise Composant logiciel Configuration Windows Server 2003 R2 Standard Edition 64 bits Oracle Database 10g R2 Version 10.2.0.1 Standard Edition, y compris l'option RAC pour clusters Correctif Oracle (patchset) Version 10.2.0.2 EMC® PowerPath® (clusters Fibre Channel Version 4.
Contrats de licence REMARQUE : si vous ne possédez pas de licence Oracle, contactez votre représentant commercial Dell. Documentation importante Pour plus d'informations sur certains composants matériels spécifiques, consultez la documentation fournie avec le système. Installation et configuration du système d'exploitation AVIS : déconnectez tous les périphériques de stockage externes avant d'installer le système d'exploitation, pour vous assurer que ce dernier sera correctement installé.
6 À l'invite de commande, tapez 2 pour sélectionner Oracle 10g R2 SE sous Windows Server 2003 x64 R2 SE et appuyez sur . 7 Lorsque vous êtes invité à sélectionner un type de déploiement, tapez 1 et appuyez sur . 8 Lorsque vous y êtes invité, retirez le premier disque du lecteur et remplacez-le par le disque Dell Deployment CD2. 9 Lorsque vous y êtes invité, insérez le disque Microsoft Windows Server 2003 Standard x64 R2 Edition CD1 dans le lecteur.
Vérification de la configuration matérielle et logicielle du cluster Avant de commencer la configuration du cluster, vérifiez que l'installation matérielle, les interfaces publique et privée et les logiciels installés sur les nœuds sont correctement configurés. Les sections suivantes fournissent des informations sur la configuration du cluster Fibre Channel. Configuration du cluster Fibre Channel La configuration du cluster Fiber Channel a été effectuée par votre prestataire de services Dell.
Tableau 1-4.
Tableau 1-5.
Configuration matérielle et logicielle du système • • • Chaque nœud doit comporter au minimum le matériel suivant : – Deux disques durs (de 73 Go minimum) dans la baie interne – Trois ports de NIC Gigabit – Deux cartes HBA (ou une carte HBA à deux ports pour les systèmes PowerEdge 1850 et 1950) Les logiciels suivants doivent être installés sur chacun des nœuds : – Windows Server 2003 R2 Standard Edition 64 bits (voir le tableau 1-1) – Pilote de carte HBA Le stockage Fibre Channel doit être con
Câblage du système de stockage Le système de stockage du cluster Oracle peut utiliser une connexion directe ou être connecté à un SAN (configuration à 4 ports), selon vos besoins. Reportez-vous aux procédures suivantes pour chaque configuration. Figure 1-3.
Configuration à connexion directe Pour créer une configuration à connexion directe pour les nœuds du cluster (voir la figure 1-3), procédez comme suit : 1 Installez un câble optique entre la carte HBA0 du nœud 1 et le port 0 du processeur SP-A. 2 Installez un câble optique entre la carte HBA1 du nœud 1 et le port 0 du processeur SP-B. 3 Installez un câble optique entre la carte HBA0 du nœud 2 et le port 1 du processeur SP-A.
Configuration avec connexion à un SAN Pour créer une configuration à 4 ports avec connexion à un SAN (voir la figure 1-4), procédez comme suit : 1 Installez un câble optique entre le port 0 du SP-A et le commutateur Fibre Channel 0. 2 Installez un câble optique entre le port 1 du SP-A et le commutateur Fibre Channel 1. 3 Installez un câble optique entre le port 0 du SP-B et le commutateur Fibre Channel 1. 4 Installez un câble optique entre le port 1 du SP-B et le commutateur Fibre Channel 0.
Configuration du réseau privé et regroupement de cartes réseau Avant de déployer le cluster, affectez une adresse IP privée et un nom d'hôte privé à chaque nœud. Cela permet aux nœuds de communiquer les uns avec les autres par l'intermédiaire de l'interface privée. Le tableau 1-8 présente un exemple de configuration réseau pour un cluster de deux nœuds. REMARQUE : cet exemple implique que toutes les adresses IP sont enregistrées dans le fichiers hosts de tous les nœuds. Tableau 1-8.
j Cliquez sur Finish (Terminer) pour achever le regroupement. k Dans la fenêtre Team: Properties (Regroupement/Nom du regroupement/Propriétés), cliquez sur OK. l Dans la fenêtre des propriétés du NIC Intel, cliquez sur OK. m Fermez la fenêtre Gestion de l'ordinateur. 4 Si le nœud 1 contient des NIC Broadcom, configurez le regroupement comme suit. Sinon, passez à l'étape 5.
m Cliquez sur Yes pour continuer. n Dans la fenêtre IP Address Setting Reminder (Rappel des paramètres d'adresses IP), cliquez sur OK. o Dans la fenêtre Broadcom Advanced Control Suite 2, cliquez sur OK. 5 Recommencez la procédure décrite de l'étape 1 à l'étape 4 sur les autres nœuds. Configuration des adresses IP pour les cartes des réseaux public et privé 1 Si nécessaire, mettez à jour le nom d'interface réseau de la carte. Sinon, passez à l'étape 3.
g Recommencez la procédure décrite de l'étape a à l'étape f pour le regroupement de NIC privés. REMARQUE : le regroupement de NIC privés ne requiert pas d'adresse de passerelle par défaut ni d'entrée sur le serveur DNS. h Recommencez la procédure décrite de l'étape a à l'étape g sur les autres nœuds. 3 Vérifiez que les cartes des réseaux public et privé apparaissent dans l'ordre approprié pour l'accès des services réseau.
5 Vérifiez que les nœuds du cluster peuvent communiquer avec les réseaux public et privé. a Sur le nœud 1, ouvrez une fenêtre d'invite de commande. b À l'invite, tapez la commande suivante et appuyez sur : ping ping où et sont les noms d'hôte des cartes publiques et privées des autres nœuds. Si les cartes réseau de ce nœud ne répondent pas aux commandes ping, vérifiez la configuration du réseau et recommencez cette étape.
6 Dans la fenêtre Gestion des disques, vérifiez que deux disques (pour une connexion directe) ou quatre disques (pour une connexion commutée) apparaissent. Ces disques et les unités logiques affectées aux nœuds de stockage doivent tous être de la même taille. 7 Recommencez la procédure décrite de l'étape 1 à l'étape 6 sur les nœuds restants. Installation de PowerPath 1 Installez EMC PowerPath sur le noeud 1.
Préparation des disques pour Oracle Clusterware Cette section contient des informations sur la création de lecteurs logiques pour les disques suivants : • Disque OCR (registre du cluster Oracle) : contient les informations de configuration du cluster. • Disque de vote : assure l'arbitrage entre les nœuds lorsque le réseau privé ou le stockage connecté n'est pas disponible pour un ou plusieurs nœuds.
b Cliquez sur Suivant. c Dans la fenêtre Sélection du type de partition, sélectionnez Lecteur logique et cliquez sur Suivant. d Dans la fenêtre Spécifier la taille de la partition, tapez 120 dans le champ Taille de la partition en Mo et cliquez sur Suivant. e Dans la fenêtre Attribuer une lettre de lecteur ou de chemin d'accès, sélectionnez Ne pas attribuer une lettre ou un chemin d'accès de lecteur et cliquez sur Suivant.
f Dans la fenêtre Attribuer une lettre de lecteur ou de chemin d'accès, sélectionnez Ne pas attribuer une lettre ou un chemin d'accès de lecteur et cliquez sur Suivant. g Dans la fenêtre Formater une partition, sélectionnez Ne pas formater cette partition et cliquez sur Suivant. h Cliquez sur Terminer. 2 Créez un lecteur logique pour la zone de récupération flash. a Repérez le disque affecté à la zone de récupération flash. b Effectuez la procédure décrite de l'étape b à l'étape h (étape 1).
Installation d'Oracle RAC 10g R2 avec ASM Cette section fournit des informations sur l'installation du logiciel Oracle RAC 10g R2. Les thèmes abordés sont les suivants : • Installation d'Oracle Clusterware • Modification de la valeur css misscount • Installation d'Oracle Database 10g R2 • Installation du correctif 10.2.0.2 et des mises à jour logicielles • Création de la base de données initiale Installation d'Oracle Clusterware version 10.2.0.
7 Cliquez sur Next. La fenêtre Specify Network Interface Usage (Définir l'utilisation des interfaces réseau) affiche la liste des interfaces réseau du cluster. 8 Dans le menu déroulant Interface Type (Type d'interface), sélectionnez Public (Publique) pour le type d'interface publique et Private (Privée) pour le type d'interface privée, si nécessaire. Pour ce faire : a Sélectionnez une valeur pour Interface Name (Nom d'interface). b Cliquez sur Edit (Modifier).
Modification de la valeur css misscount 1 Arrêtez le nœud 2. 2 Sur le nœud 1, ouvrez une fenêtre d'invite de commande. 3 Tapez la commande suivante et appuyez sur : cd %RACINE_ORA_CLUSTERWARE%\bin\ où %RACINE_ORA_CLUSTERWARE% cor respond au répertoire racine créé à l'étape 4 de la section "Installation d'Oracle Clusterware version 10.2.0.1".
REMARQUE : le répertoire racine d'Oracle doit être différent de celui sélectionné lors de l'installation d'Oracle Clusterware. Vous ne pouvez pas installer Oracle 10g R2 Standard Edition avec RAC dans le même répertoire home que celui utilisé pour Clusterware. 5 Cliquez sur Next. 6 Dans la fenêtre Specify Hardware Cluster Installation Mode (Définition du mode d'installation du cluster), cliquez sur Select All (Sélectionner tout), puis cliquez sur Next.
Installation du correctif REMARQUE : vous devez installer le correctif à partir du nœud sur lequel Oracle RAC 10g R2 a été installé. Si vous ne vous trouvez pas sur ce nœud, quittez OUI et recommencez l'opération sur le nœud approprié. 1 Exécutez l'utilitaire OUI qui se trouve dans le dossier du correctif. Exemple : %LecteurSystème%\Oracle_patch\setup.exe où %LecteurSystème% correspond au lecteur sur lequel vous avez décompressé le correctif. 2 Dans la fenêtre de bienvenue, cliquez sur Next.
5 Dans la fenêtre Summary (Résumé), cliquez sur Install. Au cours de l'installation, il est possible que le message d'erreur suivant s'affiche : Error in writing to file oci.dll (Erreur d'écriture dans le fichier oci.dll). Dans ce cas, procédez comme suit : a Annulez l'installation du correctif. b Renommez le répertoire %RacineOracle%\BIN en \bin_save. où %RacineOracle% correspond au chemin d'accès complet du répertoire d'installation d'Oracle Database. c Redémarrez le système.
Création de la base de données initiale Pour créer une base de données initiale à l'aide d'Oracle ASM, procédez comme suit : 1 Sur le nœud 1, vérifiez qu'Oracle Clusterware est en cours d'exécution. a Cliquez sur Démarrer et sélectionnez Exécuter. b Dans le champ Exécuter, tapez cmd et appuyez sur .
10 Dans la fenêtre Database Credentials (Autorisations de la base de données), cliquez sur Use Same Password for All Accounts (Utiliser le même mot de passe pour tous les comptes), tapez un nouveau mot de passe et confirmez-le, puis cliquez sur Next. REMARQUE : notez le nouveau mot de passe. Il vous servira ultérieurement pour l'administration de la base de données. 11 Dans la fenêtre Storage Options (Options de stockage), cliquez sur Automatic Storage Management (ASM) et cliquez sur Next.
16 Dans la fenêtre ASM Disk Groups (Groupes de disques ASM), cliquez sur Create New (Créer). 17 Dans la fenêtre Create Disk Group (Création d'un groupe de disques), entrez les informations relatives à la zone de récupération flash. a Entrez un nom dans le champ Disk Group Name (Nom du groupe de disques). Exemple : FLASH. b Dans la zone Redundancy (Redondance), sélectionnez External (Externe). c Cliquez sur Stamp Disks (Marquage des disques).
Cliquez sur Edit Archive Mode Parameters (Modifier les paramètres du mode d'archivage). f • Dans la fenêtre Edit Archive Mode Parameters (Modifier les paramètres du mode d'archivage), modifiez le chemin indiqué so us Archive Log Destinations (Destination des journaux d'archivage) en +FLASH/. où FLASH correspond au nom du groupe de disques de la zone de récupération flash indiqué à l'étape 17 a. • g Cliquez sur OK. Cliquez sur Next.
Informations supplémentaires Versions de logiciels prises en charge REMARQUE : les contrôleurs PCI Express ne sont pas pris en charge par cette configuration Dell pour Oracle. Le tableau 1-9 répertorie les logiciels pris en charge au moment de la publication de ce document. Pour obtenir la liste la plus récente des éléments matériels et logiciels pris en charge, rendez-vous à l'adresse www.dell.com/10g et téléchargez le document "Solution Deliverable List" (Liste des éléments pris en charge), version 1.1.
Dépannage Solutions en cas d'échec de l'installation de Clusterware Échec de l'assistant de configuration d'Oracle Clusterware Si l'installation échoue lorsque l'assistant de configuration d'Oracle Clusterware démarre dans la fenêtre Configuration Assistants (Assistants de configuration), procédez comme suit : 1 Ouvrez le fichier suivant : %RACINE_ORA_CLUSTERWARE%\cfgtoollogs\configToolFailedCommands où %RACINE_ORA_CLUSTERWARE% correspond au répertoire racine des services CRS créé à la section "Installatio
Exécution d'Oracle Universal Installer 1 Sur le nœud 1, ouvrez l'Explorateur Windows et accédez au répertoire suivant : %LecteurSystème%\oracle\produit\10.2.0\crs\oui\bin 2 Double–cliquez sur setup.exe pour démarrer Oracle Universal Installer. 3 Dans la fenêtre de bienvenue, cliquez sur Deinstall Products (Désinstaller les produits). 4 Dans la fenêtre Inventory (Inventaire), sélectionnez OraCr10g_home puis cliquez sur Remove (Supprimer). 5 Dans la fenêtre de confirmation, cliquez sur Yes.
Nettoyage des périphériques de stockage 1 Nettoyez les partitions destinées à contenir le disque registre du cluster Oracle (OCRCFG) et le disque de vote. a Cliquez sur Démarrer et sélectionnez Exécuter. b Dans le champ Exécuter, tapez cmd et cliquez sur OK. c À l'invite, tapez la commande suivante et appuyez sur : %LecteurSystème%\oracle\produit\10.2.0\crs\bin\ExportSYMLink L'exportateur de liens symboliques Oracle (ExportSYMLink) exporte les liens symboliques vers le fichier SYMMAP.
6 Supprimez les liens symboliques pour le disque OCR (OCRCFG) et le disque de vote (VOTEDSK). a Sélectionnez ocrcfg et votesdk. b Cliquez sur Options et sélectionnez Commit (Valider). Si l'opération réussit, les entrées ocrcfg et votedsk sont supprimées. c Cliquez sur Options et sélectionnez Exit pour fermer Oracle Object Manager. 7 Démarrez la console de gestion de l'ordinateur. a Sur le bureau Windows, cliquez sur Démarrer puis sélectionnez Exécuter.
12 Dans la fenêtre Console de gestion de l'ordinateur, utilisez la procédure décrite de l'étape 11 c à l'étape 11 h pour créer les partitions suivantes : • Registre du cluster (CRSCFG) • Disque de vote (VOTEDSK) • Disque de données (deux partitions) • Disque de sauvegarde (deux partitions) • Toute partition supplémentaire requise Lorsque vous créez de nouvelles partitions, l'Assistant Création de nouvelle partition s'exécute pour chaque instance.
15 Sur le nœud 2, démarrez la console de gestion de l'ordinateur et supprimez les lettres de lecteur correspondant aux nouvelles partitions. REMARQUE : en règle générale, le nœud 2 attribue des lettres aux nouvelles partitions après le redémarrage des deux nœuds. Si ces lettres ne s'affichent pas lors de la procédure suivante, effectuez cette dernière sur le nœud 1 : a Cliquez sur Démarrer et sélectionnez Exécuter. b Dans le champ Exécuter, tapez la commande suivante et appuyez sur : compmgmt.
Procédures de dépannage supplémentaires Le tableau 1-10 indique les mesures recommandées en cas d'incident lié au déploiement et à l'utilisation de Windows Server 2003 et du logiciel Oracle Database 10g R2. Tableau 1-10. Dépannage Catégorie Incident/ Symptôme Cause Regroupeme Échec du Le regroupement de NIC peut nt de cartes regroupement de échouer dans les cas suivants : réseau NIC Broadcom 1 Un des NIC Broadcom utilisé dans le regroupement est en panne ou désactivé.
Tableau 1-10. Dépannage (suite) Catégorie Incident/ Symptôme Le nœud Oracle Clusterware redémarre en affichant un écran bleu. Cause Mesure recommandée Le nœud ne peut pas communiquer avec les disques de stockage. Procédez comme suit : 1 Redémarrez le noeud. 2 Pendant l'auto-test de démarrage, appuyez sur . 3 Dans l'écran Menu d'options avancées de Windows, sélectionnez Mode sans échec. 4 Sélectionnez le système d'exploitation approprié. 5 Connectez-vous au système.
Tableau 1-10. Dépannage (suite) Catégorie Incident/ Symptôme Écran Les nœuds système bleu affichent un écran bleu. Cause Les nœuds ne peuvent pas accéder au disque de vote. Mesure recommandée 1 Vérifiez que les paramètres définissant le mode de connexion des cartes HBA dans le micrologiciel sont corrects par rapport à la configuration du stockage.
Tableau 1-10. Dépannage (suite) Catégorie Incident/ Symptôme Cause Mesure recommandée Navisphere® Lorsque vous Câblage vers les cartes HBA des Server Utility exécutez nœuds effectué de façon incorrecte. Navisphere Server Utility for AX Series, les systèmes de stockage AX100 ne s'affichent pas dans la fenêtre Connected Storage Systems (Systèmes de stockage connectés). Vérifiez que les câbles à fibres optiques sont correctement connectés aux nœuds et aux systèmes de stockage.
Tableau 1-10. Dépannage (suite) Catégorie Incident/ Symptôme Cause Stockage Les disques SCSI ne s'affichent pas. Les disques SCSI n'apparaissent pas Vérifiez que les unités logiques sont lorsque vous faites un clic droit sur affectées aux deux nœuds. Poste de travail et que vous Procédez comme suit : sélectionnez Gestion de l'ordinateur, 1 Sur le bureau Windows, faites un clic droit puis Pilotes des disques. sur Poste de travail et sélectionnez Gérer.
Obtention et utilisation de fichiers Open Source Le CD Dell Deployment comprend à la fois des programmes tiers et des programmes Dell. L'utilisation de ces logiciels est soumise aux conditions des contrats de licence des logiciels respectifs. Tous les logiciels désignés comme étant soumis aux conditions de la licence GPL GNU (GNU General Public License) peuvent être copiés, distribués et/ou modifiés en accord avec les termes et conditions de la licence GPL GNU (GNU Not Unix), version 2 de juin 1991.
Guide de déploiement
Index A E O Agrégation de liens réseau, 108 Exemples Fibre Channel, connexions matérielles, 102 Obtention d'aide, 138 C Cluster Fibre Channel, exemple de connexion matérielle, 102 Configuration d'Oracle 10g, 101 vérification des configurations matérielle et logicielle, 101 Configuration des réseaux publics et privés, 107 Configuration du cluster Fibre Channel, 101 Configuration du réseau privé, 108 F Fibre Channel, configuration du cluster, 101 I Informations supplémentaires, 127 Installation Oracle
Index 142 Index
Dell™ PowerEdge™-Systeme Oracle Database 10g Release 2 Standard Edition Real Application Cluster für Microsoft® Windows Server® 2003 Standard x64 R2 Edition Einrichtungsanleitung Version 1.1 w w w. d e l l . c o m | s u p p o r t . d e l l .
Anmerkungen und Hinweise ANMERKUNG: Eine ANMERKUNG macht auf wichtige Informationen aufmerksam, die die Arbeit mit dem Computer erleichtern. HINWEIS: Ein HINWEIS warnt vor möglichen Beschädigungen der Hardware oder vor Datenverlust und zeigt auf, wie derartige Probleme vermieden werden können. ____________________ Irrtümer und technische Änderungen vorbehalten. © 2006 Dell Inc. Alle Rechte vorbehalten. Die Reproduktion dieses Dokuments in jeglicher Form ohne schriftliche Genehmigung von Dell Inc.
Inhalt Software- und Hardwareanforderungen Lizenzvereinbarungen . Wichtige Dokumentation . . . . . . . . . . . . . . . . . . . 147 . . . . . . . . . . . . . . . . . . . . . . . . . 149 149 . . . . . . . . . . . . . . . . . . . . . . . . . Installation und Konfiguration des Betriebssystems . . . . . . . . . . . . . Installation des Betriebssystems mit den Deployment-CDs . . . . . . . 151 . . . . . . . . . . . . . . . . . 151 155 . . . . . . . . . . . . . . . . .
Wie Sie Hilfe bekommen Dell Support . . Oracle Support . . . . . . . . . . . . . . . . . . . . . . . . . . . 190 . . . . . . . . . . . . . . . . . . . . . . . . . . . . . . 190 190 . . . . . . . . . . . . . . . . . . . . . . . . . . . . . . Erwerb und Einsatz von Open-Source-Dateien Index . 146 Inhalt . . . . . . . . . . . . . . . . 190 . . . . . . . . . . . . . . . . . . . . . . . . . . . . . . . . . . . . . . .
Dieses Dokument enthält Informationen zur Installation, Konfiguration, Neuinstallation und Verwendung der Software Oracle Database 10g R2 gemäß den von Dell für Oracle unterstützten Konfigurationen. Konsultieren Sie dieses Dokument in Verbindung mit der Dell™ Deployment-CD, um die Software zu installieren. Wenn Sie das Betriebssystem ausschließlich von den Betriebssystem-CDs installieren, sind die Anweisungen im vorliegenden Dokument für Sie unter Umständen nicht relevant.
Tabelle 1-1. Softwareanforderungen Softwarekomponente Konfiguration Windows Server 2003 Standard x64 R2 Edition Oracle Database 10g R2 Version 10.2.0.1 Standard Edition mit RAC-Option für Cluster Oracle Patchset Version 10.2.0.2 EMC® PowerPath® (nur Fibre-Channel-Cluster) Version 4.
Lizenzvereinbarungen ANMERKUNG: Wenn Sie über keine Oracle-Softwarelizenz verfügen, wenden Sie sich an den Dell Vertragshändler. Wichtige Dokumentation Weitere Informationen zu speziellen Hardwarekomponenten finden Sie in der Dokumentation zum System. Installation und Konfiguration des Betriebssystems HINWEIS: Um die korrekte Installation des Betriebssystems zu gewährleisten, trennen Sie vor der Installation alle externen Speichergeräte vom System.
6 Geben Sie an der Eingabeaufforderung 2 für die Option Oracle 10g R2 SE on Windows Server 2003 x64 R2 SE ein, und drücken Sie die . 7 Wenn Sie zur Auswahl der gewünschten Einrichtung aufgefordert werden, geben Sie 1 ein, und drücken Sie die . 8 Nehmen Sie nach entsprechender Aufforderung die Dell Deployment CD1 aus dem Laufwerk, und legen Sie die Dell Deployment CD2 ein. 9 Legen Sie nach Aufforderung die CD Microsoft Windows Server 2003 Standard x64 R2 Edition CD1 ein.
Aktualisieren der Pfade für temporäre Verzeichnisse Stellen Sie sicher, dass die temporären Verzeichnisse Temp und Tmp korrekt gesetzt sind. 1 Klicken Sie auf Start, und wählen Sie Ausführen. 2 Geben Sie im Feld Öffnen den Befehl cmd ein, und klicken Sie auf OK. 3 Geben Sie an der Eingabeaufforderung echo %Temp% ein, und drücken Sie die . Der folgende Pfad wird angezeigt: %SystemDrive%\Temp 4 Geben Sie an der Eingabeaufforderung echo %Tmp% ein, und drücken Sie die .
Abbildung 1-1. Hardwareverbindungen für einen direkt verbundenen Fibre-Channel-Cluster Öffentliches Netzwerk Gigabit-Ethernet-Switches (privates Netzwerk) LAN/WAN PowerEdge-Systeme (Oracle-Datenbank) Fibre-Channel-Speichersysteme Dell|EMC CX300/CX500/CX3-20 Cat5e/6 (integrierter NIC) Cat5e/6 (Kupfer-Gigabit-NIC) Glasfaserkabel Tabelle 1-4.
Abbildung 1-2. Hardwareverbindungen für einen SAN-verbundenen Fibre-Channel-Cluster Öffentliches Netzwerk Gigabit-Ethernet-Switches (privates Netzwerk) LAN/WAN PowerEdge-Systeme (Oracle-Datenbank) Dell|EMC-Fibre-Channel-Switches (SAN) Cat5e/6 (integrierter NIC) Cat5e/6 (Kupfer-Gigabit-NIC) Glasfaserkabel Fibre-Channel-Speichersysteme Dell|EMC CX300/CX500/CX3-20 Tabelle 1-5.
Tabelle 1-5. Fibre-Channel-Hardwareverbindungen (Fortsetzung) Clusterkomponente Verbindungen Jeder GigabitEthernet-Switch Jeweils eine Cat5e/6-Verbindung zum privaten Gigabit-NIC auf jedem PowerEdge-System Eine Cat5e/6-Verbindung zu dem anderen Gigabit-Ethernet-Switch Überprüfen Sie, ob folgende Schritte für den Cluster ausgeführt wurden: • Die Hardware ist vollständig im Rack installiert. • Alle Hardwareverbindungen sind entsprechend Abbildung 1-1 bzw. Abbildung 1-2 und Tabelle 1-4 bzw.
Verkabeln des Speichersystems Sie können das Oracle-Cluster-Speichersystem je nach Bedarf als direkt verbundene (Direct-Attach) oder als über ein Speichernetzwerk mit vier Anschlüssen verbundene (SAN-Attach) Konfiguration einrichten. Nachstehend sind die Anleitungen für beide Konfigurationstypen aufgeführt. Abbildung 1-3.
Direkt verbundene Konfiguration (Direct-Attach) So richten Sie eine direkt verbundene Konfiguration (siehe Abbildung 1-3) für die Knoten ein: 1 Installieren Sie ein Glasfaserkabel zwischen HBA0 von Knoten 1 und Port 0 von SP-A. 2 Installieren Sie ein Glasfaserkabel zwischen HBA1 von Knoten 1 und Port 0 von SP-B. 3 Installieren Sie ein Glasfaserkabel zwischen HBA0 von Knoten 2 und Port 1 von SP-A. 4 Installieren Sie ein Glasfaserkabel zwischen HBA1 von Knoten 2 und Port 1 von SP-B. Abbildung 1-4.
SAN-verbundene Konfiguration So richten Sie eine SAN-verbundene Konfiguration mit vier Anschlüssen (siehe Abbildung 1-4) für die Knoten ein: 1 Installieren Sie ein Glasfaserkabel zwischen SP-A-Port 0 und Fibre-Channel-Switch 0. 2 Installieren Sie ein Glasfaserkabel zwischen SP-A-Port 1 und Fibre-Channel-Switch 1. 3 Installieren Sie ein Glaserfaserkabel zwischen SP-B-Port 0 und Fibre-Channel-Switch 1. 4 Installieren Sie ein Glaserfaserkabel zwischen SP-B-Port 1 und Fibre-Channel-Switch 0.
Konfiguration und Teaming des privaten Netzwerks Bevor Sie den Cluster einrichten, weisen Sie jedem Knoten eine private IP-Adresse und einen privaten Hostnamen zu. So ist gewährleistet, dass die Knoten über die private Schnittstelle miteinander kommunizieren können. Tabelle 1-8 zeigt ein Beispiel für eine Netzwerkkonfiguration mit einem Zwei-Knoten-Cluster. ANMERKUNG: In diesem Beispiel wird davon ausgegangen, dass alle IP-Adressen in der Datei „hosts“ aller Knoten registriert sind. Tabelle 1-8.
h Wählen Sie im Feld Select the Adapters to include in This Team (Wählen Sie die Adapter für dieses Team aus) die übrigen für das NIC-Teaming ausgewählten Netzwerkadapter, und klicken Sie auf Weiter. i Wählen Sie aus der Liste Select a Team Mode (Wählen Sie einen Team-Modus aus) die Option Adaptive Load Balancing (Adaptiver Lastausgleich). j Klicken Sie auf Finish (Fertig stellen), um das Teaming abzuschließen.
k Wählen Sie im letzten Fenster die Option Preview changes in Broadcom Advanced Control Suite 2 (Änderungen in Broadcom Advanced Control Suite 2 anzeigen), und klicken Sie auf Finish (Fertig stellen). l Klicken Sie im Fenster Broadcom Advanced Control Suite 2 auf Apply (Übernehmen). Es erscheint die Warnmeldung, dass die Netzwerkverbindung vorübergehend unterbrochen wird. m Klicken Sie zum Fortfahren auf Yes (Ja).
d Wählen Sie im Fenster Öffentliche Eigenschaften die Option Symbol bei Verbindung im Infobereich anzeigen. Nachdem Sie die in diesem Abschnitt erläuterten Schritte durchgeführt haben, wird der Status des Netzwerkadapters im Windows-Systembereich angezeigt. e Klicken Sie auf OK. f Klicken Sie im Fenster Eigenschaften auf Schließen. g Wiederholen Sie Schritt a bis Schritt f für das Privat-NIC-Team.
10.10.10.2 rac2-priv 155.16.170.201 rac1-vip 155.16.170.202 rac2-vip ANMERKUNG: Private Netzwerk-IP-Adressen sind vom öffentlichen Netzwerk aus nicht zugänglich und brauchen deshalb nicht am DNS-Server angemeldet zu werden. 5 Stellen Sie sicher, dass die Knoten mit den öffentlichen und privaten Netzwerken kommunizieren können. a Öffnen Sie ein Befehlszeilenfenster auf Knoten 1.
5 Blenden Sie Storage (Datenspeicher) ein, und klicken Sie anschließend auf Disk Management (Datenträgerverwaltung). Wenn das Fenster Welcome to the Initialize and Convert Disk Wizard (Assistent zum Initialisieren und Konvertieren von Datenträgern) angezeigt wird, führen Sie Schritt a bis Schritt d durch. Fahren Sie andernfalls mit Schritt 6 fort. a Klicken Sie im Fenster Welcome to the Initialize and Convert Disk Wizard auf Weiter.
7 Vergewissern Sie sich, dass im Fenster SP Configuration (SP-Konfiguration) alle Pfade wie folgt konfiguriert sind: • In der Spalte State (Status) wird Alive (Vorhanden) angezeigt. • In der Spalte Mode (Modus) wird Active (Aktiv) angezeigt. 8 Wiederholen Sie Schritt 6 und Schritt 7 für den verbleibenden SP. 9 Schließen Sie die PowerPathAdmin-Konsole. Daraufhin erscheint ein Hinweisfenster mit der Aufforderung, die Einstellungen für die Konsole zu speichern. 10 Klicken Sie auf Nein.
Vorbereiten des OCR- und Voting-Datenträgers für Clusterware 1 Klicken Sie auf dem Windows-Desktop mit der rechten Maustaste auf Arbeitsplatz, und wählen Sie Verwalten. 2 Blenden Sie Storage (Datenspeicher) ein, und klicken Sie anschließend auf Disk Management (Datenträgerverwaltung). Das Speicherlaufwerk, das Sie in „Überprüfen der Funktionsfähigkeit von PowerPath“ initialisiert haben, wird als Unallocated (Nicht zugeordnet) angezeigt.
10 Erstellen Sie ein logisches Laufwerk für den Voting-Datenträger. a Klicken Sie im Partitionsbereich des Datenträgers, der als OCR- und Voting-Datenträger (1-GBLUN) festgelegt ist, mit der rechten Maustaste auf den freien Bereich, und wählen Sie New Logical Drive (Neues logisches Laufwerk). Das Fenster Welcome to the New Partition Wizard (Assistent zum Erstellen von Partitionen) wird angezeigt. b Klicken Sie auf Weiter.
g Wählen Sie im Fenster Format Partition (Partition formatieren) die Option Do not format this partition (Diese Partition nicht formatieren), und klicken Sie auf Weiter. h Klicken Sie auf Finish (Fertig stellen). 2 Erstellen Sie ein logisches Laufwerk für den Flash-Wiederherstellungsbereich. a Identifizieren Sie den für den Flash-Wiederherstellungsbereich zugewiesenen Datenträger. b Führen Sie Schritt b bis Schritt h unter Schritt 1 aus.
Installation von Oracle RAC 10g R2 mit ASM In diesem Abschnitt ist die Installation der Software Oracle RAC 10g R2 beschrieben. Folgende Themen werden behandelt: • Installation von Oracle Clusterware • Ändern des Werts css misscount • Installation von Oracle Database 10g R2 • Installation des Patchsets 10.2.0.2 und von Software-Updates • Erstellen der Startdatenbank Installation von Oracle Clusterware Version 10.2.0.1 1 Legen Sie auf Knoten 1 die CD Oracle Clusterware ein.
ANMERKUNG: Achten Sie darauf, dass die Netzwerk-Hostnamen keine Domänennamenerweiterung aufweisen. 7 Klicken Sie auf Weiter. Das Fenster Specify Network Interface Usage (Nutzung der Netzwerkschnittstelle festlegen) wird angezeigt. Es enthält eine Liste clusterweiter Netzwerkschnittstellen. 8 Konfigurieren Sie mit den Dropdown-Menüs Interface Type (Schnittstellentyp) den öffentlichen Schnittstellentyp als Public und den privaten Schnittstellentyp als Private (falls erforderlich).
Im Fenster Install (Installation) wird der Fortschritt der Installation angezeigt. Anschließend wird das Fenster Configuration Assistants (Konfigurationsassistenten) angezeigt, und das Installationsprogramm OUI startet eine Reihe von Konfigurationsprogrammen. Danach wird das Fenster End of Installation (Installation abgeschlossen) angezeigt. 15 Klicken Sie auf Exit (Beenden), um die OUI-Sitzung zu beenden. 16 Klicken Sie im Fenster Exit (Beenden) auf Ja.
4 Überprüfen Sie im Fenster Specify Home Details (Stamm-Details festlegen) unter Destination (Ziel), dass die folgenden Einstellungen vorhanden sind: • Im Feld Name ist als Stammname der Oracle-Datenbank die Bezeichnung OraDb10g_home1 eingetragen. • Im Feld Path (Pfad) ist der folgende vollständige Oracle-Stammpfad eingetragen: %SystemDrive%\oracle\product\10.2.0\db_1 wobei %SystemDrive% das Laufwerk ist, auf dem der Oracle-Stammpfad konfiguriert ist.
Installation des Oracle Database 10g R2-Patchsets 10.2.0.2 1 Vergewissern Sie sich, dass nur Binärdateien der Clusterware- und Datenbankversion 10.2.0.1 auf dem System installiert sind und die Startdatenbank noch nicht erstellt wurde. 2 Laden Sie das Patchset 10.2.0.2 von der Oracle Metalink-Website unter metalink.oracle.com herunter. 3 Entpacken Sie das Patchset auf dem Laufwerk %SystemDrive%. Installation des Patchsets 10.2.0.
7 Klicken Sie im Fenster End of Installation (Installation abgeschlossen) auf Exit (Beenden). 8 Klicken Sie auf Yes (Ja), um OUI zu beenden. Installation des Patchsets 10.2.0.2 für Oracle 10g Database ANMERKUNG: Vergewissern Sie sich vor dem Installieren des Patchsets, dass alle Oracle-Dienste ausgeführt werden. Führen Sie die folgenden Schritte aus, bevor Sie einen Listener und eine Startdatenbank erstellen.
Installation des Patches zur Behebung des Split Brain-Problems während des Systemstarts 1 Navigieren Sie nach dem Ausführen der Schritte unter „Herunterladen der aktuellen Oracle-Patches“ zu dem Ordner patch5059258. 2 Kopieren Sie die Datei opmd.exe in das Verzeichnis %CRS_HOME%\bin auf allen Knoten. 3 Geben Sie an der Eingabeaufforderung die folgende Zeile ein, und drücken Sie die : %SystemDrive%\%CRS_HOME%\bin> opmd.exe -install 4 Wiederholen Sie Schritt 3 auf allen Knoten.
7 Klicken Sie im Fenster Database Templates (Datenbankvorlagen) auf Custom Database (Benutzerdefinierte Datenbank) und anschließend auf Weiter. 8 Geben Sie im Fenster Database Identification (Datenbankidentifikation) unter Global Database Name einen globalen Datenbanknamen wie racdb ein, und klicken Sie auf Weiter.
e Drücken Sie im Fenster Select disks (Datenträger auswählen) die Taste , und wählen Sie die ersten beiden Datenträger mit dem Eintrag Candidate device (Mögliches Gerät) in der Spalte Status aus. f Behalten Sie im Feld Generate stamps with this prefix (Kennzeichnungen mit diesem Präfix erzeugen) die vorgegebenen Einstellungen bei. g Klicken Sie auf Weiter. h Klicken Sie im Fenster Stamp disks (Laufwerke kennzeichnen) auf Weiter.
19 Wählen Sie im Fenster Database File Locations (Datenbank-Speicherorte) die Option Use OracleManaged Files (Von Oracle verwaltete Dateien verwenden), und klicken Sie auf Weiter. 20 Führen Sie im Fenster Recovery Configuration (Konfiguration für Wiederherstellung) folgende Schritte durch: a Wählen Sie Specify Flash Recovery Area (Flash-Wiederherstellungsbereich festlegen). b Klicken Sie auf Browse (Durchsuchen).
Zusätzliche Informationen Unterstützte Softwareversionen ANMERKUNG: In dieser Version der von Dell für Oracle unterstützten Konfigurationen („Dell Supported Configurations for Oracle“) werden PCI-Express-Controller nicht unterstützt. In Tabelle 1-9 ist die bei Erscheinen dieses Releases unterstützte Software aufgeführt. Wenn Sie aktuelle Informationen zu unterstützter Hardware und Software benötigen, laden Sie die „Solution Deliverable List“ in der Version 1.
Fehlerbehebung Umgehen von Fehlern bei der Clusterware-Installation Fehler mit Oracle Clusterware-Konfigurationsassistent Wenn die Installation mit dem Oracle Clusterware Configuration Assistant (Oracle ClusterwareKonfigurationsassistenten) fehlschlägt, führen Sie im Fenster Configuration Assistants (Konfigurationsassistenten) Folgendes durch: 1 Öffnen Sie die Datei: %ORA_CLUSTERWARE_HOME%\cfgtoollogs\configToolFailedCommands wobei %ORA_CLUSTERWARE_HOME% das CRS-Stammverzeichnis ist, das Sie in „Installati
Deinstallation von Oracle Clusterware Zum Beheben der nachstehenden Probleme müssen Sie Oracle Clusterware möglicherweise deinstallieren: • Die Installation von Oracle Clusterware ist fehlgeschlagen. • Der Oracle Clusterware-Konfigurationsassistent wurde nicht erfolgreich installiert. Um Oracle Clusterware zu deinstallieren, führen Sie das Installationsprogramm OUI auf dem betreffenden Knoten aus, und löschen Sie alle gegebenenfalls vorhandenen Oracle-Dienste sowie alle Daten auf den Speichergeräten.
3 Starten Sie Knoten 1 neu, und melden Sie sich als Administrator an. 4 Starten Sie Knoten 2 neu, und melden Sie sich als Administrator an. Löschen der Speicherlaufwerke 1 Löschen Sie alle Daten auf den Partitionen, die als OCR-Registry (OCRCFG)- und Voting-Datenträger konfiguriert werden. a Klicken Sie auf Start, und wählen Sie Ausführen. b Geben Sie im Feld Ausführen den Befehl cmd ein, und klicken Sie auf OK.
5 Starten Sie den Oracle GUI-Objektmanager. Geben Sie an der Eingabeaufforderung die folgende Zeile ein, und drücken Sie die : %SystemDrive%\ora_bin_utils\GUIOracleOBJManager.exe Das Fenster Oracle Object Manager wird angezeigt. 6 Löschen Sie die symbolischen Verknüpfungen für den OCR-Datenträger (OCRCFG) und den VotingDatenträger (VOTEDSK). a Wählen Sie ocrcfg und votedsk aus. b Klicken Sie auf Options (Optionen), und wählen Sie Commit (Überstellen).
d Klicken Sie im Fenster Disk Management mit der rechten Maustaste auf den freien Bereich, in dem sich die ehemaligen ASM-Partitionen befanden, und wählen Sie New Partition (Neue Partition). Das Fenster New Partition Wizard (Assistent zum Erstellen neuer Partitionen) wird angezeigt. e Klicken Sie auf Weiter. f Wählen Sie im Fenster Partition Type (Partitionstyp) die Option Extended Partition (Erweiterte Partition), und klicken Sie auf Weiter.
13 Starten Sie Knoten 1 neu, und melden Sie sich als Administrator an. 14 Nachdem Sie sich an Knoten 1 angemeldet haben, starten Sie Knoten 2 neu, und melden Sie sich als Administrator an. 15 Starten Sie auf Knoten 2 die Computerverwaltungskonsole, und löschen Sie die Laufwerkbuchstaben der neu erstellten Partitionen. ANMERKUNG: Im Regelfall weist Knoten 2 den neuen Partitionen Laufwerkbuchstaben zu, nachdem Sie beide Knoten neu gestartet haben.
Weitere Maßnahmen zur Fehlerbehebung Tabelle 1-10 enthält empfohlene Maßnahmen für Probleme, die beim Einrichten und beim Einsatz von Windows Server 2003 und Oracle Database 10g R2 auftreten können. Tabelle 1-10. Fehlerbehebung Kategorie Problem/Anzeichen Ursache Empfohlene Korrekturmaßnahmen NICTeaming Broadcom NIC- Folgende Schritte können zu einem Teaming schlägt Fehler beim NIC-Teaming führen: fehl 1 Einer der für das NIC-Teaming verwendeten Broadcom-NICs ist ausgefallen oder deaktiviert.
Tabelle 1-10. Fehlerbehebung (Fortsetzung) Kategorie Problem/Anzeichen Ursache Empfohlene Korrekturmaßnahmen Beim Neustart Der Knoten kann nicht mit den Führen Sie folgende Schritte durch: Oracle Clusterware des Knotens wird Speicherlaufwerken kommunizieren. 1 Starten Sie den Knoten neu. ein blauer Bildschirm angezeigt. 186 Einrichtungsanleitung 2 Drücken Sie während des Einschaltselbsttests (POST) die Taste . 3 Wählen Sie im Menü für erweiterte WindowsOptionen den Abgesicherten Modus.
Tabelle 1-10. Fehlerbehebung (Fortsetzung) Kategorie Problem/Anzeichen Ursache Blauer SystemBildschirm Die Knoten zeigen einen blauen Bildschirm an. Die Knoten können nicht auf den Voting-Datenträger zugreifen. Empfohlene Korrekturmaßnahmen 1 Stellen Sie sicher, dass die Firmwareeinstellungen für den HBAVerbindungsmodus für die Speicherkonfiguration korrekt konfiguriert sind.
Tabelle 1-10. Fehlerbehebung (Fortsetzung) Kategorie Problem/Anzeichen Ursache Empfohlene Korrekturmaßnahmen Navisphere ServerDienstprogra mm Beim Ausführen Die Kabelverbindung der Knoten mit des Serverden HBAs ist fehlerhaft. Dienstprogram ms Navisphere für die AX-Reihe werden die AX100Speichersysteme nicht im Fenster Connected Storage Systems (Angeschlossene Speichersysteme) angezeigt. Überprüfen Sie, ob die Glasfaserkabel zwischen den Knoten und den Speichersystemen korrekt angeschlossen sind.
Tabelle 1-10. Fehlerbehebung (Fortsetzung) Kategorie Problem/Anzeichen Ursache Empfohlene Korrekturmaßnahmen Speicher Datenträger erscheinen als nicht zugänglich. Überprüfen Sie, ob die LUNs der Speicherlaufwerke beiden Knoten zugewiesen sind. Wenn Sie auf dem Windows-Desktop mit der rechten Maustaste auf Arbeitsplatz klicken, Computerverwaltung wählen und dann auf Datenträgerverwaltung klicken, werden die Datenträger als nicht zugänglich angezeigt.
Wie Sie Hilfe bekommen Dell Support Weitere Informationen zum System finden Sie in der zusammen mit den Systemkomponenten gelieferten Dokumentation. Whitepaper, Informationen zu den von Dell unterstützten Konfigurationen und allgemeine Informationen erhalten Sie auf der entsprechenden Website (Dell|Oracle Tested and Validated Configurations) unter www.dell.com/10g.
Index B Beispiele Fibre-Channel-Cluster, Hardwareverbindungen, 153 Bonding (Bündelung), 158 C Cluster Fibre-ChannelHardwareverbindungen, Beispiel, 153 Cluster einrichten Fibre-Channel, 151 D Dokumentation, 149 F I Ö Installation Oracle RAC 10g, 168 Windows Server 2003 Standard x64 R2 Edition, 149 Öffentliches Netzwerk Konfiguration, 157 P K Privates Netzwerk Konfiguration, 157-158 Konfiguration von Oracle 10g, 151 Hardware- und Softwarekonfigurationen überprüfen, 151 S Konfigurieren des öffentli
Index W Wie Sie Hilfe bekommen, 190 Windows Server 2003 Standard x64 R2 Edition Installation, 149 Z Zusätzliche Informationen, 178 192 Index
Dell™ PowerEdge™ システム Oracle Database 10g Release 2 Standard Edition Real Application Cluster for Microsoft® Windows Server® 2003 Standard x64 R2 Edition 導入ガイドバージョン 1.1 w w w. d e l l . c o m | s u p p o r t . d e l l .
メモおよび注意 メモ: コンピュータを使いやすくするための重要な情報を説明しています。 注意: ハードウェアの損傷やデータの損失の可能性を示し、その危険を回避するための方法を説明してい ます。 ____________________ 本書の内容は予告なく変更されることがあります。 © 2006 すべての著作権は Dell Inc. にあります。 Dell Inc. の書面による許可のない複製は、いかなる形態においても厳重に禁じられています。 本書に使用されている商標:Dell、DELL ロゴ、および PowerEdge は Dell Inc.
目次 ソフトウェアおよびハードウェアの要件 . ライセンス契約 . . 重要なマニュアル. . . . . . . . . . . . . . . . . 197 . . . . . . . . . . . . . . . . . . . . . . . . . . . 199 199 . . . . . . . . . . . . . . . . . . . . . . . . . . . OS のインストールと設定 . . . . . . . . . . . . . . . . . . . . . . . . . . 『Deployment CD』を使用した OS のインストール . . . . . . . . . クラスタのハードウェアおよびソフトウェアの構成の確認 . ファイバーチャネルクラスタのセットアップ ストレージシステムのケーブル接続 . . . . . . . . . . . 201 201 205 . . . . . . . . . . . . . . . 207 . 207 212 212 213 213 214 217 . . . . . . . .
困ったときは . . . . . . . . . . . . . . . . . . . . . . . . . . . . . . . . . デルサポート . . . Oracle のサポート . . . . . . . . . . . . . . . . . . . . . . . . . . . . . . . . . . . . . . . . . . . . . . . . . . . . . . . オープンソースファイルの入手および使用 索引 196 目次 240 240 240 . . . . . . . . . . . . . . . 240 . . . . . . . . . . . . . . . . . . . . . . . . . . . . . . . . . . . . . . . .
本書では、Oracle をサポートするデルの構成に従って、Oracle Database 10g R2 ソフトウェアをイ ンストール、設定、再インストール、および使用するのに必要な情報について説明します。 本書と『Dell™ Deployment CD』を併用して、使用するソフトウェアをインストールしてください。 再インストール用 CD のみを使用して OS をインストールする場合、本書の手順は該当しないこと があります。 内容は次のとおりです。 • ソフトウェアおよびハードウェアの要件 • Microsoft® Windows Server® 2003, Standard x64 R2 Edition のインストールおよび設定手順 • クラスタのハードウェアおよびソフトウェアの構成の確認 • Oracle Real Application Clusters(RAC)10g R2 のネットワークおよびストレージの設定 • Oracle Database RAC 10g R2 パッチセット 10.2.0.
表 1-1. ソフトウェア要件 ソフトウェアコンポーネント 構成 Windows Server 2003 Standard x64 R2 Edition Oracle Database 10g R2 バージョン 10.2.0.1 Standard Edition、クラスタのための RAC オプション を含む Oracle パッチセット ® バージョン 10.2.0.2 ® EMC PowerPath (ファイバーチャネルクラス バージョン 4.5 タの場合のみ) メモ: ユーザー数、使用するアプリケーション、バッチプロセスなどの要因によっては、必要なパ フォーマンスを達成するために、ここに示すハードウェアの最小要件を超えるシステムが必要な場合 があります。 メモ: すべてのノードのハードウェア構成は同一でなければなりません。 表 1-2.
表 1-2. ファイバーチャネルクラスタ構成用のハードウェアの最小要件 (続き) ハードウェアコンポーネント 構成 ギガビットイーサネットスイッチ(2 台) サポートされる構成については、Dell|Oracle Tested and Validated Configurations(Dell|Oracle で検証済みの構 成)ウェブサイト www.dell.
『Deployment CD』を使用した OS のインストール メモ: BIOS、ファームウェア、およびドライバのアップデート版については、デルサポートサイト support.dell.
15 Windows へようこそ ウィンドウが表示されたら、 を押して続行します。 16 ログオン ウィンドウが表示されます。 17 パスワード フィールドに、この手順の 手順 12 で設定した管理者パスワードを入力して、OK をクリックします。 一時ディレクトリパスのアップデート ディレクトリ Temp と Tmp へのパスが正しく設定されていることを確認します。 1 スタート をクリックし、ファイル名を指定して実行 を選択します。 2 名前 フィールドに cmd と入力し、OK をクリックします。 3 コマンドプロンプトで、echo %Temp% と入力し、 を押します。次のパスが表示され ます。 %SystemDrive%\Temp 4 コマンドプロンプトで、echo %Tmp% と入力し、 を押します。次のパスが表示されます。 %SystemDrive%\Tmp クラスタのハードウェアおよびソフトウェアの構成の確認 クラスタのセットアップを開始する前に、ハードウェアの取り付け、パブリックとプライベートの イ
図 1-1 直接接続のファイバーチャネルクラスタのハードウェア接続 パブリックネットワーク ギガビットイーサネットスイッ チ(プライベートネットワーク) LAN/WAN PowerEdge システム (Oracle データベース) Dell|EMC CX300/CX500/CX3-20 ファ イバーチャネルストレージシス テム Cat5e/6(内蔵 NIC) Cat5e/6(銅線 Gigabit NIC) 光ファイバーケーブル 表 1-4.
図 1-2 SAN 接続のファイバーチャネルクラスタ用のハードウェア接続 パブリックネットワーク ギガビットイーサネットスイッ チ(プライベートネットワーク) LAN/WAN PowerEdge システム (Oracle データベース) Dell|EMC ファイバーチャネルス イッチ(SAN) Cat5e/6(内蔵 NIC) Cat5e/6(銅線 Gigabit NIC) 光ファイバーケーブル Dell|EMC CX300/CX500/CX3-20 ファイ バーチャネルストレージシステム 追加の光ファイバーケーブル 表 1-5.
表 1-5.
表 1-6.
直接接続構成 ノードを直接接続(図 1-3 を参照)で構成するには、以下の手順を実行します。 1 1 本の光ファイバーケーブルをノード 1 の HBA0 から SP-A のポート 0 に接続します。 2 1 本の光ファイバーケーブルをノード 1 の HBA1 から SP-B のポート 0 に接続します。 3 1 本の光ファイバーケーブルをノード 2 の HBA0 から SP-A のポート 1 に接続します。 4 1 本の光ファイバーケーブルをノード 2 の HBA1 から SP-B のポート 1 に接続します。 図 1-4 SAN 接続のファイバーチャネルクラスタのケーブル接続 クラスタノード 2 クラスタノード 1 0 1 HBA ポート(2) HBA ポート(2) sw1 sw0 SP-B SP-A FE0 FE1 CX3-20 ストレージシステム 206 導入ガイド 0 1 FE0 FE1
SAN 接続構成 ノードを 4 ポートの SAN 接続(図 1-4 を参照)で構成するには、以下の手順を実行します。 1 1 本の光ファイバーケーブルを SP-A ポート 0 からファイバーチャネルスイッチ 0 に接続します。 2 1 本の光ファイバーケーブルを SP-A ポート 1 からファイバーチャネルスイッチ 1 に接続します。 3 1 本の光ファイバーケーブルを SP-B ポート 0 からファイバーチャネルスイッチ 1 に接続します。 4 1 本の光ファイバーケーブルを SP-B ポート 1 からファイバーチャネルスイッチ 0 に接続します。 5 1 本の光ファイバーケーブルをノード 1 の HBA0 からファイバーチャネルスイッチ 0 に接続し ます。 6 1 本の光ファイバーケーブルをノード 1 の HBA1 からファイバーチャネルスイッチ 1 に接続し ます。 7 1 本の光ファイバーケーブルをノード 2 の HBA0 からファイバーチャネルスイッチ 0 に接続し ます。 8 1 本の光ファイバーケーブルをノード 2 の HBA1 からファイバーチャネルスイッチ
表 1-7. NIC のポート割り当て NIC ポート 利用可能なポート 3 個 利用可能なポート 4 個 1 パブリック IP および仮想 IP パブリック IP 2 プライベート IP(NIC チーム) プライベート IP(NIC チーム) 3 プライベート IP(NIC チーム) プライベート IP(NIC チーム) 4 なし 仮想 IP プライベートネットワークの設定とチーミング クラスタを展開する前に、各ノードにプライベート IP アドレスとプライベートホスト名を割り当て ます。この手順により、ノードがプライベートインタフェースを通じて確実に通信できるようにな ります。 2 ノードクラスタのネットワーク設定の例を 表 1-8 に示します。 メモ: この例では、すべてのノードのホストファイルにすべての IP アドレスが登録されています。 表 1-8. ネットワーク設定の例 ホスト名 タイプ IP アドレス 登録 rac1 パブリック 155.16.170.
4 d NIC のチーミング用として識別された Intel NIC の 1 つを右クリックし、プロパティ をク リックします。 e チーム化 タブをクリックします。 f その他のアダプタとチーム化する を選択し、新規チーム をクリックします。 g NIC チームの名前を指定し、次へ をクリックします。 h Select the Adapters to include in This Team(このチームに含めるアダプタを選択し てください)のボックスで、NIC チーミング用として識別された残りのネットワークアダ プタを選択し、次へ をクリックします。 i チームモードの選択 リストボックスで、アダプティブロードバランシング を選択します。 j 完了 をクリックしてチーミングを完了します。 k Team: Properties(チーム: <チーム名> プロパティ)ウィンドウで、OK をクリックします。 l Intel NIC のプロパティウィンドウで、OK をクリックします。 m コンピュータの管理 ウィンドウを閉じます。 ノード 1 に Bro
h Designating Standby Member(スタンバイメンバーの指定)ウィンドウで、Do not Configure a Standby Member(スタンバイメンバーを設定しない)を選択します。 i Configuring LiveLink(LiveLink の設定)ウィンドウで いいえ を選択し、次へ をクリッ クします。 j Creating/Modifying a VLAN(VLAN の作成 / 修正)ウィンドウで、いいえ を選択し、 次へ をクリックします。 k 最後のウィンドウで Preview changes in Broadcom Advanced Control Suite 2 (Broadcom Advanced Control Suite 2 におけるプレビューの変更)を選択し、 完了 をク リックします。 l Broadcom Advanced Control Suite 2 ウィンドウで、適用 をクリックします。 ネットワーク接続が一時中断することを警告するメッセージが表示されます。 5 m はい をクリックして続行します。 n IP ad
b インターネットプロトコル(TCP/IP)をダブルクリックします。 c 次の IP アドレスを使う をクリックし、必要な IP アドレス、デフォルトゲートウェイアド レス、および DNS サーバーの IP アドレスを入力し、OK をクリックします。 メモ: Oracle ソフトウェアでは、パブリックインタフェースにルータブル IP アドレスを指 定する必要があります。標準のノンルータブル(プライベート)IP アドレスを指定すると、 CRS のインストールが失敗する場合があります。 d パブリックプロパティ ウィンドウで、接続時に通知領域にアイコンを表示する を選択します。 本項の手順を実行すると、システムトレイにネットワークアダプタのステータスが表示さ れます。 e OK をクリックします。 f プロパティ ウィンドウで、閉じる をクリックします。 g プライベート NIC チームで 手順 a ~手順 f を繰り返します。 メモ: プライベート NIC チームでは、デフォルトゲートウェイアドレスと DNS サーバー項 目は不要です。 h 3 残りのノードで 手順 a ~ 手順 g
10.10.10.1 rac1-priv 10.10.10.2 rac2-priv 155.16.170.201 rac1-vip 155.16.170.
5 記憶域 を展開し、ディスクの管理 をクリックします。 ディスクの初期化と変換ウィザードへようこそ の画面が表示されたら、手順 a ~ 手順 d を実 行します。それ以外の場合は、手順 6 に進みます。 a ディスクの初期化と変換ウィザードへようこそ ウィンドウで、次へ をクリックします。 b 初期化するディスクの選択 ウィンドウの ディスク ウィンドウで、お使いのストレージ LUN と関連するディスクを選択し、次へ をクリックします。 c 変換するディスクの選択 ウィンドウで、手順 b で選択したディスクの選択を解除し、次へ をクリックします。 メモ: この手順により、ディスクは確実に ベーシック ディスクとして設定されます。 d 完了 をクリックします。 6 ディスクの管理 ウィンドウで、直接接続構成の場合は 2 台のディスク、スイッチ接続の場合は 4 台のディスクが表示されていることを確認します。ディスクのサイズは互いに、また、スト レージ内のノードに割り当てられている LUN ともほぼ同一である必要があります。 7 手順 1 ~ 手順 6 を残りのクラスタノードで繰り返します
8 もう 1 つの SP に対して 手順 6 と 手順 7 を繰り返します。 9 PowerPathAdmin コンソールを閉じます。 コンソールの設定を保存するように求めるメッセージウィンドウが表示されます。 10 いいえ をクリックします。 11 Windows デスクトップで、マイコンピュータ を右クリックし、管理 を選択します。 12 記憶域 を展開し、ディスクの管理 をクリックします。 ストレージ内に割り当てられた LUN ごとに 1 台のディスクが表示されます。 13 各 LUN が ベーシック ディスクとして設定されていることを確認します。 14 手順 1 ~ 手順 13 を残りのクラスタノードで繰り返します。 Oracle Clusterware 用のディスクの準備 本項では、以下のディスク用に論理ドライブを作成するための情報を提供します。 • Oracle Clusterware Registry(OCR)ディスク ― クラスタ設定情報が格納されています。 • 投票ディスク(Voting Disk)― 1 つまたは複数のノードでプライベートネットワークまたは
6 パーティションサイズの指定 ウィンドウで、デフォルトのパーティションサイズをそのまま使 用し、次へ をクリックします。 7 完了 をクリックします。 手順 3 で選択したディスクパーティション領域が、拡張パーティションとして設定されます。 8 ノードに割り当てられているすべての共有ディスクで、手順 3 ~ 手順 7 を繰り返します。 9 Registry(OCR)ディスク用に論理ドライブを作成します。 a OCR と投票ディスク(1 GB LUN)用として識別されたディスクのパーティション領域で 空き領域を右クリックし、新しい論理ドライブ を選択します。 新しいパーティションウィザードへようこそ が表示されます。 10 b 次へ をクリックします。 c パーティションの種類を選択 ウィンドウで 論理ドライブ を選択し、次へ をクリックします。 d パーティションサイズの指定 ウィンドウの パーティションサイズ(MB) フィールドに 120 と入力し、次へ をクリックします。 e ドライブ文字またはパスの割り当て ウィンドウで、ドライブ文字またはドライブパスを割 り当てない
データベースストレージ用のデータディスクとフラッシュリカバリ領域ディスクの準備 本項では、自動ストレージ管理(ASM)によるディスクストレージの作成に使用する論理ドライブ の作成方法について説明します。ASM ディスクストレージは、複数のディスクへのスパニングが可 能な 1 つまたは複数のディスクグループで構成されています。 1 データベース用に 1 つの論理ドライブを作成します。 a Oracle データベースに割り当てられたディスクを確認します。 b ディスクパーティション領域で空き領域を右クリックし、新しい論理ドライブ を選択します。 新しいパーティションウィザードへようこそ が表示されます。 2 216 c 次へ をクリックします。 d パーティションの種類を選択 ウィンドウで 論理ドライブ を選択し、次へ をクリックします。 e パーティションサイズの指定 ウィンドウの パーティションサイズ(MB) フィールドに適 切なサイズを入力し、次へ をクリックします。 f ドライブ文字またはパスの割り当て ウィンドウで、ドライブ文字またはドライブパスを割 り当てない を選択し、
共有ディスクの自動マウントオプションの有効化 1 ノード 1 で スタート をクリックし、ファイル名を指定して実行 を選択します。 2 ファイル名を指定して実行 フィールドに cmd と入力し、OK をクリックします。 3 コマンドプロンプトで diskpart と入力し、 を押します。 4 DISKPART コマンドプロンプトで次のテキストを入力し、 を押します。 automount enable 次のメッセージが表示されます。 Automatic mounting of new volumes enabled.
3 ようこそ ウィンドウで 次へ をクリックします。 4 ホームの詳細の指定 ウィンドウで、デフォルト設定をそのまま使用し、次へ をクリックします。 メモ:OraCR10g_home(CRS のホーム)パスをメモしておきます。後でこの情報が必要になります。 5 製品固有の前提条件のチェック ウィンドウで、次へ をクリックします。 6 Specify Cluster Configuration(クラスタ構成の指定)ウィンドウで、次の手順を実行します。 a プライマリノードのパブリック名、プライベート名、および仮想ホスト名を確認します。 これらの値を変更するには、編集 をクリックして新しい値を入力し、OK をクリックします。 b 追加 をクリックします。 c 2 番目のノードのパブリック名、プライベート名、および仮想ホスト名を入力します。 d OK をクリックします。 メモ:ネットワークホスト名にドメイン名の拡張子が含まれていないことを確認してください。 7 次へ をクリックします。 Specify Network Interface Usage(ネットワークインタフェースの用途を
c Specify Disk Configuration(ディスク構成の指定)ウィンドウで、Place Voting Disk on this partition(このパーティションに投票ディスクを置く)を選択し、OK をクリッ クします。 12 次へ をクリックします。 13 警告メッセージを無視して OK をクリックします。 14 サマリー ウィンドウで インストール をクリックしてインストール手順を開始します。 メモ:Configuration Assistant の実行中にエラーが発生した場合は、本書の トラブルシューティン グ および「Clusterware のインストールに失敗した場合の対処法」を参照してください。 インストール ウィンドウにインストールの進行状況が表示されます。 次に、Configuration Assistants ウィンドウが表示され、OUI が一連の設定ツールを実行し ます。 次に、インストールの終了 ウィンドウが表示されます。 15 終了 をクリックして OUI セッションを終了します。 16 終了 ウィンドウで、はい をクリックします。 css
b ファイル名を指定して実行 フィールドで、次のテキストを入力します。 %CD drive%\autorun\autorun.exe %CD drive% は CD ドライブのドライブ文字です。 c OK をクリックします。 OUI が起動し、ようこそ ウィンドウが表示されます。 2 次へ をクリックします。 3 インストールタイプの選択 ウィンドウで Standard Edition をクリックしてから、次へ をク リックします。 4 ホームの詳細の指定 ウィンドウの インストール先 で、以下のことを確認します。 • 名前 フィールドで、Oracle データベースのホーム名が OraDb10g_home1 であること。 • パス フィールドで、Oracle ホームの完全なパスが次のようになっていること。 %SystemDrive%\oracle\product\10.2.
Oracle 10g R2 パッチセット 10.2.0.2 のインストール 1 お使いのシステムに 10.2.0.1 Clusterware と 10.2.0.1 データベースバイナリのみがインストー ルされており、シードデータベースがまだ作成されていないことを確認します。 2 Oracle Metalink のウェブサイト metalink.oracle.com からパッチセット 10.2.0.2 をダウン ロードします。 3 パッチセットを %SystemDrive% に解凍します。 Oracle 10g Clusterware 用のパッチセット 10.2.0.2 のインストール 作業を開始する前に お使いのシステムに Oracle 10g Clusterware 用のパッチセット 10.2.0.
Oracle 10g Database 用のパッチセット 10.2.0.2 のインストール メモ: パッチセットをインストールする前に、すべての Oracle サービスが実行中であることを確認 してください。 リスナーとシードデータベースを作成する前に、次の手順を完了します。 パッチセットのインストール メモ: パッチセットソフトウェアのインストールは、RAC 10g R2 ソフトウェアをインストールしたノー ドから行う必要があります。そのノードが OUI を実行しているノードと異なる場合は、終了して、そ のノードからパッチセットをインストールします。 1 パッチセットを解凍した領域にある OUI を起動します。たとえば、次のファイルです。 %SystemDrive%\Oracle_patch\setup.
システム起動中のスプリットブレイン問題に対応するためのパッチのインストール 1 「最新の Oracle パッチのダウンロード」に従ってダウンロードした patch5059258 と表示さ れているフォルダに移動します。 2 opmd.exe をすべてのノードの %CRS_HOME%\bin ディレクトリにコピーします。 3 コマンドプロンプトで次のテキストを入力し、 を押します。 %SystemDrive%\%CRS_HOME%\bin> opmd.
9 管理オプション ウィンドウで、Enable Daily Backup(毎日のバックアップを有効にする) を選択し、毎日のバックアップを実行するのに必要な OS のユーザー名とパスワードを入力 し、次へ をクリックします。 10 データベース資格証明 ウィンドウで すべてのアカウントに対して同じパスワードを使用 をク リックし、それぞれ適切なフィールドに新しいパスワードの入力と確認の入力を行い、次へ を クリックします。 メモ:新しいパスワードをメモしておきます。後でデータベース管理のためにこの情報が必要に なります。 11 記憶域オプション ウィンドウで、Automatic Storage Management(ASM)を選択し、 次へ をクリックします。 12 ASM インスタンスの作成 ウィンドウで、以下の手順を実行します。 13 a SYS パスワード フィールドで、新しいそれぞれ適切なフィールドに新しいパスワードの入 力と確認の入力を行います。 b 初期化パラメータファイル(IFILE)の作成 を選択します。 c 次へ をクリックします。 Database Confi
16 ASM ディスクグループ ウィンドウで、新規作成 をクリックします。 17 ディスクグループの作成 ウィンドウで、フラッシュリカバリ領域の情報を入力します。 a ディスクグループ名 フィールドに、新しいディスクグループの名前を入力します。 たとえば、FLASH です。 b Redundancy(冗長)ボックスで、External(外付け)を選択します。 c Stamp Disks(ディスクにスタンプする)をクリックします。 d Add or change label(ラベルの追加または変更)を選択し、次へ をクリックします。 e ディスクの選択 ウィンドウで を押し、Status(ステータス)行で Candidate device(候補デバイス)を割り当てた残りのディスクを選択します。 f Generate stamps with this prefix(この接頭辞を持つスタンプを生成する)フィール ドで、FLASH と入力します。 g 次へ をクリックします。 h Stamp disks(ディスクにスタンプする)ウィンドウで、次へ をクリックします。
Edit Archive Mode Parameters(アーカイブモードパラメータの編集)をクリックし ます。 f • Edit Archive Mode Parameters(アーカイブモードパラメータの編集)ウィンドウ で、Archive Log Destinations(アーカイブロゴの保存先)の下に表示されている パスを +FLASH/ に変更します。 FLASH は、手順 17 a で指定したフラッシュリカバリ領域のディスクグループ名です。 • g OK をクリックします。 次へ をクリックします。 21 データベースコンテンツ ウィンドウで 次へ をクリックします。 22 データベースサービス ウィンドウで 次へ をクリックします。 23 初期化パラメータ ウィンドウで 次へ をクリックします。 24 データベース記憶域 ウィンドウで 次へ をクリックします。 25 作成オプション ウィンドウで、完了 をクリックします。 26 サマリー ウィンドウで OK をクリックします。 Database Configuration Assistant ウィンドウが表示さ
追加情報 サポートされるソフトウェアのバージョン メモ: 今回のリリースに含まれる Oracle をサポートするデルの設定では、PCI Express コントローラは サポートされていません。 今回のリリースの時点でサポートされているソフトウェアの一覧を 表 1-9 に示します。最新のサポー トされているハードウェアとソフトウェアについては、Dell|Oracle Tested and Validated Configurations (Dell|Oracle で検証済みの構成)ウェブサイト www.dell.com/10g からバージョン 1.1 の Solution Deliverable List をダウンロードして参照してください。 表 1-9. サポートされているソフトウェアのバージョン ソフトウェアコンポーネント サポートされているバージョン Windows Server 2003 Standard x64 R2 Edition PowerPath for Windows 4.5 QLogic HBA Storport ドライバ 9.1.2.
トラブルシューティング Clusterware のインストールに失敗した場合の対処法 Oracle Clusterware Configuration Assistant のエラー Oracle Clusterware Configuration Assistant を使用したインストールが失敗した場合は、 Configuration Assistant ウィンドウで以下の手順を実行します。 1 次のファイルを開きます。 %ORA_CLUSTERWARE_HOME%\cfgtoollogs\configToolFailedCommands %ORA_CLUSTERWARE_HOME% は、「Oracle Clusterware バージョン 10.2.0.
Oracle Clusterware のアンインストール 以下の問題が発生した場合は、解決のために Oracle Clusterware のアンインストールが必要な場合 があります。 • Oracle Clusterware のインストールが失敗した。 • Oracle Clusterware Configuration Assistant が正常にインストールできなかった。 Oracle Clusterware をアンインストールするには、ノードで OUI を実行し、残っている Oracle サービスをすべて削除し、ストレージデバイスをクリーンにします。 OUI の実行 1 ノード 1 で Explorer のウィンドウを開き、次のディレクトリに移動します。 %SystemDrive%\oracle\product\10.2.0\crs\oui\bin 2 setup.
ストレージデバイスをクリーンにする方法 1 OCR レジストリ(OCRCFG)と投票ディスク用に設定するパーティションをクリーンにします。 a スタート をクリックし、ファイル名を指定して実行 を選択します。 b ファイル名を指定して実行 フィールドに cmd と入力し、OK をクリックします。 c コマンドプロンプトで次のテキストを入力し、 を押します。 %SystemDrive%\oracle\product\10.2.0\crs\bin\ExportSYMLink Oracle Symbolic Link Exporter(ExportSYMLink)によって、シンボリックリンクが SYMMAP.TBL ファイルから現在のディレクトリにインポートされます。 d 2 コマンドプロンプトで次のテキストを入力し、 を押します。 notepad SYMMAP.
6 OCR(OCRCFG)および投票ディスク(VOTEDSK)用のシムリンクを削除します。 a ocrcfg および votesdk を選択します。 b オプション をクリックし、Commit(反映する)を選択します。 成功すると、ocrcfg および votedsk のエントリが消えます。 c 7 オプション をクリックし、終了 を選択して Oracle Object Manager を閉じます。 コンピュータの管理コンソールを起動します。 a Windows デスクトップで スタート をクリックし、ファイル名を指定して実行 を選択します。 b ファイル名を指定して実行 フィールドに次のテキストを入力し、 をクリックします。 compmgmt.
12 g パーティションサイズの指定 ウィンドウで、最大ディスク領域(デフォルト)を選択し、 次へ を選択します。 h 確認のメッセージが表示されたら、完了 をクリックします。 コンピュータの管理コンソール ウィンドウで、手順 11 c ~ 手順 11 h を参考にして以下のパー ティションを設定します。 • クラスタレジストリ(CRSCFG) • 投票ディスク(VOTEDSK) • データディスク(パーティション 2 つ) • バックアップディスク(パーティション 2 つ) • 必要に応じて、追加のパーティション 新しいパーティションを設定する際には、新しいパーティションウィザードが毎回起動します。 新しいパーティションを設定するには、以下の手順を実行します。 a 新しい論理ドライブ を選択します。 新しいパーティションウィザード が表示されます。 b 次へ をクリックして続行します。 c パーティションの種類 ウィンドウで 次へ をクリックします。 メモ: ストレージデバイスによって既存のパーティションが再構成されることがないよう に、パーティション OCRCFG
15 ノード 2 でコンピュータの管理コンソールを起動し、新しいパーティションからドライブ文字 を削除します。 メモ:通常、ノード 2 は、両方のノードを再起動した後で新しいパーティションにドライブ文字 を割り当てます。以下の手順を実行したときに新しいパーティションのドライブ文字が表示され ない場合は、ノード 1 で以下の手順を実行します。 a スタート をクリックし、ファイル名を指定して実行 を選択します。 b ファイル名を指定して実行 フィールドに次のテキストを入力し、 をクリックします。 compmgmt.
トラブルシューティングのその他の問題 Windows Server 2003 OS と Oracle 10g R2 ソフトウェアを導入して使用する際に発生する可能性 のある問題について、推奨する対処方法を 表 1-10 に示します。 表 1-10.
表 1-10.
表 1-10.
表 1-10.
表 1-10.
表 1-10.
困ったときは デルサポート システムの使い方の詳細については、システムコンポーネントに付属のマニュアルを参照してくださ い。各種の白書、デルがサポートする設定、一般情報については、Dell|Oracle Tested and Validated Configurations(Dell|Oracle で検証済みの構成)ウェブサイト www.dell.com/10g を参照してく ださい。ハードウェアおよび OS ソフトウェアに対するデルのテクニカルサポート、アップデート のダウンロードについては、デルサポートサイト support.dell.com を参照してください。デルへ のお問い合わせ先については、システムに付属の『インストール & トラブルシューティング』に記 載されています。 デルでは企業向けのトレーニングと資格認証を実施しています。詳細については、トレーニングと 資格認証のウェブサイト www.dell.
索引 O く と Oracle 10g の設定 , 201 ハードウェアおよびソフト ウェアの構成の確認 , 201 クラスタ ファイバーチャネルのハー ドウェア接続例 , 203 トラブルシューティング , 228 Oracle RAC 10g インストール , 217 ネットワークおよびスト レージの構成 , 207 クラスタのセットアップ ファイバーチャネル , 201 は こ W Windows Server 2003, Standard x64 R2 Edition インストール , 199 困ったときは , 240 さ サポートされるストレージデ バイス , 227 い インストール Oracle RAC 10g, 217 Windows Server 2003, Standard x64 R2 Edition, 199 か 確認 ソフトウェアの構成 , 201 ハードウェアの構成 , 201 ハードウェア ファイバーチャネルクラス タの最小要件 , 198 ファイバーチャネルの相互 接続 , 203 パブリックおよびプライベー トネットワークの設定 , 207 パブリ
ç ௠ま マニュアル , 199 ら ライセンス契約 , 199 れ 例 ファイバーチャネルクラス タ用のハードウェア接 続 , 203 242 索引
Sistemas Dell™ PowerEdge™ Base de datos Oracle 10g Versión 2 Enterprise Edition Real Application Cluster for Microsoft® Windows Server® 2003 Standard x64 R2 Edition Guía de implantación versión 1.1 w w w. d e l l . c o m | s u p p o r t . d e l l .
Notas y avisos NOTA: una NOTA proporciona información importante que le ayudará a utilizar mejor el ordenador. AVISO: un AVISO indica la posibilidad de daños en el hardware o la pérdida de datos, e informa de cómo evitar el problema. ____________________ La información contenida en este documento puede modificarse sin previo aviso. © 2006 Dell Inc. Reservados todos los derechos. Queda estrictamente prohibida la reproducción de este documento en cualquier forma sin la autorización por escrito de Dell Inc.
Contenido Requisitos de software y hardware . Contratos de licencia . . . . Documentación importante . . . . . . . . . . . . . . . . . . . . . . 247 . . . . . . . . . . . . . . . . . . . . . . . 249 249 . . . . . . . . . . . . . . . . . . . . . . . Instalación y configuración del sistema operativo . . . . . . . . . . . . . . Instalación del sistema operativo mediante los CD de implantación . . 251 . . . . . . . . . . . . . . . 251 255 . . . . . . . . . . . . . . . . 257 . . . .
Obtención de ayuda . . . . . . . . . . . . . . . . . . . . . . . . . . . . . . Asistencia de Dell . . Asistencia de Oracle . . . . . . . . . . . . . . . . . . . . . . . . . . . . . . . . . . . . . . . . . . . . . . . . . . . . . . Obtención y uso de archivos fuente abiertos Índice 246 Contenido 289 289 289 . . . . . . . . . . . . . . . . . 289 . . . . . . . . . . . . . . . . . . . . . . . . . . . . . . . . . . . . . . .
En este documento se proporciona información para instalar, configurar, reinstalar y utilizar el software de base de datos Oracle 10g R2 de acuerdo con las configuraciones de Oracle admitidas por Dell. Utilice este documento junto con el CD de implantación de Dell™ para instalar el software. Si instala el sistema operativo utilizando únicamente los CD del sistema operativo, los pasos descritos en este documento pueden no ser aplicables.
Tabla 1-1. Requisitos de software Componentes de software Configuración Windows Server 2003 Standard x64 R2 Edition Base de datos Oracle 10g R2 Versión 10.2.0.1 Standard Edition, incluida la opción RAC para clústeres Patchset de Oracle Versión 10.2.0.2 EMC® PowerPath® (sólo para clústeres Fibre Channel) Versión 4.
Contratos de licencia NOTA: si no dispone de licencia para el software Oracle, póngase en contacto con un representante de ventas de Dell. Documentación importante Para obtener más información sobre componentes de hardware específicos, consulte la documentación incluida con el sistema.
5 Inserte el primerCD de implantación de Dell en la unidad de CD. El sistema se iniciará desde el primer CD de implantación de Dell. Después del inicio, aparece una pantalla de texto que le solicita que seleccione una opción. Si el sistema no se ha iniciado desde el primer CD de implantación de Dell, reinícielo. Durante el reinicio, pulse y compruebe si la unidad de CD aparece en primer lugar en el orden de inicio.
Actualización de las rutas de directorios temporales Verifique que las rutas a los directorios Temp y Tmp se hayan establecido correctamente. 1 Haga clic en Inicio y seleccione Ejecutar. 2 En el campo Abrir, escriba cmd y haga clic en Aceptar. 3 En el indicador de comandos, escriba echo %Temp% y pulse . Aparece la ruta siguiente: %SystemDrive%\Temp 4 En el indicador de comandos, escriba echo %Tmp% y pulse .
Figura 1-1. Conexiones de hardware para un clúster Fibre Channel de conexión directa Red pública Conmutadores Ethernet Gigabit (red privada) LAN/WAN Sistemas PowerEdge (base de datos Oracle) Sistema de almacenamiento Fibre Channel Dell|EMC CX300/CX500/CX3-20 Tabla 1-4.
Figura 1-2. Conexiones de hardware para un clúster Fibre Channel de conexión mediante SAN Red pública Conmutadores Ethernet Gigabit (red privada) LAN/WAN Sistemas PowerEdge (base de datos Oracle) Conmutadores Dell|EMC Fibre Channel (SAN) Cat5e/6 (NIC integrada) Cat5e/6 (NIC Gigabit de cobre) Cables de fibra óptica Sistema de almacenamiento Fibre Channel Dell|EMC CX300/CX500/CX3-20 Tabla 1-5.
Compruebe que se hayan realizado las tareas siguientes en el clúster: • Todo el hardware está instalado en el rack. • Todas las interconexiones de hardware están configuradas como se indica en la figura 1-1 o en la figura 1-2, y se enumeran en la tabla 1-4 o en la tabla 1-5. • Se han creado todos los números de unidad lógica (LUN), los grupos de matriz redundante de discos independientes (RAID) y los grupos de almacenamiento en el sistema de almacenamiento Dell|EMC Fibre Channel.
Cableado del sistema de almacenamiento Puede configurar el sistema de almacenamiento del clúster Oracle con una conexión directa o con una conexión mediante SAN de cuatro puertos, según sus necesidades. A continuación se describen los procedimientos relativos a ambas configuraciones. Figura 1-3.
Figura 1-4.
Configuración de conexión mediante SAN Para configurar los nodos del clúster con una configuración de conexión mediante SAN de cuatro puertos (vea la figura 1-4), realice los pasos siguientes: 1 Conecte un cable óptico del puerto 0 SP-A al conmutador 0 Fibre Channel. 2 Conecte un cable óptico del puerto 1 SP-A al conmutador 1 Fibre Channel. 3 Conecte un cable óptico del puerto 0 SP-B al conmutador 1 Fibre Channel. 4 Conecte un cable óptico del puerto 1 SP-B al conmutador 0 Fibre Channel.
Tabla 1-7. Asignaciones de puertos NIC Puerto NIC Tres puertos disponibles Cuatro puertos disponibles 1 IP pública e IP virtual IP pública 2 IP privada (grupo de NIC) IP privada (grupo de NIC) 3 IP privada (grupo de NIC) IP privada (grupo de NIC) 4 ND IP virtual Configuración y agrupación de la red privada Antes de implantar el clúster, asigne una dirección IP y un nombre de host privados a cada nodo.
e Haga clic en la ficha Teaming (Agrupación). f Seleccione Team with other Adapters (Agrupar con otros Adaptadores) y haga clic en New Team (Nuevo Grupo). g Especifique un nombre para el equipo NIC y haga clic en Next (Siguiente). h En la casilla Select the Adapters to include in This Team (Seleccione los adaptadores que se incluirán en este grupo), seleccione los adaptadores de red restantes que ha identificado para la agrupación de NIC y haga clic en Next (Siguiente).
g Haga clic en Next (Siguiente). h En la ventana Designating Standby Member (Designación de miembro en espera), seleccione Do not configure a Standby Member (No crear un miembro en espera). i En la ventana Configuring LiveLink (Configuración de LiveLink), seleccione No y haga clic en Next (Siguiente). j En la ventana Creating/Modifying a VLAN (Creación/Modificación de una VLAN), seleccione No y haga clic en Next (Siguiente).
c Haga clic en Usar la siguiente dirección IP, especifique la dirección IP necesaria, la dirección de puerta de enlace predeterminada y la dirección IP del servidor DNS, y haga clic en Aceptar. NOTA: el software Oracle requiere que se especifiquen direcciones IP enrutables para las interfaces públicas. La instalación de CRS podría fallar si se especifica una dirección IP estándar no enrutable (privada).
10.10.10.1 rac1-priv 10.10.10.2 rac2-priv 155.16.170.201 rac1-vip 155.16.170.202 rac2-vip NOTA: debido a que las direcciones IP de la red privada no son accesibles desde la red pública, no hace falta registrar estas direcciones IP con el servidor DNS. 5 Asegúrese de que los nodos pueden comunicarse con las redes pública y privada. a En el nodo 1, abra una ventana de indicador de comandos.
5 Expanda Almacenamiento y haga clic en Administración de discos. Si aparece Éste es el Asistente para inicializar y convertir discos, realice del paso a al paso d. De lo contrario, vaya al paso 6. a En la ventana Éste es el Asistente para inicializar y convertir discos, haga clic en Siguiente. b En la ventana Discos de la ventana Seleccione los discos que desee inicializar, seleccione los discos que están asociados a los LUN de almacenamiento y haga clic en Siguiente.
8 Repita el paso 6 y el paso 7 para los SP restantes. 9 Cierre la consola PowerPathAdmin. Aparece una ventana de mensaje en la que se le solicita que guarde la configuración de la consola. 10 Haga clic en No. 11 En el escritorio de Windows, haga clic con el botón derecho del ratón en Mi PC y seleccione Administrar. 12 Expanda Almacenamiento y haga clic en Administración de discos. Aparece un disco por cada LUN asignado en el almacenamiento.
6 En la ventana Especificar el tamaño de la partición, acepte el tamaño predeterminado y haga clic en Siguiente. 7 Haga clic en Finalizar. El área de partición de disco que ha seleccionado en el paso 3 se configura como partición extendida. 8 Repita del paso 3 al paso 7 en todos los discos compartidos que están asignados a los nodos. 9 Cree unidades lógicas para el disco de registro (OCR).
Preparación de los discos de datos y de área de recuperación flash para el almacenamiento de base de datos En esta sección se proporciona información para crear las unidades lógicas que se utilizarán para la creación del almacenamiento en disco ASM (administración automática del almacenamiento). El almacenamiento en disco ASM se compone de uno o más grupos de discos que pueden abarcar varios discos. 1 Cree una unidad lógica para la base de datos. a Localice el disco asignado para la base de datos Oracle.
Activación de la opción automount para los discos compartidos 1 En el nodo 1, haga clic en Inicio y seleccione Ejecutar. 2 En el campo Ejecutar, escriba cmd y haga clic en Aceptar. 3 En el indicador de comandos, escriba diskpart y pulse . 4 En el indicador de comandos de DISKPART, escriba lo siguiente y pulse : automount enable Aparece el mensaje siguiente: Montaje automático de nuevos volúmenes habilitado. 5 En el indicador de comandos de DISKPART, escriba exit y pulse .
4 En la ventana Specify Home Details (Especificar detalles de la ubicación principal), acepte los valores predeterminados y haga clic en Next (Siguiente). NOTA: anote la ruta OraCR10g_home (ubicación principal de CRS), ya que necesitará esta información más adelante. 5 En la ventana Product-Specific Prerequisite Checks (Comprobaciones de requisitos previos específicos del producto), haga clic en Next (Siguiente).
11 En la ventana Cluster Configure Storage (Almacenamiento de configuración de clúster), realice los pasos siguientes para el disco de votación: a Localice la partición de 50 MB que ha creado en el apartado "Preparación de los discos OCR y de votación para el software de clúster". b Seleccione la partición y haga clic en Edit (Editar).
Instalación de la base de datos Oracle 10g R2 con Real Application Clusters 10.2.0.1 1 Inserte el CD Oracle Database 10g Release 2 (Base datos Oracle 10g versión 2) en la unidad de CD. OUI se inicia y aparece la ventana de bienvenida. Si aparece la pantalla de bienvenida, vaya al paso 2. De lo contrario, realice los pasos siguientes: a Haga clic en Inicio y seleccione Ejecutar. b En el campo Ejecutar, escriba: %Unidad_CD%\autorun\autorun.exe donde %Unidad_CD% es la letra de la unidad de CD.
11 Cuando haya completado los procedimientos necesarios que se indican en la ventana End of Installation (Fin de la instalación), haga clic en Exit (Salir). 12 En la ventana Exit (Salir), haga clic en Yes (Sí). Instalación de Oracle 10g R2 patchset 10.2.0.2 1 Asegúrese de que sólo el software de clúster 10.2.0.1 y los binarios de base de datos 10.2.0.1 estén instalados en el sistema y de que la base de datos semilla no esté todavía creada. 2 Descargue el patchset 10.2.0.
6 En la ventana End of installation (Fin de la instalación), realice todos los pasos que se enumeran en la ventana Summary (Resumen). No realice el paso en el que se indica que debe detener los servicios de Oracle. Ese paso debería haberlo realizado antes de empezar la instalación del patchset, tal como se indica en "Antes de comenzar". 7 En la ventana End of Installation (Fin de la instalación), haga clic en Exit (Salir). 8 Haga clic en Yes (Sí) para salir de OUI. Instalación del patchset 10.2.0.
Descarga de los parches de Oracle más recientes 1 Abra un explorador web. 2 Vaya a la página web de Oracle Metalink (metalink.oracle.com). 3 Descargue los parches apropiados para su instalación. Instalación del parche para "split brain" durante el inicio del sistema 1 Vaya a la carpeta etiquetada patch5059258 descargada según lo indicado en "Descarga de los parches de Oracle más recientes". 2 Copie opmd.exe en el directorio %CRS_HOME%\bin en todos los nodos.
5 En la ventana Operations (Operaciones), haga clic en Create a Database (Crear una base de datos) y, a continuación, en Next (Siguiente). 6 En la ventana Node Selection (Selección de nodos), haga clic en Select All (Seleccionar todos) y, a continuación, en Next (Siguiente). 7 En la ventana Database Templates (Plantillas de base de datos), haga clic en Custom Database (Base de datos personalizada) y, a continuación, en Next (Siguiente).
15 En la ventana Create Disk Group (Crear grupo de discos), introduzca la información para los archivos de base de datos. a En el campo Disk Group Name (Nombre de grupo de discos), introduzca un nombre para el grupo de discos nuevo. Por ejemplo, BASEDEDATOS. b En la casilla Redundancy (Redundancia), seleccione External (Externa). c Haga clic en Stamp Disks (Marcar discos). d Seleccione Add or change label (Añadir o cambiar etiqueta) y haga clic en Next (Siguiente).
Seleccione las casillas de verificación que aparecen junto a los discos disponibles y haga clic en OK (Aceptar). j Aparece la ventana ASM Disk Group (Grupo de discos ASM), donde se indica que el software está creando el grupo de discos. Una vez finalizado el proceso, el grupo de discos FLASH aparecerá en la columna Disk Group Name (Nombre de grupo de discos). 18 Seleccione únicamente el nombre de grupo de discos que ha asignado a BASEDEDATOS en el paso 15 y haga clic en Next (Siguiente).
27 Anote la información incluida en la ventana del asistente para la configuración de bases de datos a fin de utilizarla posteriormente para administrar la base de datos. 28 Haga clic en Exit (Salir). Aparece la ventana Start Cluster Database (Iniciar base de datos del clúster) y se inicia la base de datos del clúster. Información adicional Versiones de software admitidas NOTA: en esta versión de las configuraciones de Oracle admitidas por Dell, no se admiten las controladoras PCI Express.
Solución de problemas Solución de errores de instalación del software de clúster El asistente para la configuración del software de clúster Oracle falla En la ventana Configuration Assistants (Asistentes de configuración), si la instalación no puede ejecutarse con el asistente para la configuración del software de clúster Oracle, realice lo siguiente: 1 Abra el archivo: %ORA_CLUSTERWARE_HOME%\cfgtoollogs\configToolFailedCommands donde %ORA_CLUSTERWARE_HOME% es el directorio principal de CRS que ha creado e
Desinstalación del software de clúster Oracle Es posible que deba desinstalar el software de clúster Oracle para solucionar los problemas siguientes: • El procedimiento de instalación del software de clúster Oracle ha fallado. • El asistente de configuración del software de clúster Oracle no se ha instalado correctamente. Para desinstalar el software de clúster Oracle, ejecute OUI en el nodo, elimine los servicios de Oracle restantes y limpie los dispositivos de almacenamiento.
Limpieza de los dispositivos de almacenamiento 1 Limpie las particiones que se configurarán para los discos de registro OCR (OCRCFG) y de votación. a Haga clic en Inicio y seleccione Ejecutar. b En el campo Ejecutar, escriba cmd y haga clic en Aceptar. c En el indicador de comandos, escriba lo siguiente y pulse : %SystemDrive%\oracle\product\10.2.0\crs\bin\ExportSYMLink El exportador de enlaces simbólicos de Oracle (ExportSYMLink) importa los enlaces simbólicos al archivo SYMMAP.
6 Elimine los enlaces simbólicos de los discos OCR (OCRCFG) y de votación (VOTEDSK). a Seleccione ocrcfg y votesdk. b Haga clic en Options (Opciones) y seleccione Commit (Confirmar). Si la operación es correcta, las entradas ocrcfg y votedsk desaparecen. c Haga clic en Options (Opciones) y seleccione Exit (Salir) para cerrar Oracle Object Manager. 7 Inicie la consola de administración de equipos. a En el escritorio de Windows, haga clic en Inicio y seleccione Ejecutar.
12 En la ventana de la consola de administración de equipos, utilice del paso 11 c al paso 11 h como referencia para crear las particiones siguientes: • Registro del clúster (CRSCFG) • Disco de votación (VOTEDSK) • Disco de datos (dos particiones) • Disco de copia de seguridad (dos particiones) • Todas las particiones adicionales que sean necesarias Cuando cree las particiones nuevas, el Asistente para partición nueva se inicia para cada instancia.
15 En el nodo 2, inicie la consola de administración de equipos y elimine las letras de unidad de las particiones nuevas. NOTA: normalmente, el nodo 2 asigna letras de unidad a las particiones nuevas una vez reiniciados los dos nodos. Si las letras de unidad de las particiones nuevas no aparecen al realizar los pasos siguientes, lleve a cabo estos pasos en el nodo 1. a Haga clic en Inicio y seleccione Ejecutar. b En el campo Ejecutar, escriba lo siguiente y pulse : compmgmt.
Solución de problemas adicionales En la tabla 1-10 se indican las acciones recomendadas para los problemas que pueden surgir al implantar y utilizar el sistema operativo Windows Server 2003 y el software de base de datos Oracle 10g R2. Tabla 1-10. Solución de problemas Categoría Problema / síntoma Causa Agrupación de NIC La agrupación de Los pasos siguientes pueden provocar NIC Broadcom un error en una agrupación de NIC: falla.
Tabla 1-10. Categoría Solución de problemas (continuación) Problema / síntoma Causa Software de El nodo del clúster El nodo no puede comunicarse con se reinicia con los discos de almacenamiento. clúster una pantalla azul. Oracle Acción correctiva recomendada Realice los pasos siguientes: 1 Reinicie el nodo. 2 Durante la POST, pulse . 3 En la pantalla Menú de opciones avanzadas de Windows, seleccione Modo seguro. 4 Seleccione el sistema operativo adecuado. 5 Inicie sesión en el sistema.
Tabla 1-10. Categoría Solución de problemas (continuación) Problema / síntoma Pantalla azul Los nodos del sistema generan una pantalla azul. Causa Los nodos no pueden acceder al disco de votación. Acción correctiva recomendada 1 Asegúrese de que los valores del firmware para el modo de conexión de HBA estén configurados correctamente para su configuración de almacenamiento.
Tabla 1-10. Categoría Solución de problemas (continuación) Problema / síntoma Causa Acción correctiva recomendada Utilidad de Cuando se El cableado a los HBA de los nodos es servidor ejecuta la incorrecto. Navisphere® utilidad de servidor Navisphere para la serie AX, los sistemas de almacenamiento AX100 no se muestran en la ventana Connected Storage Systems (Sistemas de almacenamiento conectados).
Tabla 1-10. Solución de problemas (continuación) Categoría Problema / síntoma Causa Acción correctiva recomendada En almacenamiento No se puede acceder a los discos. En el escritorio de Windows, cuando hace clic con el botón derecho del ratón en Mi PC, selecciona Administración de equipos y hace clic en Administración de discos, los discos aparecen como inaccesibles. Compruebe que se hayan asignado LUN de almacenamiento a los dos nodos. Causas: • No se han asignado los LUN a los nodos.
Obtención de ayuda Asistencia de Dell Para obtener más información sobre el uso del sistema, consulte la documentación incluida con los componentes del sistema. Para obtener documentos técnicos, configuraciones admitidas e información general de Dell, visite la página web de configuraciones probadas y validadas por Dell|Oracle (www.dell.com/10g).
Guía de implantación
Índice B F R bonding, 258 Fibre Channel, configuración del clúster, 251 red privada configurar, 257-258 C clúster ejemplo de conexiones de hardware Fibre Channel, 253 configuración del clúster Fibre Channel, 251 configurar la red privada, 258 configurar las redes pública y privada, 257 configurar Oracle 10g, 251 verificar las configuraciones de hardware y software, 251 contratos de licencia, 249 D dispositivos de almacenamiento admitidos, 277 documentación, 249 E H hardware interconexiones Fibre Ch
Índice 292 Índice