Dell 27 USB-C 显示器 - P2720DC 用户指南 显示器型号:P2720DC 认证型号:P2720DCc
注:“注”表示可以帮助您更好使用显示器的重要信息。 注意:“注意”表示如果不按照说明进行操作,可能造成硬件损坏或数据丢失。 警告:“警告”表示可能会造成财产损失、人身伤害或死亡。 版权所有 © 2019 Dell Inc.或其子公司。保留所有权利。Dell、EMC以及其他商标是Dell Inc.或其子 公司的商标。其他商标可能是其各自所有者的商标。 2019 – 11 Rev.
目录 关于您的显示器 . . . . . . . . . . . . . . . . . . . . . . . . . . . . . . 6 物品清单 . . . . . . . . . . . . . . . . . . . . . . . . . . . 6 产品特性 . . . . . . . . . . . . . . . . . . . . . . . . . . . 8 识别部件和控制按钮 . . . . . . . . . . . . . . . . . . . . . 9 前部概览 . . . . . . . . . . . . . . . . . . . . . . . . . . . . . . . . 9 后部概览 . . . . . . . . . . . . . . . . . . . . . . . . . . . . . . . 10 侧视图 . . . . . . . . . . . . . . . . . . . . . . . . . . . . . . . . 11 底视图 . . . . . . . . . . . . . . . . . . . . . . . .
连接显示器 . . . . . . . . . . . . . . . . . . . . . . . . . 28 连接 DP 线 . . . . . . . . . . . . . . . . . . . . . . . . . . . . . . 28 连接显示器以使用DP多流传输(MST)功能 . . . . . . . . . . . . . . 28 连接USB Type-C线 . . . . . . . . . . . . . . . . . . . . . 29 连接显示器以使用USB-C多流传输(MST)功能 . . . . . . . 30 整理线缆 . . . . . . . . . . . . . . . . . . . . . . . . . . 31 卸下底座 . . . . . . . . . . . . . . . . . . . . . . . . . . 32 壁挂安装(选购). . . . . . . . . . . . . . . . . . . . . . 33 操作显示器 . . . . . . . . . . . . . . . . . . . . . . .
故障排除 . . . . . . . . . . . . . . . . . . . . . . . . . . . . . . . . . . . 58 自检 . . . . . . . . . . . . . . . . . . . . . . . . . . . . . 58 内置诊断 . . . . . . . . . . . . . . . . . . . . . . . . . . 60 常见问题 . . . . . . . . . . . . . . . . . . . . . . . . . . 62 产品特有的问题 . . . . . . . . . . . . . . . . . . . . . . . 65 附录 . . . . . . . . . . . . . . . . . . . . . . . . . . . . . . . . . . . . . . 67 安全说明 . . . . . . . . . . . . . . . . . . . . . . . . . . 67 FCC声明(仅限美国)和其他管制信息 . . . . . . . . . . .
关于您的显示器 物品清单 此显示器在出厂时包括如下所示的物品。确认所有物品是否齐全,如有任何物 品缺失,请参见联系 Dell 获取详细信息。 注:有些物品可能是选购件,您的显示器在出厂时不包括它们。一些功能或 介质在特定国家(地区)可能不提供。 显示器 底座支撑臂 底座 电源线(视国家 / 地区不同而 异) 6 │ 关于您的显示器
DP 1.
产品特性 Dell P2720DC 显示器采用有源矩阵、薄膜晶体管 (TFT)、液晶显示屏 (LCD)、 防静电、以及 LED 背光。显示器特性包括: • 68.47 cm(27.0 英寸)可视区域显示屏(对角线测量)。2560 x 1440 分辨率,支持低分辨率全屏。 • • • • • • • • • • • • • • • • 宽视角,可以坐着或站着观看或者从侧面观看。 99% sRGB色域。 高动态对比度。 倾斜、旋转、高度和转动调整能力。 可拆卸底座和Video Electronics Standards Association (VESA™) 100 mm安装孔,安装方式灵活。 数字连接方式DisplayPort和HDMI。 配有4个USB下行端口。 一条USB Type-C线,在接收视频信号时为兼容笔记本电脑供电。 即插即用能力(需系统支持)。 屏幕显示(OSD)调整,可方便地设置和优化屏幕。 软件和文档介质包括信息文件(INF)、图像色彩匹配文件(ICM)、以及产 品文档。 防盗锁插槽。 底座锁。 可以在图像质量保持不变的情况下,从宽幅画面切换到标准画面比例。 在睡眠模式下0.
识别部件和控制按钮 前部概览 1 2 控制按钮 标签 说明 用途 1 功能按钮 使用功能按钮调整 OSD 菜单中的项 目。(有关详细信息,请参见 使用控制按钮) 2 开机 / 关机按钮 使用电源按钮开启和关闭显示器电 源。 关于您的显示器 │ 9
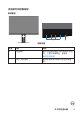
后部概览 2 3 4 DELL P2720DC Flat Panel Monitor /Monitor Plano Panel /Moniteur écran plat /⏢Ღ亟⽪ಘ Model No. /Modelo /N°de modelo /ර㲏: P2720DCc Input Ra ng /Entrade /Daya Tegangan:100-240V 50/60Hz,2.5A 䕨ޕ䴫Ⓚ Ӕ⍱䴫༃100-240Կ⢩,2.5ᆹษ,50/60䎛㥢 Consumo de energía en operación: xxxxx Wh Удельная мощность рабочего режима - xxxx Вт/см² Потребляемая мощность изделием в режиме ожидания - xx Вт Потребляемая мощность изделием в выключенном режиме - xx Вт Apparatet må lkoples jordet s kkontakt.
侧视图 1 标签 说明 用途 1 USB 3.
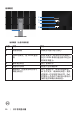
底视图 1 2 34 5 6 7 8 底部概览(无显示器底座) 标签 说明 用途 1 电源接口 连接电源线(随显示器一起提供)。 2 防盗锁插槽 使用安全锁(单独购买)来固定显示器,以防止未经 授权移动显示器。 3 底座锁功能 使用 M3 x 6 mm 螺丝将立座固定在显示器上(螺丝 未随附)。 4 HDMI 端口 使用 HDMI 线连接计算机。 5 DisplayPort(输 使用 DisplayPort 线(随显示器一起提供)连接计算 入) 机。 6 DisplayPort(输 DP 输出,适用于支持 MST(多流传输)的显示器。 出) 在 MST 链中,DP 1.1 显示器只能连接为最后一台显 示器。如要启用 MST,请参见“连接显示器以使用 DP 多流传输 (MST) 功能”部分的说明。 注:使用 DP 输出端口时取下橡胶塞。 7 USB Type-C 端 口 您可以使用 USB Type-C 线(随显示器附带)将显 示器连接到 PC,以获得如下显示器体验:支持高达 USB 3.1 的数据传输速度。在 Display Port™1.
8 USB 2.0 下行端 口x2 连接您的USB设备。 注:只有将 USB Type-C 线连接到计算机和显 示器上的 USB Type-C 端口之后,您才能使用 这个端口。 显示器规格 型号 P2720DC 屏幕类型 有源矩阵 - TFT LCD 面板类型 平面切换技术 可视图像 对角线 684.70 mm(27.0 英寸) 水平有效区域 596.74 mm(23.49 英寸) 垂直有效区域 335.66 mm(13.76 英寸) 面积 200,301.75 mm2 (323.22 英寸 2) 像素点距 0.233 mm x 0.233 mm 每英寸像素 (PPI) 108 可视角度 水平 178°(典型) 垂直 178°(典型) 明亮度输出 350 cd/m²(典型) 对比度 1000:1(典型) 面板涂层 防眩光,3H 硬度,雾度 25% 背光 LED edgelight 系统 响应时间(灰色到灰色) 8 ms(普通) 5 ms(快速) 颜色深度 16.
1 x HDMI 1.4 连接性 1 x DP 1.2(输入) 1 x DP 1.2(输出) 1 x USB Type-C 端口 2 x USB 3.0 端口 - 侧面 2 x USB 2.0 端口 - 底部 边框宽度(从显示屏边缘到有效区域) 顶部 7.4 mm 左侧 / 右侧 7.4 mm 底部 21.
支持的视频模式 P2720DC 型号 视频显示能力 (HDMI/DP) 480i, 480p, 576i, 576p, 720p, 1080i, 1080p, 1440p 预设显示模式 显示模式 水平频率 (kHz) 垂直频率 (Hz) 像素时钟 (MHz) 同步极性 (水平 / 垂直) VESA, 720 x 400 VESA, 640 x 480 VESA, 640 x 480 VESA, 800 x 600 VESA, 800 x 600 VESA, 1024 x 768 VESA, 1024 x 768 VESA, 1152 x 864 VESA, 1280 x 768 VESA, 1280 x 1024 VESA, 1280 x 1024 VESA, 1600 x 1200 VESA, 1680 x 1050 VESA, 1920 x 1080 VESA, 1920 x 1200 VESA, 2048 x 1080 VESA, 2560 x 1440 31.5 31.5 37.5 37.9 46.9 48.4 60.0 67.5 47.8 64.0 79.9 75.0 65.
MST多流传输(MST)模式 MST 源显示器 可支持的外部显示器最大数量 2560 x 1440/ 60 Hz 2560 x 1440/ 60 Hz 2 注:支持的最大外部显示器分辨率仅为2560 x 1440 60Hz。 电气规范 型号 P2720DC 视频输入信号 HDMI 1.4,600 mV(每个差分线路),100 欧姆输 入阻抗(每个差分对) DP 1.2,600 mV(每个差分线路),100Ω 输入阻 抗(每个差分对) USB Type-C,600 mV(每个差分线路),90 欧姆 输入阻抗(每个差分对) 交流输入电压 / 频率 / 电 流 100 VAC 至 240 VAC / 50 Hz 或 60 Hz ± 3 Hz / 2.
物理特性 型号 P2720DC 信号线类型 • 数字:DP,20 针 • 数字:USB Type-C,24 针 尺寸(含底座) 高度(展开时) 525.3mm(20.68英寸) 高度(收回时) 395.3mm(15.56英寸) 宽度 611.6mm(24.08英寸) 厚度 185.0mm(7.28英寸) 尺寸(不含底座) 高度 364.1mm(14.34英寸) 宽度 611.6mm(24.08英寸) 厚度 43.6mm(1.72英寸) 底座尺寸 高度(展开时) 418.4mm(16.47英寸) 高度(收回时) 371.0mm(14.61英寸) 宽度 245.0mm(9.65英寸) 厚度 185.0mm(7.28英寸) 重量 重量(含包装) 9.53 kg(21.01磅) 重量(含底座组件和线缆) 7.27 kg(16.03磅) 重量(不含底座组件和线缆) 4.97 kg(10.96磅) 底座组件重量 1.85 kg(4.
环境特性 P2720DC 型号 兼容标准 • 取得ENERGY STAR认证的显示器 • EPEAT已在适用的地方注册。EPEAT注册状态因国家/地区不同而异。关于 各个国家/地区的注册状态,请访问www.epeat.net。 • 取得TCO认证的显示器。 • 符合RoHS要求 • 不含BFR/PVC的显示器(外部线缆除外) • 符合NFPA 99漏电流要求。 • 无砷玻璃和无汞面板 • 能量表实时显示此显示器的能耗情况。 温度 工作时 0 °C 到 40 °C(32 °F 到 104 °F) 不工作时 • 存储时:-20 °C 到 60 °C(-4 °F 到 140 °F) • 运输时:-20 °C 到 60 °C(-4 °F 到 140 °F) 湿度 工作时 10% 到 80%(无冷凝) 不工作时 • 存储时 10% 到 90%(无冷凝) • 运输时 10% 到 90%(无冷凝) 海拔 工作时(最大值) 5,000 m(16,400 ft) 不工作时(最大值) 12,192 m(40,000 ft) 散热 • 444.60 BTU/ 小时(最大) • 83.
如果您的计算机中安装了符合 VESA DPM 标准的显卡或软件,则在不使用时, 显示器会自动进入低能耗模式。这就是节能模式 *。如果计算机检测到来自键盘、 鼠标或其他输入设备的输入,显示器会自动恢复工作。下表显示了这项自动节 能功能的功耗和信号。 * 只有从显示器上拔下电源线时,才能在关机模式下达到零功耗。 VESA 模 式 水平同步 垂直同步 视频 电源指示灯 功耗 正常运行 有效 有效 有效 白色 130 W(最大) ** 24.5 W(典型 值) 停用模式 停用 停用 空白 白色(闪亮) 小于 0.3 W*** 关闭 - - - 关 功耗P 19.2 W 总能耗(TEC) 63 kWh ON 小于 0.
本产品在出厂默认设置情况下符合ENERGY STAR标准。出厂默认设置可以通 过OSD菜单中的“工厂重置”功能进行恢复。更改出厂默认设置或启用其他功 能可能会增加功耗,因而可能超出ENERGY STAR规定的限值。 注: PON: 工作模式功耗的定义基于Energy Star 8.0版本。 TEC:Energy Star 8.
DisplayPort 接口 针脚编号 所连接信号线的20针脚侧 1 ML0 (p) 2 GND 3 ML0 (n) 4 ML1 (p) 5 GND 6 ML1 (n) 7 ML2 (p) 8 GND 9 ML2 (n) 10 ML3 (p) 11 GND 12 ML3 (n) 13 GND 14 GND 15 AUX (p) 16 GND 17 AUX (n) 18 热插拔检测 19 Re-PWR 20 +3.
USB Type-C 接口 针脚 A1 信号 GND 针脚 B12 信号 GND A2 SSTXp1 B11 SSTXp1 A3 SSTXn1 B10 SSTXn1 A4 VBUS B9 VBUS A5 CC1 B8 SBU2 A6 Dp1 B7 Dn1 A7 Dn1 B6 Dp1 A8 SBU1 B5 CC2 A9 VBUS B4 VBUS A10 SSRXn2 B3 SSRXp2 A10 SSRXp2 B2 SSRXp2 A12 GND B1 GND 22 │ 关于您的显示器
通用串行总线 (USB) 接口 此部分提供显示器上可用 USB 端口的相关信息。 注:此显示器为超高速 USB 3.0 和高速 USB 2.0 兼容。 传输速度 超速 数据速率 5 Gbps 功耗* 4.5 W(最大,每个端口) 高速 480 Mbps 4.5 W(最大,每个端口) 全速 12 Mbps 4.5 W(最大,每个端口) 传输速度 高速 数据速率 480 Mbps 功耗* 2.5 W(最大,每个端口) 全速 12 Mbps 2.5 W(最大,每个端口) 低速 1.5 Mbps 2.5 W(最大,每个端口) USB 3.
USB 2.0 下行接口 针脚编号 1 接头的4针端 VCC 2 DMD 3 DPD 4 GND USB端口 • 2 x USB 2.0 下行 - 底部 • 2 x USB 3.0 下行 - 侧面 注:为使用USB 3.0功能,计算机须支持USB 3.
即插即用功能 您可以在支持即插即用的系统中安装此显示器。此显示器会自动使用显示数据 通道 (DDC) 协议为计算机系统提供其扩展显示标识数据 (EDID),以便系统可以 自行配置,并优化显示器设置。大多数显示器安装是自动进行的,需要时,您 可以选择不同的设置。有关更改显示器设置的详细信息,请参见操作显示器。 液晶显示器质量和像素政策 在液晶显示器的制造过程中,在有些情况下一个或多个像素可能处于固定不变 的状态,这种情况很难看到并且不影响显示质量和可用性。有关 Dell 显示器 质量和像素政策的详细信息,请访问 Dell 支持网站:www.dell.
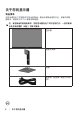
安装显示器 安装底座 注:显示器在出厂时,未安装底座。 注:这适用于带底座的显示器。如果您购买了第三方底座,请参见相应的 底座安装指南,以了解安装方法。 安装显示器底座。 1. 按照包装箱标签上的说明从固定它的上部衬垫上卸下底座。 2. 将底座块完全插入底座插槽。 3. 提起螺丝手柄,顺时针转动螺丝。 4. 完全拧紧螺丝后,将螺丝手柄折叠平放入凹进处。 1 2 3 5. 提起盖板,露出用于安装底座的VESA区域。 6. 将底座组件安装到显示器上。 a. 将底座上部的两个凸片放入显示器背面的槽中。 b.
1 2 7.
连接显示器 警告:在开始本节中的任何步骤之前,请遵照安全说明中的内容执行。 注:请勿同时将所有线缆连接到计算机。建议先将线缆穿过理线槽,然后 再将线缆连接至显示器。 将显示器连接到计算机: 1. 关闭计算机,拔掉电源线。 2.
注:支持 DP MST 功能。为了使用此功能,您的 PC 图形卡必须取得 DP1.2(含 MST 选项)认证。 注:使用 DP 输出端口时取下橡胶塞。 连接USB Type-C线 USB Type-c USB Type-c 显示器上的 USB Type-C 端口: • 可以交替用作 USB Type-C 或 DisplayPort 1.
连接显示器以使用USB-C多流传输(MST)功能 DP输出 USB Type-c 注:通过 MST 支持的显示器最大数量取决于 USB-C 源的带宽。 注:使用 DP 输出端口时取下橡胶塞。 30 │ 安装显示器
整理线缆 使用线缆管理槽来布放已连接到显示器的线缆。 安装显示器 │ 31
卸下底座 注:为防止在卸下底座时刮擦屏幕,确保将显示器放在柔软洁净的表面上。 注:下述步骤仅适用于显示器随附的底座。若是连接第三方底座,请参阅 底座随附的文档。 卸下底座: 1. 将显示器放在软布或软垫上。 2. 按住底座松开按钮。 3.
壁挂安装(选购) (螺丝尺寸:M4 x 10 mm)。 参见 VESA 兼容壁挂套件随附的文档。 1. 将显示器放在铺有软布或软垫的桌子上(靠近桌边)。 2. 卸下底座。参见卸下底座了解详细信息。 3. 拧下用于将面板固定到显示器的 4 个螺丝。 4. 将壁挂套件中的装配架安装到显示器上。 5. 如要将显示器安装到墙壁上,请参见壁挂套件随附的文档。 注:只可使用 UL 或 CSA 或 GS 认证的壁挂架,并且最小承重不小于 19.
操作显示器 打开显示器电源 按 按钮打开显示器电源。 语言选项 Dell 27 Monitor Please select language: English Español Français Deutsch Português(Brasil) Pусский 简体中文 日本語 34 │ 操作显示器
USB-C 充电选项 Dell 27 Monitor 轻松初始设置: .
3 使用菜单按钮启动屏幕显示(OSD)和选择 OSD菜单。参见使用OSD菜单。 菜单 4 使用此按钮返回主菜单或退出OSD主菜单。 退出 5 使用电源按钮开启和关闭显示器电源。 稳定白色表示显示器处于开机状态。闪烁白 打开/关闭电源按钮(带有 色表示处于省电模式。 LED指示灯) OSD控制按钮 使用显示器前部的按钮调整图像设置。 1 2 3 4 控制按钮 1 说明 使用向上按钮增大数值或在菜单中上移。 向上 2 使用向下按钮减小数值或在菜单中下移。 向下 3 使用确定按钮确认您在菜单中的选择。 确定 36 │ 操作显示器
4 使用返回按钮返回上一菜单。 返回 使用屏幕显示(OSD)菜单 使用OSD菜单 注:当您移至另一菜单、退出 OSD 菜单或等待 OSD 菜单自动关闭时,所 作的任何更改都会自动保存下来。 1. 按 按钮显示OSD主菜单。 Dell 27 Monitor 亮度/对比度 输入源 颜色 75% 菜单 75% 显示 个性设置 其他 2. 按 和 按钮在设置选项之间移动。当您从一个图标移动到另一个图标 时,选项会高亮显示。 3. 按一下 或 或 按钮激活高亮显示的选项。 4. 按 和 按钮选择所需的参数。 5. 按 ,然后根据菜单上的指示,使用 6.
图标 菜单和子菜单 亮度/对比度 说明 使用此菜单激活亮度/对比度调整。 Dell 27 Monitor 亮度/对比度 输入源 颜色 75% 菜单 75% 显示 个性设置 其他 亮度 对比度 亮度选项可调整背光的明亮度。 按 按钮提高亮度,按 按钮降低亮度(最小0 / 最大 100)。 先调整亮度,如果需要进一步调整,再调整对比度。 按 按钮提高对比度,按 按钮降低对比度(最小0 / 最大100)。 对比度功能调整显示器屏幕的暗度和亮度之间的差异 程度。 38 │ 操作显示器
输入源 使用输入源菜单选择显示器连接的不同视频信号。 Dell 27 Monitor 亮度/对比度 输入源 USB Type-C DP 颜色 HDMI 菜单 自动选择USB-C 显示 个性设置 自动选择 重置输入源 开 多个输入信号时进行提示 其他 USB Type-C DP HDMI 自动选择 当使用USB Type-C接口时,选择USB Type-C输入。 按 选择USB Type-C输入源。 当使用DP接口时,选择DP输入。按 源。 选择 DP 输入 当使用HDMI接口时,选择HDMI输入。按 选择HDMI 输入源。 选择“自动选择”可以扫描可用的输入信号。 自动选择 USB-C 允许您将“自动选择USB-C”设置为: • 多个输入信号时进行提示:始终显示“切换到 USB-C视频输入”消息,让用户选择是否切换。 • 是:当USB-C连接时,显示器在始终在不询 问的情况下切换到USB-C视频。 • 否:显示器不会从其他可用输入自动切换到 USB-C视频。 重置输入源 选择此选项恢复默认输入源。 颜色 使用颜色调整颜色设置模式。 Dell 27 Monitor 亮度/
预设模式 40 │ 操作显示器 选择预设模式时,可以从列表中选择标准、 Comfortview、 电影、游戏、暖色、冷色或自定颜 色。 • 标准:加载显示器的默认颜色设置。这是默认预设 模式。 • ComfortView: 降低屏幕发射的蓝光强度,让眼睛 看起来更舒适。 注:为了减少因长时间使用显示器而造成眼睛 疲劳和颈部/手臂/背部/肩部疼痛的风险,我们建议 您: • 使屏幕距离眼睛大约20-28英寸(50-70 cm)。 • 在使用显示器时,经常眨眼以湿润眼睛。 • 每两个小时定期和经常休息20分钟。 • 在休息期间,将目光从显示器上移开,注视 20英尺外的物体至少20秒钟。 • 在休息期间,伸展身体以缓解颈部/手臂/背 部/肩膀紧张。 • 电影:加载最适合电影的颜色设置。 • 游戏:加载适合大多数游戏应用程序的颜色设置。 • 暖色:提高色温。屏幕呈现红色/黄色偏暖效果。 • 冷色:降低色温。屏幕呈现蓝色偏冷效果。 • 自定颜色:手动调整颜色设置。
按下 和 按钮调整三种颜色。 (红、绿、蓝)的值,生成您自己的预设颜色模式。 Dell 27 Monitor 亮度/对比度 预设模式 颜色 重置颜色 输入源 输入颜色格式 显示 ComfortView 电影 游戏 暖色 菜单 冷色 个性设置 自定颜色 其他 输入颜色格式 标准 将视频输入模式设为: • RGB:当您的显示器通过HDMI线连接到计算机或 DVD播放机时,选择此选项。 • YPbPr:若您的DVD播放机只支持YPbPr输出,选 择此选项。 Dell 27 Monitor 亮度/对比度 预设模式 颜色 重置颜色 输入源 显示 输入颜色格式 RGB YPbPr 菜单 个性设置 其他 色调 此功能可以使视频图像的颜色向绿色或紫色移动。这 可用于调整至所需的肤色。使用 或 在 0 到 100 的范围内调整色调。 按 按 提升视频图像的绿色阴影。 提升视频图像的紫色阴影。 注:仅当选择电影和游戏模式时,方可调整色调。 操作显示器 │ 41
饱和度 此功能可以调整视频图像的色饱和度。使用 在 0 到 100 的范围内调整饱和度。 按 或 提升视频图像的黑白外观效果。 按 重置颜色 显示 提升视频图像的彩色外观效果。 注:仅当选择电影和游戏模式时,方可调整饱和 度。 允许您将显示器的颜色设置恢复至出厂设置。 使用显示来调整图像。 Dell 27 Monitor 亮度/对比度 宽高比 颜色 响应时间 输入源 显示 菜单 个性设置 清晰度 MST 重置显示器 宽高比16:9 50 普通 关 其他 宽高比 清晰度 响应时间 MST 重置显示器 42 │ 操作显示器 调整图像比例:宽高比16:9、4:3或5:4 此功能可使图像看起来更锐利或更柔和。使用 或 在0到100的范围内调整清晰度。 用户可以选择“快速”或“普通”。 Dp多流传输,设置为“开”启用MST(DP输出), 设置为“关”禁用MST功能。 注:当连接 DP/USB-C 上行电缆和 DP 下行电缆 时,显示器将自动设置 MST 为“开”,此操作 仅在工厂重置或显示器重置后执行一次。 选择此选项可以恢复默认显示设置。
菜单 选择此选项调整OSD的设置,如OSD语言、菜单在屏 幕上的停留时间等。 Dell 27 Monitor 亮度/对比度 语言 简体中文 颜色 透明度 20 锁 禁用 输入源 显示 定时器 个性设置 重置菜单 菜单 其他 语言 旋转 旋转 20 s 语言选项用于设置OSD显示的语言,共八种:英语、 西班牙语、法语、德语、葡萄牙语(巴西)、俄语、 简体中文、日语。 将 OSD 逆时针转动 90 度。您可以根据显示器旋转调 整菜单。 透明度 选择此选项后,按 和 按钮在 0 到 100 的范围内改 变菜单透明度。 定时器 OSD 保持时间:设置从最后一次按下一个按钮到 OSD 关闭之间所等待的时间长度。 使用 或 调整滑块,范围是从 5 秒到 60 秒(以 1 秒为单位)。 锁 重置菜单 控制用户对调整选项的访问。用户可以选择下面一项: 菜单按钮、电源按钮、菜单 + 电源按钮、禁用。(有 关详细信息,请参见菜单和电源按钮锁定)。 将所有OSD设置恢复至出厂预设值。 操作显示器 │ 43
个性设置 选择此选项调整个性化设置。 Dell 27 Monitor 亮度/对比度 快捷键1 预设模式 颜色 LED电源按钮 工作期间开启 输入源 显示 USB-A 充电 个性设置 复位个性化设置 菜单 其他 快捷键1 快捷键2 USB-C 充电 输入源 待机期间关闭 关机时关闭 用户可以选择下面一项:预设模式、亮度/对比度、输 入源、宽高比、旋转,将其设为快捷键1。 Dell 27 Monitor 亮度/对比度 快捷键1 颜色 LED电源按钮 输入源 显示 USB-A 充电 个性设置 复位个性化设置 菜单 其他 快捷键2 快捷键2 USB-C 充电 预设模式 亮度/对比度 输入源 宽高比 旋转 用户可以选择下面一项:预设模式、亮度/对比度、输 入源、宽高比、旋转,将其设为快捷键2。 Dell 27 Monitor 亮度/对比度 快捷键1 颜色 LED电源按钮 菜单 USB-C 充电 输入源 显示 USB-A 充电 个性设置 复位个性化设置 其他 44 │ 操作显示器 快捷键2 预设模式 亮度/对比度 输入源
LED电源按钮 将电源LED指示灯设为工作期间开启或工作期间关 闭,以节省能源。 Dell 27 Monitor 亮度/对比度 快捷键1 颜色 LED电源按钮 输入源 显示 USB-A 充电 个性设置 复位个性化设置 菜单 其他 USB-A 充电 快捷键2 USB-C 充电 工作期间开启 工作期间关闭 启用或禁用显示器待机模式下的USB-A 充电功能。 Dell 27 Monitor 亮度/对比度 快捷键1 颜色 LED电源按钮 输入源 显示 USB-A 充电 个性设置 复位个性化设置 菜单 其他 USB-C 充电 快捷键2 USB-C 充电 待机期间开启 待机期间关闭 启用或禁用显示器关机模式下的USB-C 充电功能。 Dell 27 Monitor 亮度/对比度 快捷键1 颜色 LED电源按钮 输入源 快捷键2 显示 USB-A 充电 个性设置 复位个性化设置 菜单 其他 USB-C 充电 关机时开启 关机时关闭 复位个性化设置 将个性设置菜单中的所有设置恢复至默认设置。 操作显示器 │ 45
其他 选择此选项调整OSD设置,如DDC/CI、LCD调节 等。 Dell 27 Monitor 亮度/对比度 输入源 颜色 DDC/CI LCD调节 显示 固件 个性设置 重置其它设置 菜单 其他 显示信息 显示信息 开 关 13C114 服务标签 工厂重置 ENERGY STAR® 显示显示器的当前设置。 Dell 27 Monitor 亮度/对比度 DDC/CI 显示 固件 颜色 菜单 个性设置 其他 DDC/CI 显示信息 输入源 LCD调节 服务标签 型号: Dell P2720DC 输入源:DP 当前: 2560x1440, 60Hz 24-bit DP兼容性:DP 1.
固件 显示此显示器的固件版本。 注:关于固件更新,请访问 Dell 支持网站,网址 是 www.dell.com/support/monitors 服务标签 显示此显示器的服务标签号。服务标签是唯一的字母 数字标识符,供 Dell 识别产品规格和确认保修信息。 注:服务标签也印制在盖板背面的标签上。 重置其它设置 工厂重置 将其他设置菜单中的所有设置恢复至出厂预设值。 将所有预设值恢复至出厂默认设置。这些也是 ENERGY STAR® 测试的设置。 Dell 27 Monitor 显示信息 亮度/对比度 输入源 开 DDC/CI 颜色 关 LCD调节 显示 固件 个性设置 重置其它设置 13C114 服务标签 菜单 工厂重置 其他 ENERGY STAR® Dell 27 Monitor 轻松初始设置: .
菜单和电源按钮锁定 控制用户对调整选项的访问。 菜单和电源按钮锁定的默认设置是禁用。 1 2 3 4 5 进入锁定菜单:按住“退出”键(按钮4)四秒以显示锁定菜单(当菜单和电源 按钮解锁时),锁定菜单出现在显示屏右下角。 Dell 27 Monitor 选择选项: + 进入解锁菜单:按住“退出”键(按钮4)四秒以显示锁定菜单(当菜单和电源 按钮锁定时),解锁菜单出现在显示屏右下角。 Dell 27 Monitor 选择选项: 48 │ 操作显示器
锁定有3个级别。 1 菜单 菜单按钮 说明 选择了“菜单按钮”时,不允许用户进行任何调整。 除电源按钮外,所有按钮均被锁定。 2 电源按钮 选择了“电源按钮”时,用户无法通过电源按钮关 闭显示器。 3 菜单+电源按钮 选择了“菜单+电源按钮”时,不允许用户进行调 整,并且电源按钮被锁定。 4 内置诊断 + 有关的详细信息,请参见内置诊断 。 注:如要进入锁定或解锁菜单 - 请按住“退出”键(按钮4)四秒。 在下述条件下, 定状态。 图标会出现在显示屏的中央,以表明菜单和电源按钮处于锁 1. 在“菜单按钮”锁定状态下,按向上键(按钮1)、向下键(按钮2)、菜 单键(按钮3)或退出键(按钮4)。 2. 在“电源按钮”锁定状态下,按电源键(按钮5)。 3.
OSD警告消息 当显示器不支持特殊分辨率模式时,会显示下面的消息: Dell 27 Monitor 显示器不支持当前的输入时序。 请将输入时序更改为2560x1440, 60Hz,或按照显示器规格, 更改为其他任何列有时序的显示器。 这表示显示器不能与它从计算机接收的信号同步。请参见Monitor specifications 了解此显示器支持的水平和垂直频率范围。推荐模式是2560 x 1440。 在禁用DDC/CI功能之前,会显示下面的消息: Dell 27 Monitor 使用PC应用程序调节显示器设置的功能将被禁用。 是否禁用DDC/CI功能? 是 否 P2720DC 当显示器进入省电模式时,会显示下面的消息: Dell P2418HZ Dell 27 Monitor 进入省电模式 P2720DC 当您按电源按钮之外的任何其他按钮时,会根据所选型号显示下面的消息: 50 │ 操作显示器
Dell P2418HZ Dell 27 Monitor 没有来自您设备的 HDMI 信号。 ? 按键盘上的任何键或移动鼠标可唤醒它。 如果没有显示,再次按显示器按钮 可选择正确的输入信号源。 P2720DC 如果未连接HDMI,DP或USB Type-C线,会显示如下所示的浮动对话框。显示 器在此状态停留4分钟后进入省电模式。 Dell P2418HZ Dell 27 Monitor ? 无HDMI电缆 显示器将在4分钟后进入省电模式。 www.dell.com/P2720DC P2720DC 或 Dell P2418HZ Dell 27 Monitor ? 无DP电缆 显示器将在4分钟后进入省电模式。 www.dell.
Dell P2418HZ Dell 27 Monitor 无USB Type-C电缆 ? 显示器将在4分钟后进入省电模式。 www.dell.
设置显示器 设置最大分辨率 为显示器设置最大分辨率: 在 Windows 7、Windows 8、Windows 8.1 和 Windows 10 系统中: 1. 仅限 Windows 8 和 Windows 8.1,请选择桌面磁贴以切换到经典桌面。 2. 右键单击桌面,然后单击 Screen Resolution(屏幕分辨率)。 3. 单击屏幕分辨率下拉列表,选择 2560 x 1440。 4. 单击确定。 如果您看不到 2560 x 1440 选项,则可能需要更新您的图形驱动程序。根据您 的计算机,完成下面相应的过程。 如果您使用的是 Dell 台式机或便携电脑: • 访问www.dell.com/support,输入您计算机的服务标签,下载图形卡的最 新驱动程序。 如果您使用的不是 Dell 计算机(便携或台式): • 访问您计算机的支持网站,下载最新的图形驱动程序。 • 访问您图形卡的网站,下载最新的显卡驱动程序。 如果您使用的是Dell台式机或Dell便携电脑且可访问Internet • 访问www.dell.com/support,输入您的服务标签,下载显卡的最新驱动程 序。 5.
如果您使用的不是Dell台式机、便携电脑或显卡 在 Windows 7、Windows 8、Windows 8.1 和 Windows 10 系统中: 1. 仅限 Windows 8 和 Windows 8.1,请选择桌面磁贴以切换到经典桌面。 2. 右键单击桌面,然后单击 Personalization(个性化)。 3. 单击 Change Display Settings(更改显示设置)。 4. 单击 Advanced Settings(高级设置)。 5. 根据窗口顶部的说明,确认显卡控制器的厂商(如 NVIDIA、ATI、Intel 等)。 6. 请访问图形卡提供商的网站以获取更新的驱动程序(如 www.ATI.com 或 www.AMD.com)。 7.
使用倾斜、旋转和纵向展开 注:这些值适用于显示器随附的底座。如安装在其他底座上,请参见底座 随附的文档。 倾斜、转动 显示器安装了底座时,您可以倾斜和转动显示器,以取得最舒适的视角。 5° 45° 21° 45° 注:显示器在出厂时,未安装底座。 纵向展开 注:底座在纵向上最多可展开 130 mm。 130mm 操作显示器 │ 55
转动显示器 在转动显示器之前,显示器应为完全垂直扩展 ( 纵向展开 ) 和完全向上倾斜可以 避免碰到显示器的底边。 1 2 56 │ 90° 90° 90° 90° 操作显示器
注:要使用 Dell 计算机的显示旋转功能(横向与纵向),您需要一个本显 示器上未包括的更新图形驱动程序。如要下载图形驱动程序,请访问www. dell.com/support,在视频驱动程序的“下载”部分查找最新驱动程序更 新。 注:在纵向模式时,在图形密集型应用程序中(3D 游戏等),您可能遇到 性能降级问题。 调整系统的旋转显示设置 旋转显示器之后,您需要完成下面的步骤以调整系统的旋转显示设置。 注:如果您使用的不是Dell计算机,则需要访问图形驱动程序网站或计算机 制造商网站,了解如何旋转显示“内容”。 调整旋转显示设置: 1. 右键单击桌面,然后单击Properties(属性)。 2. 选择Settings(设置)选项卡,单击Advanced(高级)。 3. 如果使用的是ATI图形卡,请选择Rotation(旋转)选项卡,设置所需的旋 转。 4. 如果使用的是nVidia图形卡,请单击nVidia选项卡,在左侧栏中选择 NVRotate,然后选择所需的旋转。 5.
故障排除 警告:在开始本节中的任何步骤之前,请遵照安全说明中的内容执行。 自检 这款显示器提供一个自检功能,可以让您检查显示器是否工作正常。如果显示 器和计算机已正确连接,但显示器屏幕仍为黑屏,请执行以下步骤来运行显示 器自检: 1. 关闭计算机和显示器。 2. 拔下显示器的所有视频线。这样就不会牵涉到计算机。 3. 打开显示器电源。 如果显示器正常工作,会检查到没有信号,并会显示以下消息之一。在自检模 式下,电源 LED 保持白色。 Dell P2418HZ Dell 27 Monitor ? 无HDMI电缆 显示器将在4分钟后进入省电模式。 www.dell.com/P2720DC P2720DC 或 Dell P2418HZ Dell 27 Monitor ? 无DP电缆 显示器将在4分钟后进入省电模式。 www.dell.
Dell P2418HZ Dell 27 Monitor ? 无USB Type-C电缆 显示器将在4分钟后进入省电模式。 www.dell.com/P2720DC P2720DC 注:在正常系统操作期间,如果视频线断开连接或已损坏,也会出现这个 对话框。 4.
内置诊断 此显示器有一个内置诊断工具,可帮助您确认所遇到的显示异常是显示器问题 还是计算机和视频卡问题。 注:仅当拔掉了视频线并且显示器处于自检模式时,可以运行内置诊断。 2 1 3 4 5 运行内置诊断: 1. 确保屏幕洁净(屏幕表面没有灰尘颗粒)。 2. 从计算机或显示器后部拔掉视频线。显示器随后进入自检模式。 3.
Dell 27 Monitor 选择选项: 4. 选择 图标以启用内置诊断。 5. 仔细检查屏幕是否存在异常。 6. 再按一次后盖上的向上键(按钮1)。画面颜色变为灰色。 7. 检查显示屏是否存在任何异常。 8.
常见问题 下表包含了您可能遇到的显示器常见问题的一般信息以及可能的解决办法: 常见现象 可能的解决办法 没有视频 / 电源 LED • 确保显示器和计算机之间的视频线连接正确且牢 不亮 固。 • 使用其他电气设备确认电源插座是否工作正常。 • 确保电源按钮已按下。 • 确保通过输入源菜单选择正确的输入源。 没有视频 / 电源 LED • 使用 OSD 提高亮度和对比度控制。 点亮 • 执行显示器自检功能检查。 • 检查视频线接口针脚是否有弯曲或折断。 • 运行内置诊断。 • 确保通过输入源菜单选择正确的输入源。 聚焦不好 视频摇晃不定 像素缺失 62 │ 故障排除 • 不要使用视频延长线。 • 将显示器恢复至出厂设置(工厂重置)。 • 将视频分辨率改为正确的宽高比。 • 将显示器恢复至出厂设置(工厂重置)。 • 检查一下环境因素。 • 改变显示器位置,将其移到其他房间进行测试。 • 关机后再开机。 • 像素永久不亮是液晶技术可能出现的一个固有缺 陷。 • 有关 Dell 显示器质量和像素政策的详细信息, 请访问 Dell 支持网站: www.dell.
亮点像素 • 关机后再开机。 • 像素永久不亮是液晶技术可能出现的一个固有缺 陷。 • 有关 Dell 显示器质量和像素政策的详细信息, 请访问 Dell 支持网站: www.dell.
颜色不正确 • 在 Color Settings(颜色设置)OSD 中,将 Color Setting Mode(颜色设置模式)改为显卡或视频(视 应用程序而定)。 • 在颜色设置 OSD 中尝试不同的预设模式。调整颜色设 置 OSD 中自定颜色中的 R/G/B 值。 • 在颜色设置 OSD 中,将输入颜色格式改为 RGB 或 YPbPr。 • 运行内置诊断。 图像残留(由于显 示器长时间显示一 个静态图像) • 每当不使用显示器时,使用电源管理功能关闭显 示器(有关的详细信息,请参见 电源管理模式)。 • 此外,最好使用动态变化的屏幕保护程序。 视频重影或过度调 节 • 根据您的使用情况,将显示 OSD 中的响应时间改为 快速或普通。 64 │ 故障排除
产品特有的问题 特定现象 可能的解决办法 • 检查显示设置 OSD 中的宽高比。 • 将显示器恢复至出厂设置(工厂重置)。 无法使用面板下部 • 关闭显示器,拔掉电源线后重新插上,然后打开 的按钮调整显示器 显示器电源。 • 检查 OSD 菜单是否锁定。若已锁定,请按住菜单 按钮 4 秒进行解锁。 屏幕图像太小 按用户控制时没有 • 检查信号源。移动计算机鼠标或按键盘上的任意 输入信号 键,确保计算机未处于待机或睡眠模式。 • 检查视频线是否正确插入。如有需要,可拔下视 频线并重连。 • 重新启动计算机或视频播放机。 画面不填满整个屏 • 由于 DVD 的不同视频格式(宽高比),显示器可 幕 能无法全屏显示。 • 运行内置诊断。 使用 USB Type C • 验证 PC 或笔记本电脑 USB Type C 接口是否支持 连接到 PC 或笔记 备用模式 DP 1.2。 本电脑时没有图 • PC 或笔记本电脑的 USB Type C 接口不能支持备 像。 用模式 DP 1.
超高速 USB 3.0 接 • 检查计算机是否支持 USB 3.0。 口速度太慢。 • 有些计算机配备 USB 3.0、USB 2.0 和 USB 1.1 三种端口。确保使用正确的 USB 端口。 • 重新将 USB-C 上行电缆连接到计算机。 • 重新连接 USB 外设(下行接口)。 • 重新启动计算机。 插入 USB 3.0 设备 • 增大 USB 3.0 外设和无线 USB 接收器之间的距 时,无线 USB 外 离。 设停止工作 • 使无线 USB 接收器尽量靠近无线 USB 外设。 • 利用 USB 延长线,使无线 USB 接收器尽量远离 USB 3.
附录 安全说明 警告:如果不按本文档所述使用控制、进行调整或执行其它任何过程,可 能导致电击、触电和 / 或机械伤害。 关于安全注意事项信息,请参见安全环境和管制信息 (SERI)。 FCC声明(仅限美国)和其他管制信息 关于 FCC 声明和其他管制信息,请参见管制符合性网站,网址是 www.dell. com/regulatory_compliance。 为了使显示器达到最佳性能和延长使用寿命,请遵循下述安全事项: 1. 电源插座应安装在设备附近并且应便于插拔电源线。 2. 设备可以安装在墙壁上或者水平地吊装在天花板上。 3. 此显示器配备三插片接地插头,其中一个是接地插片。 4. 请勿在靠近水的地方使用此产品。 5. 请仔细阅读这些说明。妥善保管此文档,以备参考。遵循产品上标注的所 有警告和说明。 6.
中国能源效率标识 根据中国大陆 << 能源效率标识管理办法 >> 本显示器符合以下要求 : 生产者名称 规格型号 能效等级 能源效率(cd/W) 关闭状态功率 (W) 睡眠状态功率 (W) 产品类型 依据国家标准 戴尔(中国)有限公司 P2720DC 1级 ≥1.5 ≤1.2 ≤0.
联系Dell 对于美国用户,请拨打电话 800-WWW-DELL (800-999-3355)。 注:如果您没有可用的 Internet 连接,可在购买发票、装箱单、付费单、 或 Dell 产品宣传页上查找联系信息。 Dell 提供多种在线和电话支持与服务选项。具体情况视国家(地区)和产品而定, 有些服务在您所在地区可能不提供。 获取在线显示器支持内容: 1. 访问 www.dell.com/support/monitors。 就销售、技术支持或客户服务等问题联系 Dell: 1. 访问 www.dell.com/support。 2. 在页面底部的 Choose A Country/Region(选择国家 / 地区)下拉菜单中, 选择您所在的国家或地区。 3. 单击页面左侧的 Contact Us(联系我们)。 4. 根据您的需求,选择相应的服务或支持链接。 5.