Dell™ Latitude™ D620 User's Guide Finding Information System Setup Program About Your Computer Reinstalling Software Using a Battery Adding and Replacing Parts Using the Keyboard Dell™ QuickSet Features Using the Display Traveling With Your Computer Using Multimedia Getting Help Using a Network Specifications Using Cards Appendix Securing Your Computer Glossary Troubleshooting For information on other documentation included with your computer, see Finding Information.
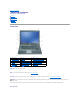
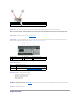
Back to Contents Page About Your Computer Dell™ Latitude™ D620 User's Guide Front View Left Side View Right Side View Back View Bottom View Front View 1 display latch 2 display 3 power button 4 device status lights 5 keyboard 6 fingerprint reader (optional) (optional) 7 speaker 8 touch pad buttons/track stick 9 keyboard status lights 10 volume control buttons 11 ambient light sensor (ALS) 12 mute button display latch — Keeps the display closed.
Turns on when you turn on the computer and blinks when the computer is in a power management mode. Turns on when the computer reads or writes data. NOTICE: To avoid loss of data, never turn off the computer while the flashing. light is Turns on steadily or blinks to indicate battery charge status. Turns on when wireless devices are enabled. ® Turns on when Bluetooth wireless technology is enabled. To enable or disable Bluetooth wireless technology, move the wireless switch to the "on" position.
The green lights located above the keyboard indicate the following: Turns on when the numeric keypad is enabled. Turns on when the uppercase letter function is enabled. Turns on when the scroll lock function is enabled. volume control buttons — Press these buttons to adjust the volume. mute button — Press this button to turn off the volume.
Attach headphones to the Attach a microphone to the connector. connector. infrared sensor — Lets you transfer files from your computer to another infrared-compatible device without using cable connections. When you receive your computer, the sensor is disabled. You can use the system setup program (see System Setup Program) to enable the sensor. For information on transferring data, see Windows Help, the Help and Support Center, or the documentation that came with your infrared-compatible device.
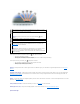
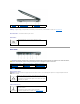
1 media bay 2 device latch release 3 USB connectors (2) media bay — Supports a floppy or an optical drive, second battery, second hard drive, or a Dell TravelLite™ module. See Using Multimedia. device latch release — Use the latch release to eject a device. USB connectors Connect USB devices, such as a mouse, keyboard, or printer. Back View CAUTION: Do not block, push objects into, or allow dust to accumulate in the air vents.
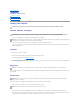
USB connectors Connect USB devices, such as a mouse, keyboard, or printer. serial connector Connects serial devices, such as a mouse or handheld device. video connector Connects video devices, such as a monitor. AC adapter connector — Connects an AC adapter to the computer. The AC adapter converts AC power to the DC power required by the computer. You can connect the AC adapter with your computer turned either on or off. CAUTION: The AC adapter works with electrical outlets worldwide.
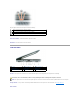
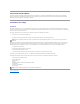
1 memory module cover 2 battery charge gauge 3 battery 4 battery-bay latch releases (2) 5 docking-device connector 6 air vents 7 hard drive memory module cover — Covers the compartment that contains the second memory module. See Memory. battery charge gauge — Provides information on the battery charge. See Checking the Battery Charge. battery — When a battery is installed, you can use the computer without connecting the computer to an electrical outlet. See Using a Battery.
Back to Contents Page Appendix Dell™ Latitude™ D620 User's Guide Cleaning Your Computer Macrovision Product Notice FCC Notice (U.S. Only) Cleaning Your Computer CAUTION: Before you begin any of the procedures in this section, follow the safety instructions in the Product Information Guide. Computer, Keyboard, and Display CAUTION: Before you clean your computer, disconnect the computer from the electrical outlet and remove any installed batteries. Clean your computer with a soft cloth dampened with water.
Macrovision Product Notice This product incorporates copyright protection technology that is protected by U.S. patents and other intellectual property rights. Use of this copyright protection technology must be authorized by Macrovision, and is intended for home and other limited viewing uses only unless otherwise authorized by Macrovision. Reverse engineering or disassembly is prohibited. FCC Notice (U.S.
Back to Contents Page Using a Battery Dell™ Latitude™ D620 User's Guide Battery Performance Checking the Battery Charge Conserving Battery Power Power Management Modes Configuring Power Management Settings Charging the Battery Replacing the Battery Storing a Battery Battery Performance NOTE: For information about the Dell™ warranty for your computer, see the Product Information Guide or separate paper warranty document that shipped with your computer.
Microsoft® Windows® Power Meter The Windows Power Meter indicates the remaining battery charge. To check the Power Meter, double-click the If the computer is connected to an electrical outlet, a icon on the taskbar. icon appears. Charge Gauge Before you insert a battery, press the status button on the battery charge gauge to illuminate the charge-level lights. Each light represents approximately 20 percent of the total battery charge.
To enter standby mode: l Click the Start button, click Turn off computer, and then click Stand by. or l Depending on how you set the power management options on the Advanced tab in the Power Options Properties window, use one of the following methods: ¡ Press the power button. ¡ Close the display. ¡ Press . To exit standby mode, press the power button or open the display depending on how you set the options on the Advanced tab.
Replacing the Battery CAUTION: Before performing these procedures, turn off the computer, disconnect the AC adapter from the electrical outlet and the computer, disconnect the modem from the wall connector and computer, and remove any other external cables from the computer. CAUTION: Using an incompatible battery may increase the risk of fire or explosion. Replace the battery only with a compatible battery purchased from Dell. The battery is designed to work with your Dell™ computer.
Back to Contents Page Using Cards Dell™ Latitude™ D620 User's Guide Card Types Installing a PC Card or ExpressCard Removing a Card or Blank NOTE: Electrical and electronic devices are sensitive to electrostatic discharge (ESD). If a substantial ESD occurs, the device may reset and the device software may attempt to reinitialize a connection. If the software is not operational after an ESD occurrence, restart the modem software program.
2. Slide the card into the slot until the card is completely seated in its connector. If you encounter too much resistance, do not force the card. Check the card orientation and try again. The computer recognizes most PC Cards and automatically loads the appropriate device driver. If the configuration program tells you to load the manufacturer's drivers, use the floppy disk or CD that came with the PC Card. To install an ExpressCard: 1. Place the ExpressCard in the adapter. 2.
Back to Contents Page Using the Display Dell™ Latitude™ D620 User's Guide Adjusting Brightness Switching the Video Image Setting Display Resolution and Refresh Rate Dual Independent Display Mode Swapping Primary and Secondary Displays Using the Ambient Light Sensor Adjusting Brightness When a Dell™ computer is running on battery power, you can conserve power by setting the brightness to the lowest comfortable setting by pressing and the up- or down-arrow key on the keyboard.
You can attach an external monitor or projector to your computer and use it as an extension of your display (known as "dual independent display" or "extended desktop" mode). This mode allows you to use both screens independently and drag objects from one screen to the other, effectively doubling the amount of viewable work space. 1. Connect the external monitor, TV, or projector to the computer. 2. Under Pick a category, click Appearance and Themes. 3. Under Pick a task...
1 ambient light sensor The ALS is disabled when your computer is shipped to you. If you enable the ALS and then use any of the display brightness key combinations, the ALS is disabled and the display brightness is increased or decreased accordingly. Dell™ QuickSet allows you to enable or disable the ALS feature. You can also adjust maximum and minimum brightness settings that are activated when you enable the ALS feature.
Back to Contents Page Reinstalling Software Dell™ Latitude™ D620 User's Guide Drivers Resolving Software and Hardware Incompatibilities Using Microsoft® Windows® XP System Restore Using the Operating System CD NOTE: The Drivers and Utilities CD and the Operating System CD are optional and may not ship with your computer. Drivers What Is a Driver? A driver is a program that controls a device such as a printer, mouse, or keyboard. All devices require a driver program.
3. Click System. 4. In the System Properties window, click the Hardware tab. 5. Click Device Manager. 6. Right-click the device for which the new driver was installed and click Properties. 7. Click the Drivers tab. 8. Click Roll Back Driver. If Device Driver Rollback does not resolve the problem, then use System Restore to return your computer to the operating state that existed before you installed the new driver.
7. Click Install from a list or specific location (Advanced) and click Next. 8. Click Browse and browse to the location to which you previously extracted the driver files. 9. When the name of the appropriate driver appears, click Next. 10. Click Finish and restart your computer.
To change the restore point, you can either repeat the steps using a different restore point, or you can undo the restoration. Undoing the Last System Restore NOTICE: Before you undo the last system restore, save and close all open files and exit any open programs. Do not alter, open, or delete any files or programs until the system restoration is complete. 1. Click the Start button, point to All Programs® Accessories® System Tools, and then click System Restore. 2.
4. Press immediately after the DELL™ logo appears. If the operating system logo appears, wait until you see the Windows desktop, and then shut down the computer and try again. 5. Follow the instructions on the screen to complete the installation.
Back to Contents Page Finding Information Dell™ Latitude™ D620 User's Guide NOTE: Some features or media may be optional and may not ship with your computer. Some features or media may not be available in certain countries. NOTE: Additional information may ship with your computer.
3. l l Service Tag and Express Service Code Microsoft Windows License Label Click the User's Guide for your computer. Service Tag and Microsoft® Windows® License These labels are located on the bottom of your computer.
NOTE: The color of your CD varies based on the operating system you ordered.
Back to Contents Page Glossary Dell™ Latitude™ D620 User's Guide Terms in this Glossary are provided for informational purposes only and may or may not describe features included with your particular computer. A AC — alternating current — The form of electricity that powers your computer when you plug the AC adapter power cable in to an electrical outlet.
CD-RW — CD rewritable — A rewritable version of a CD. Data can be written to a CD-RW disc, and then erased and written over (rewritten). CD-RW drive — A drive that can read CDs and write to CD-RW (rewritable CDs) and CD-R (recordable CDs) discs. You can write to CD-RW discs multiple times, but you can write to CD-R discs only once. CD-RW/DVD drive — A drive, sometimes referred to as a combo drive, that can read CDs and DVDs and write to CD-RW (rewritable CDs) and CD-R (recordable CDs) discs.
EMI — electromagnetic interference — Electrical interference caused by electromagnetic radiation. ENERGY STAR® — Environmental Protection Agency requirements that decrease the overall consumption of electricity. EPP — enhanced parallel port — A parallel connector design that provides bidirectional data transmission. ESD — electrostatic discharge — A rapid discharge of static electricity. ESD can damage integrated circuits found in computer and communications equipment.
I IC — integrated circuit — A semiconductor wafer, or chip, on which thousands or millions of tiny electronic components are fabricated for use in computer, audio, and video equipment. IDE — integrated device electronics — An interface for mass storage devices in which the controller is integrated into the hard drive or CD drive. IEEE 1394 — Institute of Electrical and Electronics Engineers, Inc.
measured in MHz. modem — A device that allows your computer to communicate with other computers over analog telephone lines. Three types of modems include: external, PC Card, and internal. You typically use your modem to connect to the Internet and exchange e-mail. module bay — See media bay. ms — millisecond — A measure of time that equals one thousandth of a second. Access times of storage devices are often measured in ms. N network adapter — A chip that provides network capabilities.
read-only — Data and/or files you can view but cannot edit or delete. A file can have read-only status if: ¡ ¡ It resides on a physically write-protected floppy disk, CD, or DVD. It is located on a network in a directory and the system administrator has assigned rights only to specific individuals. refresh rate — The frequency, measured in Hz, at which your screen's horizontal lines are recharged (sometimes also referred to as its vertical frequency).
change the settings for this program. T TAPI — telephony application programming interface — Enables Windows programs to operate with a wide variety of telephony devices, including voice, data, fax, and video. text editor — A program used to create and edit files that contain only text; for example, Windows Notepad uses a text editor. Text editors do not usually provide word wrap or formatting functionality (the option to underline, change fonts, and so on).
X XGA — extended graphics array — A video standard for video cards and controllers that supports resolutions up to 1024 x 768. Z ZIF — zero insertion force — A type of socket or connector that allows a computer chip to be installed or removed with no stress applied to either the chip or its socket. Zip — A popular data compression format. Files that have been compressed with the Zip format are called Zip files and usually have a filename extension of .zip.
Back to Contents Page Getting Help Dell™ Latitude™ D620 User's Guide Obtaining Assistance Problems With Your Order Product Information Returning Items for Warranty Repair or Credit Before You Call Contacting Dell Obtaining Assistance CAUTION: If you need to remove the computer covers, first disconnect the computer power and modem cables from all electrical outlets. 1. Complete the procedures in Troubleshooting. 2. Run the Dell Diagnostics. 3. Make a copy of the Diagnostics Checklist and fill it out.
support.jp.dell.com (Japan only) support.euro.dell.com (Europe only) l Electronic Quote Service apmarketing@dell.com (Asian/Pacific countries only) sales_canada@dell.com (Canada only) AutoTech Service Dell's automated support service—AutoTech—provides recorded answers to the questions most frequently asked by Dell customers about their portable and desktop computers. When you call AutoTech, use your touch-tone telephone to select the subjects that correspond to your questions.
Before You Call NOTE: Have your Express Service Code ready when you call. The code helps Dell's automated-support telephone system direct your call more efficiently. Remember to fill out the Diagnostics Checklist. If possible, turn on your computer before you call Dell for assistance and call from a telephone at or near the computer. You may be asked to type some commands at the keyboard, relay detailed information during operations, or try other troubleshooting steps possible only at the computer itself.
Sales Aruba Australia (Sydney) International Access Code: 0011 General Support 0-810-444-3355 toll-free: 800-1578 Website: support.ap.dell.com E-mail: support.ap.dell.com/contactus Country Code: 61 City Code: 2 General Support 13DELL-133355 Website: support.euro.dell.com E-mail: tech_support_central_europe@dell.
Customer Care E-mail: customer_cn@dell.
Fax (calls from outside of France) City Codes: (1) (4) 04 99 75 40 01 Corporate Technical Support Customer Care 0825 004 719 0825 338 339 Switchboard 01 55 94 71 00 Sales 01 55 94 71 00 Fax 01 55 94 71 01 Website: support.euro.dell.com E-mail: tech_support_central_europe@dell.
Home and Small Business Italy (Milan) International Access Code: 00 Country Code: 39 City Code: 02 Technical Support 02 577 826 90 Customer Care 02 696 821 14 Fax 02 696 821 13 Switchboard 02 696 821 12 Corporate Technical Support 02 577 826 90 Customer Care 02 577 825 55 Fax 02 575 035 30 Switchboard Jamaica General Support (dial from within Jamaica only) 02 577 821 1-800-682-3639 Website: support.jp.dell.
001-877-384-8979 Customer Technical Support or 001-877-269-3383 50-81-8800 Mexico Sales or 01-800-888-3355 International Access Code: 00 001-877-384-8979 Country Code: 52 Customer Service or 001-877-269-3383 50-81-8800 Main or 01-800-888-3355 Montserrat General Support toll-free: 1-866-278-6822 Netherlands Antilles General Support 001-800-882-1519 Website: support.euro.dell.
005 Country Code: 65 Technical Support (PowerApp, PowerEdge, PowerConnect, and PowerVault) Customer Care Transaction Sales Corporate Sales toll-free: 1800 394 7478 toll-free: 1 800 394 7430 (option 6) toll-free: 1 800 394 7412 toll-free: 1 800 394 7419 Website: support.euro.dell.com E-mail: czech_dell@dell.
Technical Support (OptiPlex, Latitude, and Dell Precision) toll-free: 1800 0060 07 Technical Support (PowerApp, PowerEdge, PowerConnect, and PowerVault) toll-free: 1800 0600 09 International Access Code: 001 Customer Care toll-free: 1800 006 007 (option 7) Country Code: 66 Corporate Sales toll-free: 1800 006 009 Transaction Sales toll-free: 1800 006 006 Thailand Trinidad/Tobago General Support 1-800-805-8035 Turks and Caicos Islands General Support toll-free: 1-866-540-3355 Website: suppo
Back to Contents Page Using the Keyboard Dell™ Latitude™ D620 User's Guide Numeric Keypad Key Combinations Touch Pad Changing the Track Stick Cap Numeric Keypad 1 numeric keypad The numeric keypad functions like the numeric keypad on an external keyboard. Each key on the keypad has multiple functions. The keypad numbers and symbols are marked in blue on the right of the keypad keys. To type a number or symbol, hold down and press the desired key. l To enable the keypad, press .
Power Management Activates a power management mode. You can reprogram this keyboard shortcut to activate a different power management mode using the Advanced tab in the Power Options Properties window. Puts the computer into hibernate mode. Dell QuickSet is required (see Dell™ QuickSet Features). Microsoft® Windows® Logo Key Functions Windows logo key and Minimizes all open windows Windows logo key and Restores all minimized windows.
l 3. Click the Pointer tab to adjust touch pad and track stick settings. Click OK to save the settings and close the window. Changing the Track Stick Cap You can replace your track stick cap if it wears down from prolonged use or if you prefer a different color. You can purchase additional caps by visiting the Dell website at www.dell.com. 1. Pull the cap off the track stick. 2. Align the new cap over the square track-stick post and gently press the cap down onto the post.
Back to Contents Page Using Multimedia Dell™ Latitude™ D620 User's Guide Playing CDs or DVDs Adjusting the Volume Adjusting the Picture Playing CDs or DVDs NOTICE: Do not press down on the CD or DVD tray when you open or close it. Keep the tray closed when you are not using the drive. NOTICE: Do not move the computer while playing CDs or DVDs. 1. Press the eject button on the front of the drive. 2. Pull out the tray. 3.
Volume Control Buttons You can adjust the volume with the volume control buttons on your computer. See volume control buttons. Volume Control Keys You can adjust the volume by pressing the following keys: l Press to increase volume. l Press to decrease volume. l Press to mute volume.
Back to Contents Page Adding and Replacing Parts Dell™ Latitude™ D620 User's Guide Before You Begin Wireless Local Area Network (WLAN) Card Hinge Cover Mobile Broadband Card Keyboard Subscriber Identity Module (SIM) Card Internal Card With Bluetooth® Wireless Technology Hard Drive Coin-Cell Battery Media Bay Memory Before You Begin This chapter provides procedures for removing and installing the components in your computer.
2. Turn off your computer (see Turning Off Your Computer). 3. If the computer is connected to a docking device (docked), undock it. See the documentation that came with your docking device for instructions. NOTICE: To disconnect a network cable, first unplug the cable from your computer and then unplug it from the network wall connector. 4. Disconnect any telephone or network cables from the computer. 5. Close the display and turn the computer upside down on a flat work surface.
NOTICE: To avoid electrostatic discharge, ground yourself by using a wrist grounding strap or by periodically touching an unpainted metal surface (such as the back panel) on the computer. 1. Follow the instructions in Before You Begin. 2. Turn the computer right-side up and open it. 1 hinge cover 3. 2 keyboard Remove the hinge cover (see Hinge Cover).
6. If the keyboard cable is held in place by a keyboard lock arm next to the keyboard connector, carefully pivot the lock arm upward to uncover the cable. 7. Pull up on the pull-tab to disconnect the keyboard cable connector from the keyboard connector on the system board. NOTE: When you replace the keyboard, ensure that the keyboard tabs are completely in place to avoid scratching the palm rest.
NOTICE: To avoid damaging the system board, you must remove the main battery before you begin working inside the computer. 1. Follow the procedures in Before You Begin. 2. Remove the hinge cover (see Hinge Cover). 3. Remove the keyboard (see Keyboard). 1 battery connector 2 coin-cell battery 3 plastic mylar 4. Remove the battery connector from the connector on the system board. 5. Being careful not to break the plastic, slightly raise the corner of the mylar above the battery. 6.
1 memory module (DIMM A) 2 securing clips (2) NOTICE: To prevent damage to the memory module connector, do not use tools to spread the memory-module securing clips. 4. 1 If you are replacing a memory module, ground yourself and remove the existing module: a. Use your fingertips to carefully spread apart the securing clips on each end of the memory module connector until the module pops up. b. Remove the module from the connector. securing clips (2 per connector) 5.
1 memory module cover 2 captive screw NOTICE: To prevent damage to the memory module connector, do not use tools to spread the memory-module securing clips. 3. 1 If you are replacing a memory module, ground yourself and remove the existing module: a. Use your fingertips to carefully spread apart the securing clips on each end of the memory module connector until the module pops up. b. Remove the module from the connector.
7. Turn on the computer. As the computer boots, it detects the additional memory and automatically updates the system configuration information. To confirm the amount of memory installed in the computer, click Start®Help and Support, and then click Computer Information. 8. Replace the memory module cover. Wireless Local Area Network (WLAN) Card If you ordered a WLAN card with your computer, the card is already installed.
1 WLAN card 5. 1 2 metal securing tabs (2) To install a WLAN card: a. Move any antenna cables out of the way to make space for the WLAN card. b. Align the WLAN card with the connector at a 45-degree angle, and press the card into the connector until you feel a click. WLAN card 2 antenna cable connectors NOTICE: To avoid damaging the WLAN card, never place cables on top of or under the card. NOTE: Your WLAN card may have two or three connectors, depending on the type of card you ordered.
2. Remove the hinge cover (see Hinge Cover). 3. Remove the keyboard (see Keyboard). 1 Mobile Broadband card 2 antenna wires (2) NOTICE: To prevent damage to the connector, do not use tools to spread the securing clips. 4. If a Mobile Broadband card is not already installed, go to step 5. If you are replacing a Mobile Broadband card, remove the existing card: a. 1 Disconnect the Mobile Broadband card from any attached cables. Mobile Broadband card 2 metal securing tabs (2) b.
1 Mobile Broadband card 2 antenna wires (2) NOTICE: To avoid damaging the Mobile Broadband card, never place cables on top of or under the card and ensure that you route the cables properly. NOTE: For more specific information about which cable to connect to which connector, see the documentation that came with your Mobile Broadband card. c.
CAUTION: Before working inside your computer, follow the safety instructions in the Product Information Guide. NOTICE: To prevent data loss, turn off your computer before removing the hard drive. Do not remove the hard drive while the computer is on, in standby mode, or in hibernate mode. NOTICE: Hard drives are extremely fragile; even a slight bump can damage the drive. NOTE: Dell does not guarantee compatibility or provide support for hard drives from sources other than Dell.
2. If the computer is running, double-click the Safely Remove Hardware icon on the taskbar, click the device you want to eject, and click Stop. 3. Press the device latch release. 4. Pull the device out of the media bay. To install a device, push the new device into the bay until it clicks into place.
Back to Contents Page Dell™ QuickSet Features Dell™ Latitude™ D620 User's Guide NOTE: This feature may not be available on your computer. Dell™ QuickSet provides you with easy access to configure or view the following types of settings: l Network connectivity l Power management l Display l System information Depending on what you want to do in Dell™ QuickSet, you can start it by either clicking, double-clicking, or right-clicking the QuickSet icon, Microsoft® Windows® taskbar.
Back to Contents Page Securing Your Computer Dell™ Latitude™ D620 User's Guide Security Cable Lock Using Smart Cards Passwords Trusted Platform Module (TPM) Security Management Software Computer Tracking Software If Your Computer Is Lost or Stolen Security Cable Lock NOTE: Your computer does not ship with a security cable lock. A security cable lock is a commercially available antitheft device. To use the lock, attach it to the security cable slot on your Dell™ computer.
1 gold contact pad 2 smart card (top) 2. Slide the smart card into the smart card slot until the card is completely seated in its connector. The smart card will protrude approximately 1/2 inch from the slot. The smart card slot is located below the PC Card slot. If you encounter too much resistance, do not force the card. Check the card orientation and try again. Passwords About Passwords NOTE: Passwords are disabled when you receive your computer.
NOTICE: Passwords provide a high level of security for data in your computer or hard drive. However, they are not foolproof. If you require more security, obtain and use additional forms of protection, such as smart cards, data encryption programs, or PC Cards with encryption features. If you forget any of your passwords, contact Dell (see Contacting Dell). For your protection, Dell technical support staff will ask you for proof of your identity to ensure that only an authorized person can use the computer.
TPM is a hardware-based security feature that can be used to create and manage computer-generated encryption keys. When combined with security software, the TPM enhances existing network and computer security by enabling features such as file protection capabilities and protected e-mail. The TPM feature is enabled through a system setup option. NOTICE: To secure your TPM data and encryption keys, follow the backup procedures documented in the Broadcom Secure Foundation Getting Started Guide.
Computer Tracking Software Computer tracking software may enable you to locate your computer if it is lost or stolen. The software is optional and may be purchased when you order your Dell™ computer, or you can contact your Dell sales representative for information about this security feature. NOTE: Computer tracking software may not be available in certain countries.
Back to Contents Page System Setup Program Dell™ Latitude™ D620 User's Guide Overview Viewing the System Setup Screens System Setup Screens Commonly Used Settings Overview NOTE: Your operating system may automatically configure most of the options available in system setup, thus overriding options that you set through system setup. (An exception is the External Hot Key option, which you can disable or enable only through system setup.
l Diskette Drive l Modular bay HDD l Internal HDD l CD/DVD/CD-RW drive During the boot routine, the computer starts at the top of the list and scans each enabled device for the operating system start-up files. When the computer finds the files, it stops searching and starts the operating system. To control the boot devices, select (highlight) a device by pressing the down-arrow or up-arrow key, and then enable or disable the device or change its order in the list.
Back to Contents Page Specifications Dell™ Latitude™ D620 User's Guide Processor Processor types Intel® Core™ Solo and Intel Core Duo processors L1 cache 64 KB (internal) L2 cache 2 MB (on die) External bus frequency 667 MHz System Information System chipset Intel 945GM or 945PM Data bus width 64 bits DRAM bus width 64 bits Processor address bus width 36 bits PC Card/ExpressCard CardBus controller O2Micro OZ601CardBus controller PC Card connector one (supports one Type I or Type II card
Audio microphone miniconnector, stereo headphones/speakers miniconnector USB four 4-pin USB 2.0-compliant connectors Infrared sensor sensor compatible with IrDA Standard 1.1 (Fast IR) and IrDA Standard 1.0 (Slow IR) Modem RJ-11 support Network adapter RJ-45 port D-Dock standard D-Dock connector for devices such as DDock advanced port replicators and expansion stations D-Port standard D-Port connector Communications Modem: Type v.
Stereo conversion 24-bit (stereo digital-to-analog), 24-bit (stereo analog-to-digital) Interfaces: Internal PCI bus/High Definition Audio External microphone miniconnector, stereo headphones/speakers miniconnector Speaker one 4-ohm speaker Internal speaker amplifier 2-W per channel into 4 ohms Volume controls keyboard shortcuts or program menus Display Type (active-matrix TFT) WXGA or WXGA+ Active area (X/Y) 303.36 x 189.5 Dimensions: Height 214.3 mm (8.4 inches) Width 285.7 mm (11.
Size protrudes 0.5 mm higher than surrounding keycaps Battery Type: 9-cell lithium-ion battery 85 WHr NOTE: You cannot use an auto/air adapter with a 9cell battery. 6-cell lithium-ion battery 56 WHr 4-cell lithium-ion battery 35 WHr Dimensions:185.22 4-cell and 6-cell lithium-ion batteries: Depth 66.6 mm (2.62 inches) Height 19.2 mm (0.76 inch) Width 185.22 mm (72.92 inches) 9-cell lithium-ion battery: Depth 93.3 mm (3.67 inches) Height 20.59 mm (0.81 inch) Width 287.30 mm (11.
Weight (without cables) 0.36 kg (0.79 lb) (65 W) 0.46 kg (1.01 lb) (90 W) Temperature range: Operating 0° to 35°C (32° to 95°F) (both) Storage –40° to 65°C (–40° to 149°F) (both) Physical Height 32 mm (1.26 inches) Width 337 mm (13.3 inches) Depth 238 mm (9.3 inches) Weight: With travel module 1.98 kg (4.37 lb) (4 cell) With CD drive 2.27 kg (5.
Back to Contents Page Dell™ Latitude™ D620 User's Guide For information on other documentation included with your computer, see Finding Information. NOTE: A NOTE indicates important information that helps you make better use of your computer. NOTICE: A NOTICE indicates either potential damage to hardware or loss of data and tells you how to avoid the problem. CAUTION: A CAUTION indicates a potential for property damage, personal injury, or death.
Back to Contents Page Traveling With Your Computer Dell™ Latitude™ D620 User's Guide Identifying Your Computer Packing the Computer Travel Tips Identifying Your Computer l l Attach a name tag or business card to the computer. Write down your Service Tag and store it in a safe place away from the computer or carrying case. Use the Service Tag if you need to report a loss or theft to law enforcement officials and to Dell. l Create a file on the Microsoft® Windows® desktop called if_found.
l Prior to entering the airplane, verify that using a computer is permitted. Some airlines forbid the use of electronic devices during flight. All airlines forbid the use of electronic devices during takeoff and landing.
Back to Contents Page Troubleshooting Dell™ Latitude™ D620 User's Guide Dell Technical Update Service Network Problems Dell Diagnostics PC Card or ExpressCard Problems Dell Support Utility Power Problems Drive Problems Printer Problems E-Mail, Modem, and Internet Problems Scanner Problems Error Messages Sound and Speaker Problems Keyboard Problems Touch Pad or Mouse Problems Lockups and Software Problems Video and Display Problems Memory Problems Dell Technical Update Service The Dell Tech
l l l During the assessment, answer any questions that appear. If a failure is detected, the computer stops and beeps. To stop the assessment and restart the computer, press ; to continue to the next test, press ; to retest the component that failed, press . If failures are detected during the Pre-boot System Assessment, write down the error code(s) and contact Dell (see Contacting Dell).
The Dell Diagnostics obtains configuration information for all devices from system setup, memory, and various internal tests, and it displays the information in the device list in the left pane of the screen. The device list may not display the names of all the components installed on your computer or all devices attached to your computer. Parameters Allows you to customize the test by changing the test settings. 4.
l Insert another floppy disk, CD, or DVD to eliminate the possibility that the original one is defective. l Insert a bootable floppy disk and restart the computer. Clean the drive or disk — See Cleaning Your Computer. Ensure that the CD is snapped onto the spindle Check the cable connections Check for hardware incompatibilities — See Resolving Software and Hardware Incompatibilities. Run the Dell Diagnostics — See Dell Diagnostics.
3. Click Properties. 4. Click the Tools tab. 5. Under Error-checking, click Check Now. 6. Click Scan for and attempt recovery of bad sectors. 7. Click Start. E-Mail, Modem, and Internet Problems CAUTION: Before you begin any of the procedures in this section, follow the safety instructions in the Product Information Guide. NOTE: Connect the modem to an analog telephone jack only. The modem does not operate while it is connected to a digital telephone network.
Error Messages Fill out the Diagnostics Checklist (see Diagnostics Checklist) as you complete these checks. CAUTION: Before you begin any of the procedures in this section, follow the safety instructions in the Product Information Guide. If the message is not listed, see the documentation for the operating system or the program that was running when the message appeared. Auxiliary device failure — The touch pad, track stick, or external mouse may be faulty.
Hard-disk drive failure — The hard drive does not respond to commands from the computer. Shut down the computer, remove the hard drive (see Hard Drive), and boot the computer from a CD. Then shut down the computer, reinstall the hard drive, and restart the computer. If the problem persists, try another drive. Run the Hard-Disk Drive tests in the Dell Diagnostics (see Dell Diagnostics). Hard-disk drive read failure — The hard drive may be defective.
Not enough memory or resources. Exit some programs and try again — You have too many programs open. Close all windows and open the program that you want to use. Operating system not found — Reinstall the hard drive (see Hard Drive). If the problem persists, contact Dell (see Contacting Dell). Optional ROM bad checksum — The optional ROM apparently failed. Contact Dell (see Contacting Dell). A required .DLL file was not found — The program that you are trying to open is missing an essential file.
Fill out the Diagnostics Checklist (see Diagnostics Checklist) as you perform the various checks. NOTE: Use the integrated keyboard when running Dell Diagnostics or the System Setup program. External Keyboard problems Check the keyboard cable — Shut down the computer. Disconnect the keyboard cable and check it for damage, and firmly reconnect the cable. If you are using a keyboard extension cable, disconnect it and connect the keyboard directly to the computer. Check the external keyboard — 1.
Turn the computer off — If you are unable to get a response by pressing a key on your keyboard or moving your mouse, press and hold the power button for at least 8 to 10 seconds until the computer turns off. Then restart your computer. A program stops responding A program crashes repeatedly NOTE: Software usually includes installation instructions in its documentation or on a floppy disk or CD. End the program — 1. Press simultaneously. 2. Click Task Manager. 3.
cannot verify the DRM restrictions, so the licensed files cannot be played. Licensed music and video files have a lock icon next to them. You can access licensed files in the Windows XP operating system environment. Adjusting the color settings for movies that contain scenes that are too dark or too bright — Click EagleVision to use a video enhancement technology that detects video content and dynamically adjusts the brightness/contrast/saturation ratios.
General Check the network cable connector — Ensure that the network cable is firmly inserted into both the network connector on the back of the computer and the network connector. Check the network lights on the network connector — No light indicates that no network communication exists. Replace the network cable. Restart the computer and log on to the network again.
Power Problems Fill out the Diagnostics Checklist (see Diagnostics Checklist) as you complete these checks. CAUTION: Before you begin any of the procedures in this section, follow the safety instructions in the Product Information Guide. Check the power light — When the power light is lit or blinking, the computer has power. If the power light is blinking, the computer is in standby mode— press the power button to exit standby mode. If the light is off, press the power button to turn on the computer.
Docking While the Computer Is Running If a computer is connected to the Dell D/Dock or Dell D/Port while the computer is running, presence of the docking device is ignored until the AC adapter is connected to the computer. AC Power Loss While the Computer Is Docked If a computer loses AC power while docked to the Dell D/Dock or Dell D/Port, the computer immediately goes into low-performance mode. Printer Problems Fill out the Diagnostics Checklist (see Diagnostics Checklist)as you complete these checks.
1. Click the Start button, click Control Panel, and then click Printers and Other Hardware. 2. Click Scanners and Cameras. If your scanner is listed, Windows recognizes the scanner. Reinstall the scanner driver — See the scanner documentation for instructions. Sound and Speaker Problems Fill out the Diagnostics Checklist (see Diagnostics Checklist) as you complete these checks.
Adjust the Windows volume control — Click or double-click the speaker icon in the lower-right corner of your screen. Ensure that the volume is turned up and that the sound is not muted. Touch Pad or Mouse Problems Check the touch pad settings — 1. Click the Start button, click Control Panel, and then click Printers and Other Hardware. 2. Click Mouse. 3. Try adjusting the settings. Check the mouse cable — Shut down the computer.
Check the AC adapter — Check the AC adapter cable connections. If the AC adapter has a light, ensure that the light is on. Connect the computer directly to an electrical outlet — Bypass power protection devices, power strips, and the extension cable to verify that the computer turns on. Adjust the power properties — Search for the keyword standby in the Windows Help and Support Center (see Windows Help and Support Center).
Back to Contents Page Using a Network Dell™ Latitude™ D620 User's Guide Physically Connecting to a Network or Broadband Modem Network Setup Wizard Wireless Local Area Network (WLAN) Mobile Broadband Network Managing Your Network Settings Through the Dell QuickSet Location Profiler Dell™ Wi-Fi Catcher™ Network Locator Internet Connection Firewall Physically Connecting to a Network or Broadband Modem Before you connect your computer to a network that is not wireless, the computer must have a network cable c
waves.
6. Disconnect the AC adapter cable from your wireless router to ensure that there is no power connected to the router. 7. Insert a network cable into the network (RJ-45) connector on the unpowered broadband modem. 8. Connect the other end of the network cable into the Internet network (RJ-45) connector on the unpowered wireless router. 9. Ensure that no network or USB cables, other than the network cable connecting the modem and the wireless router, are connected to the broadband modem.
2. Under Pick a Help topic, click Dell User and System Guides.s 3. Under Device Guides, select the documentation for your wireless network card. Completing the Connection to the WLAN When you turn on your computer and a network (for which your computer is not configured) is detected in the area, a pop-up appears near the network icon in the notification area (in the lower-right corner of the Windows desktop). Follow the instructions provided in any utility prompts that appear on your screen.
2. Under Pick a task, click Use Tools to view your computer information and diagnose problems. 3. Under Tools, click My Computer Information and then click Find information about the hardware installed on this computer. On the My Computer Information - Hardware screen, you can view the type of Mobile Broadband card installed in your computer as well as other hardware components. NOTE: The Mobile Broadband card is listed under Modems.
Because the Wi-Fi Catcher Network Locator is disabled and not configured for use when your computer is shipped to you, you must first use Dell QuickSet to enable and configure the switch to control Wi-Fi network connections. For more information on the Wi-Fi Catcher Network Locator and to enable the feature through QuickSet, see the Dell QuickSet Help. To access the Help file, right-click the icon in the taskbar.