Dell PowerConnect RPS720, MPS600, MPS1000, and MPS 1U Shelf Getting Started With Your System Regulatory Model PowerConnect RPS720, MPS600, and MPS1000
Notes, Cautions, and Warnings NOTE: A NOTE indicates important information that helps you make better use of your computer. CAUTION: A CAUTION indicates potential damage to hardware or loss of data if instructions are not followed. WARNING: A WARNING indicates a potential for property damage, personal injury, or death. ____________________ Information in this publication is subject to change without notice. © 2010 Dell Inc. All rights reserved.
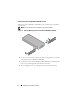
Features Dell PowerConnect RPS720 Figure 1-1.
• 1U, 19-inch rack mountable system with brackets • Up to three MPS600 units in a MPS 1U Shelf (density–3per 1U, 19-inch rack) Dell PowerConnect MPS1000 Figure 1-3.
• Rack mounting kit • AC power cord: • – RPS720—Type C13 plug – MPS600—Type C13 plug – MPS1000—Type C15 plug (with notch) Switch DC power cords: – RPS720—14-pin DC power cords (4) – MPS600—16-pin DC power cord (1) – MPS1000—16-pin DC power cord (1) Installation WARNING: Before performing the following procedure, review the safety instructions that came with the system.
Installing PowerConnect RPS720 in a Rack The PowerConnect RPS720 can be installed in most standard 19-inch racks. NOTE: For racks that are not pre-threaded, cage nuts are provided. Figure 1-4. Attaching Mounting Brackets–PowerConnect RPS720 3 Use the screws that are provided to attach a mounting bracket to each side of the PowerConnect RPS720. 4 Position the PowerConnect RPS720 in the rack and align the holes in the mounting bracket with the holes in the rack.
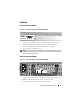
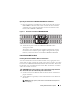
Operating the PowerConnect RPS720 After Installation 1 Plug one end of the switch DC power cord (14-pin) into the connector labeled RPS on the back of the switch. Connect the other end of the switch DC power cord to any available RPS connector on the back of the PowerConnect RPS720. Figure 1-5. Back View–PowerConnect RPS720 2 Attach the AC power cord to the PowerConnect RPS720 and to an AC power outlet. The switch is now using both power supplies simultaneously.
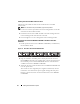
Installing PowerConnect MPS600 or MPS1000 in a Rack The PowerConnect MPS600 or MPS1000 can be installed in most standard 19-inch racks. NOTE: For racks that are not pre-threaded, cage nuts are provided. Figure 1-6. Attaching Mounting Brackets–PowerConnect MPS600 or MPS1000 3 Use the screws that are provided to attach a mounting bracket to each side of the PowerConnect MPS600 or MPS1000.
Operating the PowerConnect MPS600 or MPS1000 After Installation 1 Plug one end of the switch DC power cord (16-pin) into the connector labeled MPS on the back of the switch. Connect the other end of the switch DC power cord to the DC OUT connector on the back of the PowerConnect MPS600 or MPS1000. Figure 1-7. Back View–PowerConnect MPS600/MPS1000 2 Attach the AC power cord to the MPS600 or MPS1000 and to an AC power outlet. The switch is now using both power supplies simultaneously.
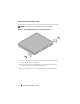
Installing PowerConnect MPS 1U Shelf in a Rack The PowerConnect MPS 1U Shelf can be installed in most standard 19-inch racks. NOTE: For racks that are not pre-threaded, cage nuts are provided. 1 Use the screws that are provided to attach a mounting bracket to each side of the PowerConnect MPS 1U Shelf. 2 Position the PowerConnect MPS 1U Shelf in the rack and align the holes in the mounting bracket with the holes in the rack. 3 Insert and tighten two screws through each of the mounting brackets.
Other Information You May Need WARNING: See the safety and regulatory information that shipped with your system. Warranty information may be included within this document or as a separate document. • The rack documentation included with your rack solution describes how to install your system into a rack. • The PowerConnect Switch User Guides provide information about system features and describes how to troubleshoot the system and install or replace system components.
180 W AC-DC power supply NOTE: The power supply has an universal input (90 VAC to 264 VAC) and a 12 VDC regulated output. This regulated output supplies power to other power supply backup source. The power supply incorporates over current protection and OVP. Input Voltage Universal input– 90 to 264 VAC Nominal input– 15 to 230 VAC. Input Frequency Range 47 to 63 Hz Max. Input AC Current 2.3 A max per supply (9.
PowerConnect MPS600 The PowerConnect MPS600 contains a 600 W power supply. Physical Height 41.6 mm (1.64 in)(maximum) Width 133.8 mm (5.27 in)(maximum) Depth 401.4 mm (15.8 in)(maximum) 600 W AC-DC power supply NOTE: The power supply has an universal input (90 VAC to 264 VAC) and a 12 VDC regulated output. This regulated output supplies power to other power supply backup source. The power supply incorporates over current protection and OVP.
1000 W AC-DC power supply NOTE: The power supply has an universal input (100 VAC to 240 VAC). This regulated output supplies power to other power supply backup source. The power supply incorporates over current protection and OVP. Input Voltage Universal input– 100 to 240 VAC Input Frequency Range 47 to 63 Hz, single phase AC Max. Input AC Current 12.