
Users Guide


Power Supply Replacement Procedure 5
53-1001789-01
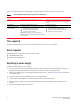
CAUTION
Do not force the installation. If the power supply does not slide in easily, ensure that the power supply is
correctly oriented before continuing.
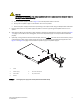
a. Orient the power supply as shown in Figure 3, with the AC power switch on the left.
b. Gently push the power supply into the chassis until it is firmly seated.
c. Secure the power supply to the chassis by screwing in the captive screw using the Phillips-head screwdriver.
7. Plug the power cord in to the power supply and power on the unit by pressing the AC power switch to the “1”
symbol.
8. Verify that the LED on the new power supply displays a steady green light while the switch is operating (see Table
1 on page 4). If the LED is not a steady green, ensure that the power supply is securely installed and seated
properly.
9. Optionally, if using the Command Line Interface (CLI), enter the psShow command at the command line prompt
to display power supply status. Power supply status can also be viewed using the Web Tools application. See
Figure 1 and Figure 2 on page 3 for the location of power supply 1 and power supply 2.
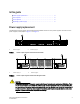
FIGURE 3 Inserting the power supply in the switch (PowerConnect B-8000 shown)
1Switch 5 Captive screw
2 Power supply 6 AC Power receptacle
3Status LED 7 AC power switch
4Handle
2
3
6
1
4
5
7