
User's Manual


103 | The Basic User-Centric Networks Dell Networking W-Series ArubaOS 6.4.x| User Guide
Creating, Updating, and Deleting VLAN Pools
VLAN pooling should not be used with static IP addresses.
You can create, update, and delete a VLAN pool using the WebUI or the CLI. See Creating a VLAN Pool on page
149.
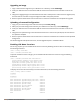
Use the CLI to add existing VLAN IDS to a pool.
(host) #configure terminal
Enter Configuration commands, one per line. End with CNTL/Z
(host) (config) #vlan-name mygroup pool
(host) (config) #vlan mygroup 2,4,12
(host) (config) #
To confirm the VLAN pool status and mappings assignments, use the show vlan mapping command:
(host) (config) #show vlan mapping
VLAN Name Pool Status VLAN IDs
--------- ----------- --------
mygroup Enabled 2,4,12
group123 Disabled
Assigning and Configuring the Trunk Port
The following procedures configures a Gigabit Ethernet port as trunk port.
In the WebUI
1. Navigate to the Configuration > Network > Ports window on the WebUI.
2. In the Port Selection section, click the port that will connect the controller to the network. In this example,
click port 25.
3. For Port Mode, select Trunk.
4. For Native VLAN, select VLAN 5 from the scrolling list, then click the left (<--) arrow.
5. Click Apply.
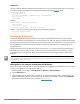
In the CLI
interface gigabitethernet 1/25
switchport mode trunk
switchport trunk native vlan 5
To confirm the port assignments, use the show vlan command:
(host) (config) #show vlan
VLAN CONFIGURATION
------------------
VLAN Name Ports
---- ---- -----
1 Default Fa1/0-23 Gig1/24
5 VLAN0005 Gig1/25
Configuring the Default Gateway
The following configurations assign a default gateway for the controller.
In the WebUI
1. Navigate to the Configuration > Network > IP > IP Routes window.