
User's Manual


684 | Virtual Intranet Access Dell Networking W-Series ArubaOS 6.4.x| User Guide
based on the user authentication. You can configure multiple VIA authentication profiles and / or use the
default VIA authentication profile created with Internal server group. For details, see Create VIA
Authentication Profile on page 684.
4. Create VIA Connection Profile— A VIA connection profile contains settings required by VIA to establish a
secure connection to the controller. You can configure multiple VIA connection profiles. A VIA connection
profile is always associated to a user role and all users belonging to that role will use the configured settings.
If you do not assign a VIA connection profile to a user role, the default connection profile is used.For details,
see Create VIA Connection Profile on page 686.
5. Configure VIA Web Authentication—A VIA web authentication profile contains an ordered list of VIA
authentication profiles. The web authentication profile is used by end users to login to the VIA download
page (https://<server-IP-address>/via) for downloading the VIA client. Only one VIA web authentication
profile is available. If more than one VIA authentication profile is configured, users can view this list and
select one during the client login. For details, see Configure VIA Web Authentication on page 690.
6. Associate VIA Connection Profile to User Role—A VIA connection profile has to be associated to a user role.
Users will login by authenticating against the server group specified in the VIA authentication profile and are
put into that user role. The VIA configuration settings are derived from the VIA connection profile attached
to that user role. Default connection profile is used. For details, see Associate VIA Connection Profile to User
Role on page 691.
7. Configure VIA Client WLAN Profiles—You can push WLAN profiles to end-user computers that use the
Microsoft Windows Wireless Zero Config (WZC) service to configure and maintain their wireless networks.
After the WLAN profiles are pushed to end-user computers, they are automatically displayed as an ordered
list in the preferred networks. The VIA client WLAN profiles provisioned on the client can be selected from
the VIA connection profile described in Step 6. For details, see Configure VIA Client WLAN Profiles on page
691.
8. Rebranding VIA and Downloading the Installer—You can use a custom logo on the VIA client and on the VIA
download web page. For details, see Rebranding VIA and Downloading the Installer on page 694.
9. Download VIA Installer and Version File
Using the WebUI to Configure VIA
The following steps illustrate configuring your controller for VIA using the WebUI.
Enable VPN Server Module
You must install the PEFV license to configure and assign user roles. See Software Licenses on page 130 for
licensing requirements.
To install a license:
1. Navigate to Configuration > Network > Controller and select the Licenses tab on the right hand side.
2. Paste the license key in the Add New License key text box and click the Add button.
Create VIA User Roles
To create VIA users roles:
1. Navigate to Configuration > Security > Access Control > User Roles.
2. Click Add to create new policies. Click Done after creating the user role and apply to save it to the
configuration.
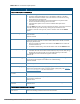
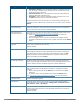
Create VIA Authentication Profile
This following steps illustrate the procedure to create an authentication profile to authenticate users against a
server group.