
User's Manual


Dell PowerConnect W-AirWave 7.4 | User Guide Using VisualRF | 279
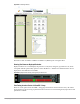
Figure 218 Network Tree View - Floor highlighted
3. Use the arrows to drill down into the folders to select the Campus, Building, or Floor. Select the folder or floor
plan icon to open the view you have selected. The Network Tree View window will remain on the screen until
you close it.
Planning and Provisioning
VisualRF provides the capability to plan campuses, buildings, floors, and access points prior to the actual access
point deployment. The following procedure describes the workflow:
“Creating a New Campus” on page279
“Creating a New Building in a Campus” on page280
“Importing a Floor Plan” on page281
“Editing a Floor Plan Image” on page282
“Provisioning Existing Access Points onto the Floor Plan” on page285
“Automatically Provisioning APs onto a Floor Plan” on page286
“Tweaking a Planning Region” on page287
“Printing a Bill of Materials Report” on page288
Creating a New Campus
Floors are associated with a building and buildings are associated with a campus. In order to create a new floor,
you must first create a campus and building.
To create and place your campus, follow these steps:
1. Navigate to VisualRF > Floor Plans.
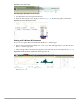
2. Select the Add Campus button, located above the floor plan on the top left. The Create New Campus
window, illustrated in Figure 219, appears.
NOTE: If you prefer not to use background maps for your campus or building placements, click a background and select Auto-
Arrange to move the campuses, buildings from their placements into an alphabetically-sorted list.