
Setup Guide


Rack Installation Guide 7
CAUTION: After installing systems in a rack, never pull more than one system out of the rack on its
slide assemblies at one time. The weight of more than one extended system could cause the rack
to tip over and cause injury.
The stabilizer feet help prevent the rack from tipping over when a system or other component is
pulled out of the rack with the slide assemblies fully extended. See the documentation provided
with the rack cabinet for instructions on installing and anchoring the stabilizer feet.
Installation Tasks
Installing a rack kit involves performing the following tasks in their numbered order:
1
Removing the rack doors
2
Marking the rack (if necessary)
3
Installing the rail assemblies in the rack:
• RapidRails installation
• VersaRails installation
4
Installing the system in the rack
5
Routing cables
6
Replacing the rack doors
Recommended Tools and Supplies
• A #2 Phillips screwdriver
• Masking tape or a felt-tip pen, for use in marking the mounting holes to be used
• A measuring ruler or tape measure
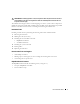
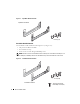
RapidRails Rack Kit Contents
The RapidRails rack kit includes the following items (see Figure 1-1):
• One pair of RapidRails assemblies
• Four reusable tie wraps